概要
Blurhashを利用して、blur画像(ぼかし画像)を動的に生成します。
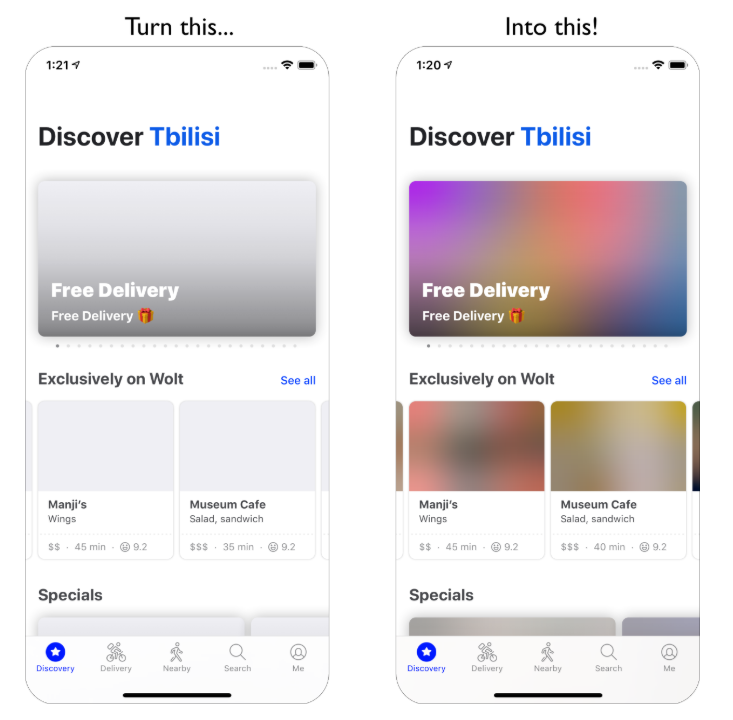
用途としては、実際に表示される画像の想像ができるblur画像をプレースホルダーとして表示することで、読み込み時間のUXを改善しようというものです。
▼右がblur画像を用いた例
Blurhashの準備
公式のGithubリポジトリからソースを入手します。
複数の言語に対応しており、今回はPHPバージョンを利用します。
環境の都合でComposerを使用せず、ソースをDLして使います。
「Download ZIP」からzipをDLすることが出来ます。
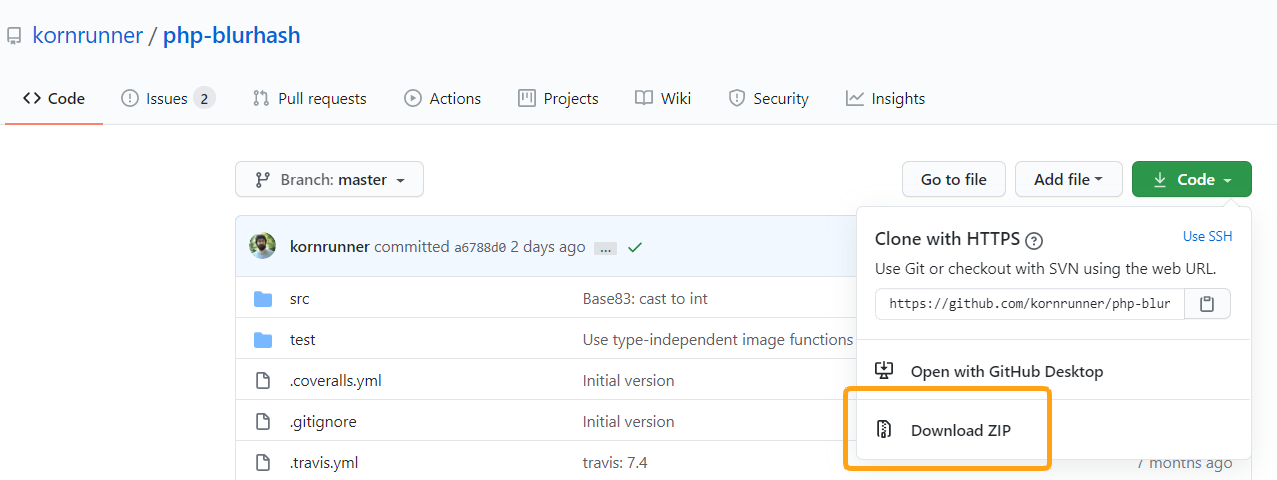
zipを解凍すると「php-blurhash-master」というディレクトリができます。
使い勝手を考慮して「blurhash」にリネームし、ディレクトリごと好きな場所に置きます。
Blurhashを実装
Blurhashで行う処理はエンコードとデコードの2つです。
①オリジナル画像をblur画像化し、短い文字列を生成する(エンコード)
②文字列をblur画像に戻す(デコード)
まずは必要なファイルを読み込みます。
Composerを利用していないので、requireで各ファイルを読み込む必要があります。
<?php
use kornrunner\Blurhash\Blurhash;
use kornrunner\Blurhash\Color;
use kornrunner\Blurhash\DC;
use kornrunner\Blurhash\AC;
use kornrunner\Blurhash\Base83;

require_once('blurhash/src/Blurhash.php');
require_once('blurhash/src/Color.php');
require_once('blurhash/src/DC.php');
require_once('blurhash/src/AC.php');
require_once('blurhash/src/Base83.php');

// Composerを利用した場合は下記2行だけでOK
// require_once('vendor/autoload.php');
// use kornrunner\Blurhash\Blurhash;

// メモリが足りなければ調整
// ini_set('memory_limit', '512M');
:
:
// 続きの処理
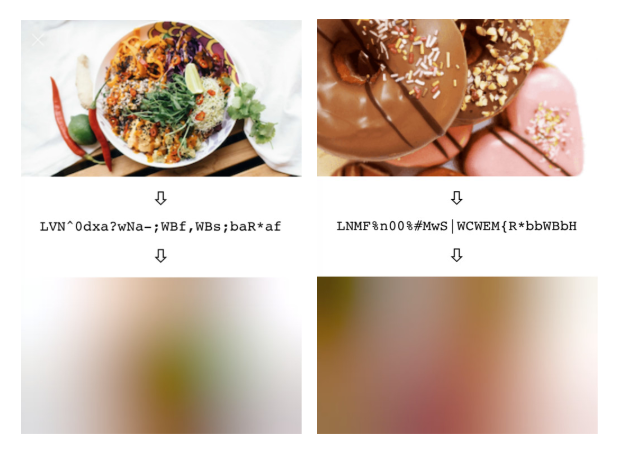
まずはオリジナル画像をblur画像にして文字列にエンコードします。
$file = 'original.png';
$image = imagecreatefromstring(file_get_contents($file));
$width = imagesx($image);
$height = imagesy($image);

$pixels = [];
for ($y = 0; $y < $height; ++$y) {
    $row = [];
    for ($x = 0; $x < $width; ++$x) {
        $index = imagecolorat($image, $x, $y);
        $colors = imagecolorsforindex($image, $index);

        $row[] = [$colors['red'], $colors['green'], $colors['blue']];
    }
    $pixels[] = $row;
}

$components_x = 3;
$components_y = 4;
$blurhash = Blurhash::encode($pixels, $components_x, $components_y);

echo $blurhash;
// 出力結果
// LEHV9uae2yk8pyo0adR*.7kCMdnj
ソースはGithubのサンプルまんまです。
ファイルを渡して処理すると、短い文字列が生成されます。
この文字列をデコードするとblur画像になります。
オリジナル画像を渡して動的にエンコード~デコードまで行うと処理に少し時間がかかりました。
そのため、オリジナル画像をエンコードして文字列を保存しておき、表示するタイミングでデコードして画像を表示させる…などといった使い方になると思います。(多分)
次はデコードしてblur画像を表示します。
今回はimgタグで表示させるために、getパラメータでエンコードした文字列を渡します。
<img src="decode.php?image=LEHV9uae2yk8pyo0adR*.7kCMdnj">
$blurhash = $_GET['image']; // 生成した文字列を取得

// 画像のサイズを取得(もしくは生成したいサイズを入力)
$fileinfo = getimagesize('original.png');
$width    = $fileinfo[0];
$height   = $fileinfo[1];

$pixels = Blurhash::decode($blurhash, $width, $height);
$image  = imagecreatetruecolor($width, $height);
for ($y = 0; $y < $height; ++$y) {
    for ($x = 0; $x < $width; ++$x) {
        [$r, $g, $b] = $pixels[$y][$x];
        // if($r > 255) {$r = 255;} // 場合によって追記
        // if($g > 255) {$g = 255;} // 場合によって追記
        // if($b > 255) {$b = 255;} // 場合によって追記
        imagesetpixel($image, $x, $y, imagecolorallocate($image, $r, $g, $b));
    }
}
// 画像を出力
header('Content-Type: image/png');
imagepng($image);
これで、decode.phpに渡した文字列がデコードされ、画像として表示されます。
// 場合によって追記の3行に関しては、画像によって(例えば真っ白の画像など)RGBの値を超える?エラーが出るため、上限を設定しています。
ちなみに、公式ではデコードに関してはJavaScript/TypeScriptを使うのをおすすめしています。
blur画像を保存したい場合
blur画像を保存せずに表示する方法を書きましたが、保存も可能です。
①decode.phpをブラウザで実行すれば画像が表示されるので、右クリックで保存
②最終行を下記に変更すれば、指定した先に保存されます。
// header('Content-Type: image/png');
imagepng($image, '保存先/保存名.png');
blur画像をbase64で表示する
blur画像は保存したくないけど、動的にデコード処理をするのが嫌な場合。
画像をbase64にエンコードしてsrcに渡すことで表示することができます。
// decode.phpの最終行を以下に書き換える
// header('Content-Type: image/png');
// imagepng($image);

// 画像のGDリソースをbase64に変換する
ob_start();
imagepng($image);
$image_data = ob_get_contents();
ob_end_clean();

$image_data_base64 = base64_encode($image_data);

echo $image_data_base64;
// 出力結果
// iVBORw0KGgoAAAANSUhEUgAAAeAAAAFACAIAAADrqjgsAAAACXBIWXMAAA7E....
base64に変換したものを保存しておき、下記のように渡すと画像が表示できます。
(ただし文字列が尋常じゃなく長い場合があるので、実装には向かない)
<img src="data:image/jpeg;base64,<?= $image_data_base64 ?>" alt="">