この記事はNTTドコモソリューションズ Advent Calendar 2025 3日目の記事です。
はじめに
NTTドコモソリューションズの雲雀です。
社内にMicrosoft 365 Copilot(以下、M365 Copilot)のライセンスが行き渡り、身の回りで「コパる」とか「コパろう」という表現(Copilotを使って業務を効率化するの意)を見聞きするようになりました。
今年はとある業務システムをSharePoint Onlineで構築する機会があり、その中でListsフォームレイアウトのカスタマイズをコパってみたので、M365 Copilotを活用する一例として紹介したいと思います。
コパった部分
該当のシステムは問合せ管理を行うもので、SharePoint Listsを用いて下図の構成で実装しました。実際のシステムはより多くの入力項目や画面が存在するのですが、ここでは簡略化したサンプルを用いて説明していきます。

「問合せ入力画面」はSharePoint Listsのフォーム機能で受け付けた問合せをListsのアイテムとして保存し、「回答入力画面」はアイテム編集用のフォームでサポート担当者が回答を入力するようにしています。
なお、問合せ内容/回答履歴は質問者とサポート担当者のやり取りが記録されていくよう、追記型のテキストを使用しています。
名前が紛らわしいのですが、「問合せ入力画面」で使用しているフォーム機能(Microsoft Lists Forms)と、「回答入力画面」のフォームは別物です。
前者はMicrosoft Formsに似たデータ投入用のフォーム画面を作成する機能です。ボタンの色や背景色は変更できるくらいで、画面レイアウトの細かなカスタマイズはできません。

出典:Microsoft Corporation, Microsoft Lists(筆者利用テナント/スクリーンショット取得日:2025年11月20日)
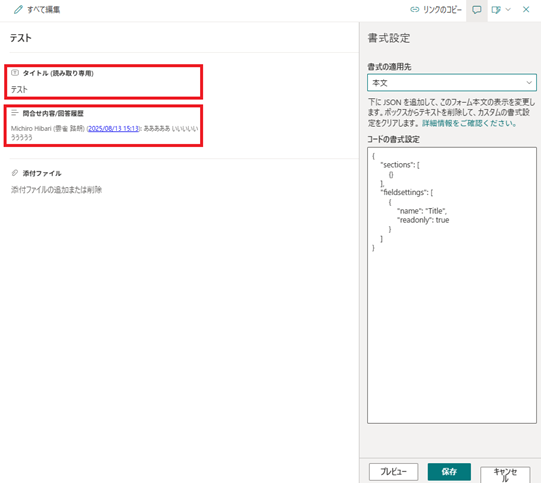
後者はSharePoint Listsに登録されたアイテムの編集フォームで、JSON形式の書式設定を使用してレイアウトのカスタマイズができます。下図は書式設定を行っていないデフォルトの状態です。右側に書式設定の入力箇所があります。今回はここに入力するJSON形式の書式設定をコパって作成していきます。

出典:Microsoft Corporation, Microsoft SharePoint(筆者利用テナント/スクリーンショット取得日:2025年11月20日)
画面要件
コパるには、M365 Copilotに希望するレイアウトを伝える必要があるため、どのようなレイアウトにしたいかを整理しておきます。
「回答入力画面」ではサポート担当者が質問者の入力した情報を参照しつつ回答を記入しますが、既存の入力内容を誤って変更しないように参照専用で表示したいです。問合せ内容/回答履歴は追記型テキストになっているため、ここで参照専用にしたいのはタイトルのみになります。
また、デフォルトでは質問者の情報が表示されないため、画面上で質問者の氏名/メールアドレスと登録日時を表示できるようにしたいです。
レイアウトは書式の適用先として指定可能なヘッダー/本文/フッターの3箇所に設定できるのですが、後述の理由からヘッダーのレイアウトをカスタマイズして参照専用の情報を表示するようにします。
ここまでの要件をまとめると、以下になります。
- ヘッダーに下記の情報を表示したい
- 質問者(=アイテムの登録者)の質問者の氏名/メールアドレス
- アイテムの登録日時
- タイトル
ヘッダーで設定を行う理由
本文で扱える情報は入力項目として表示可能なものに限られるため、アイテム登録者の情報や登録日時といったメタ情報はヘッダーかフッターでしか表示できません。
また、本文をカスタマイズすると、フォームレイアウトが単一列から複数列のレイアウトに切り替わってしまい、他の項目も複数行のレイアウトが強制されてしまいます。
<本文の表示例(カスタマイズなし)>
単一列レイアウトでは画面幅いっぱいに項目の内容が表示されます。

<本文の表示例(タイトルをRead-Onlyにカスタマイズ)>
複数列レイアウトとなることで表示幅が狭くなり、問合せ内容/回答履歴のように長文の入力が想定される項目では見づらくなる可能性があります。
マイクロソフト社は「将来の更新で、単一列レイアウトで本文を構成するためのサポートを追加する予定です」という情報を出していますが、いつ追加されるかは不明です。
コパる
前置きがだいぶ長くなってしまいましたが、いよいよコパっていきます。先ほど整理した要件をM365 Copilotに伝えてみましょう。

出典:Microsoft Corporation, Microsoft 365 Copilot(筆者ローカル環境/スクリーンショット取得日:2025年11月20日)
数秒でJSONを作ってくれました。

実際に生成されたJSONその1はこちらです。
{
    "elmType": "div",
    "attributes": {
        "class": "ms-borderColor-neutralLight ms-bgColor-white"
    },
    "style": {
        "padding": "12px",
        "border-bottom": "1px solid #e1e1e1"
    },
    "children": [
        {
            "elmType": "div",
            "style": {
                "fontSize": "20px",
                "fontWeight": "600",
                "marginBottom": "8px"
            },
            "txtContent": "[$Title]"
        },
        {
            "elmType": "div",
            "style": {
                "marginBottom": "4px"
            },
            "children": [
                {
                    "elmType": "span",
                    "style": {
                        "fontWeight": "500"
                    },
                    "txtContent": "質問者: "
                },
                {
                    "elmType": "span",
                    "txtContent": "[$Author.title]"
                }
            ]
        },
        {
            "elmType": "div",
            "style": {
                "marginBottom": "4px"
            },
            "children": [
                {
                    "elmType": "span",
                    "style": {
                        "fontWeight": "500"
                    },
                    "txtContent": "メールアドレス: "
                },
                {
                    "elmType": "span",
                    "txtContent": "[$Author.email]"
                }
            ]
        },
        {
            "elmType": "div",
            "children": [
                {
                    "elmType": "span",
                    "style": {
                        "fontWeight": "500"
                    },
                    "txtContent": "登録日時: "
                },
                {
                    "elmType": "span",
                    "txtContent": "=toLocaleString([$Created])"
                }
            ]
        }
    ]
}
早速、M365 Copilotに作ってもらったレイアウトを反映してみます。

ちゃんとヘッダーに各項目が表示されていますね。ただ、1行にすべての項目が詰め込まれていて読みづらいのと、全体的に質素すぎて寂しい感じがするので、デザインを整えていきたいと思います。
以降、M365 Copilotにあれこれお願いして修正していくのですが、生成AIの出力は冪等性が無いため途中で迷走することがあります。その場合は新規のチャットに切り替えて、途中まで上手く行っていたJSONをアップロードして仕切り直すと良いでしょう。
先ほど生成したJSONを新規のチャットにアップロードしてから、デザインを伝えてみます。赤枠の+ボタンからファイルをアップロード可能です。


レイアウト変更のお手伝いを向こうから提案してくれました。親切ですね ![]()
アップロードしたJSONに対して修正を加えていきます。実現したいデザインは以下です。
- ヘッダー上部に「回答登録画面」という画面名を表示
- 画面名と基本情報(タイトル、登録日時)と質問者情報(氏名、メールアドレス)をセクション分けして表示
- 各セクションは行で縦に並べて表示
- 背景色は淡いピンク、画面名は赤地に白文字で中央揃え、フォントは Segoe UI

修正版のJSONその2はこちらです。
{
    "$schema": "https://developer.microsoft.com/json-schemas/sp/v2/row-formatting.schema.json",
    "elmType": "div",
    "style": {
        "background-color": "#ffe4e1",
        "font-family": "Segoe UI",
        "padding": "12px"
    },
    "children": [
        {
            "elmType": "div",
            "style": {
                "background-color": "#d60000",
                "color": "white",
                "text-align": "center",
                "font-weight": "600",
                "font-size": "20px",
                "padding": "8px"
            },
            "txtContent": "回答登録画面"
        },
        {
            "elmType": "div",
            "style": {
                "margin-top": "12px"
            },
            "children": [
                {
                    "elmType": "div",
                    "style": {
                        "font-weight": "600"
                    },
                    "txtContent": "タイトル:"
                },
                {
                    "elmType": "div",
                    "txtContent": "[$Title]"
                },
                {
                    "elmType": "div",
                    "style": {
                        "font-weight": "600",
                        "margin-top": "8px"
                    },
                    "txtContent": "登録日時:"
                },
                {
                    "elmType": "div",
                    "txtContent": "=toLocaleString([$Created])"
                }
            ]
        },
        {
            "elmType": "div",
            "style": {
                "margin-top": "12px"
            },
            "children": [
                {
                    "elmType": "div",
                    "style": {
                        "font-weight": "600"
                    },
                    "txtContent": "質問者:"
                },
                {
                    "elmType": "div",
                    "txtContent": "[$Author.title]"
                },
                {
                    "elmType": "div",
                    "style": {
                        "font-weight": "600",
                        "margin-top": "8px"
                    },
                    "txtContent": "メールアドレス:"
                },
                {
                    "elmType": "div",
                    "txtContent": "[$Author.email]"
                }
            ]
        }
    ]
}
反映してみると各セクションが縦ではなく横並びになっています。

あとは手動で直してもよいのですが、修正内容をコードに近い表現で伝えると精度が良くなるので、もう少しコパってみます。

修正版のJSONその3はこちらです。
{
    "$schema": "https://developer.microsoft.com/json-schemas/sp/v2/view-formatting.schema.json",
    "elmType": "div",
    "style": {
        "background-color": "#ffe4e1",
        "padding": "12px",
        "display": "flex",
        "flex-direction": "column",
        "font-family": "Segoe UI"
    },
    "children": [
        {
            "elmType": "div",
            "style": {
                "background-color": "red",
                "color": "white",
                "text-align": "center",
                "font-size": "24px",
                "font-weight": "bold",
                "padding": "8px",
                "margin-bottom": "12px",
                "display": "flex",
                "justify-content": "center"
            },
            "txtContent": "回答登録画面"
        },
        {
            "elmType": "div",
            "style": {
                "margin-bottom": "12px",
                "display": "flex",
                "flex-direction": "column"
            },
            "children": [
                {
                    "elmType": "div",
                    "style": {
                        "font-size": "18px",
                        "font-weight": "600",
                        "margin-bottom": "4px"
                    },
                    "txtContent": "[$Title]"
                },
                {
                    "elmType": "div",
                    "children": [
                        {
                            "elmType": "span",
                            "style": {
                                "font-weight": "600"
                            },
                            "txtContent": "登録日時: "
                        },
                        {
                            "elmType": "span",
                            "txtContent": "=toLocaleString([$Created])"
                        }
                    ]
                }
            ]
        },
        {
            "elmType": "div",
            "style": {
                "display": "flex",
                "flex-direction": "column"
            },
            "children": [
                {
                    "elmType": "div",
                    "children": [
                        {
                            "elmType": "span",
                            "style": {
                                "font-weight": "600"
                            },
                            "txtContent": "質問者: "
                        },
                        {
                            "elmType": "span",
                            "txtContent": "[$Author.title]"
                        }
                    ]
                },
                {
                    "elmType": "div",
                    "children": [
                        {
                            "elmType": "span",
                            "style": {
                                "font-weight": "600"
                            },
                            "txtContent": "メールアドレス: "
                        },
                        {
                            "elmType": "span",
                            "txtContent": "[$Author.email]"
                        }
                    ]
                }
            ]
        }
    ]
}
縦並びになりましたね。

基本情報と質問者情報はそれぞれ1行でよいでしょう。ついでに全体を左揃えにしてみます。

修正版のJSONその4はこちらです。
{
    "$schema": "https://developer.microsoft.com/json-schemas/sp/v2/view-formatting.schema.json",
    "elmType": "div",
    "style": {
        "background-color": "#ffe4e1",
        "padding": "12px",
        "font-family": "Segoe UI",
        "display": "flex",
        "flex-direction": "column",
        "align-items": "flex-start"
    },
    "children": [
        {
            "elmType": "div",
            "style": {
                "background-color": "red",
                "color": "white",
                "font-size": "24px",
                "font-weight": "bold",
                "text-align": "left",
                "padding": "4px"
            },
            "txtContent": "回答登録画面"
        },
        {
            "elmType": "div",
            "style": {
                "display": "flex",
                "flex-direction": "row",
                "gap": "12px",
                "margin-top": "8px"
            },
            "children": [
                {
                    "elmType": "span",
                    "txtContent": "タイトル: [$Title]"
                },
                {
                    "elmType": "span",
                    "txtContent": "登録日時: =toLocaleString([$Created])"
                }
            ]
        },
        {
            "elmType": "div",
            "style": {
                "display": "flex",
                "flex-direction": "row",
                "gap": "12px",
                "margin-top": "8px"
            },
            "children": [
                {
                    "elmType": "span",
                    "txtContent": "質問者: [$Author.title]"
                },
                {
                    "elmType": "span",
                    "txtContent": "メールアドレス: [$Author.email]"
                }
            ]
        }
    ]
}
基本情報と質問者情報はそれぞれ1行になりましたが、変数の値が表示されなくなってしまいました。

直さなくて良いところまで変更を加えられてしまうのは生成AIあるあるですね。変数の値が表示されるようにします。

修正版のJSONその5はこちらです。
{
    "$schema": "https://developer.microsoft.com/json-schemas/sp/v2/view-formatting.schema.json",
    "elmType": "div",
    "style": {
        "background-color": "#ffe4e1",
        "padding": "12px",
        "font-family": "Segoe UI",
        "display": "flex",
        "flex-direction": "column",
        "align-items": "flex-start"
    },
    "children": [
        {
            "elmType": "div",
            "style": {
                "background-color": "red",
                "color": "white",
                "font-size": "24px",
                "font-weight": "bold",
                "text-align": "left",
                "padding": "4px"
            },
            "txtContent": "回答登録画面"
        },
        {
            "elmType": "div",
            "style": {
                "display": "flex",
                "flex-direction": "row",
                "gap": "12px",
                "margin-top": "8px"
            },
            "children": [
                {
                    "elmType": "span",
                    "txtContent": "= 'タイトル: ' + [$Title]"
                },
                {
                    "elmType": "span",
                    "txtContent": "= '登録日時: ' + toLocaleString([$Created])"
                }
            ]
        },
        {
            "elmType": "div",
            "style": {
                "display": "flex",
                "flex-direction": "row",
                "gap": "12px",
                "margin-top": "8px"
            },
            "children": [
                {
                    "elmType": "span",
                    "txtContent": "= '質問者: ' + [$Author.title]"
                },
                {
                    "elmType": "span",
                    "txtContent": "= 'メールアドレス: ' + [$Author.email]"
                }
            ]
        }
    ]
}
無事、すべての情報が意図した位置で表示されるようになりました。

手直し
タイトルがヘッダーに表示されましたが、本文にも表示が残っています。画面要件に沿って非表示としたいため、手直ししていきます。
ここで注意点として、列の編集でタイトルの項目を無効化してしまうとヘッダー上のタイトルも値が表示されなくなってしまいます。これはヘッダーで使用しているTitle変数が本文で表示されているタイトルを参照しているためです。


小技として列の編集ではタイトルを有効にしつつ、項目の表示有無を制御する条件式の設定に、常時判定が非表示になる式を入力することで、本文上に項目は表示されないがヘッダーの変数からは参照できる状態にします。
式には=if([$ID],'false','true')を入力しています。登録済みのアイテムには必ずIDが存在するため、式は常にfalseを返します。


完成版のフォームは以下の通りです。タイトルが本文には表示されなくなっています。

おわりに
JSON形式の書式設定をまっさらな状態から作成するのはハードルが高く感じられたのですが、M365 Copilotにチャットで作りたい画面要件を伝えるだけでフォームのカスタマイズができました。
完全に期待するレイアウトにはならなかったとしても大枠で雛形を生成してもらえれば、そこから手直しするだけでよいので、全てを自力で作るよりかなりラクになるのではないでしょうか。
今回の例に限らず来年も様々なシーンでコパってみようと思います。
※ 記載されている会社名、製品名、サービス名は、各社の商標または登録商標です。