やっと時代が追いついた!
関連記事:
- [behat3とzombiejsでBDDに挑戦(1)]
- [behat3とzombiejsでBDDに挑戦(2)]
- [behat 3.0 とzombiejsでBDDに挑戦(3)]
- [behat 3.0とphantomjsでBDDに挑戦(4)]
- [behat 3.0とJenkins CIでBDDに挑戦(5)]
- behatとChrome HeadlessでBDDに実践(6)
[behat3とzombiejsでBDDに挑戦(1)]:http://qiita.com/dozo/items/be0ff9e9443413a32d25
[behat3とzombiejsでBDDに挑戦(2)]:http://qiita.com/dozo/items/4cb29ee55c4bd8891786
[behat 3.0 とzombiejsでBDDに挑戦(3)]:http://qiita.com/dozo/items/ec0448ffcbb703df9e43
[behat 3.0とphantomjsでBDDに挑戦(4)]:http://qiita.com/dozo/items/5a5f81061a5aade383d6
[behat 3.0とJenkins CIでBDDに挑戦(5)]:http://qiita.com/dozo/items/4de280e580bdc48c9d93
ヾ(・ω<)ノ" 三三三● ⅱⅲ コロコロ♪
------------------- ↓ 余談はここから ↓-------------------
当QiitaではbehatのBDDについてあれこれ書いてきた。
そこではヘッドレスブラウザ(画面なしブラウザ)についてあれこれ研究してきたわけだが、
メジャーブラウザが対応を始めるという動きが出てきた。
それに伴いPhantomJSは役割を終えた。
https://www.infoq.com/jp/news/2017/04/Phantomjs-future-uncertain
せっかくメジャーブラウザが対応してくれたので、
使ってやらねばと言うことで、
今回はChrome Headlessで実行してみることにした。
Chrome Headlessだが、
まだ、オレオレ証明書無視(--ignore-certificate-errorsオプション)をサポートしておらず、
開発環境でhttpsアクセスする場合はheadlessモードでは無く、
ブラウザモードにする必要がある。
ブラウザモードでもリモートでバッグオプションは有効なので、
Xvfbを駆使すると良いと思う。
------------------- ↑ 余談はここまで ↑-------------------
ヾ(・ω<)ノ" 三三三● ⅱⅲ コロコロ♪
------------------- ↓ 本題はここから ↓-------------------
Chrome Headlessのインストール
普通にChromeをインストールしてもらえば良い。
Linux, Macではversion59以上、Windowsなら60以上にしてもらえば良い。
インストール済みなら特に作業は不要。
ChromeをHeadlessモードで起動する(Linux, Mac)
$ google-chrome --remote-debugging-port=9222 --disable-gpu --remote-debugging-address=0.0.0.0 --headless
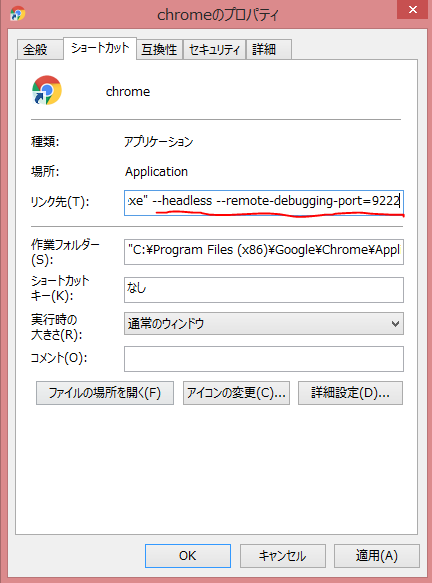
ショートカットにオプションを仕込む(Windows)
起動オプションをショートカットに記述。
ダブルクリックして起動する。
(画面に変化は無い)
"C:\Program Files (x86)\Google\Chrome\Application\chrome.exe" --remote-debugging-port=9222 --disable-gpu --remote-debugging-address=0.0.0.0 --headless
(終了はタスクマネージャーからだが)
behat
behatのインストール
何度もしつこくて恐縮だが、
当記事ではインストールから記述するので、
適当に読み飛ばしてもらえば良いと思う。
composerのインストール
$ curl http://getcomposer.org/installer | php  # composerのダウンロード
$ chmod +x composer.phar
$ ./composer.phar init -n                      # composer.jsonの生成
$ ./composer.phar config bin-dir "bin/"        # binディレクトリ指定
$ ./composer.phar install                      # venderディレクトリ生成
$ ./composer.phar require behat/behat=@stable behat/mink=@stable behat/mink-extension=@stable behat/mink-browserkit-driver=@stable behat/mink-goutte-driver=@stable --prefer-dist # 各種インストール
# ./composer.phar require dmore/behat-chrome-extension=@stable # Chrome Headless用minkドライバ
インストール確認
$ ./bin/behat --version
behat 3.4.1
behatの設定
behatのプロジェクトを初期化する。
featuresディレクトリが新規に作成され必要なファイルが生成される。
$ ./bin/behat --init
+d features - place your *.feature files here
+d features/bootstrap - place your context classes here
+f features/bootstrap/FeatureContext.php - place your definitions, transformations and hooks here
chromeドライバ設定
zombie.js、phantomjs同様にChrome Headless使うにはchromeドライバを設定ファイルに記述する
behat.yml作成
behat設定ファイルbehat.ymlの作成をする
テンプレートがmink-extentionsのインストール先にあるので、それを使う
$ cp vendor/behat/mink-extension/behat.yml.dist ./behat.yml  # behat設定ファイル
$ vi behat.yml
default:
  suites:
    default:
      paths: # ←↓ここ修正
        - %paths.base%/features
      contexts: # ←↓ここ修正
        - FeatureContext
        - Behat\MinkExtension\Context\MinkContext
  extensions: # ↓ここ修正
    DMore\ChromeExtension\Behat\ServiceContainer\ChromeExtension: ~
    Behat\MinkExtension:
      base_url: http://en.wikipedia.org/
      sessions:
        default:
          chrome: # ←↓ここ修正
            api_url: http://localhost:9222
動作確認だけしておこう。(エラーメッセージが出なければ成功)
$ ./bin/behat
No scenarios
No steps
0m0.05s (15.05Mb)
設定はこれで完了。
実際のフィーチャファイルで動作を確認する。
$ cp vendor/behat/mink-extension/features/search.feature ./features # behat設定ファイル
$ ./bin/behat
Feature: Search
  In order to see a word definition
  As a website user
  I need to be able to search for a word

  Scenario: Searching for a page that does exist               # features\search.feature:6
    Given I am on "/wiki/Main_Page"                            # Behat\MinkExtension\Context\MinkContext::visit()
    When I fill in "search" with "Behavior Driven Development" # Behat\MinkExtension\Context\MinkContext::fillField()
    And I press "searchButton"                                 # Behat\MinkExtension\Context\MinkContext::pressButton()
    Then I should see "agile software development"             # Behat\MinkExtension\Context\MinkContext::assertPageContainsText()

  Scenario: Searching for a page that does NOT exist        # features\search.feature:12
    Given I am on "/wiki/Main_Page"                         # Behat\MinkExtension\Context\MinkContext::visit()
    When I fill in "search" with "Glory Driven Development" # Behat\MinkExtension\Context\MinkContext::fillField()
    And I press "searchButton"                              # Behat\MinkExtension\Context\MinkContext::pressButton()
    Then I should see "Search results"                      # Behat\MinkExtension\Context\MinkContext::assertPageContainsText()

2 scenarios (2 passed)
8 steps (8 passed)
0m9.42s (8.96Mb)
------------------- ↑ 本題はここまで ↑-------------------
ヾ(・ω<)ノ" 三三三● ⅱⅲ コロコロ♪
------------------- ↓ 補足はここから ↓-------------------
スケルトンから環境を構築
behat-chrome-extensionの作者が簡単に環境を作れる様にスケルトンを用意してくれている。
https://gitlab.com/DMore/behat-chrome-skeleton.git
これを使って環境を作ってみる。
実践する場合はこのスケルトンをforkしてセッティングし直した方がいいだろう。
スケルトンをクローン
$ git clone https://gitlab.com/DMore/behat-chrome-skeleton.git
Cloning into 'behat-chrome-skeleton'...
remote: Counting objects: 30, done.
remote: Compressing objects: 100% (24/24), done.
remote: Total 30 (delta 4), reused 0 (delta 0)
Unpacking objects: 100% (30/30), done.
Webサーバ起動
$ cd web
$ php -S localhost:80 &
$ cd ..
composer update
composer.jsonがあるが、
入れ直した方がいいっぽいので、
単純updateでは無くrequireを使う。
$ composer config bin-dir "bin/"
$ composer require behat/behat=@stable behat/mink=@stable behat/mink-extension=@stable dmore/behat-chrome-extension=@stable # バージョンを調整
$ ./bin/behat
Feature: Hello world
  In order to be nice
  As a polite PHP script
  I need to say hello to my user

  Scenario: It says hello world          # features\hello_user.feature:6
    Given I am on "/index.php?name=John" # FeatureContext::visit()
    Then I should see "Hello, John"      # FeatureContext::assertPageContainsText()

Feature: Hello world
  In order to be nice
  As a polite html page
  I need to say hello

  Scenario: It says hello world      # features\hello_world.feature:6
    Given I am on "/index.html"      # FeatureContext::visit()
    Then I should see "Hello, world" # FeatureContext::assertPageContainsText()

2 scenarios (2 passed)
4 steps (4 passed)
0m2.74s (8.72Mb)
