【 ns-3.30の使い方 → [1] → 2 → 3 → 4 → 5 → 6 → 7 】
ネットワークシミュレータであるns3の説明をいくつかにわけて投稿しています.この投稿は「1. インストール」です.
1. インストール
公式のインストール手順に則って,Ubuntu 18.04にns-3.30をインストールします.そして,初めてのシナリオファイルを動かしてみましょう.Unix環境であればLinux以外にもns3をインストールできますが,多少の制限があります.その手順や制限の内容は文献2を参照してください.
- ns3のインストールの前に
- ns3のインストール
- ビルド
- テスト
- Hello Simulator
- 追加モジュール
- エラーが発生してしまった場合
文献
- https://www.nsnam.org/docs/release/3.30/tutorial/html/index.html
- https://www.nsnam.org/wiki/Installation
ns3のインストールの前に
インストールの前に,別にインストールしておかなくてはいけないモジュールが多々あるため.aptコマンドにてインストールしていきます.下記のスクリプトの2行目以降を1行づつコピペしてシェル上で実行するか,全部コピーしてpreinstall.shというファイルに貼り付け,シェル上でbash preinstall.shとしてください(下記スクリプトはns-3.30@Ubuntu 18.04専用).
中には使わないモジュールもあるかと思いますが,のちのちエラーに見舞われて時間をとるよりは,ここで全てインストールしてしまう方が吉です.ただし,ローカルにドキュメントがあってもおそらく見ない,ウェブ上のものだけで十分という方は,ドキュメント生成に関するモジュールは必要ありません.その部分はコメントで示してあるので,実行しなくても大丈夫です.
!#/bin/bash

# minimal requirements for Python users (release 3.30 and ns-3-dev)
sudo apt install -y gcc g++ python python3 python3-dev
# minimal requirements for Python (development)
sudo apt install -y python3-setuptools git mercurial
# Netanim animator
sudo apt install -y qt5-default mercurial
# Support for ns-3-pyviz visualizer
sudo apt install -y gir1.2-goocanvas-2.0 python-gi python-gi-cairo python-pygraphviz python3-gi python3-gi-cairo python3-pygraphviz gir1.2-gtk-3.0 ipython ipython3
# Support for MPI-based distributed emulation
sudo apt install -y openmpi-bin openmpi-common openmpi-doc libopenmpi-dev
# Support for utils/check-style.py code style check program
sudo apt install -y uncrustify
# GNU Scientific Library (GSL) support for more accurate 802.11b WiFi error models (not needed for OFDM):
sudo apt install -y gsl-bin libgsl-dev libgsl23 libgslcblas0
# Database support for statistics framework
sudo apt install -y sqlite sqlite3 libsqlite3-dev
# Xml-based version of the config store (requires libxml2 >= version 2.7)
sudo apt install -y libxml2 libxml2-dev
# Support for generating modified python bindings
sudo apt install -y cmake libc6-dev libc6-dev-i386 libclang-6.0-dev llvm-6.0-dev automake pip
python3 -m pip install --user cxxfilt
# A GTK-based configuration system
sudo apt install -y libgtk2.0-0 libgtk2.0-dev
# To experiment with virtual machines and ns-3
sudo apt install -y vtun lxc
# Support for openflow module (requires some boost libraries)
sudo apt install -y libboost-signals-dev libboost-filesystem-dev

### オンラインでドキュメントを見る場合,ここ以下は不要
# Doxygen and related inline documentation
sudo apt install -y doxygen graphviz imagemagick
sudo apt install -y texlive texlive-extra-utils texlive-latex-extra texlive-font-utils texlive-lang-portuguese dvipng latexmk
# The ns-3 manual and tutorial are written in reStructuredText for Sphinx (doc/tutorial, doc/manual, doc/models), and figures typically in dia (also needs the texlive packages above)
sudo apt install -y python3-sphinx dia
ns3のインストール
ここではgit cloneを使ってのインストール手順を紹介します.
$ cd
$ mkdir workspace
$ cd workspace
$ git clone https://gitlab.com/nsnam/ns-3-allinone.git
$ cd ns-3-allinone
ns-3-allinone内
$ ls
build.py  constants.py   download.py  README  util.py
download.pyを使ってns-3.30をインストールします.
$ python download.py -n ns-3.30
ホームディレクトリにシンボリックリンク(ショートカット)を作成しておくと便利です.
$ ln -s ~/workspace/ns-3-allinone/ns-3.30/ ~/ns-3.30
ビルド
$ cd ns-3.30
$ #./waf clean # 過去のビルド設定の破棄
$ ./waf configure --build-profile=debug --enable-examples --enable-tests
$ ./waf build
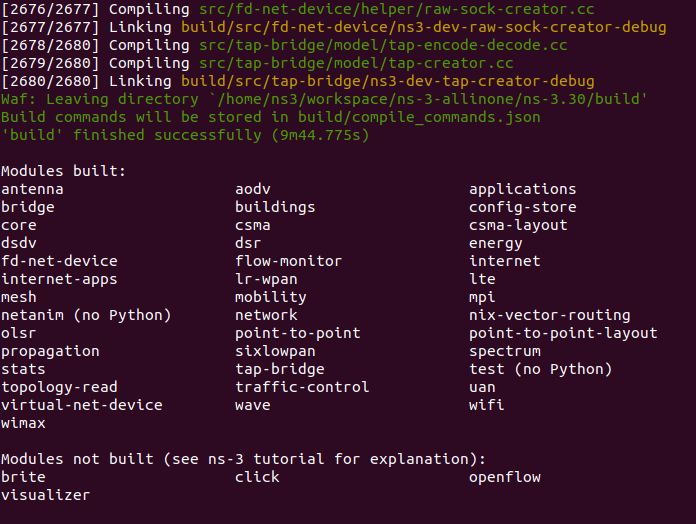
ビルドは私の環境で10分程度で完了しました.成功すると以下の画面が表示されます.ビルドされていない4つのモジュールのインストール方法については後述します.
細かいビルドオプションの説明をしようと思いますが,細かい話は知らぬ存ぜぬ,という方は次節まで読み飛ばしても問題ないです.
--build-profile
--debug-profile=debugはデバッグ可能なビルドをするオプションです.debug以外にrelasseとoptimizedを指定でき,それぞれコンパイルオプションが異なります.
| --debug-profile= | debug | release | optimized |
|---|---|---|---|
| コンパイルオプション | -O0 -ggdb -g3 | -O3 -g0 -fomit-frame-pointer | -O3 -g -fstrict-overflow -march=native |
debugにすると,NS_LOGやNS_ASSERTと言ったデバッグする際に便利なマクロを使えるようになったり,gdbでデバッグできるようになります.デバッグは必須なので,ここではdebugを指定します.
--enable-examples
サンプルコードがビルド対象になります.モジュールの使い方がわからない時,サンプルコードを動かすことができれば,理解の一助になります.
--enable-tests
テストコードがビルド対象になります.テストコードというのは,ns3が仕様通りに動くかどうかをチェックするコードです.普通はテストをパスするはずなので,確認作業はいらないという方は,オプションを省けばビルドの時間が短くなります.
テスト
インストールしたns3がテストコードをパスするかチェックします.私の環境では30分ほどかかりました.普通はパスするので別にやらなくても大丈夫です.
$ ./test.py
...

PASS: TestSuite command-line
PASS: TestSuite callback
PASS: TestSuite attributes

...

PASS: Example src/wifi/examples/wifi-manager-example --wifiManager=Ideal --standard=802.11ax-5GHz --serverChannelWidth=160 --clientChannelWidth=160 --serverShortGuardInterval=3200 --clientShortGuardInterval=3200 --serverNss=4 --clientNss=4 --stepTime=0.1
627 of 637 tests passed (627 passed, 10 skipped, 0 failed, 0 crashed, 0 valgrind errors)
List of SKIPped tests:
    examples/routing/simple-routing-ping6.py (requires Python bindings)
    examples/tutorial/first.py (requires Python bindings)
    examples/wireless/mixed-wired-wireless.py (requires Python bindings)
    examples/wireless/wifi-ap.py (requires Python bindings)
    ns3-tcp-cwnd (requires NSC)
    ns3-tcp-interoperability (requires NSC)
    nsc-tcp-loss (requires NSC)
    src/bridge/examples/csma-bridge.py (requires Python bindings)
    src/core/examples/sample-simulator.py (requires Python bindings)
    src/flow-monitor/examples/wifi-olsr-flowmon.py (requires Python bindings)
Hello Simulator
初めてのシナリオファイルの実行です.
$ ./waf --run hello-simulator
Waf: Entering directory `/home/ns3/workspace/ns-3-allinone/ns-3.30/build'
Waf: Leaving directory `/home/ns3/workspace/ns-3-allinone/ns-3.30/build'
Build commands will be stored in build/compile_commands.json
'build' finished successfully (1.559s)
Hello Simulator
Hello Simulatorと表示されていれば,ns3のインストールは無事成功です.シミュレーションを開始するには,./waf --run以下にシナリオファイルを指定します.シナリオファイルはシミュレーション内容を記述したもので,hello-simulatorはあらかじめ用意されているシナリオの1つです.hello-simulator自体はHello Simulatorと表示するだけで,ネットワークの構築などはしていません.
追加モジュール
ビルド画面でModules not buildとなっていた4つのモジュールを追加でインストールします.
visualizer
シミュレーションを視覚化してくれるモジュールです.本来であればビルドされているはずですが,ns3に同封されているpybindgenのモジュールに関連してエラーが発生してしまっています.私のブログに具体的な手順を示していますので,そちらを参考にインストールしてみてください.
ns3.30でpybindgenが有効化されない - dorapon2000’s diary
click
公式手順にしたがってインストール.
# https://github.com/kohler/click/blob/master/INSTALL.md#ns-3-simulator-driver
# clickのビルド
cd ~/workspace/ns-3-allinone/
git clone git@github.com:kohler/click.git
cd click
./configure --enable-userlevel --disable-linuxmodule --enable-nsclick
make

# ns3に組み込む
cd ~/workspace/ns-3-allinone/ns-3.30/
./waf configure --enable-examples --enable-tests --with-nsclick=../click
# NS-3 Click Integration        : enabled
./waf build

# 正しく動くか確認
./waf --run nsclick-simple-lan
brite
公式手順にしたがってインストール.
# https://www.nsnam.org/docs/models/html/brite.html
# briteのビルド
cd ~/workspace/ns-3-allinone/
hg clone http://code.nsnam.org/BRITE
cd BRITE
make

# ns3に組み込む
cd ~/workspace/ns-3-allinone/ns-3.30/
./waf configure --enable-examples --enable-tests --with-brite=../BRITE
# BRITE Integration             : enabled
./waf build

# 正しく動くか確認
./waf --run brite-generic-example
openflow
公式手順にしたがってインストール
# https://www.nsnam.org/docs/models/html/openflow-switch.html
# openflowのビルド
cd ~/workspace/ns-3-allinone/
hg clone http://code.nsnam.org/openflow
cd openflow
./waf configure
./waf build

# ns3に組み込む
cd ~/workspace/ns-3-allinone/ns-3.30/
./waf configure --enable-examples --enable-tests --with-openflow=../openflow
# NS-3 OpenFlow Integration     : enabled
./waf build

# 正しく動くか確認
./waf --run openflow-switch
ただし,こちらのopenflowのバージョンは0.8.9と古いです.カンピーナス大学のネットワーク研究室がns3用のopenflow1.3を提供しているので,新しいバージョンが必要な場合,そちらを利用するとよいかと思います.
最終的な./waf configure
1つのモジュールを追加してインストールしようとするたびに./waf configureのオプションは長くなり,最終的なコマンドは以下です.
./waf configure --build-profile=debug --enable-examples --enable-tests --with-pybindgen=../PyBindGen-0.20.0  --with-nsclick=../click --with-brite=../BRITE --with-openflow=../openflow
./waf build
エラーが発生してしまった場合
赤字が大量に表示されてしまった場合,エラーが発生しています.エラーの内容を見てみてください.環境に適したモジュールが足りなかったり,ただ実行に時間がかかっているだけかもしれません.ただし,./waf configureの大量のnot enabledはエラーではないです.
原因をいくつか挙げてみます.
- Ubuntu 18.04ですか?19.04や16.04の場合は「ns3のインストールの前に」で必要なモジュールが異なる部分があります.詳しくは文献2を参照ください.
- ns-3.30以外のインストールですか?ns-3.30以外だと必要なモジュールが異なることがあります.文献2を参照ください.
- pythonのバージョンは2系ですか?3系ですか?python2は2.7.10以上,python3は3.4以上が必要要件で,python3は必ずインストールしてある必要があります.
python --versionとpython3 --versionで確認してみてください. - C++のコンパイラはなんですか?clangかg++のどちらかがインストールされている必要があります.g++は4.9以上.
g++ --versionで確認してみてください. - ビルドに時間がかかりますか?スペック次第では数時間とかかるかもしれません.エラー画面がでるまでは気長にお待ちください.
- Hello Simulatorが表示されませんか?でBuild profileがdebugである必要があります.
./waf --check-profileで確認してみてください. - 容量不足ではないですか?
- コマンドの実行場所は正しいですか?