前書き
ディープラーニングってよく聞くけど実は触った事ない…中国では AI 系のエンジニアは年収1500〜2000万ももらっているらしいのに…俺ときたら…やばいちょっとエンジニアとして恥ずかしいかも…という人。安心して下さい、ここにもいますよ!という訳で、Mac で C# をインターフェースとして TensorFlow を触ってみた記事です。ただし、前提知識として、「ディープラーニングの事は知識ゼロ、全く何も分かりません」という方にはちょっと難しいかもしれません。そういった方は、下記の本を読んでみて下さい。とても分かりやすいので、ディープラーニングの原理原則がざっくり理解できると思います。
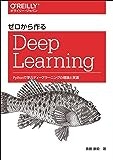
ゼロから作るDeep Learning ―Pythonで学ぶディープラーニングの理論と実装
この本を読んだ後に、じゃあ実際に C# で使ってみたいんだけど、という方にちょうどよい記事になっていると思います。なんで Python じゃないの?なんなの?という方もいらっしゃると思いますが単純に C# の方が好きだからです(笑) Python での入門記事は山の様にありますのでそちらをご参照下さい😂
なお、開発環境としては Visual Studio を利用します。持っていない方はインストールしておいて下さい。
そもそも TensorFlowSharp とは
そもそも TensorFlowSharp とは、mono で有名な migueldeicaza 先生が作った TensorFlow の C# バインディングです。
この記事を最初に公開した時に見られた方にはお詫びをしたいのですが、私少し勘違いしておりました。TensowFlowSharp は TensorFlow のダイナミックライブラリとのバインディングであり、このダイナミックライブラリは モデルをデプロイするためにあるのであって、学習させるためのものではない、という事です。本家でもこの様に言及されており、実際、train 系の API は存在していません。
These APIs are aimed at deploying TensorFlow models in applications and are not as extensive as the Python APIs.
なので、学習自体は Python などで行っておく必要があります。余談ですが、だから Unity の Machine Learning Agents は Academy が Python に接続しているんですね。このライブラリでは学習させる事ができなかったからだと思います。
今後は Train 系も移植される可能性はあると思いますが、一旦、学習はさせる事ができないという理解でいた方がよさそうです。
インストール
TensorFlowSharp 自体は Visual Studio などで nuget からインストールすればいいので楽なのですが、TensorFlowSharp 自体はネイティブのダイナミックライブラリを C# から利用するためのインターフェースにすぎないので、本体のダイナミックライブラリがインストールされている必要があります。TensorFlowSharp のページでは 1.1.0 を直接ダウンロードする様に書かれていて、普通にこの方法でインストールしてもいいのですが、最新版がよい方は TensorFlow 自体の本家のページのインストラクションに従い、下記の様にインストールできます。
$ TF_TYPE="cpu"
$ OS="darwin" # Mac だから darwin
$ TARGET_DIRECTORY="/usr/local"
$ curl -L \
   "https://storage.googleapis.com/tensorflow/libtensorflow/libtensorflow-${TF_TYPE}-${OS}-x86_64-1.3.0.tar.gz" |
   sudo tar -C $TARGET_DIRECTORY -xz

# ここまでで一応インストールはできている。以下一応の確認。

$ cd $TARGET_DIRECTORY/lib
$ ls -al | grep tensor
-r-xr-xr-x   1 root            wheel  94218652  1  1  1970 libtensorflow.so
# ↑ .so としてインストールされている。

# 以下は実行しなくても動くのだが、作法としてはやっておいた方がいいっぽい。
$ sudo ln -s /usr/local/lib/libtensorflow.so /usr/local/lib/libtensorflow.dylib
これでインストールはできたはずなので、サイトにある様にバージョンを確認するだけの簡単な C のコードを書いてコンパイル、実行してみる。
$ vim hello_tf.c
# include <stdio.h>
# include <tensorflow/c/c_api.h>

int main() {
  printf("Hello from TensorFlow C library version %s\n", TF_Version());
  return 0;
}
$ gcc -I/usr/local/include -L/usr/local/lib hello_tf.c -ltensorflow
$ ./a.out
Hello from TensorFlow C library version 1.3.0
# 1.3.0 のライブラリがインストールされている事が確認できた
これで、後は Visual Studio から nuget で TensorFlowSharp をインストールすれば TensorFlow で遊べます。
Visual Studio で実際に使ってみる
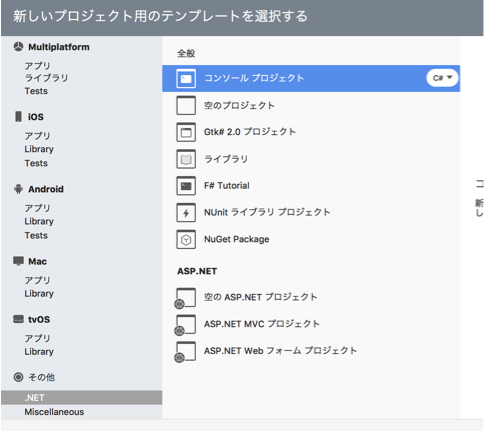
とりあえず TensorFlow で遊ぶぶんには、コンソールプロジェクトで十分でしょう。
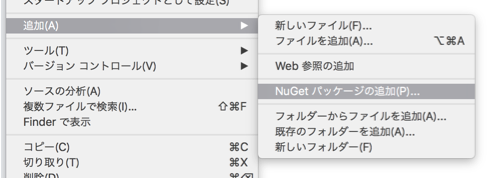
さっそく、TensorFlowSharp をインストールしましょう。NuGet から入手できますので、コンソールプロジェクトを作成したら、プロジェクトを右クリックして、NuGet パッケージの追加を選択。
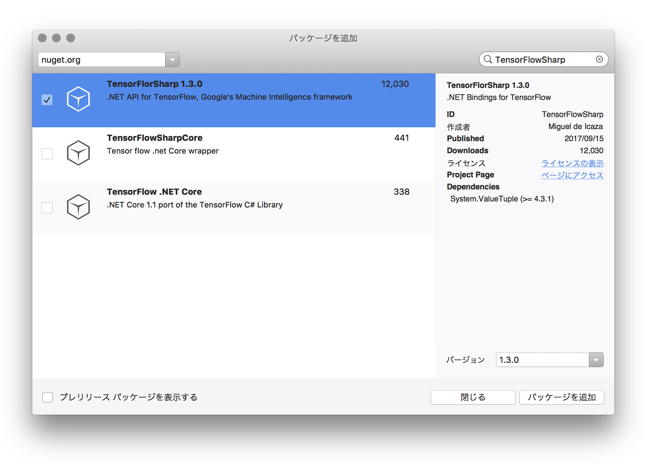
右上の検索ボックスに TensorFlowSharp を入れれば、一番上に出てくるはずですのでこれをインストールします。
なお、途中で System.ValueTuple のライセンスに同意する必要がありますみたいなダイアログが出てきますがアクセプトしておきます。さて、インストールできたら公式サイトにあるサンプルコードを組み込んでとりあえず動かしてみます。
using System;
using TensorFlow;

namespace TensorFlowSharp
{
    class MainClass
    {
        public static void Main(string[] args)
        {
            new MainClass().DoTF();
        }

        public void DoTF()
        {
			using (var session = new TFSession())
			{
				var graph = session.Graph;

				var a = graph.Const(2);
				var b = graph.Const(3);
				Console.WriteLine("a=2 b=3");

				// Add two constants
				var addingResults = session.GetRunner().Run(graph.Add(a, b));
				var addingResultValue = addingResults.GetValue();
				Console.WriteLine("a+b={0}", addingResultValue);

				// Multiply two constants
				var multiplyResults = session.GetRunner().Run(graph.Mul(a, b));
				var multiplyResultValue = multiplyResults.GetValue();
				Console.WriteLine("a*b={0}", multiplyResultValue);
			}
        }
    }
}
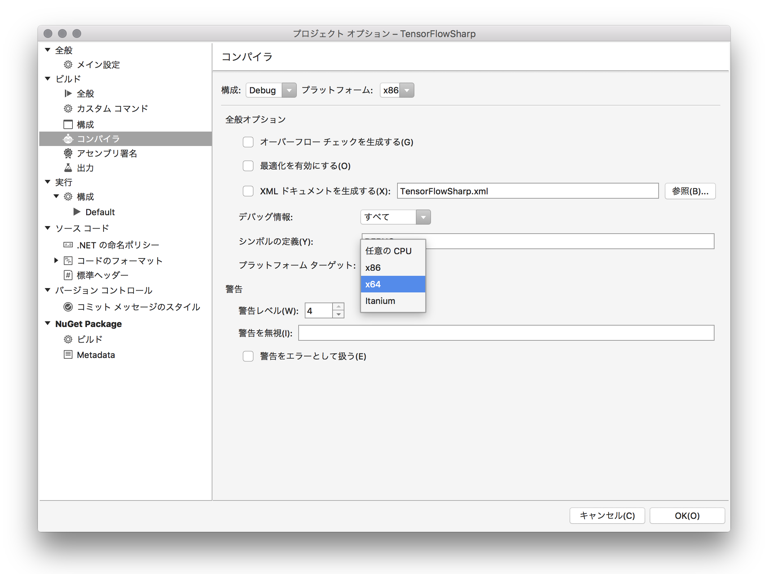
ここで注意しなければいけない事が1つあって、 コンパイラのターゲットプラットフォームを x64 にする必要があります。TensorFlow のダイナミックライブラリが 64bit 版なので、こうしておかないと実行時にエラーになってしまいます。私はここでめちゃくちゃハマりました…😞
こんな感じで x64 を指定しておきましょう。これで準備ができたので、実行してみます。
2017-10-03 21:15:03.625016: W tensorflow/core/platform/cpu_feature_guard.cc:45] The TensorFlow library wasn't compiled to use SSE4.2 instructions, but these are available on your machine and could speed up CPU computations.
2017-10-03 21:15:03.625056: W tensorflow/core/platform/cpu_feature_guard.cc:45] The TensorFlow library wasn't compiled to use AVX instructions, but these are available on your machine and could speed up CPU computations.
2017-10-03 21:15:03.625062: W tensorflow/core/platform/cpu_feature_guard.cc:45] The TensorFlow library wasn't compiled to use AVX2 instructions, but these are available on your machine and could speed up CPU computations.
2017-10-03 21:15:03.625067: W tensorflow/core/platform/cpu_feature_guard.cc:45] The TensorFlow library wasn't compiled to use FMA instructions, but these are available on your machine and could speed up CPU computations.
a=2 b=3
a+b=5
a*b=6
こんな感じの出力がされたはずです。ノードを通じて計算がされている事が確認できます。
TensorFlow の流儀
ゼロから作るDeep Learning で学んだ理論を TensorFlow 上で実践してみたい訳ですが、さすがにすんなりとは行きません。TensorFlow の流儀にそって、少し適応する必要があります。ざっくり感覚として大事そうだなと思ったのは、下記の様な事です。
- 入力を受け付けるノードは placeholder
- 定数は constant
- 変数(ウェイトやバイアス)は variable
- 演算は add や matmul といったものが定義されている
- 損失関数は自分で定義する
それぞれ書こうかと思ったのですが、また終わりのない戦いを始める事になりそうだなと思ったのでこの記事は環境を整えるところで終えたいと思います。詳しくは TensorFlow の Get Started やチュートリアルを見てみて下さい。詳しく書かれています。
ただ、冒頭でも書いた通り既に構築されたモデルから上記の様に計算させる事はできますが、学習自体は別途行っておく必要があります。これは Python などで行う事になると思います。
付録:Anaconda が入っている環境に TensorFlow を入れる
ちょっと本題からは逸れるのですが、ゼロから作る Deep Learning を読んだ方は、Anaconda をインストールされた事でしょう。Anaconda をインストールした環境に TensorFlow をインストールしようとすると、本家サイトのやり方だとハマるところがあったので、付録として書いておこうと思います。
基本的には本家サイトのやり方に従っておけばよいのですが、 virtualenv の実行に失敗するはずです。
$ virtualenv --system-site-packages -p python3 tensorflow/
Running virtualenv with interpreter /Users/dora-gt/anaconda/bin/python3
Using base prefix '/Users/dora-gt/anaconda'
New python executable in /Users/dora-gt/tensorflow/bin/python3
Also creating executable in /Users/dora-gt/tensorflow/bin/python
dyld: Library not loaded: @rpath/libpython3.6m.dylib
  Referenced from: /Users/dora-gt/tensorflow/bin/python3
  Reason: image not found
ERROR: The executable /Users/dora-gt/tensorflow/bin/python3 is not functioning
ERROR: It thinks sys.prefix is '/Users/dora-gt' (should be '/Users/dora-gt/tensorflow')
ERROR: virtualenv is not compatible with this system or executable
このサイトにある様に、Anaconda との相性が悪い様ですが、下記の方法で回避する事ができます。
$ sudo pip uninstall virtualenv
$ sudo conda install virtualenv
$ virtualenv --system-site-packages -p python3 tensorflow/
$ easy_install -U pip
$ pip3 install --upgrade tensorflow
もしハマったら、確認してみて下さい。
