前回は 80 ミリカメラと 80 ミリフィルムで動画を撮影していました。
「役に立たない機械」感を醸し出していたかもしれないですね。
連続で印刷するため、変換ライブラリを少し変更して、自動用紙カットを解除しました。
今回もこの変換ライブラリ lib/receiptline.js に手を入れてみようと思います。
用紙節約か、読みやすさか
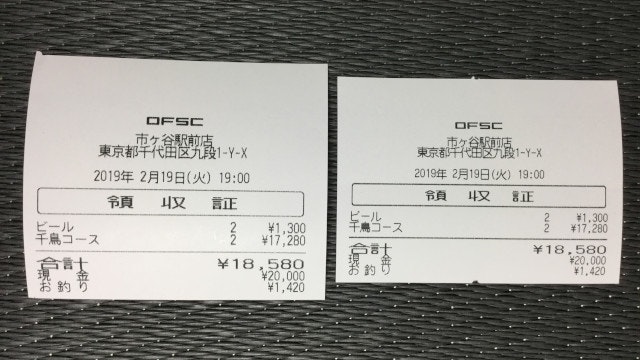
receiptline に添付されているサンプルデータを印刷してみました。
左は TM-T88V で、右は mC-Print3 です。
行間隔が狭いので、文字が詰まって見えます。
今どきのレシートプリンターには用紙節約機能があるので、そういう時代だと思いますが。
行間隔を空ける
行間隔を空けて読みやすくしてみようと思います。
レシートプリンターのコマンドを調べて、一部のコマンドを置き換えてみます。
ESC/POS コマンドリファレンス
https://reference.epson-biz.com/pos/reference_ja/
- 変更前
- 行間隔なしコマンド ESC 3 n
- 変更後
- 行間隔ありコマンド ESC 2
StarPRNTモード コマンド仕様書
http://sp-support.star-m.jp/SDKDocumentation.aspx
- 変更前
- 行間隔なしコマンド ESC 0
- 変更後
- 行間隔ありコマンド ESC z n
lib/receiptline.js
//
// ESC/POS
//
const _escpos = {
    // start printing: ESC @ GS a n ESC M n FS ( A pL pH fn m ESC SP n FS S n1 n2 ESC 3 n ESC { n
    // open: printer => '\x1b@\x1da\x00\x1bM0\x1c(A' + $(2, 0, 48, 0) + '\x1b \x00\x1cS\x00\x00\x1b3\x00\x1b{' + $(printer.upsideDown),
    open: printer => '\x1b@\x1da\x00\x1bM0\x1c(A' + $(2, 0, 48, 0) + '\x1b \x00\x1cS\x00\x00\x1b2\x1b{' + $(printer.upsideDown),
    ...
};

//
// StarPRNT MBCS
//
const _starmbcs = {
    // start printing: ESC @ ESC RS a n ESC RS F n ESC SP n ESC s n1 n2 ESC 0 (SI) (DC2)
    // open: printer => '\x1b@\x1b\x1ea0\x1b\x1eF\x00\x1b 0\x1bs00\x1b0' + (printer.upsideDown ? '\x0f' : '\x12'),
    open: printer => '\x1b@\x1b\x1ea0\x1b\x1eF\x00\x1b 0\x1bs00\x1bz1' + (printer.upsideDown ? '\x0f' : '\x12'),
    ...
};
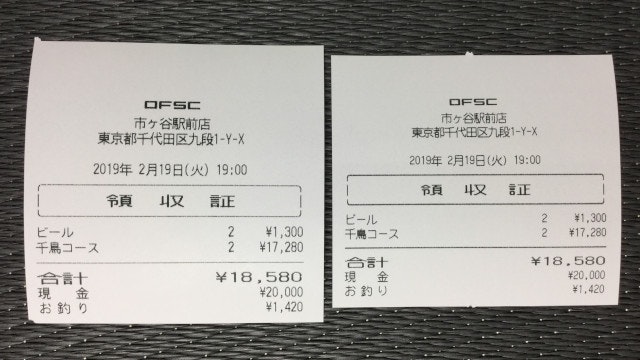
Node を再起動して再印刷。
行間隔は広がりましたが、縦罫線が途切れてしまっています。
縦罫線を接続する
変換ライブラリをさらに変更。
縦罫線を引く領域では、行間隔を空けないようにします。
ESC/POS
- 縦罫線の始まり
- 行間隔なしコマンドを追加 ESC 3 n
- 縦罫線の終わり
- 行間隔ありコマンドを追加 ESC 2
StarPRNT
- 縦罫線の始まり
- 行間隔なしコマンドを追加 ESC 0
- 縦罫線の終わり
- 行間隔ありコマンドを追加 ESC z n
lib/receiptline.js
//
// ESC/POS
//
const _escpos = {
    ...
    // start rules: FS C n ESC t n ... LF
    // vrstart: (widths, left, right) => '\x1cC0\x1bt\x01' + widths.reduce((a, w) => a + '\x95'.repeat(w) + '\x91', left ? '\x9c' : '\x98').slice(0, -1) + (right ? '\x9d' : '\x99'),
    vrstart: (widths, left, right) => '\x1b3\x00\x1cC0\x1bt\x01' + widths.reduce((a, w) => a + '\x95'.repeat(w) + '\x91', left ? '\x9c' : '\x98').slice(0, -1) + (right ? '\x9d' : '\x99'),
    // stop rules: FS C n ESC t n ... LF
    // vrstop: (widths, left, right) => '\x1cC0\x1bt\x01' + widths.reduce((a, w) => a + '\x95'.repeat(w) + '\x90', left ? '\x9e' : '\x9a').slice(0, -1) + (right ? '\x9f' : '\x9b'),
    vrstop: (widths, left, right) => '\x1b2\x1cC0\x1bt\x01' + widths.reduce((a, w) => a + '\x95'.repeat(w) + '\x90', left ? '\x9e' : '\x9a').slice(0, -1) + (right ? '\x9f' : '\x9b'),
    ...
};

//
// StarPRNT MBCS
//
const _starmbcs = {
    ...
    // start rules: ESC $ n ... LF
    // vrstart: (widths, left, right) => '\x1b$0' + widths.reduce((a, w) => a + '\x95'.repeat(w) + '\x91', left ? '\x9c' : '\x98').slice(0, -1) + (right ? '\x9d' : '\x99'),
    vrstart: (widths, left, right) => '\x1b0\x1b$0' + widths.reduce((a, w) => a + '\x95'.repeat(w) + '\x91', left ? '\x9c' : '\x98').slice(0, -1) + (right ? '\x9d' : '\x99'),
    // stop rules: ESC $ n ... LF
    // vrstop: (widths, left, right) => '\x1b$0' + widths.reduce((a, w) => a + '\x95'.repeat(w) + '\x90', left ? '\x9e' : '\x9a').slice(0, -1) + (right ? '\x9f' : '\x9b'),
    vrstop: (widths, left, right) => '\x1bz1\x1b$0' + widths.reduce((a, w) => a + '\x95'.repeat(w) + '\x90', left ? '\x9e' : '\x9a').slice(0, -1) + (right ? '\x9f' : '\x9b'),
    ...
};
もう一度 Node を再起動して再印刷。
縦罫線がくっつきました!

動作条件
実は、これが動作するのは printers.json の upsideDown が false の場合です。
この値が true で、印刷の向きを上下反転している場合はうまく動きません。
printers.json
{
    "tm_t88v": {
        "host": "192.168.1.2",
        "port": 9100,
        "cpl": 42,
        "encoding": "cp932",
        "gamma": 1.8,
        "upsideDown": false,
        "command": "escpos"
    },
    "mc_print3": {
        "host": "192.168.1.3",
        "port": 9100,
        "cpl": 48,
        "encoding": "cp932",
        "gamma": 1.8,
        "upsideDown": false,
        "command": "starmbcs"
    }
}
奥が深いです。
また何か作ったら投稿します。ではまた!