はじめに
iOS17から使用できるSwiftDataを少し使ってみました。
めっちゃええやん!って思ったので紹介します。
この記事でわかること
- SwiftDataとはなにか
- SwiftDataのなんとなくの使い方
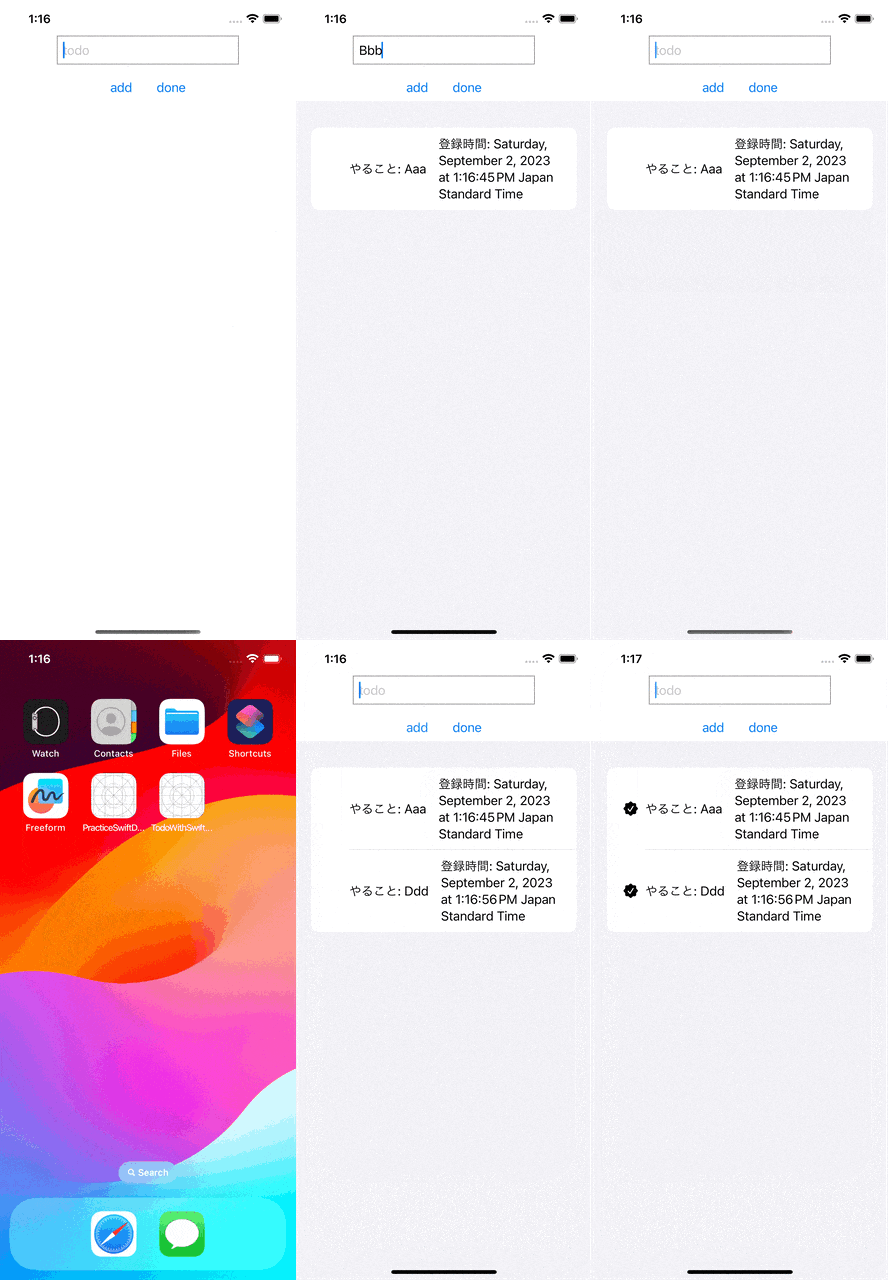
今回作ったサンプル
仕様
- todoを入力して"add"ボタンを押すと、時間と共に保存される
- doneボタンを押すと、上のタスクから順に完了マークがつく
- スワイプでtodoを消すことができる
- アプリをキルして再度立ち上げても登録したタスクは残っている
サンプル動画
環境
- PC: MacBook Air M2
- macOS: Ventura 13.5.1
- Xcode: Version 15.0 beta 6
SwiftDataってなに?
SwiftDataはiOS17から使用できる、データを永続化するためのフレームワークです。
Appleが提供しているCoreDataや外部ライブラリであるRealmなどと属性としては同じであり、SwiftDataはCoreDataの後継という立ち位置かと思います。
UserDefaultやKeyChainなども使い所は違いますが、データの永続化を実現できる手段ですね。
実際の使い方
保存するデータの型を作成
保存するデータのクラスを作ります。
今回は、Todoというclassを作成しました。
ポイントは保存したいデータの型の上に@Modelをつけること。
import Foundation
import SwiftData

@Model
final class Todo {
    var content: String
    var isDone: Bool
    let registerDate: Date

    init(content: String) {
        self.content = content
        isDone = false
        registerDate = Date()
    }
}
CRUD処理の方法(データの保存、削除、更新)
下準備
SwiftDataを使用してデータを出し入れするためにはまずcontextを宣言します。
さらに、データベースから取得したいデータのプロパティの前に@Queryを付与します。
import SwiftUI
import SwiftData

struct ContentView: View {

    @Environment(\.modelContext) private var context
    @Query private var todos: [Todo]

    // ...
}
Appにも以下のように.modelContainerを追加します。
.modelContainerを付与していないと、保存するときなどにクラッシュします。
import SwiftUI
import SwiftData

@main
struct TodoWithSwiftDataApp: App {
    var body: some Scene {
        WindowGroup {
            ContentView()
                .modelContainer(for: Todo.self)
        }
    }
}
データの保存、削除、更新
めちゃくちゃ簡単です。
追加したければcontext.insert()です。
削除したければcontext.delete()です。
更新したければcontext.save()です。
データの取得がいちいち、取得用の処理を書かずしても@Queryで自動最新のデータをViewに渡してくれるので、それがめちゃくちゃいいなと思いました!
import SwiftUI
import SwiftData

struct ContentView: View {

    // ...

    // データの追加
    private func add(todo: String) {
        let data = Todo(content: todo)
        context.insert(data)
    }

    // データの削除
    private func delete(todo: Todo) {
        context.delete(todo)
    }

    // データのアップデート
    private func update() {
        let updatingTodoIndex = todos.firstIndex { !$0.isDone }
        guard let updatingTodoIndex else { return }
        todos[updatingTodoIndex].isDone = true
        try? context.save()
    }
}
プレビューで動作を確認したいとき
プレビューで動きを確認したい時も、.modelContainer(for: Todo.self)を付与しておきましょう!
#Preview {
    ContentView()
        .modelContainer(for: Todo.self)
}
2つ以上のModelを扱いたい時
もし、2種類以上のModelを作成してSwiftDataを使用したいときは、.modelContainer()の引数を配列にすればOKです!
@main
struct TodoWithSwiftDataApp: App {
    var body: some Scene {
        WindowGroup {
            ContentView()
                .modelContainer(for: [Todo.self, User.self])
        }
    }
}
ContentViewの全体
import SwiftUI
import SwiftData

struct ContentView: View {

    @Environment(\.modelContext) private var context
    @Query private var todos: [Todo]

    @State private var textFieldInput = ""

    var body: some View {
        VStack {
            TextField("todo", text: $textFieldInput)
                .padding(8)
                .border(.gray, width: 1)
                .frame(width: 240)

            HStack {
                Button(action: {
                    add(todo: textFieldInput)
                    textFieldInput = ""
                }, label: {
                    Text("add")
                })
                .padding(.trailing, 24)

                Button(action: {
                    update()
                }, label: {
                    Text("done")
                })
            }
            .padding(.top, 12)

            Spacer()

            List {
                ForEach(todos) { todo in
                    HStack {
                        Image(systemName: "checkmark.seal.fill")
                            .opacity(todo.isDone ? 1.0 : 0)
                        Text("やること: \(todo.content)")
                            .padding(.trailing, 8)
                        Text("登録時間: \(todo.registerDate)")
                    }
                }
                .onDelete(perform: { indexSet in
                    for index in indexSet {
                        delete(todo: todos[index])
                    }
                })
            }
        }
    }

    private func add(todo: String) {
        let data = Todo(content: todo)
        context.insert(data)
    }

    private func delete(todo: Todo) {
        context.delete(todo)
    }

    private func update() {
        let updatingTodoIndex = todos.firstIndex { !$0.isDone }
        guard let updatingTodoIndex else { return }
        todos[updatingTodoIndex].isDone = true
        try? context.save()
    }
}

#Preview {
    ContentView()
        .modelContainer(for: Todo.self)
}
サンプルのリポジトリ
こちらに置いているのでよければどうぞ!
https://github.com/Rin-t/PracticeSwiftData
その他SwiftDataに関して書いている記事
enumを保存する方法
おわりに
まだSwiftDataも勉強し始めたばっかりなので、もうちょっと触ってみようと思います〜!
おーわーり。
