CloudflareのCloudflare Zero Trustというサービスを使って自宅サーバーを管理できるようにしてみました。
なお、ここで説明することはすべてCloudflare Docsに書いてあります。ぜひそちらもお読みください。
Connect private networks - Cloudflare Zero Trust docs
概要
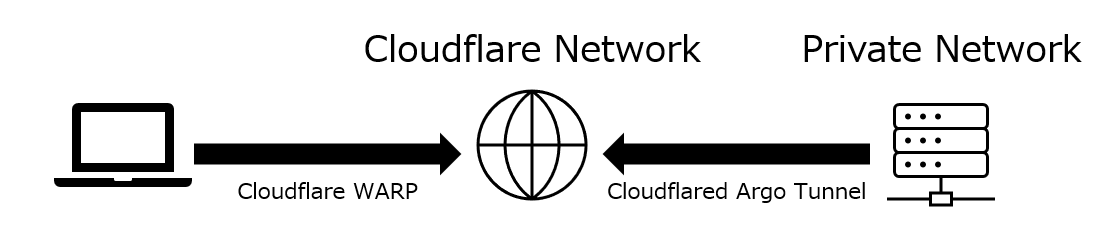
以下の図のようにCloudflaredとCloudflare WARPを使用して自宅のネットワークにアクセスできるようにします。
前提
Cloudflareのアカウントを持っていること
ドメインを持っており、ネームサーバーをCloudflareに向けてあること
Cloudflare Zero Trustの初期設定が済んでいること
ここではこれらの説明は割愛します。
Cloudflare Zero Trustの初期設定に関しては以下を参照してください。
Get started - Cloudflare Zero Trust docs
環境
Proxmox VE上のVM, Oracle Linux 8.6
Cloudflaredのインストール
自宅サーバーにCloudflaredをインストールします。
他のOSやCPUを使用している場合は適宜読み替えてください。
ここから先はsu -やsudo su -などでrootで作業することをお勧めします。(後でデーモン化するときに楽なので)
Downloads - Cloudflare Zero Trust docs
任意のフォルダーにwgetでダウンロードし、インストールします。
#Debian
$ wget https://github.com/cloudflare/cloudflared/releases/latest/download/cloudflared-linux-amd64.deb
$ apt install ./cloudflared-linux-amd64.deb

#RHEL
$ wget https://github.com/cloudflare/cloudflared/releases/latest/download/cloudflared-linux-x86_64.rpm
$ dnf install ./cloudflared-linux-x86_64.rpm
これでインストールは完了です。
Cloudflareにログイン
$ cloudflared tunnel login
ログイン用のURLが表示されるので任意の端末のブラウザでアクセスし、認証を行います。
Cloudflare Edgeとトンネルを張る
トンネルを作成します
toyohashi-networkの部分は好きな名称で構いません。
$ cloudflared tunnel create toyohashi-network
最下段に表示されるUUIDをコピーします。後程使います。
自宅サーバーのネットワーク登録
IP/CIDRはご自身の環境に合わせて変更してください。
$ cloudflared tunnel route ip add 192.168.1.0/24 toyohashi-network
ルートが正常に登録されているか確認します。
$ cloudflared tunnel route ip show
トンネルの設定
任意のテキストエディタを使用して/root/.cloudflared/config.ymlを編集します。
$ vim /root/.cloudflared/config.yml
新しくファイルが作成されます。次のように書き込みます。
tunnel: <コピーしておいたUUID>
credentials-file: /root/.cloudflared/<コピーしておいたUUID>.json
warp-routing:
    enabled: true
iで編集モードに移行し、Escで編集モードを終了します。
:wqで保存して終了します。
実行
$ cloudflared tunnel run toyohashi-network
これでCloudflare Edgeとトンネルを張れるはずです。
Ctrl+Cで終了できます。
デーモン化
先ほどの方法ではSSH接続を終了してしまうと、Cloudflareとの接続が切断されてしまいます。
デーモン化をして再起動時に自動で実行したり、バックグラウンドで動作してもらうようにします。
$ cloudflared service install
自動起動の設定と起動
$ systemctl enable cloudflared
$ systemctl start cloudflared
念のためちゃんと動作しているのか確認してみましょう。
$ systemctl status cloudflared
これでサーバー側の設定は完了です。
次回の記事 でクライアント側の設定について紹介します。