はじめに
- QRではなく一次元バーコードの読み取りをブラウザで行う
- WebRTC(getUserMedia)を利用したリアルタイムのライブプレビューでスキャンする
- 使い慣れているVueで実装する
やりたいこと
WebRTCでカメラを利用してブラウザ上でバーコードを読み取り、読み取った瞬間の画像と読み取り結果(ISBN)を画面上に表示する。
WebRTCとは
Web Real Time Communicationsの略で、ブラウザ上で音声や映像やファイルのやり取りをリアルタイムで行うことができる技術です。
また、それらをブラウザで簡単に扱えるようにしたAPI群です。
HTTPSかlocalhostでしか動かないので注意。
今回はライブラリに頼りきりの実装となっているので細かくは説明しませんが、ざっと説明すると上記のような感じです。
WebRTC API - Web API | MDN
いろんなデモ
デモ
Scanボタンをクリックしてカメラを許可するだけで使えます。
PWAに対応しているので、インストールしてアプリのように使うこともできます。
セットアップ
まずはVue CLIでプロジェクトを立ち上げます。
アプリっぽく使える方が便利なので、PWAにもチェックをいれておきます。
$ vue create barcode_scanner


Vue CLI v4.2.3
? Please pick a preset: Manually select features
? Check the features needed for your project: Babel, TS, PWA, Linter
? Use class-style component syntax? No
? Use Babel alongside TypeScript (required for modern mode, auto-detected polyfills, transpiling JSX)? Yes
? Pick a linter / formatter config: Prettier
? Pick additional lint features: (Press <space> to select, <a> to toggle all, <i> to invert selection)Lint on save
? Where do you prefer placing config for Babel, ESLint, etc.? In dedicated config files
? Save this as a preset for future projects? No
バーコードスキャナーを実装する
QuaggaJSを使って実装します。
このライブラリにgetUserMediaを使って検出ができる設定があるのでそれを使います。
$ yarn add quagga
スキャン部分の全体的なコードはこんな感じ。
<template>
  <div>
    <div id="cameraArea">
      <img v-if="code.length" src="" alt="result" class="resultImg" />
    </div>
    <p v-if="code.length" class="getMessage">取得できました</p>
    <p class="resultCode">{{ code }}</p>
    <button @click="startScan">Scan</button>
    <button aria-label="close" @click.prevent.stop="stopScan">
      Stop
    </button>
  </div>
</template>

<script lang="ts">
import Vue from "vue";

export type DataType = {
  Quagga: any;
  code: string;
};

export default Vue.extend({
  name: "BarcodeScanner",
  data(): DataType {
    return {
      Quagga: null,
      code: ""
    };
  },
  methods: {
    startScan() {
      this.code = "";
      this.initQuagga();
    },
    stopScan() {
      this.Quagga.offProcessed(this.onProcessed)
      this.Quagga.offDetected(this.onDetected)
      this.Quagga.stop();
    },
    initQuagga() {
      this.Quagga = require("quagga");
      this.Quagga.onProcessed(this.onProcessed);
      this.Quagga.onDetected(this.onDetected);

      // 設定
      const config = {
        inputStream: {
          name: "Live",
          type: "LiveStream",
          target: document.querySelector("#cameraArea"),
          constraints: { facingMode: "environment" }
        },
        numOfWorkers: navigator.hardwareConcurrency || 4,
        decoder: { readers: ["ean_reader", "ean_8_reader"] }
      };
      this.Quagga.init(config, this.onInit);
    },
    onInit(err: any) {
      if (err) {
        console.log(err);
        return;
      }
      console.info("Initialization finished. Ready to start");
      this.Quagga.start();
    },
    onDetected(success: any) {
      this.code = success.codeResult.code;
      // 取得時の画像を表示
      const $resultImg: any = document.querySelector(".resultImg");
      $resultImg.setAttribute("src", this.Quagga.canvas.dom.image.toDataURL());
      this.Quagga.stop();
    },
    onProcessed(result: any) {
      const drawingCtx = this.Quagga.canvas.ctx.overlay;
      const drawingCanvas = this.Quagga.canvas.dom.overlay;

      if (result) {
        // 検出中の緑の線の枠
        if (result.boxes) {
          drawingCtx.clearRect(0, 0, drawingCanvas.width, drawingCanvas.height);
          const hasNotRead = (box: number[][]) => box !== result.box;
          result.boxes.filter(hasNotRead).forEach((box: number[][]) => {
            this.Quagga.ImageDebug.drawPath(box, { x: 0, y: 1 }, drawingCtx, {
              color: "green",
              lineWidth: 2
            });
          });
        }

        // 検出に成功した瞬間の青い線の枠
        if (result.box) {
          this.Quagga.ImageDebug.drawPath(
            result.box,
            { x: 0, y: 1 },
            drawingCtx,
            {
              color: "blue",
              lineWidth: 2
            }
          );
        }

        // 検出に成功した瞬間の水平の赤い線
        if (result.codeResult && result.codeResult.code) {
          this.Quagga.ImageDebug.drawPath(
            result.line,
            { x: "x", y: "y" },
            drawingCtx,
            {
              color: "red",
              lineWidth: 3
            }
          );
        }
      }
    }
  }
});
</script>

<style>
# cameraArea {
  overflow: hidden;
  width: 320px;
  height: 240px;
  margin: auto;
  position: relative;
  display: flex;
  align-items: center;
}
# cameraArea video,
# cameraArea canvas {
  width: 320px;
  height: 240px;
}
button {
  width: 100px;
  height: 40px;
  background-color: #fff;
  border: 1px solid #333;
  margin-top: 30px;
}
.resultImg {
  width: 100%;
}
.resultCode {
  font-size: 24px;
  font-weight: bold;
  text-align: center;
}
.getMessage {
  color: red;
}
</style>
検出画面
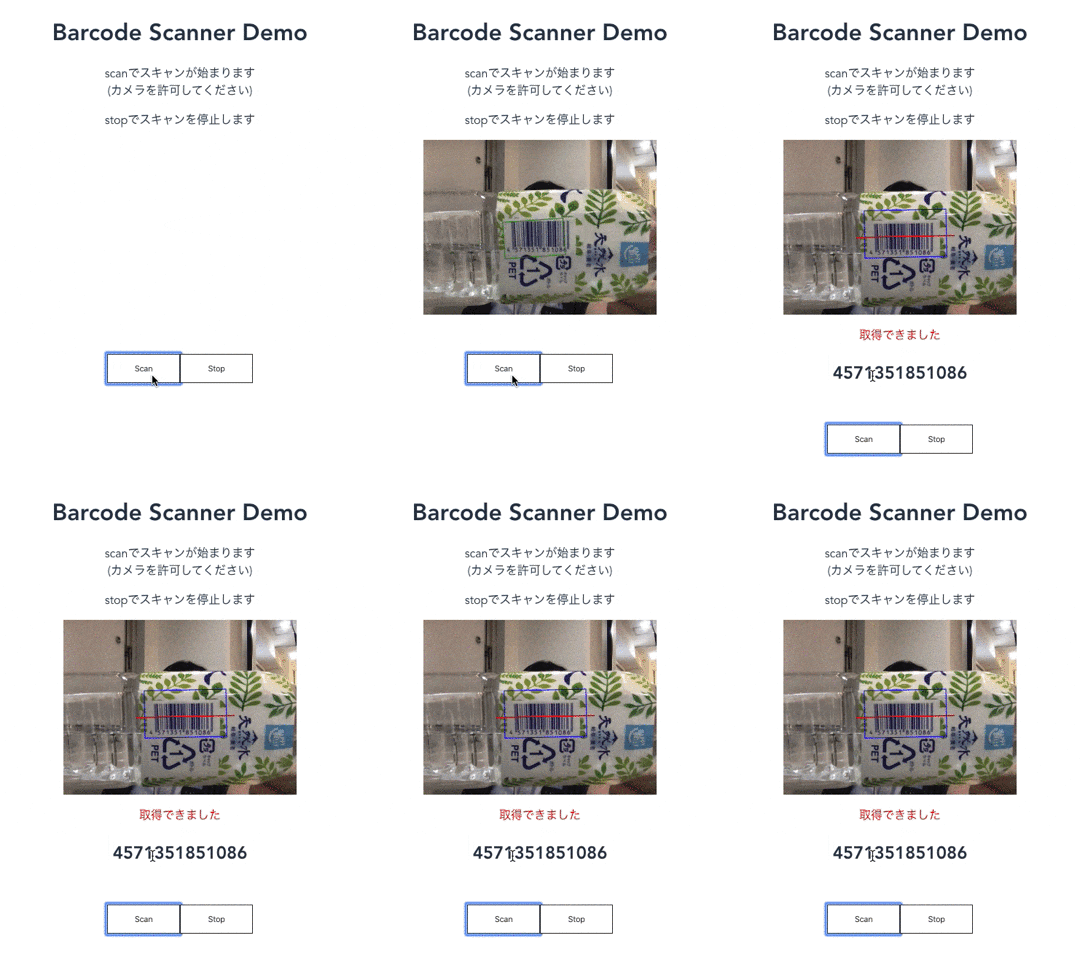
読み取り中はバーコードを緑の線で囲み、読み取りに成功するとバーコードを青い線で囲み真ん中に水平に赤い線を引いた画面(QRコードリーダーアプリとかでよく見るやつ)になります。
線を非表示にすることも可能です。
検出中と検出結果gif
検出結果

まとめ
ライブプレビューでバーコードをスキャンして読み取った結果を表示するまでをブラウザ上で完結することができました。
今回はただ読み取った結果を表示するだけの単純なデモアプリを作成しましたが、要件によって様々な応用ができそうです。
例えば、APIを叩いて何かしらのデータを表示させたり、実際の店頭で商品のバーコードを読み取り商品ページに遷移させたりといったことも可能です。
UIデザインに落とし込み便利な機能を持たせることでUXを向上させることができそうです。
参考
Nuxt.jsでバーコードリーダを作ったら、いろいろハマった上にiOSのPWAでカメラにアクセスできなかった話
quaggaJS/live_w_locator.js at master · serratus/quaggaJS
QuaggaJS, an advanced barcode-reader written in JavaScript
WebRTC
