概要
前回の記事からの続きで、この記事では以下について書きます。
- プッシュ通知を受信できるようにする
- プッシュ通知の配信基盤をFirebaseで構築する
Firebaseでプロジェクトを作る
FCMを利用するためにFirebaseでプロジェクトを作成します。
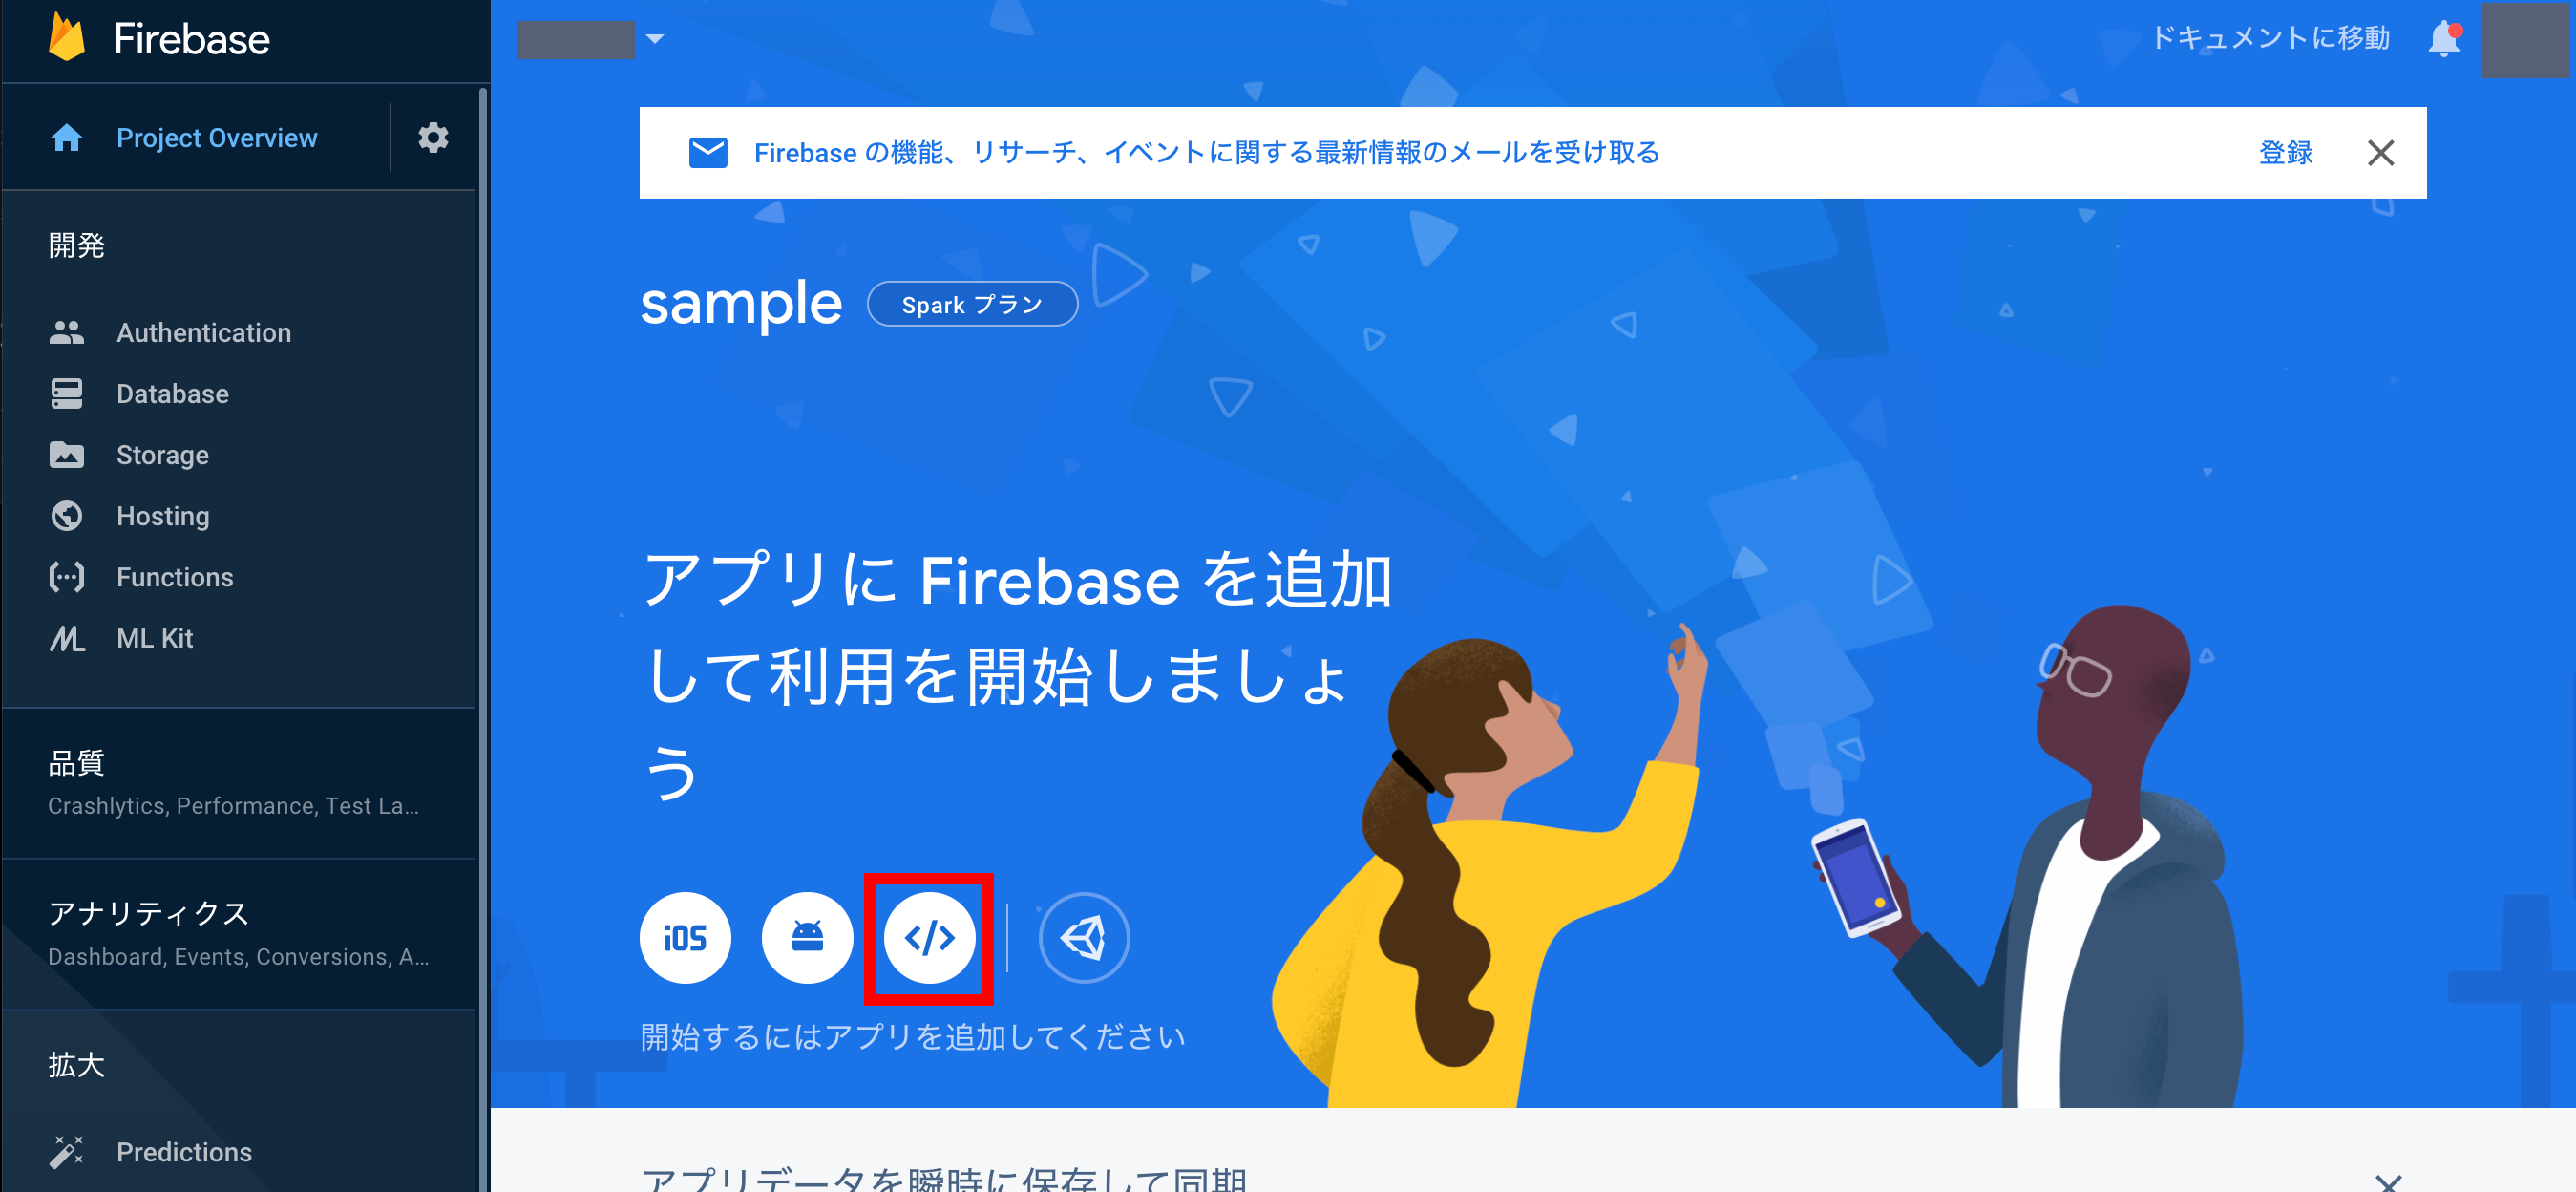
以下の画面からプロジェクトを追加します。
3ステップ入力する画面が出てくるので、それぞれ入力していきます。

プロジェクトを作成すると下記の画面に遷移するので、ウェブ用アプリを追加します。
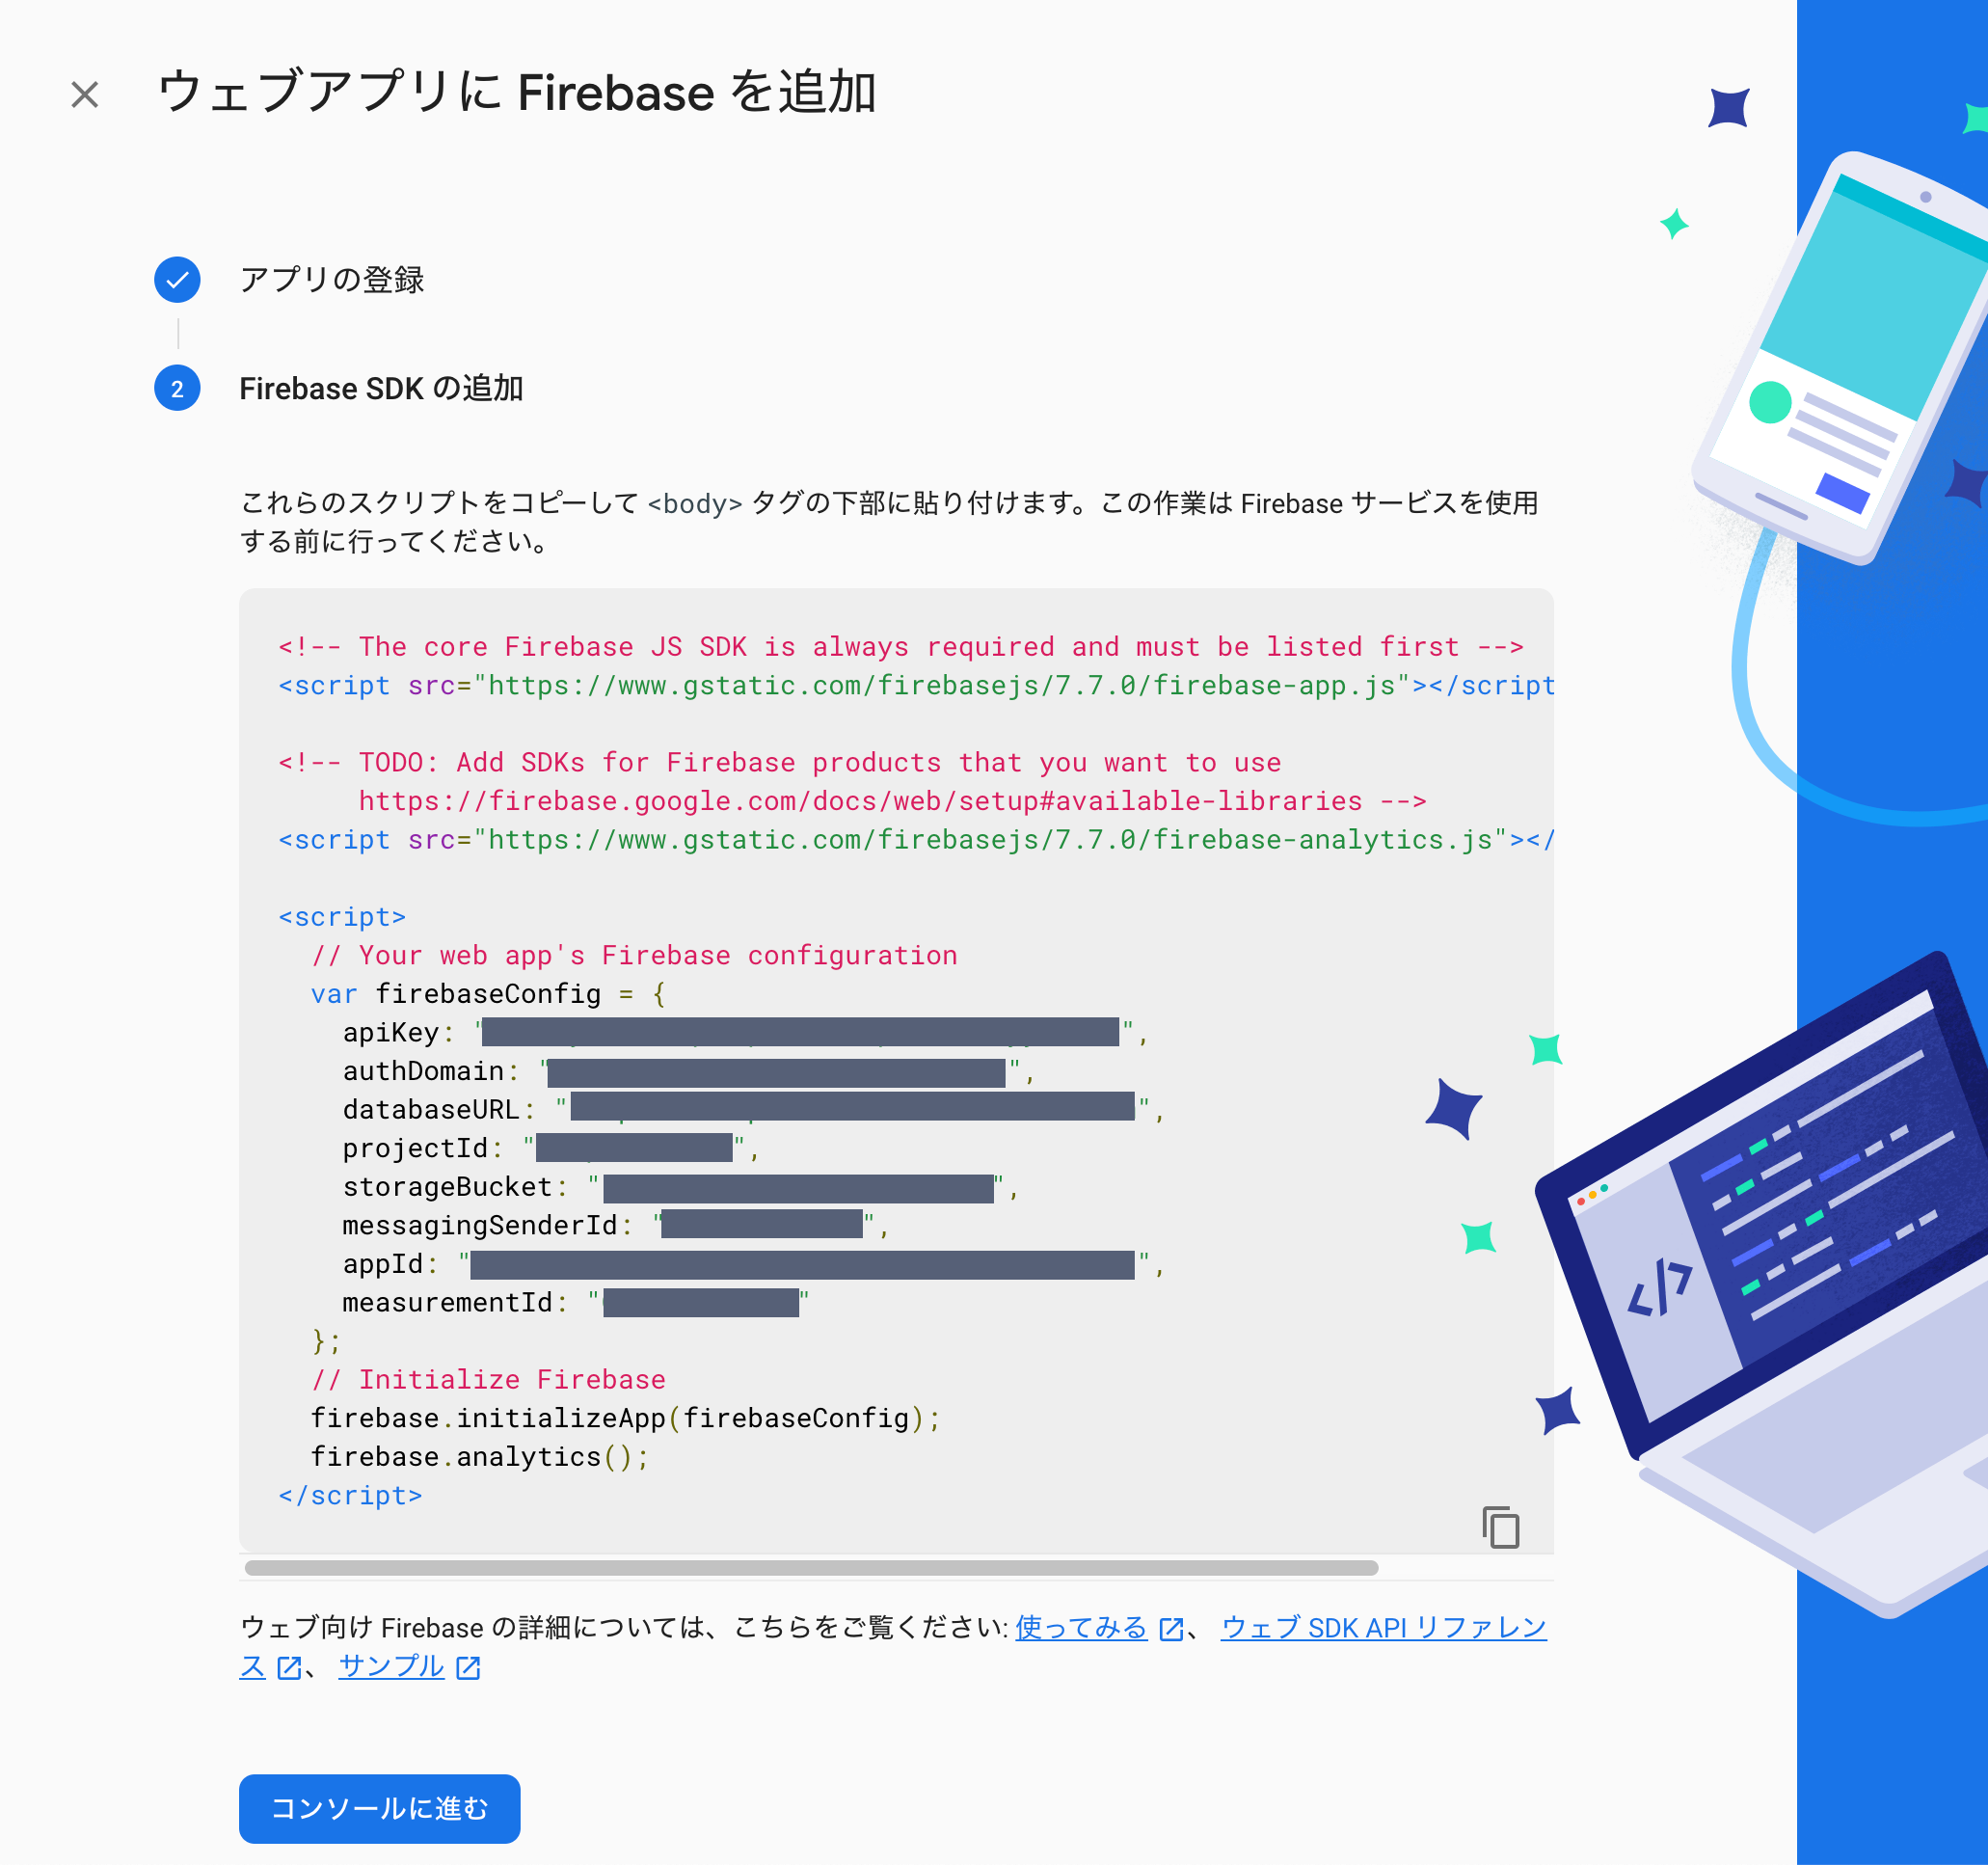
アプリを追加するとスクリプトが表示されるので、これを後述で作るファイルで使うので控えておく。
「Settings(プロジェクトの設定)」→「全般」→「マイアプリ」からも確認できます。
プッシュ通知を受け取る
FCMを使う場合、ファイル名をfirebase-messaging-sw.jsとしなければならないので、サイトのルートディレクトリにfirebase-messaging-sw.jsを作成する。
ローカルでプッシュ通知を受け取る
とりあえずプッシュ通知を実際に受け取れるのかローカルで確認してみます。
firebase-messaging-sw.jsを一旦以下のように記述します。
self.addEventListener("push", function (event) {
  if (event.data) {
    console.log('This push event has data: ', event.data.text());
  } else {
    console.log('This push event has no data.');
  }

  const title = "テスト用のタイトル";
  const options = {
    body: "bodyの内容です。",
    icon: '/img/icons/android-chrome-192x192.png',
    badge: '',
  };

  event.waitUntil(self.registration.showNotification(title, options));
});
デベロッパーツールの「Application」タブの「Service Workers」の画面からPushボタンをクリックしてみます。

すると、実際にプッシュ通知を受け取って表示することができました。

FCM経由でプッシュ通知を表示してみる
今度はFCM経由でプッシュ通知を表示できるように実装します。
仕組み
仕組みとしては、以下の図のような感じ。
デバイス
アクセスしたらトークンを発行し、それをFirestoreに格納します。

配信基盤
Cloud Functionsのエンドポイントに任意のJSONをPOSTして、その際にDBのsubscribeがtrueのドキュメントをトークンをトピックに追加。
そのトピックに対してPOSTしたJSONの内容を配信する。

Firestoreの設定
コードを書く前にfirestoreを設定していきます。

「Databese」から「データベースの作成」をクリック
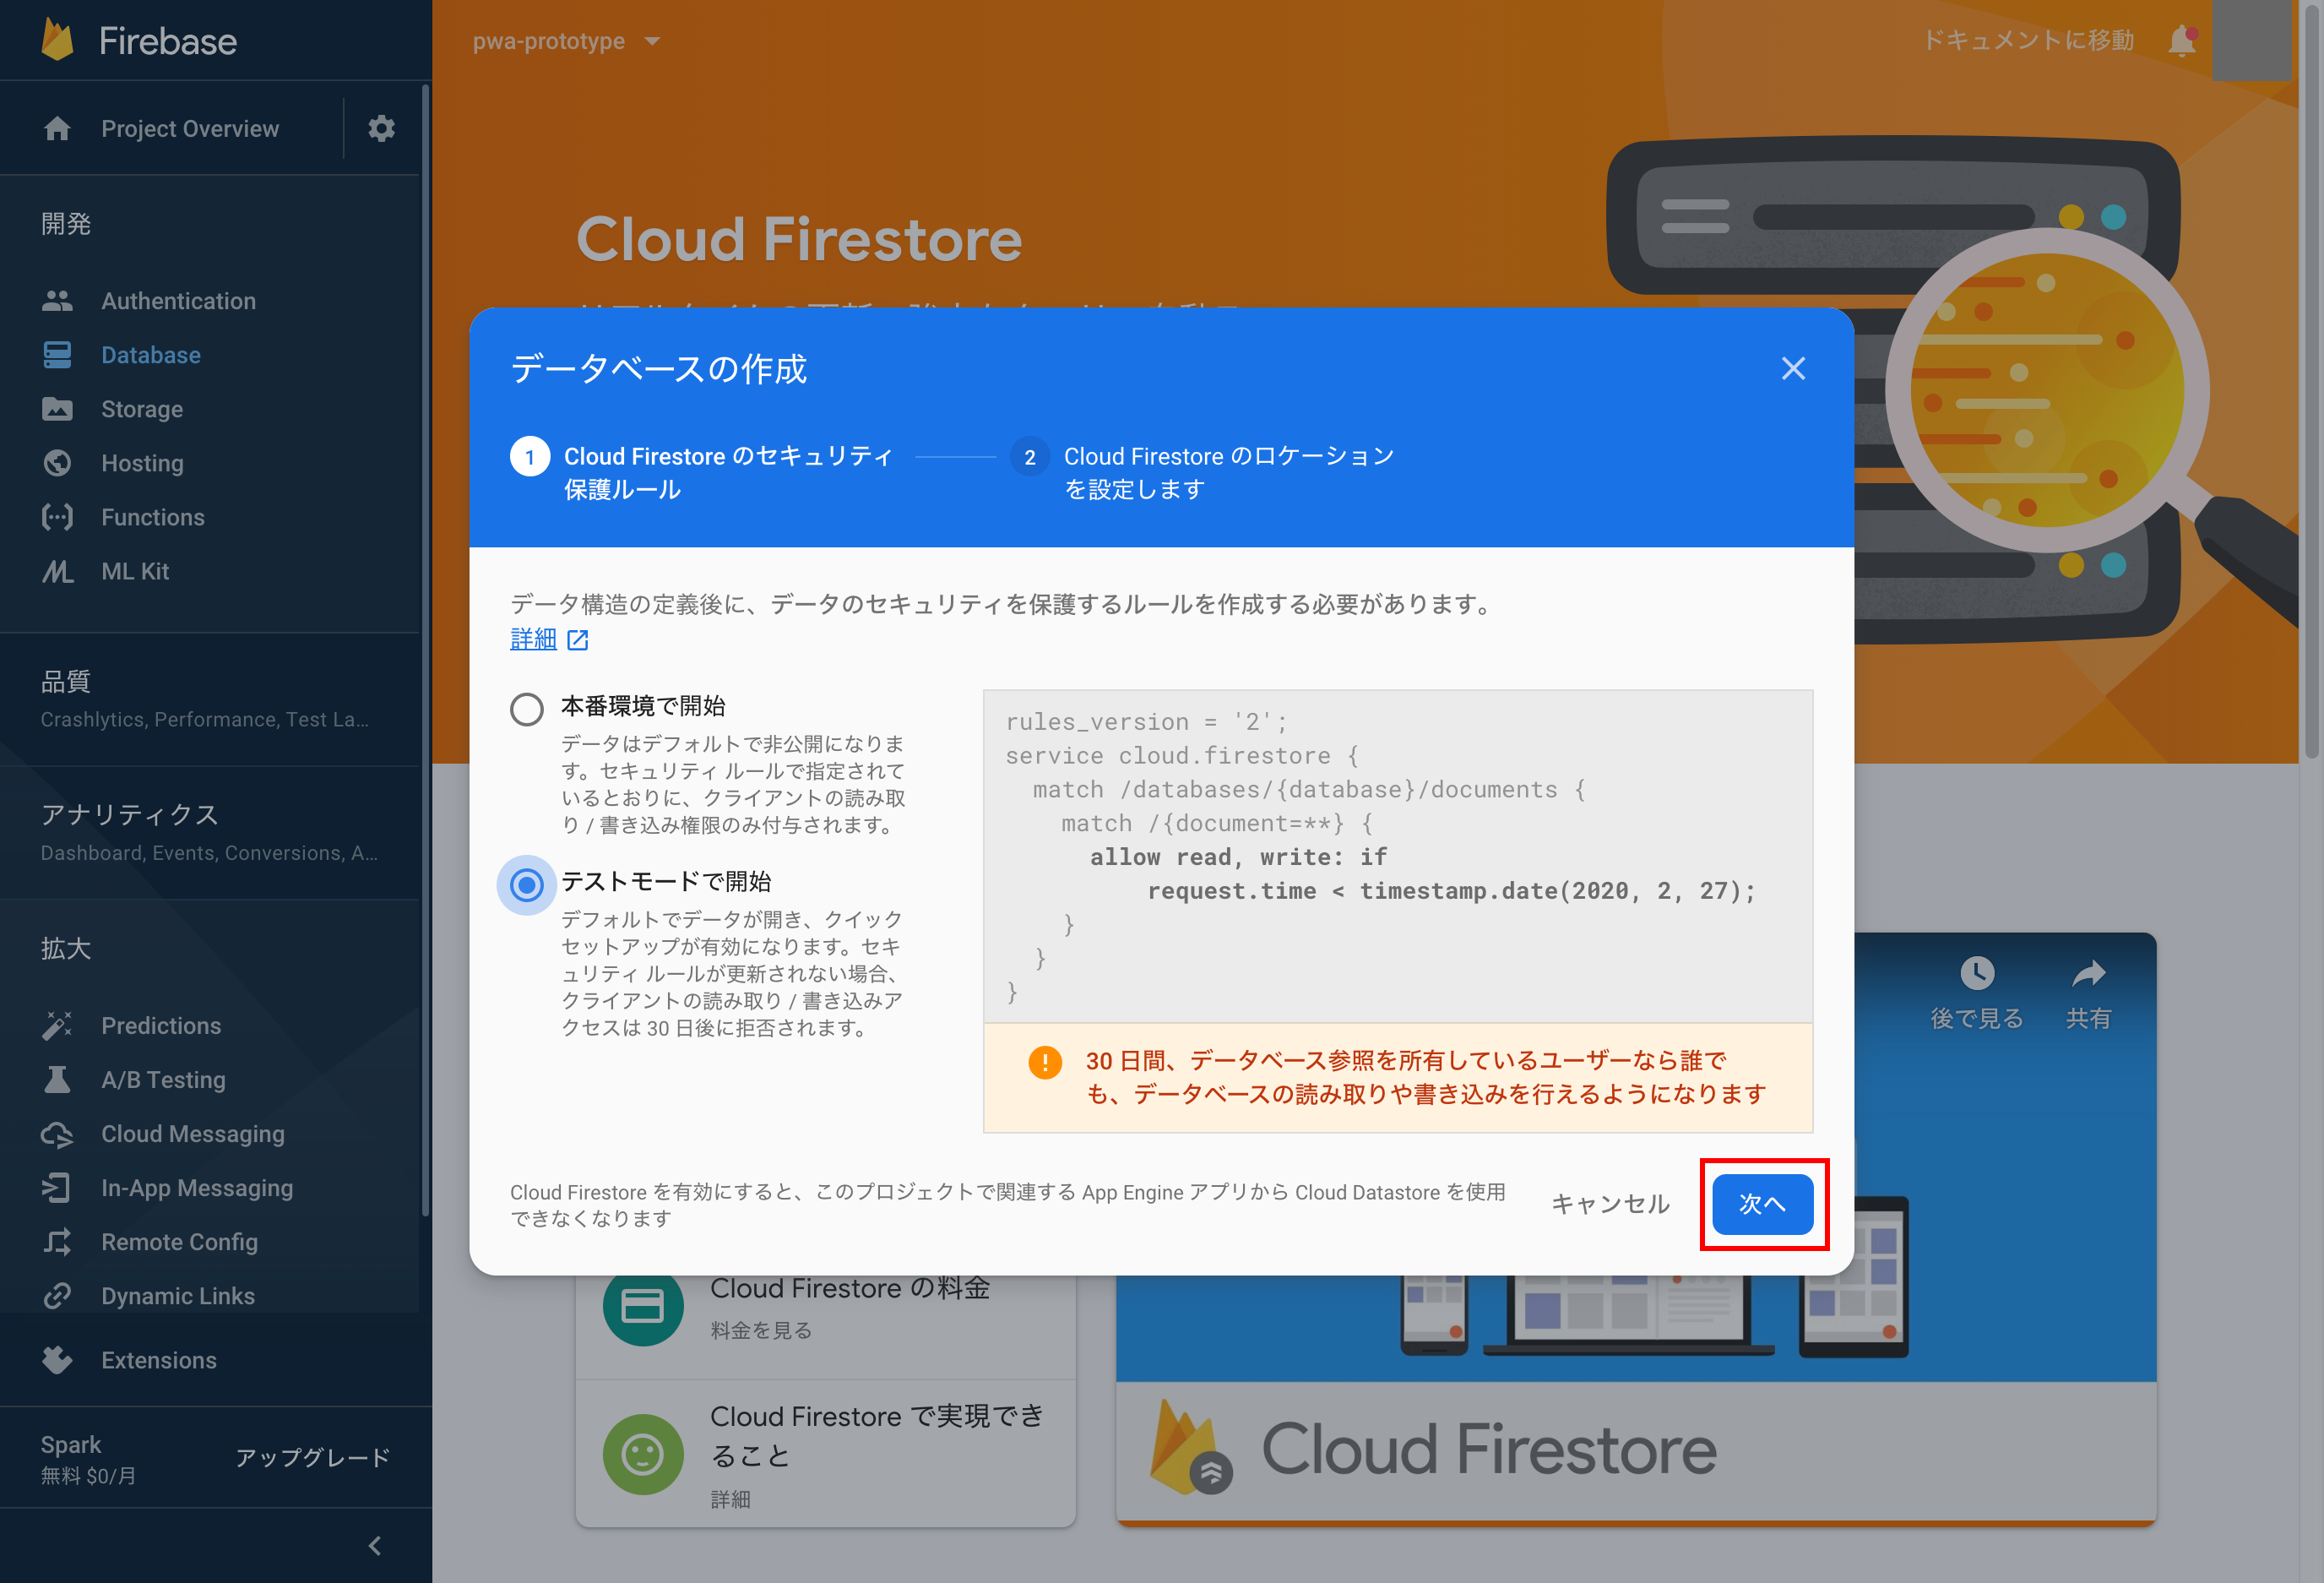
テストモードを選択肢「次へ」をクリック
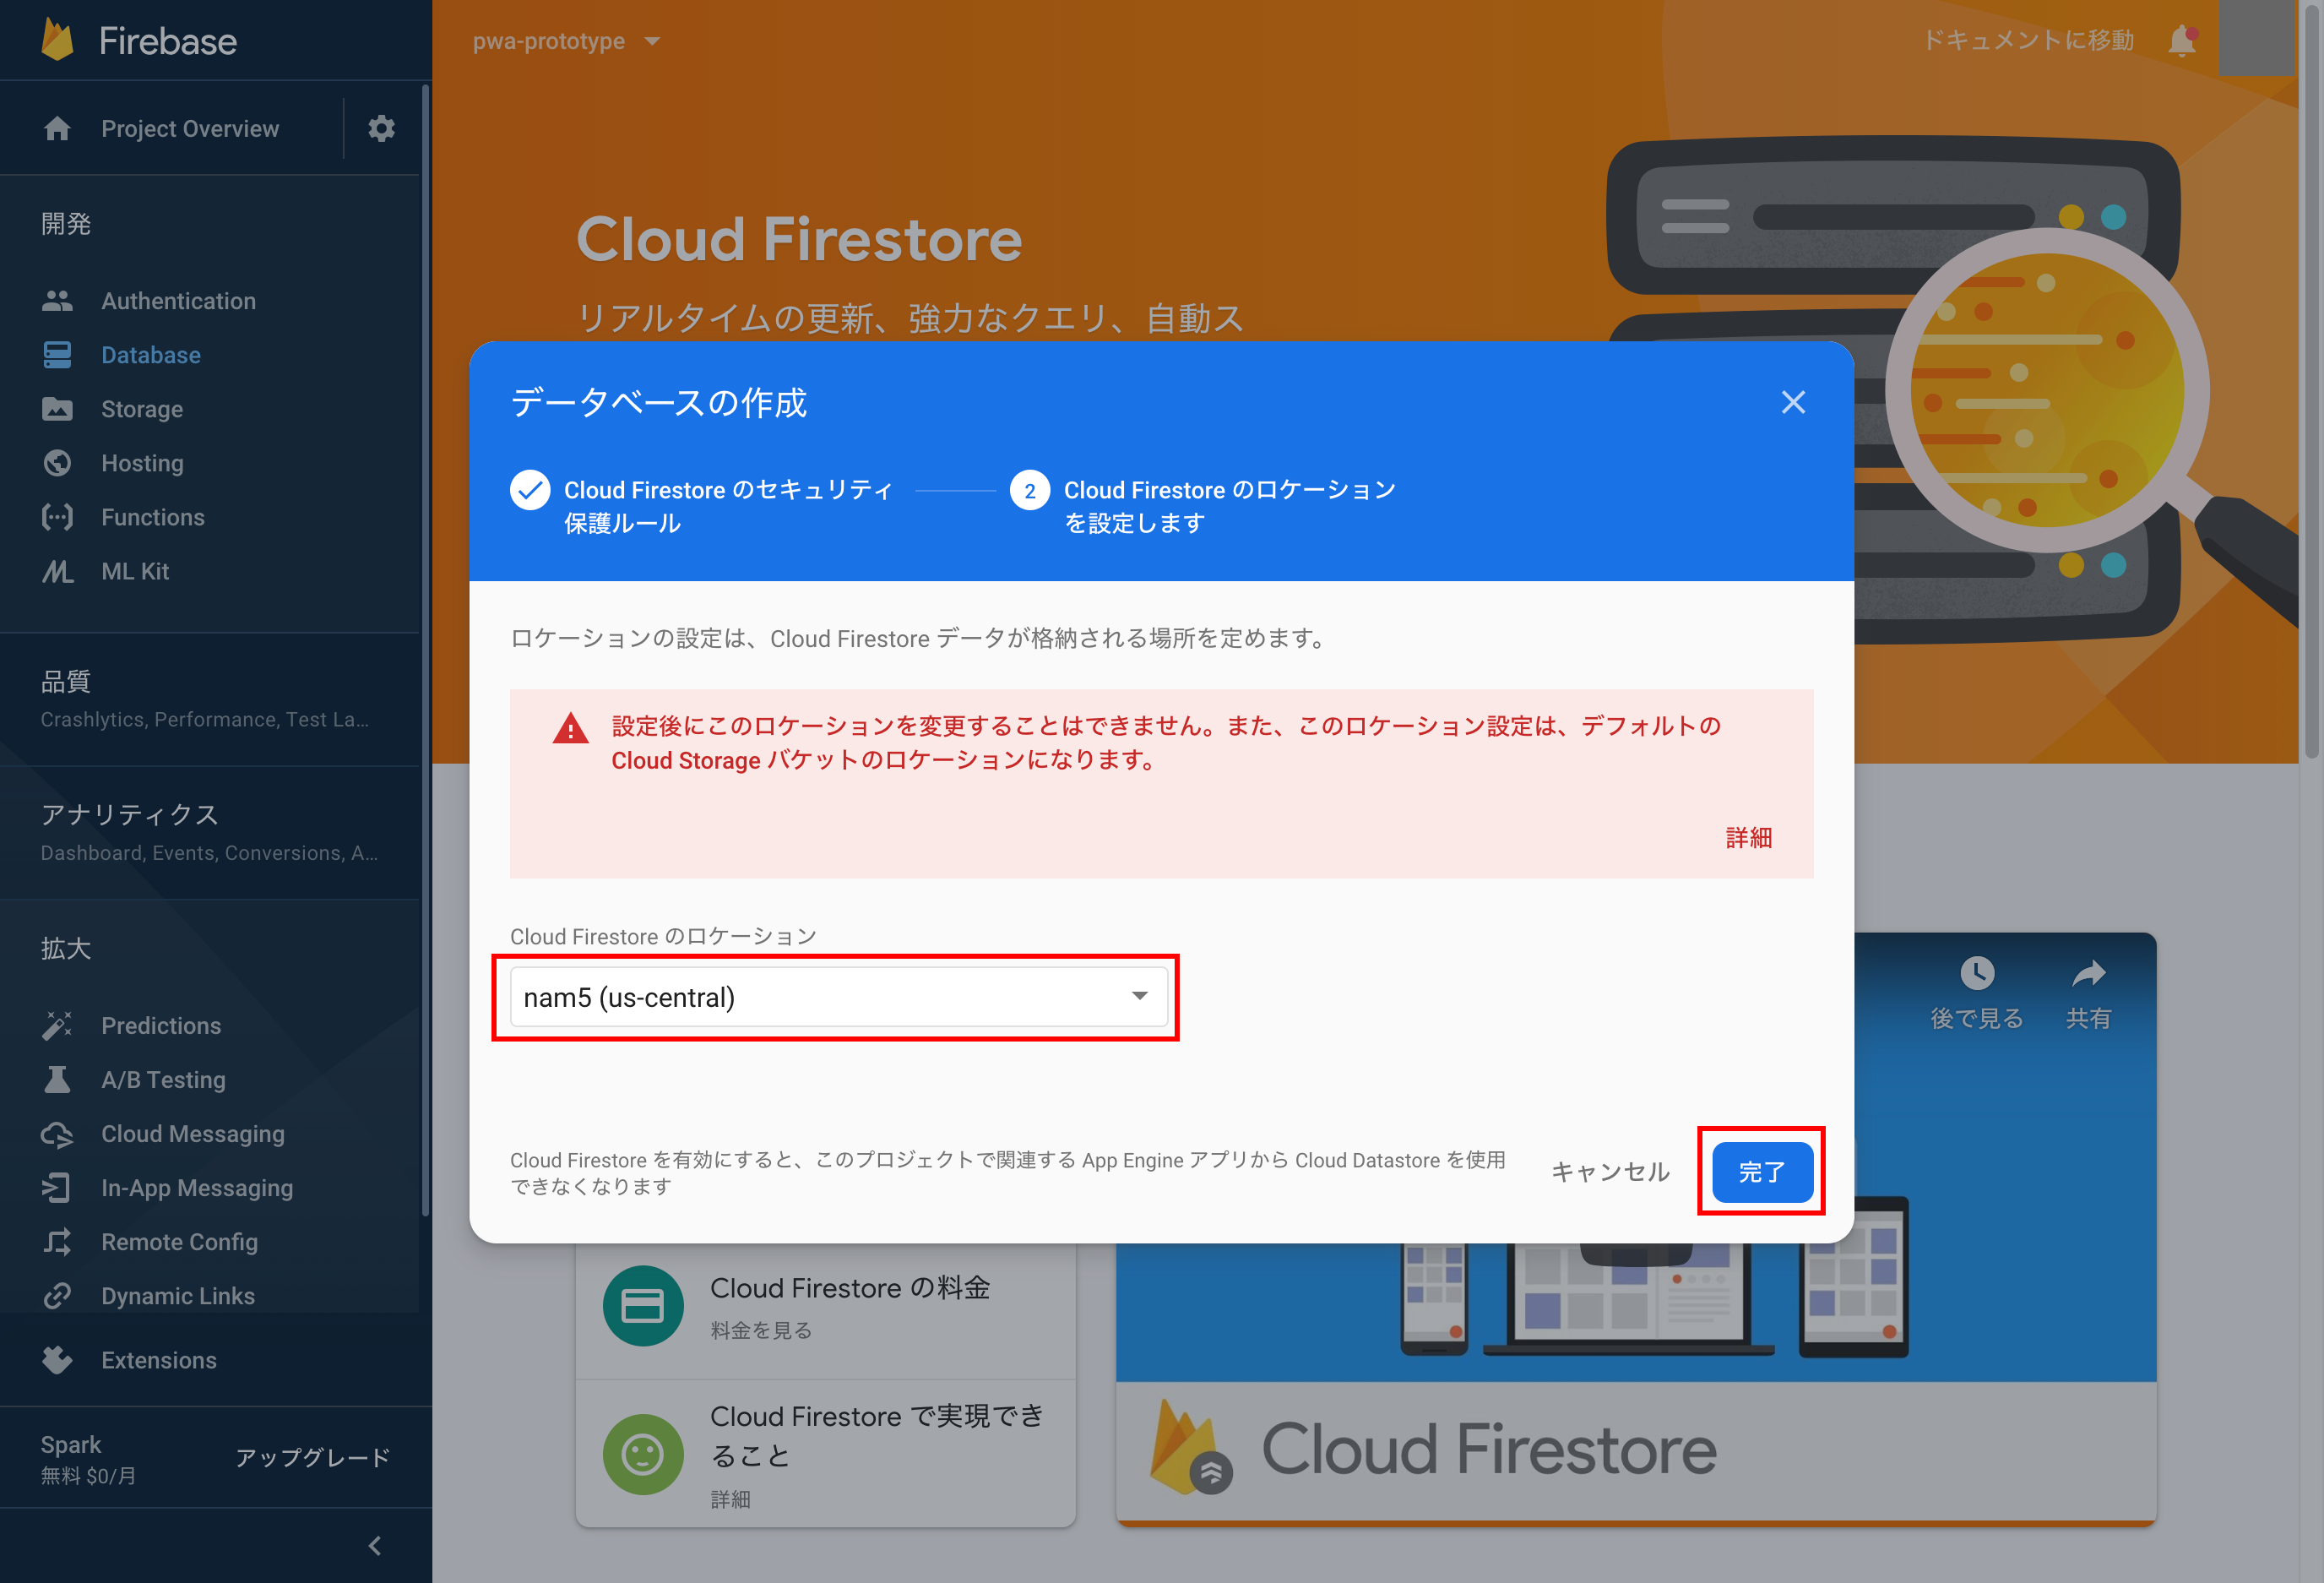
ロケーションにus-centralを選択し完了します。
トークンの発行と格納
firestoreの設定ができたので、トークンの発行とその情報をfirestoreに格納するまでの実装をしていきます。
ついでに、フォアグラウンドで通知を受け取る処理も記述します。
const config = {
  apiKey: "xxxxxxxxxxxx",
  authDomain: "xxxxxxxxxxxx.firebaseapp.com",
  databaseURL: "https://xxxxxxxxxxxx.firebaseio.com",
  projectId: "xxxxxxxxxxxx",
  storageBucket: "xxxxxxxxxxxx.appspot.com",
  messagingSenderId: "xxxxxxxxxxxx",
  appId: "xxxxxxxxxxxx",
  measurementId: "xxxxxxxxxxxx"
};
firebase.initializeApp(config);

const messaging = firebase.messaging()
const vapidKey = "xxxxxxxxxxxxxxxxxxxxxxxx"
messaging.usePublicVapidKey(vapidKey)

// firestore
const db = firebase.firestore();
const fcmUsersRef = db.collection("fcm_users");

messaging.requestPermission().then(() => {
  console.log("Notification permission granted.")
  // TODO(developer): Retrieve an Instance ID token for use with FCM
  messaging.getToken().then((currentToken) => {
    if (currentToken) {
      console.log("Current Token: ", currentToken)

      function device_type() {
        const ua = navigator.userAgent.toLowerCase()
        switch (true) {
          case ua.indexOf("android") > -1 && ua.indexOf("mobile") > -1:
            return "android"
            break;
          case ua.indexOf("iphone") > -1:
            return "iphone"
            break;
          case ua.indexOf("ipad") > -1:
            return "ipad"
            break;
          case ua.indexOf("android") > -1 && ua.indexOf("mobile") == -1:
            return "androidtablet"
            break;
          default:
            return "pc"
            break;
        }
      }

      // firestore
      fcmUsersRef.where("fcm_token", "==", currentToken).get().then(token => {
        if (token.empty) {
          db.collection('fcm_users').add({
            created_at: new Date(),
            device_type: device_type(),
            fcm_token: currentToken,
            subscribe: true
          })
        } else {
          token.forEach(doc => {
            console.log('トークンはすでに登録されています。');
            fcmUsersRef.doc(doc.id).update({
              subscribe: true,
              updated_at: new Date()
            })
          });
        }
      })
    } else {
      console.log("No instance ID token available. Request permission to generate one.")
    }
  }).catch((err) => {
    console.log("An error occurred while retrieving token.", err)
  })
}).catch((err) => {
  console.log("Unable to get permission to notify.", err)
})

// フォアグラウンドの状態で通知を受信する
messaging.onMessage((payload) => {
  console.log("Message recieved.", payload)
  const notificationTitle = payload.notification.title; // タイトル
  const notificationOptions = {
    body: payload.notification.body, // 本文
    icon: payload.notification.icon, // アイコン
  };

  // ブラウザが通知をサポートしているか確認する
  if ("Notification" in window) {
    // すでに通知の許可を得ているか確認する
    if (Notification.permission === "granted") {
      const notification = new Notification(notificationTitle, notificationOptions);
    }
  }
})
<script src="/main.js"></script>
アクセスしてトークンがfirestoreに格納されたことを確認できたら完了です。
Cloud Functionsで配信エンドポイントを作る
CLI をインストール
$ npm install -g firebase-tools
プロジェクトの作成
$ firebase init
Functionsを選択してエンター
     ######## #### ########  ######## ########     ###     ######  ########
     ##        ##  ##     ## ##       ##     ##  ##   ##  ##       ##
     ######    ##  ########  ######   ########  #########  ######  ######
     ##        ##  ##    ##  ##       ##     ## ##     ##       ## ##
     ##       #### ##     ## ######## ########  ##     ##  ######  ########

You're about to initialize a Firebase project in this directory:

  /Users/xxxxxx/xxxxxx

? Which Firebase CLI features do you want to set up for this folder? Press Space to select features, then Enter to conf
irm your choices.
 ◯ Database: Deploy Firebase Realtime Database Rules
 ◯ Firestore: Deploy rules and create indexes for Firestore
❯◉ Functions: Configure and deploy Cloud Functions
 ◯ Hosting: Configure and deploy Firebase Hosting sites
 ◯ Storage: Deploy Cloud Storage security rules
 ◯ Emulators: Set up local emulators for Firebase features
すでにプロジェクトを作成していたので、Use an existing projectを選択
? Which Firebase CLI features do you want to set up for this folder? Press Space to select features, then Enter to confirm your choices. F
unctions: Configure and deploy Cloud Functions

=== Project Setup

First, let's associate this project directory with a Firebase project.
You can create multiple project aliases by running firebase use --add,
but for now we'll just set up a default project.

? Please select an option: (Use arrow keys)
❯ Use an existing project
  Create a new project
  Add Firebase to an existing Google Cloud Platform project
  Don't set up a default project
任意のプロジェクトを選択
? Please select an option: Use an existing project
? Select a default Firebase project for this directory: (Use arrow keys)
❯ pwa-prototype (pwa-prototype)
  testapp-55ea0 (testApp)
すると、サイトのルートディレクトリにfunctionsというディレクトリとその中に以下のファイルが生成されます。
└── functions
    ├── index.js
    ├── node_modules
    ├── package-lock.json
    └── package.json
以上で完了です。
プロジェクトの選択で何も出てこないエラーが出た場合
プロジェクトの選択時になぜかプロジェクトが出てこないエラーが出た。
Error: Failed to list Firebase projects. See firebase-debug.log for more info.
firebase logoutした後、firebase loginをしてやりなおすと正常にプロジェエクトが表示された。
参考
Expressを使ってAPIを作る
今回はプッシュ通知の内容をPOSTするためのエンドポイントをExpressを使って作ってみます。
パッケージをインストールします。
$ npm i -S express
Cloud FunctionsでPOSTできるか確認する
まずはCloud Functionsで経由でPOSTしたものが正常に返ってくるか確認してみます。
以下は確認用のコードです。
const functions = require('firebase-functions');

const express = require('express');
const cors = require('cors');

const app = express();

// Automatically allow cross-origin requests
// CORSを許可
app.use(cors({
  origin: true
}));

app.post("/pushTest", (req, res) => {
  const title = req.body.title;
  const body = req.body.body;
  res.send(`${title}: ${body}`)
})

exports.sendMessage = functions.https.onRequest(app);
Firebaseにデプロイします。
$ npm run deploy
FirebaseコンソールのFunctionsにsendMessageという関数が追加されていれば成功です。
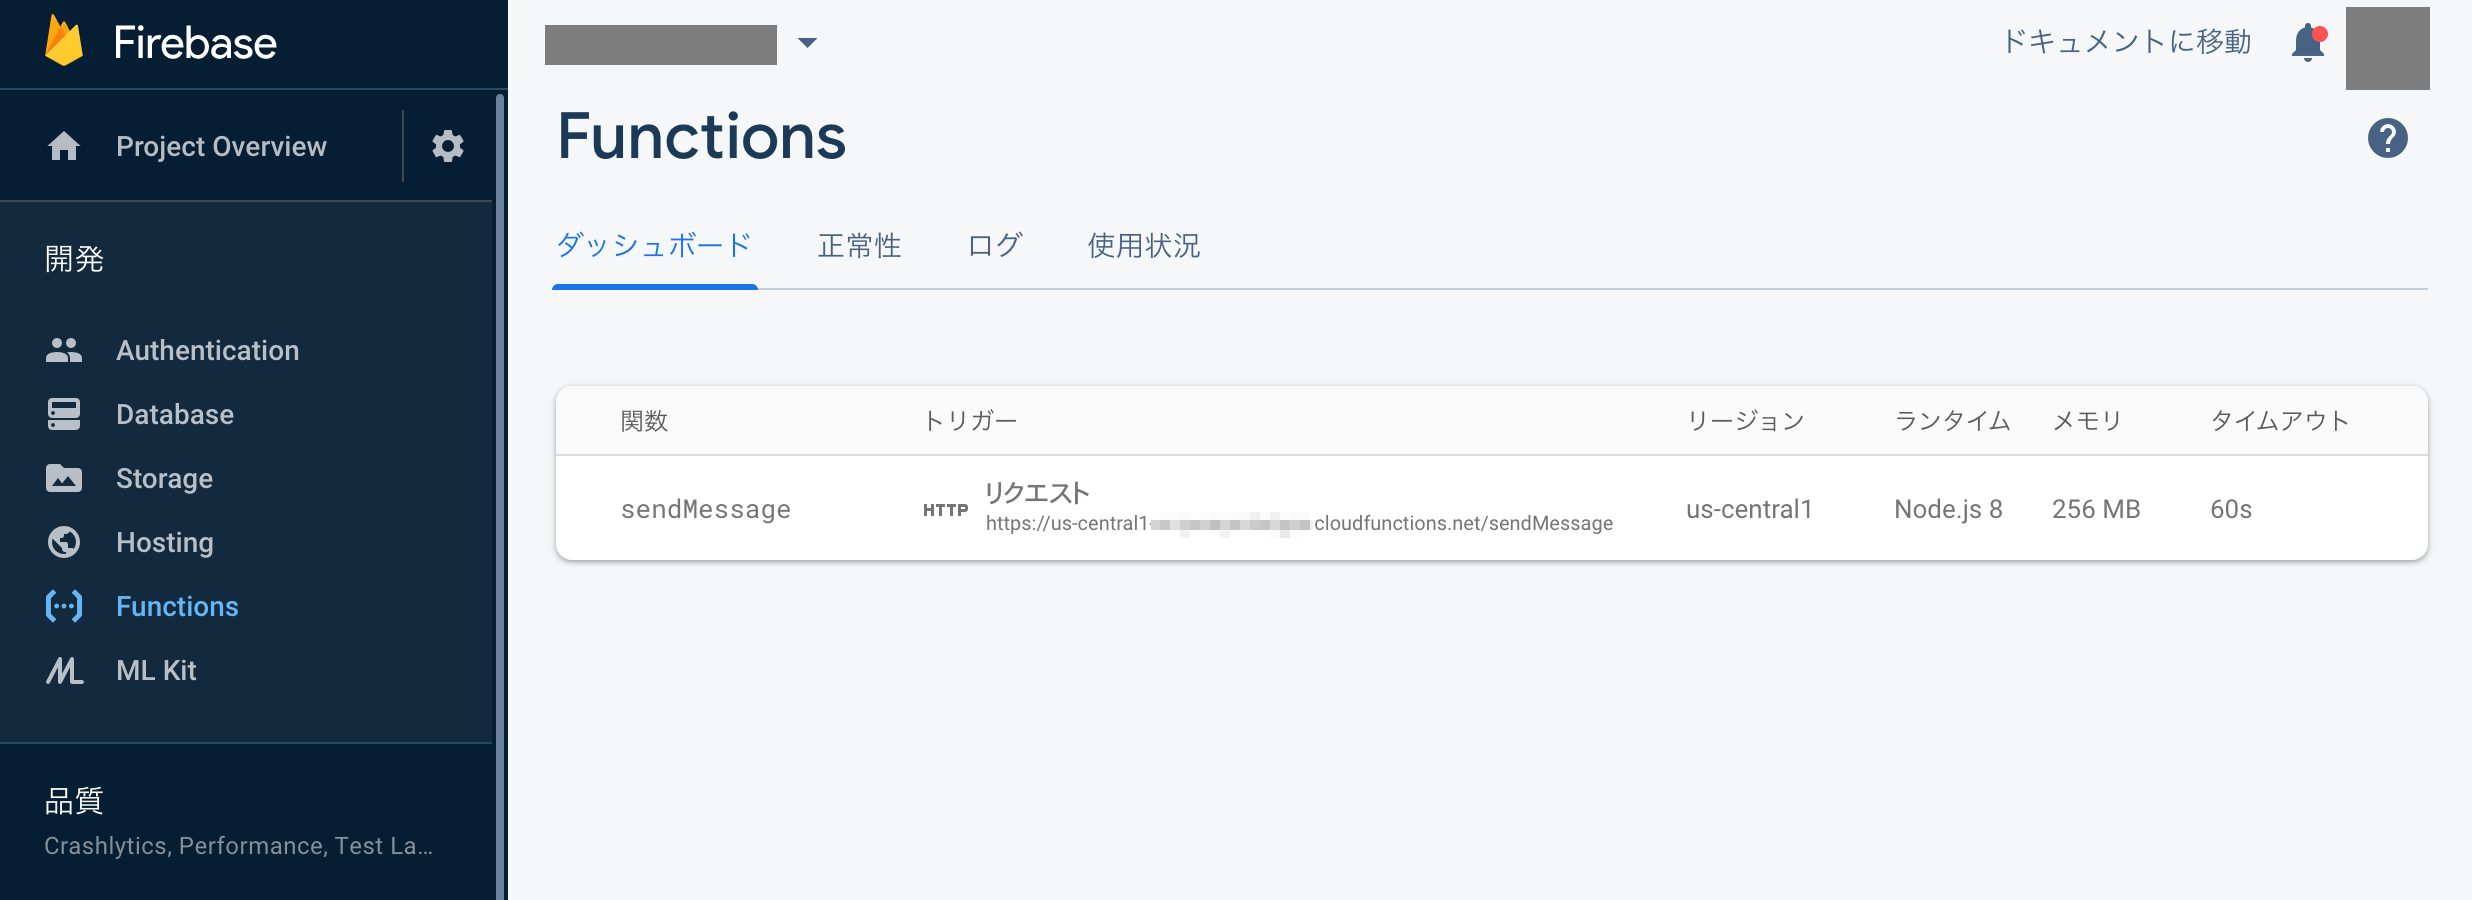
実際にPOSTしてみる
FirebaseコンソールのFunctionsのトリガーの列でエンドポイントが確認できます。
エンドポイントは以下のようなURLになります。
https://<region>-<project-id>.cloudfunctions.net/sendMessage/pushTest
このエンドポイントに以下のjsonをPOSTしてみます。
{
  "title": "テストタイトル",
  "body": "テスト用記事です。"
}
テストタイトル: テスト用記事です。という文字列が返ってきたら成功です。
ちゃんと通信できていることが確認できたら、プッシュ通知用のコードを実装していきます。
プッシュ通知用のコードを実装する
firestoreに存在するトークンをトピックに追加して、セール情報を一斉配信することを想定とした、/saleというエンドポイントを作ります。
const functions = require('firebase-functions');

// 設定
const admin = require("firebase-admin");
const serviceAccount = require("./key/xxxxxxxxxxx.json"); //Admin SDK利用のため作成した秘密鍵の場所

admin.initializeApp({
  credential: admin.credential.cert(serviceAccount),
  databaseURL: "https://<project-id>.firebaseio.com" //[Firebaseコンソール→設定→サービスアカウント]で確認できるデータベースのURL
});

const express = require('express');
const cors = require('cors');

const app = express();

// Automatically allow cross-origin requests
// CORSを許可
app.use(cors({
  origin: true
}));

app.post("/sale", (req, res) => {
  const db = admin.firestore();

  db.collection('fcm_users').get()
    .then(snapshot => {
      let registrationTokens = [];
      let unregistrationTokens = [];
      snapshot.forEach(doc => {
        const data = doc.data();
        if (data.subscribe === true) {
          registrationTokens.push(data.fcm_token);
        } else {
          unregistrationTokens.push(data.fcm_token);
        }
      });

      // デバイスをトピックに登録
      if (registrationTokens.length) {
        admin.messaging().subscribeToTopic(registrationTokens, 'fcm_test_01')
          .then(response => {
            // See the MessagingTopicManagementResponse reference documentation
            // for the contents of response.
            console.log('Successfully subscribed to topic:', response);
          })
          .catch(error => {
            console.log('Error subscribing to topic:', error);
          });
      }

      // トピックからデバイスを登録解除
      if (unregistrationTokens.length) {
        admin.messaging().unsubscribeFromTopic(unregistrationTokens, 'fcm_test_01')
          .then(response => {
            // See the MessagingTopicManagementResponse reference documentation
            // for the contents of response.
            console.log('Successfully unsubscribed to topic:', response);
          })
          .catch(error => {
            console.log('Error subscribing to topic:', error);
          });
      }
    })
    .catch(error => {
      console.log('Error getting documents', error);
    });

  const title = req.body.title;
  const body = req.body.body;
  const link = req.body.link;

  const message = {
    webpush: {
      notification: {
        title,
        body,
        requireInteraction: true,
        badge: "/img/icons/android-chrome-192x192.png",
        icon: "/img/icons/android-chrome-192x192.png",
      },
      fcm_options: {
        link
      }
    }
  };

  admin.messaging().send(message)
    .then(response => {
      console.log('Successfully sent message:', response);
    })
    .catch(error => {
      console.log('Error sending message:', error);
    });
})

exports.sendMessage = functions.https.onRequest(app);
次に、firebase-messaging-sw.jsでメッセージを受け取れるように修正します。
importScripts('https://www.gstatic.com/firebasejs/6.3.4/firebase-app.js');
importScripts('https://www.gstatic.com/firebasejs/6.3.4/firebase-messaging.js');

// Initialize the Firebase app in the service worker by passing in the messagingSenderId.
firebase.initializeApp({
  'messagingSenderId': 'xxxxxxxxxxx'
});

// Retrieve an instance of Firebase Messaging so that it can handle background messages.
const messaging = firebase.messaging();

self.addEventListener("push", function (event) {
  // empty
});

// バックグラウンドでのプッシュ通知受信
messaging.setBackgroundMessageHandler((payload) => {
  console.log('[firebase-messaging-sw.js] Received background message ', payload);
  // Customize notification here
  var notificationTitle = payload.notification.title; // タイトル
  var notificationOptions = {
    body: payload.notification.body, // 本文
    // icon: payload.notification.icon, // アイコン
  };

  return self.registration.showNotification(notificationTitle,
    notificationOptions);
});
実際にPOSTしてみる
https://<region>-<project-id>.cloudfunctions.net/sendMessage/sale
このエンドポイントに以下のjsonをPOSTしてみます。
{
  "title": "セールタイトル",
  "body": "セール情報です。",
  "link": "https://www.google.co.jp"
}
通知を許可したデバイスに以下のような通知が来たら成功です。

ブラウザがバックグラウンド時の場合、通知をクリックするとlinkで設定したURLに飛びます。
補足
トピックに追加できるトークンは1000個までなので、それ以上のデバイスに通知を送りたい場合はもう少し工夫する必要がある。
注: 1 つのリクエストで登録または登録解除できるデバイスの最大数は 1,000 台です。配列に 1,000 を超える登録トークンを指定すると、そのリクエストは messaging/invalid-argument エラーで失敗します。
まとめ
とりあえず既存サイトのPWA化とプッシュ通知の配信基盤を作るところまではできました。
プッシュ通知に関しては、ググった記事を参考にしても動かなったり機能がなくなっていたり(特にFCMまわり)していることが多かったが、英語版の公式ドキュメントを読めばどうにかはなった。
フレームワークを使ってない環境で試しましたが、Nuxtとかフレームワークを使った方が楽なのかもしれない(真面目に触ってないので不明)。
キャッシュとプッシュ通知の確認とデバッグで何度もデータ消したりスマホで通知確認したりとても手間でした。
もっと他の効率の良いやり方はないのか。
そもそもベストプラクティスを知らないが、このやり方は良いものなのだろうか。
実際に使うとなるとレイテンシとか料金とかいろいろ考えてやる必要があるのだろうけど、プロトタイプとしては一通りのことは実装できました。
参考
アプリサーバーからの送信リクエストを作成する | Firebase
複数のデバイスにメッセージを送信する | Firebase