概要
前回作成したLambdaから実行する処理を流用してクライアントアプリから起動するように設定します。
準備
- AWS Batchは前々回のものをそのまま使います。AWS BatchのジョブさえできていればいいのでCodeCommitなどはこのためだけに準備しなくても大丈夫です。
- バッチを実行できるIAMユーザを作成します。
- AWS CLIをインストールして
aws_access_key_idaws_secret_access_keyDefault regionを設定します。- このあたりの手順は公式 などを参考にしてください。
- クライアントアプリを作成する場合は
pyinstallerを以下のコマンドでインストールします。pip install pyinstaller
クライアントアプリの用意
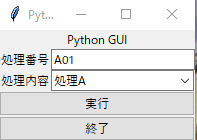
- tkinterを使用して作成します。
- JOB_NAME はジョブ定義の名称
- JOB_DEFINITION はジョブ定義のジョブ定義ARN
- JOB_QUEUE はジョブキューのキューARN
-
XXXXXXXXXXの部分はAWSのアカウントIDを設定します。
-
-
commandの部分に引数をリスト形式で -
environmentには環境変数を辞書形式 name,valeの辞書をリスト形式で設定します。
- ソースは以下になります。
- ログ用のクラスはこちらを参照
長いので折りたたんでます
from utils.logger import LoggerObj
import sys
import os
import requests
import tkinter
from datetime import datetime
import boto3
from tkinter import *
from tkinter import messagebox
from tkinter import filedialog
from tkinter import ttk
from tkinter.ttk import *
import threading
from tkinter import messagebox
from tkinter import filedialog
from tkinter import Button,ttk,StringVar
from selenium import webdriver
from functools import partial


root= tkinter.Tk()
EXECUTE_LIST=['処理A','処理B','処理C']
class PythonGui():

    def __init__(self):
        self.lock = threading.Lock()

        self.inputText=StringVar()

        self.progressMsg=StringVar()
        self.progressBar=None
        self.progressMsgBox=None

        self.progressStatusBar=None
        self.progressValue=None

    def init(self):
        pass

    # 初期設定後の動作
    def preparation(self,logfilename):
        self._executer=partial(self.execute,logfilename)

    def progressSequence(self,msg,sequenceValue=0):
        self.progressMsg.set(msg)
        self.progressValue=self.progressValue+sequenceValue
        self.progressStatusBar.configure(value=self.progressValue)

    def quite(self):
        if messagebox.askokcancel('終了確認','処理を終了しますか?'):
            if self.lock.acquire(blocking=FALSE):
                pass
            else:
                messagebox.showinfo('終了確認','ブラウザ起動中はブラウザを閉じてください。')
            self.lock.release()
            root.quit()
        else:
            pass

    def execute(self,logfilename):

        logObj=LoggerObj()
        log=logObj.createLog(logfilename)
        log.info('処理開始')

        executeType=EXECUTE_LIST.index(self.combo.get())
        nowDate=datetime.now().strftime('%Y%m%d%H%M%S')
        inputVal=self.inputText.get()

        client = boto3.client('batch')

        JOB_NAME = 'pandas-envtest'
        JOB_QUEUE = "arn:aws:batch:ap-northeast-1:XXXXXXXXXX:job-queue/first-run-job-queue"
        JOB_DEFINITION = "arn:aws:batch:ap-northeast-1:XXXXXXXXXX:job-definition/pandas-envtest:1"

        response = client.submit_job(
            jobName = JOB_NAME,
            jobQueue = JOB_QUEUE,
            jobDefinition = JOB_DEFINITION,
        containerOverrides={
            'command': [
                inputVal,nowDate,str(executeType)
            ],
            'environment': [
                {
                    'name': 'TEST',
                    'value': 'abcd'
                }
            ]
        }
        )
        self.progressMsgBox.after(10,self.progressSequence('処理実行中',sequenceValue=50))
        root.update_idletasks()

        self.progressBar.stop()
        self.progressMsgBox.after(10,self.progressSequence('登録処理完了',sequenceValue=50))
        root.update_idletasks()

        log.info('処理終了')
        self.lock.release()


    def doExecute(self):
        if self.lock.acquire(blocking=FALSE):
            if messagebox.askokcancel('実行前確認','処理を実行しますか?'):
                self.progressValue=0
                self.progressStatusBar.configure(value=self.progressValue)
                self.progressBar.configure(maximum=10,value=0)
                self.progressBar.start(100)
                th = threading.Thread(target=self._executer)
                th.start()
            else:
                self.lock.release()
        else:
            messagebox.showwarning('エラー','処理実行中です')


    def progressMsgSet(self,msg):
        self.progressMsg.set(msg)

    def progressStart(self):
        self.progressBar.start(100)


    def main(self):
        root.title("Python GUI")

        content = ttk.Frame(root)
        frame = ttk.Frame(content,  relief="sunken", width=300, height=500)
        title = ttk.Label(content, text="Python GUI")

        content.grid(column=0, row=0)


        title.grid(column=0, row=0, columnspan=4)

        fileLabel=ttk.Label(content,text="処理番号")
        pulldownLabel=ttk.Label(content,text="処理内容")

        fileInput=ttk.Entry(content,textvariable=self.inputText,width=23)

        self.inputText.set('A01')
        # コンボボックスの作成(rootに配置,リストの値を編集不可(readonly)に設定)
        self.combo = ttk.Combobox(content, state='readonly')
        # リストの値を設定
        self.combo["values"] = tuple(EXECUTE_LIST)
        # デフォルトの値を食費(index=0)に設定
        self.combo.current(0)


        labelStyle=ttk.Style()
        labelStyle.configure('PL.TLabel',font=('Helvetica',10,'bold'),background='white',foreground='red')
        self.progressMsgBox=ttk.Label(content,textvariable=self.progressMsg,width=70,style='PL.TLabel')
        self.progressMsg.set('処理待機中')

        self.progressBar=ttk.Progressbar(content,orient=HORIZONTAL,length=140,mode='indeterminate')
        self.progressBar.configure(maximum=10,value=0)

        self.progressStatusBar=ttk.Progressbar(content,orient=HORIZONTAL,length=140,mode='determinate')


        executeButton=ttk.Button(content,text='実行',command=self.doExecute)
        quiteButton=ttk.Button(content,text='終了',command=self.quite)

        fileLabel.grid(column=1, row=1,sticky='w')
        fileInput.grid(column=2, row=1)
        pulldownLabel.grid(column=1, row=2,sticky='w')

        # コンボボックスの配置
        self.combo.grid(column=2, row=2)
        executeButton.grid(column=1, row=6,columnspan=2,sticky='we')
        quiteButton.grid(column=1, row=12,columnspan=2,sticky='we')


        root.mainloop()


if  __name__ == "__main__":
    pythonGui=PythonGui()
    pythonGui.preparation('log')
    pythonGui.main()
-
処理内容については以下のようになります。
- main
- 実行時に呼ばれる関数です。画面を作成する処理をこちらに記載しています。
- テキストエリアの初期値やコンボボックスの内容なども作成しています。
- 実行時に呼ばれる関数です。画面を作成する処理をこちらに記載しています。
- doExecute
- 実行ボタンを押下したときに呼び出される処理です。
- thread を使用して 二重起動を防止しています。
- execute
- 実際にAWS Batchを呼び出す処理です。
- boto3.client を呼び出すところで
aws_access_key_idaws_secret_access_keyDefault regionを受け取る形にすればAWS CLIのインストールなどは不要になります。
- main
-
ソースを実行しても確認ができますが、クライアントアプリとして使う場合は以下のコマンドでexeを作成します。 ソースのファイル名を
pythonGui.pyとした場合以下のようになります。- pyinstaller pythonGui.py --onefile
-
AWS Batchの方の実行結果については前回と同様になるので割愛。
