はじめに
Firestore を用いてデータの読み書き・永続化させるのに、フロントエンドアプリ内に Firestore への読み書きのロジックを置くのではなく HTTP で通信してデータの読み書きをしたいと思い、 Firestore への読み書きをフロントエンドからサーバーサイドへ移して WebAPI と同様の手順でフロントエンドからリソースの読み書きできるようにしてみます。
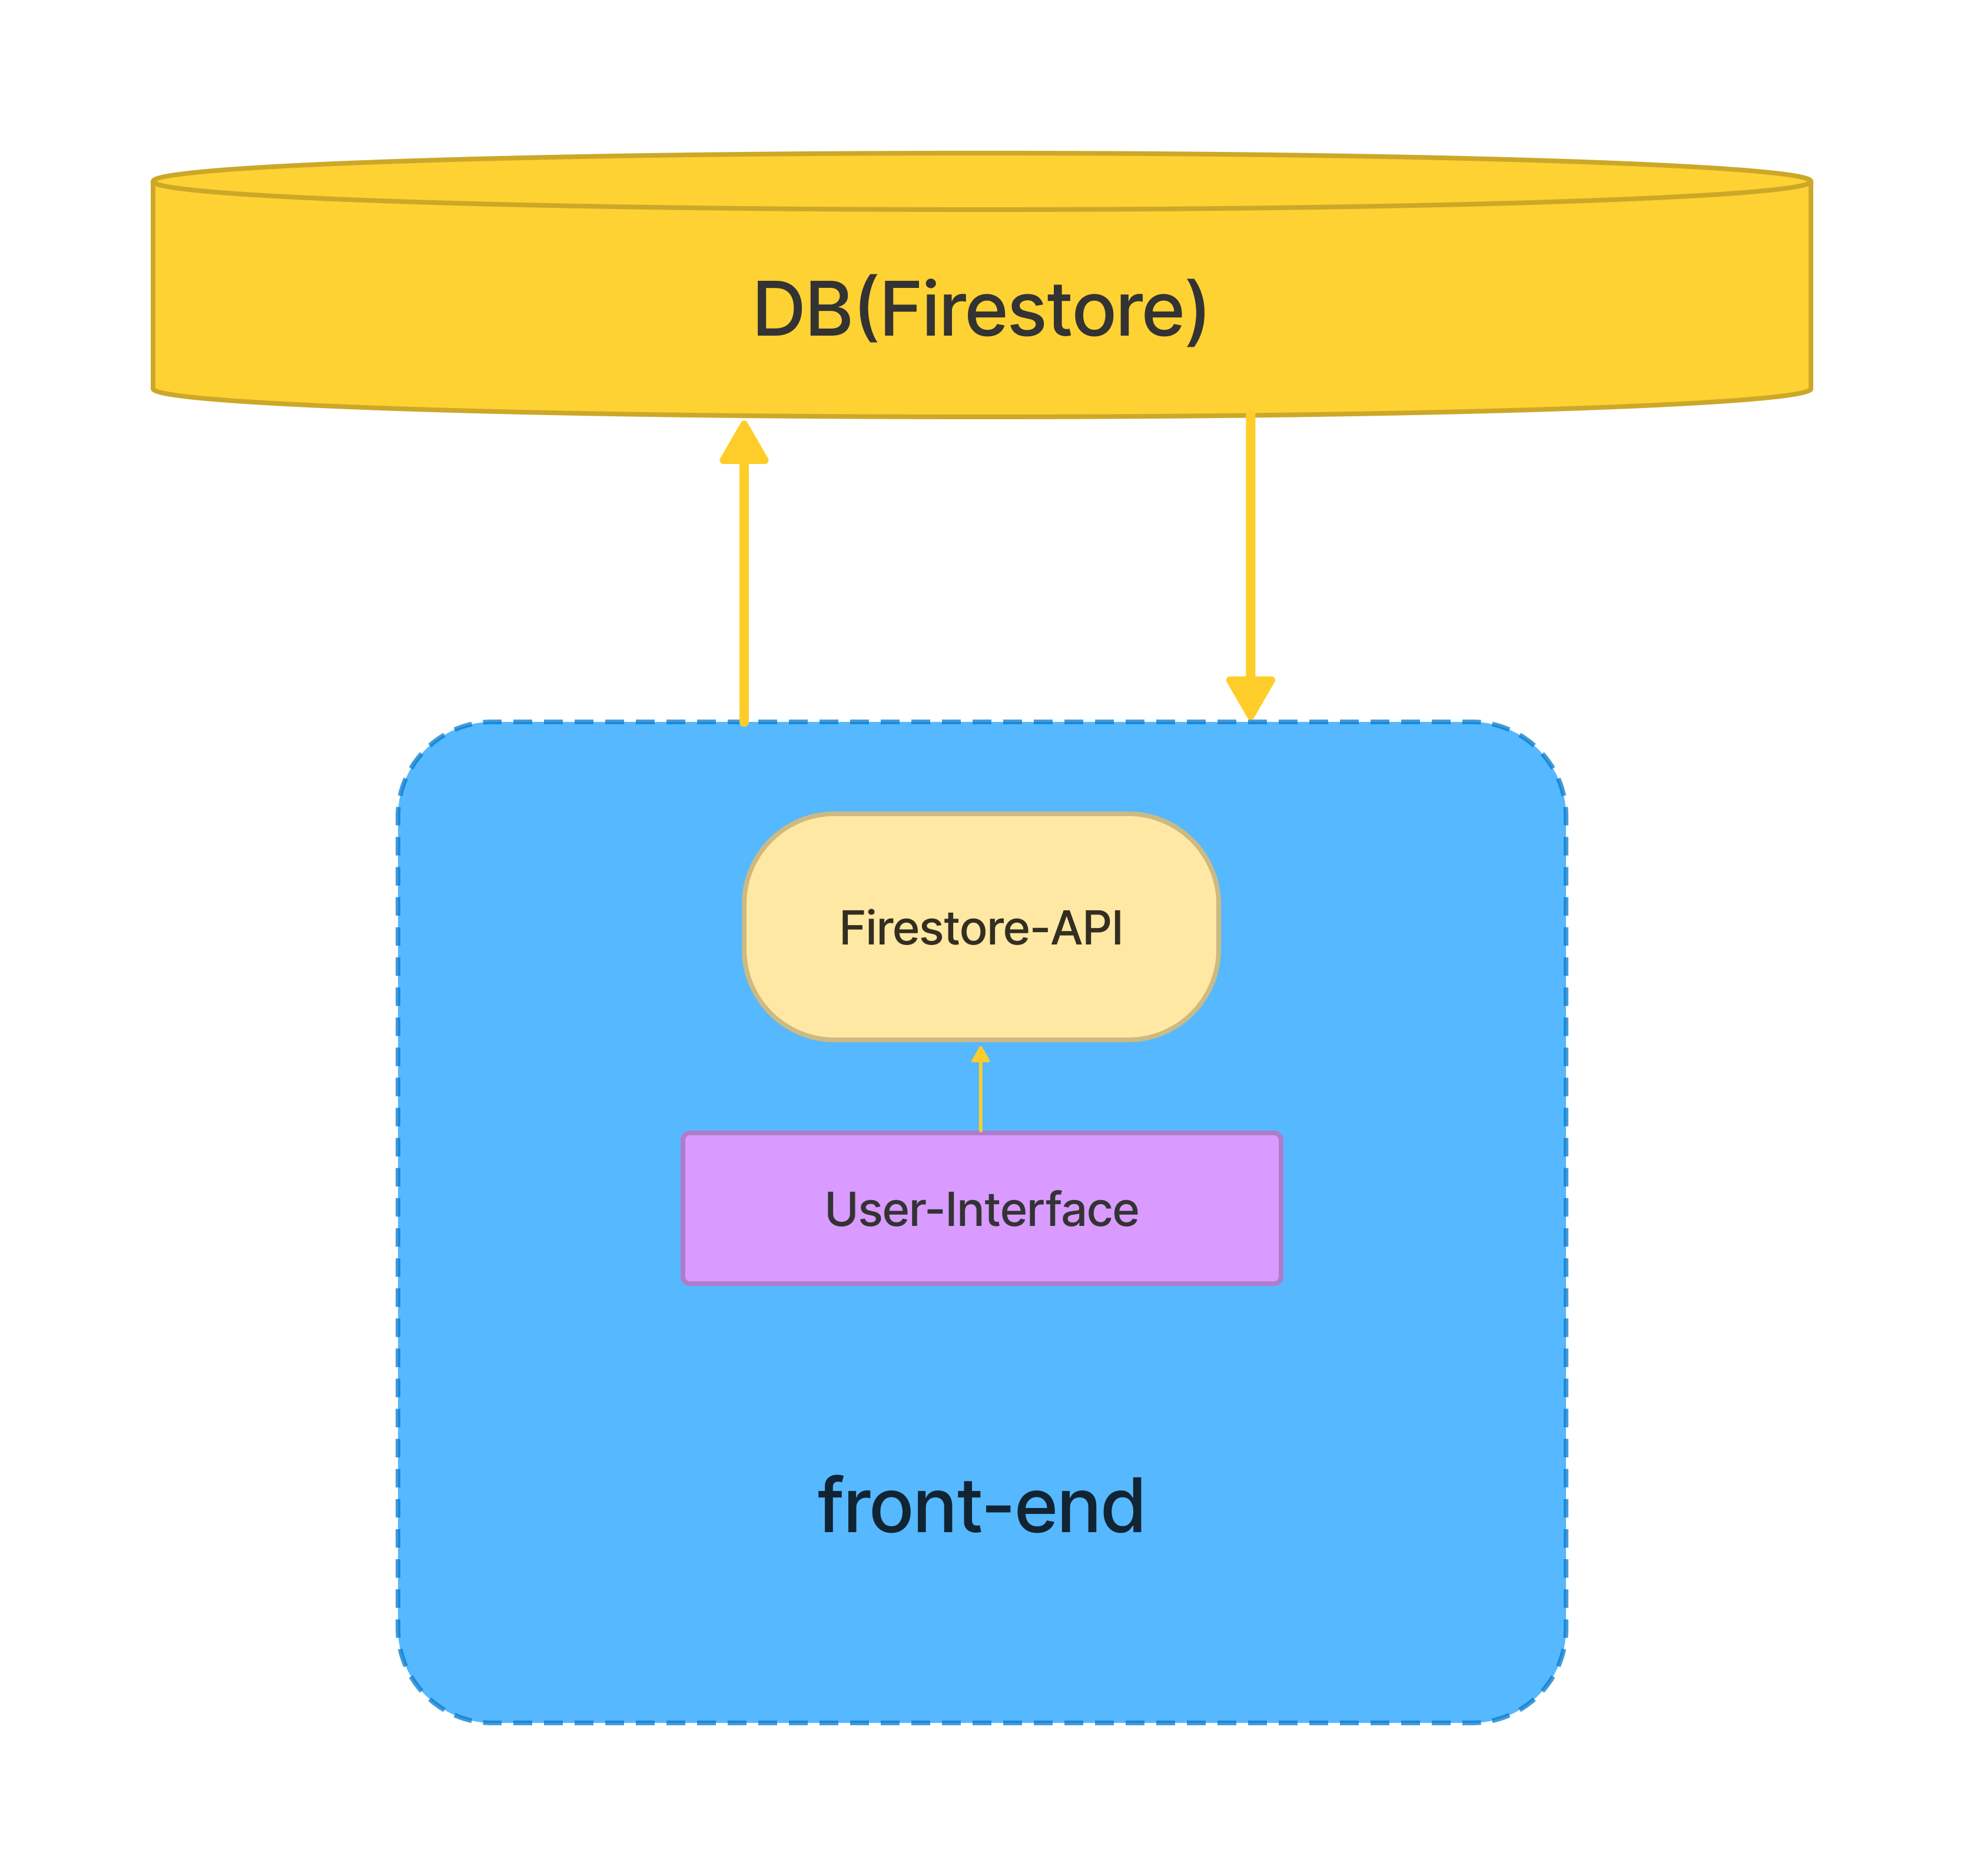
befor
after

私自身フロントエンドでの業務経験しかなかったが、今回やってみてサーバーサイドの理解がぐっと深まりました。フロントエンド + Firestore でアプリを作れるようになったという方にも是非試してもらえたらと思います。
この記事で行うこと
元のコード( React プロジェクト内で Firestore へ読み書きする TODO アプリ)から、 Firestore への読み書きロジックをサーバーサイドへ移行し WebAPI を作成します。フロントエンドからは WebAPI のエンドポイントへそれぞれの HTTP メソッドでアクセスし、 Firestore への読み書きをするようにコードを書き換えていきます。
こちらが元のコードになります。
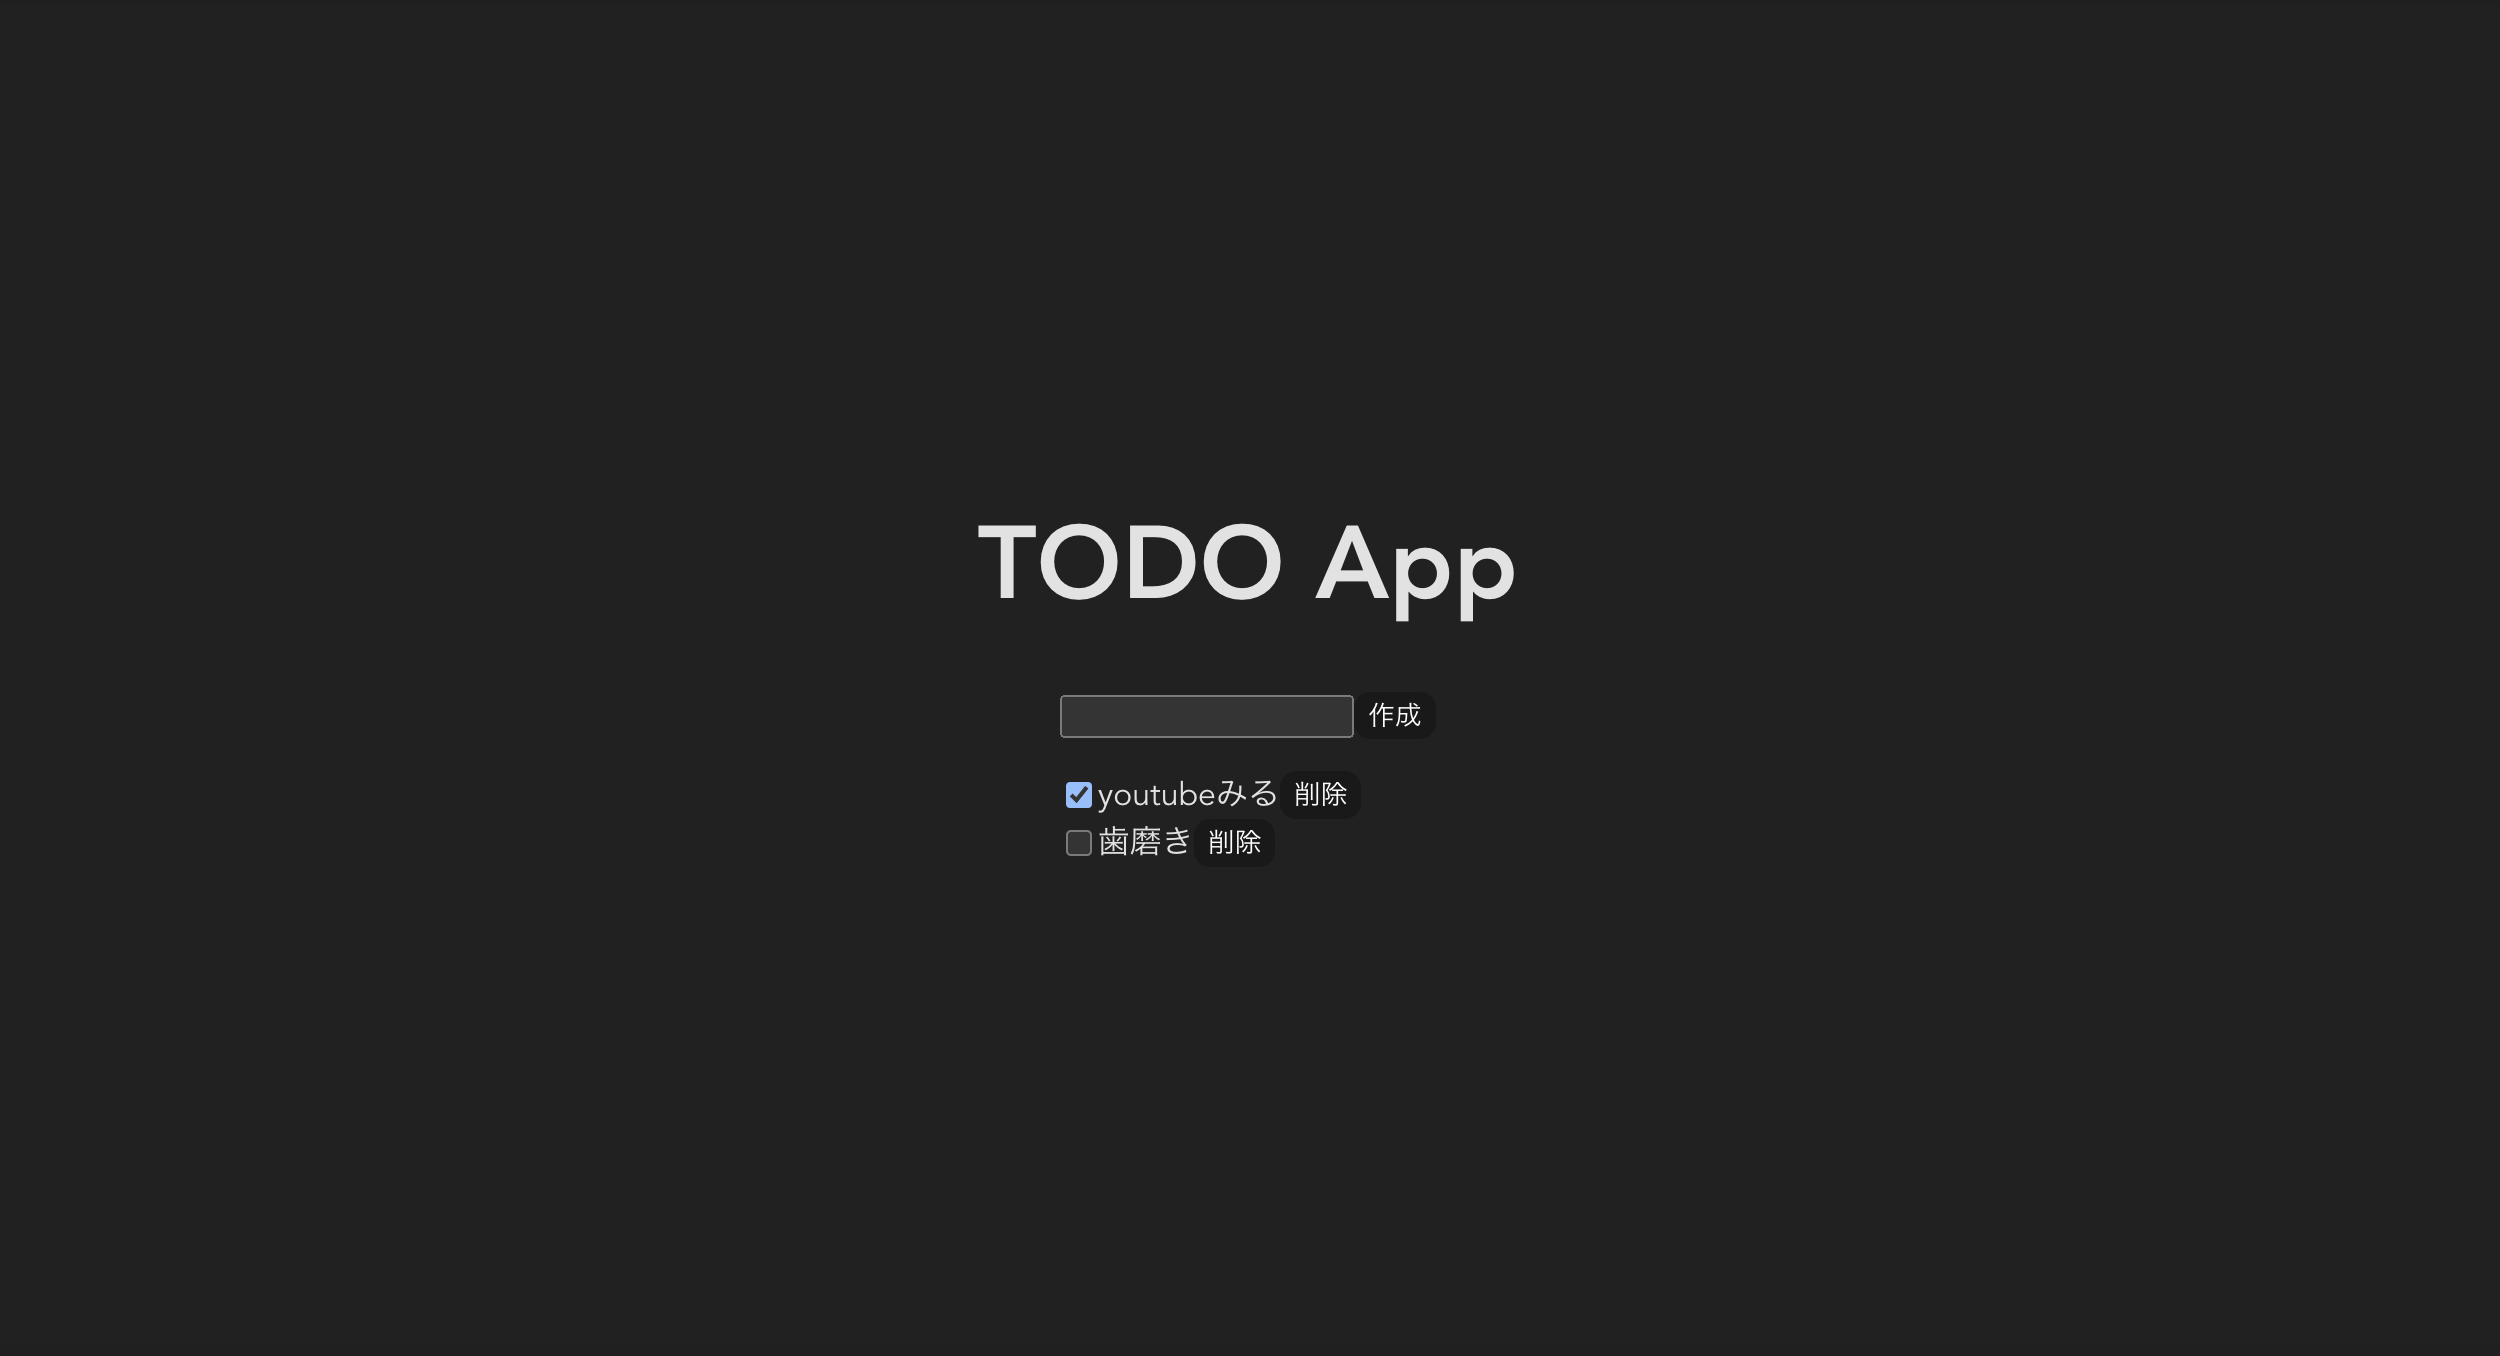
CRUD 機能を持ったシンプルな TODO アプリです。
- 入力フォームに TODO (任意の文字列) を入力し、作成ボタンをクリックすると、入力した TODO を保存する
- ブラウザでアプリにアクセスすると、保存されている全ての TODO を表示する
- それぞれの TODO のチェックボックスにチェックを入れると、完了とみなし、上書きする
- それぞれの TODO のチェックボックスからチェックを外すと、未完了とみなし、上書きする
- それぞれの TODO の削除ボンタンをクリックすると TODO を削除する
Node.js のサーバーサイドフレームワークである Express と、Firestore と同じく firebase が提供する Cloud Functions を用いて、サーバーサイドを作ります。
Firebase Admin SDK を使うことで Firestore を操作できます。
エンドポイントへ HTTP でアクセスすることで、サーバーサイドアプリを通して Firestore への読み書きの結果を JSON 形式でフロントエンドへと返す WebAPI を作ります。
個人的な見解でしかありませんが、以下のようなメリットがあると思われます。
- web ブラウザやスマートフォンなど異なるクライアントアプリで使いまわせる
- フロントエンドのコードがシンプルになる
- テストがしやすい
フロントエンドのコードがシンプルになる に関しては、フロントエンドで Firestore への読み書きのロジックを書かずに、fetch メソッドを使って WebAPI を叩くだけになるので大幅にフロントエンドのコードを減らせそうです。
テストがしやすい に関しては、フロントエンド側では Firestore のロジックに依存しないで済むのでテストを簡単に書くことができるようになります。さらに、テストコードで特別な事をせずに済むので、読みやすくなることでしょう。
サーバーサイドのプロジェクトを作成
firebase プロジェクトを作成する
以下の公式ドキュメントの 1, 3, 4 を参考にプロジェクトを作成します。
プロジェクトを作成したらコンソールから Cloud Firestore を有効にします。
プロジェクトを初期化する
firebase-tools の CLI コマンドを使ってプロジェクトを初期化します。
-
$ firebase loginを実行して firebase コンソール上からログインします - 任意のディレクトリに移動して、
$ firebase init functionsを実行します - 上のコマンドを実行すると対話式でいくつか質問されるので答えていきます
- 今回は TypeScript を使います
- すべての質問に答えると functions ディレクトリと .firebaserc, firebase.json が作られます
以上が済んだら実際に動かしてみます。
functions/src/index.ts の 5 行目以降のコメントアウトを外し、ターミナルで yarn shell を実行します。
import * as functions from "firebase-functions";

// // Start writing functions
// // https://firebase.google.com/docs/functions/typescript

export const helloWorld = functions.https.onRequest((request, response) => {
  functions.logger.info("Hello logs!", {structuredData: true});
  response.send("Hello from Firebase!");
});
すると、関数の入力を求められるので firebase > に続いて helloWorld() と入力し、以下のような結果が表示されれば OK です。

Express を導入する
各エンドポイントへのルーティングをするために Node.js のサーバーサイドフレームワークである Express を導入します。
ライブラリを install します。
$ yarn add express
$ yarn add -D @types/express
続いて、アプリ内で express を使います。
import * as functions from "firebase-functions";
import * as express from "express";

const app = express();

app.get("/helloworld", (req, res) => {
  res.json("Hello Express");
});

export const api = functions.region("asia-northeast1").https.onRequest(app);
最終行で変数 API を export することで、cloud functions で API 配下にそれぞれルーティングを作成します。
ファイルを保存した後、 $ yarn serve コマンドを実行し、準備ができたら別タブで以下のように curl コマンドを実行します。
curl -X GET http://127.0.0.1:5001/{プロジェクトのID}/asia-northeast1/api/helloworld と入力し Hello Express が返ってくれば成功です。
Firestore への読み書きロジックを移行
フロントエンドで使っていた Todo の型定義を流用します。
type Todo = {
  id: string;
  title: string;
  completed: boolean;
};
src/todos/model.ts を作成し、Firestore への読み書きロジックを書いていきます。
import { firestore } from "firebase-admin";

const db = firestore();
const todosRef = db.collection("todos");

export async function findAllTodos(): Promise<Todo[]> {
  const snapshots = await todosRef.get();

  return snapshots.docs.map((snapshot) => {
    const doc = snapshot.data();

    return {
      id: snapshot.id,
      title: doc.title,
      completed: doc.completed,
    };
  });
}

export async function createTodo(title: string) {
  return await todosRef.add({ title: title, completed: false });
}

export async function setCompleteTodo(id: string) {
  return await todosRef.doc(id).update({ completed: true });
}

export async function setIncompleteTodo(id: string) {
  return await todosRef.doc(id).update({ completed: false });
}

export async function deleteTodo(id: string) {
  return await todosRef.doc(id).delete();
}
エンドポイント設計
それぞれのエンドポイントと処理内容は以下のようにします。
# GET api/todos
- todos 一覧を取得する

# POST api/todos
- todo を新規作成する

# PUT api/todos/:id/completed
- id に紐づく todo を完了済みに更新する

# PUT api/todos/:id/uncompleted
- id に紐づく todo を未完了に更新する

# DELETE api/todos/:id
- id に紐づく todo を削除する
src/todos/controller.ts を作成し、ルーティングを実装します。
import { Router } from "express";
import {
  createTodo,
  deleteTodo,
  findAllTodos,
  setCompleteTodo,
  setIncompleteTodo,
} from "./model";

const router = Router();

router.get("/todos", async (req, res) => {
  const todos = await findAllTodos();
  res.status(200);
  res.json(todos);
});

router.post("/todos", async (req, res) => {
  const body = req.body;
  const { title } = body;

  await createTodo(title);
  res.status(201).end();
});

router.delete("/todos/:id", async (req, res) => {
  const { id } = req.params;
  await deleteTodo(id);
  res.status(200).end();
});

router.put("/todos/:id/completed", async (req, res) => {
  const { id } = req.params;
  await setCompleteTodo(id);
  res.status(204).end();
});

router.put("/todos/:id/uncompleted", async (req, res) => {
  const { id } = req.params;
  await setIncompleteTodo(id);
  res.status(204).end();
});

export default router;
controller.ts で作成した router を index.ts で読み込み、ルーティングできるようにします。
また、 index.ts で firebase-admin から import した initializeApp を実行します。
import * as admin from "firebase-admin";
import * as functions from "firebase-functions";

admin.initializeApp();

import * as express from "express";
import * as cors from "cors";
import todosRouter from "./todos/controller";

const app = express();
app.use(cors());
app.use(todosRouter);

export const api = functions.region("asia-northeast1").https.onRequest(app);
上記の設定ではあらゆるオリジンから WebAPI へのアクセスを許可している状態です。気になる方は個別で cors の設定をするといいでしょう。
これで WebAPI の実装は完了です。
$ yarn serve コマンドを実行し、 curl コマンドで上手く動くかの確認をし、問題なければデプロイを行います。
デプロイ
完成したプログラムを cloud functions 上にデプロイします。
cloud functions を使う際には firebase のプランを Blaza (従量課金)にする必要があるので firebase コンソールから設定をします。
料金プランの変更が済んだらターミナル上で $ yarn deploy コマンドを実行します。
しばらく待ち、デプロイに成功すると URL が発行されるます。
フロントエンドから WebAPI を使う
いよいよ Firestore から先程作った WebAPI へと切り替えていきます。
元のコード( React プロジェクト内で Firestore へ読み書きする TODO アプリ)に変更を加えていきます。
デプロイして作られた WebAPI の URL を変数に置きます。
const WEB_API_BASE_URL = "https://asia-northeast1-XXX.cloudfunctions.net/api"
WebAPI からのデータの取得に axios と react-query を使います。
$ yarn add axios @tanstack/react-query
react-query のバージョン 4 からライブラリ名が変更されたようです。
https://tanstack.com/query/v4/?from=reactQueryV3&originl=https://react-query-v3.tanstack.com/
react-query を使うために、まず App.tsx に以下のコードを追加します。
+ import { import { QueryClient, QueryClientProvider } from "@tanstack/react-query";

export const App: React.FC = () => {
+   const queryClient = new QueryClient();

  return (
+     <QueryClientProvider client={queryClient}>
      <div className="App">
        // Component
      </div>
+     </QueryClientProvider>
  );
};
WebAPI と通信する関数を作成します。
async function fetchTodos(): Promise<Todo[]> {
  const res = await axios.get<Todo[]>(`${WEB_API_BASE_URL}/todos`);
  return res.data;
}

async function postNewTodo(title: string) {
  await axios.post(`${WEB_API_BASE_URL}/todos`, { title: title });
}

async function setCompleteTodo(id: string) {
  await axios.put(`${WEB_API_BASE_URL}/todos/${id}/completed`);
}

async function setIncompleteTodo(id: string) {
  await axios.put(`${WEB_API_BASE_URL}/todos/${id}/uncompleted`);
}

async function deleteTodo(id: string) {
  await axios.delete(`${WEB_API_BASE_URL}/todos/${id}`);
}
todo 一覧を取得して表示するコンポーネントを書き換えていきます。
export const TodoList: React.FC = () => {
  const { data: todos, isLoading, error } = useQuery(["todos"], fetchTodos);

  if (isLoading) {
    <h2>Loading...</h2>;
  }

  if (error) {
    return <h2>エラーが発生しました。</h2>;
  }

  return (
    <ul>
      {todos && todos.map((todo) => <TodoItem todo={todo} key={todo.id} />)}
    </ul>
  );
};
続いて todo を新規作成するコンポーネントを書き換えていきます。
export const NewTodoInput: React.FC = () => {
  const queryClient = useQueryClient();

  const { mutate } = useMutation((title: string) => postNewTodo(title), {
    onSuccess: () => {
      // todoの新規作成に成功したらtodosを再取得し、TodoListを更新する
      queryClient.invalidateQueries(["todos"]);
    },
  });

  const [title, setTitle] = useState("");

  const handleInputTitle = (ev: React.ChangeEvent<HTMLInputElement>) => {
    const { value } = ev.target;
    setTitle(value);
  };

  const handleClickCreateTitle = () => {
    mutate(title);
    setTitle("");
  };

  return (
    <div>
      <input type="text" onChange={handleInputTitle} value={title} />
      <button onClick={handleClickCreateTitle}>作成</button>
    </div>
  );
};
最後に、各 todo への更新・削除処理を行うコンポーネントを書き換えます。
type Props = {
  todo: Todo;
};

export const TodoItem: React.FC<Props> = ({ todo }) => {
  const queryClient = useQueryClient();

  const { mutate: updateCompleteMutate } = useMutation(
    (id: string) => setCompleteTodo(id),
    {
      onSuccess: () => {
        // todoの更新に成功したらtodosを再取得し、TodoListを更新する
        queryClient.invalidateQueries(["todos"]);
      },
    }
  );

  const { mutate: updateIncompleteMutate } = useMutation(
    (id: string) => setIncompleteTodo(id),
    {
      onSuccess: () => {
        // todoの更新に成功したらtodosを再取得し、TodoListを更新する
        queryClient.invalidateQueries(["todos"]);
      },
    }
  );

  const { mutate: deleteTodoMutate } = useMutation(
    (id: string) => deleteTodo(id),
    {
      onSuccess: () => {
        // todoの削除に成功したらtodosを再取得し、TodoListを更新する
        queryClient.invalidateQueries(["todos"]);
      },
    }
  );
  const handleChangeCheckbox = (ev: React.ChangeEvent<HTMLInputElement>) => {
    const { checked } = ev.target;

    if (checked) {
      updateCompleteMutate(todo.id);
      alert("タスクを完了にしました。");
    } else {
      updateIncompleteMutate(todo.id);
      alert("タスクを未完了にしました。");
    }
  };

  const handleClickDeleteButton = () => {
    deleteTodoMutate(todo.id);
    alert("タスクを削除しました。");
  };

  return (
    <li>
      <input
        type="checkbox"
        onChange={handleChangeCheckbox}
        checked={todo.completed}
      />
      <p>{todo.title}</p>
      <button onClick={handleClickDeleteButton}>削除</button>
    </li>
  );
};
開発サーバーを立てて確認し、無事動作することを確認できれば OK です。
フロントエンド側で Firestore への読み書きロジックを取り除いた状態で無事動作したら、不要になったファイル等を削除して終了です。
$ rm -f firebase.json firestore.indexes.json firestore.rules
$ rm -rf src/firebase
最後に
今回書いたコードはこちらのリポジトリにまとめてあります。
firebase の設定など本記事で伝えたい内容では無いところの説明が蔑ろになってしまい、読み辛い箇所もあったかと思います。そのあたりに関しては参考になる記事が多く出回っているのでそちらを参考にしてみてください。