はじめに
UnityでTensorFlowで書いたモデルを動かせたらいいのに..
Unityでできるシミュレーションの幅がかなり広がりそうな事案ですよね。
学習済みモデルをUnityで動かせないか色々画策していました
(1年前に書いていたのを投稿するのを完全に忘れていたので,最新状況は知らないです)
できること
tensorflowで書かれたモデルをUnity上で動かす。今回は学習済みであるVGG16モデルを使って
Unity上で1000クラスの画像識別を行います。
使用環境
Python3.6
Unity 2017.2
TensorFlow
TensorFlowSharp
MacbookPro 2017
悪戦苦闘
先日@peace098beatさんがC#で学習済みVGG16モデルを使ってアプリを作る方法を投稿しておられ、
C#でできるならばUnityでも再現できるだろう...と思って早速使用してみました。
"""
Convert_VGG16.py


"""
import tensorflow as tf
import shutil
import os.path

print("Keras-application vgg16")

# Import data
# from tensorflow.examples.tutorials.mnist import input_data
# mnist = input_data.read_data_sets("./tmp/data/", one_hot=True)

g = tf.Graph()

with g.as_default():

    # ===================================================================
    from my_vgg16 import VGG16

    model = VGG16(weights='imagenet', include_top=True)
    model.summary()  # variablesをconstantsに変換したグラフを生成する

    # ===================================================================
    # kerasのモデルだと上手く名前指定ができないので,わざわざTFに変換
    # ここらへんは良く分からなかったので,適当に0を足している.

    zero_const = tf.constant(0.0, name="dummy_zero")
    y_ = tf.add(model.get_layer(name="fc2").output, zero_const, name="output_fc2") # 4096
    y_ = tf.add(model.get_layer(name="fc1").output, zero_const, name="output_fc1") # 4096

    # ==================================================================
    sess = tf.Session()
    init = tf.initialize_all_variables();
    sess.run(init)
        #どうやらここで学習済みのモデルの初期化が起きてしまっている。
    # ===================================================================

    # 定数化(const)し無い場合は初期かエラーが発生してしまう
    # graph_def = g.as_graph_def()
    # tf.train.write_graph(graph_def, './tmp/beginner-export','beginner-graph.pb', as_text=False)
    # print("[ OK ] Output : beginner-graph.pb")
    # tf.train.write_graph(graph_def, './tmp/beginner-export','beginner-graph.pbtxt', as_text=True)
    # print("[ OK ] Output : beginner-graph.pbttxt")


    # ===================================================================

    # 計算済みの重みを定数にする

    from tensorflow.python.framework import graph_util
    # 出力ノードの名前を指定
    converted_graph = graph_util.convert_variables_to_constants(sess, sess.graph_def, ['input', 'output_fc1', 'output_fc2'])
    # プロトコルバッファとして書き出し
    tf.train.write_graph(converted_graph, './tmp/beginner-export','beginner-const-graph.pb', as_text=False)

    # テキストで吐き出せる
    # tf.train.write_graph(converted_graph, './tmp/beginner-export','beginner-const-graph.pbtxt', as_text=True)


    # ===================================================================

    sess.close()


print("FIN")
sess.run(init)の部分で初期化が生じてしまっています。これにより学習済みモデルの重みがリセット
されてしまっていて正しく動いてくれないという問題が発生していました...
ならばこの部分のコードを削ればいいのでは?と削って実行してみたのですが、今度は重みを定数にする段階でエラーを吐きました。
kerasから重みを正しくインポートできていないようです。
その後もkerasから重みを持ってくるのに失敗してしまい(上手くいった方法があったら知りたいです...)はじめからTensorFlowで構築されているVGG16のモデルを書き出すことにしました。
TensorFlowによるVGG16モデルの書き出し
TensorFlowで書かれたVGG16モデルとして、こちらが上手くいきそうな予感がしたのでなんなりしてダウンロードします。VGG16モデルとVGG19モデルが入っているのですが、今回はVGG16モデルを使用します。学習済みVGG16モデルを使用する場合、事前に学習済みの重みを入手しておく必要があるので、ここからダウンロードしてvgg16.pyと同じ階層に置いておきます。
あとはvgg16.pyを、前節のmy_vgg.pyに倣って書き換えていきます
import inspect
import os

import numpy as np
import tensorflow as tf
import time

# kerasの画像前処理モジュールのインポート
from tensorflow.python.keras._impl.keras import backend as K
from tensorflow.python.keras._impl.keras.applications.imagenet_utils import _obtain_input_shape
from tensorflow.python.keras._impl.keras.layers import Input


class Vgg16:
    def __init__(self, vgg16_npy_path=None):
        if vgg16_npy_path is None:
            path = inspect.getfile(Vgg16)
            path = os.path.abspath(os.path.join(path, os.pardir))
            path = os.path.join(path, "vgg16.npy")
            vgg16_npy_path = path
            print(path)

        self.data_dict = np.load(vgg16_npy_path, encoding='latin1').item()
        print("npy file loaded")

    def build(self,include_top=True,
          weights='imagenet', input_tensor=None,
          input_shape=None):
        """
        load variable from npy to build the VGG

        :param rgb: rgb image [batch, height, width, 3] values scaled [0, 1]
        """

        start_time = time.time()
        print("build model started")

        input_shape = _obtain_input_shape(
                    input_shape,
                default_size=224,
                min_size=48,
                data_format=K.image_data_format(),
                require_flatten=include_top,
                weights=weights)

                #nameをつけて後から参照できるようにしておく
        if input_tensor is None:
            img_input = Input(shape=input_shape,name="input")
        else:
            img_input = Input(tensor=input_tensor, shape=input_shape,name="input")

        self.conv1_1 = self.conv_layer(img_input, "conv1_1")
        self.conv1_2 = self.conv_layer(self.conv1_1, "conv1_2")
        self.pool1 = self.max_pool(self.conv1_2, 'pool1')

        self.conv2_1 = self.conv_layer(self.pool1, "conv2_1")
        self.conv2_2 = self.conv_layer(self.conv2_1, "conv2_2")
        self.pool2 = self.max_pool(self.conv2_2, 'pool2')

        self.conv3_1 = self.conv_layer(self.pool2, "conv3_1")
        self.conv3_2 = self.conv_layer(self.conv3_1, "conv3_2")
        self.conv3_3 = self.conv_layer(self.conv3_2, "conv3_3")
        self.pool3 = self.max_pool(self.conv3_3, 'pool3')

        self.conv4_1 = self.conv_layer(self.pool3, "conv4_1")
        self.conv4_2 = self.conv_layer(self.conv4_1, "conv4_2")
        self.conv4_3 = self.conv_layer(self.conv4_2, "conv4_3")
        self.pool4 = self.max_pool(self.conv4_3, 'pool4')

        self.conv5_1 = self.conv_layer(self.pool4, "conv5_1")
        self.conv5_2 = self.conv_layer(self.conv5_1, "conv5_2")
        self.conv5_3 = self.conv_layer(self.conv5_2, "conv5_3")
        self.pool5 = self.max_pool(self.conv5_3, 'pool5')

        self.fc6 = self.fc_layer(self.pool5, "fc6")
        assert self.fc6.get_shape().as_list()[1:] == [4096]
        self.relu6 = tf.nn.relu(self.fc6)

        self.fc7 = self.fc_layer(self.relu6, "fc7")
        self.relu7 = tf.nn.relu(self.fc7)

        self.fc8 = self.fc_layer(self.relu7, "fc8")

        self.prob = tf.nn.softmax(self.fc8, name="prob")

        self.data_dict = None
        print(("build model finished: %ds" % (time.time() - start_time)))

    def avg_pool(self, bottom, name):
        return tf.nn.avg_pool(bottom, ksize=[1, 2, 2, 1], strides=[1, 2, 2, 1], padding='SAME', name=name)

    def max_pool(self, bottom, name):
        return tf.nn.max_pool(bottom, ksize=[1, 2, 2, 1], strides=[1, 2, 2, 1], padding='SAME', name=name)

    def conv_layer(self, bottom, name):
        with tf.variable_scope(name):
            filt = self.get_conv_filter(name)

            conv = tf.nn.conv2d(bottom, filt, [1, 1, 1, 1], padding='SAME')

            conv_biases = self.get_bias(name)
            bias = tf.nn.bias_add(conv, conv_biases)

            relu = tf.nn.relu(bias)
            return relu

    def fc_layer(self, bottom, name):
        with tf.variable_scope(name):
            shape = bottom.get_shape().as_list()
            dim = 1
            for d in shape[1:]:
                dim *= d
            x = tf.reshape(bottom, [-1, dim])

            weights = self.get_fc_weight(name)
            biases = self.get_bias(name)

            # Fully connected layer. Note that the '+' operation automatically
            # broadcasts the biases.
            fc = tf.nn.bias_add(tf.matmul(x, weights), biases)

            return fc

    def get_conv_filter(self, name):
        return tf.constant(self.data_dict[name][0], name="filter")

    def get_bias(self, name):
        return tf.constant(self.data_dict[name][1], name="biases")

    def get_fc_weight(self, name):
        return tf.constant(self.data_dict[name][0], name="weights")

if __name__=="__main__":
    vgg = Vgg16()
    vgg.build()
    from tensorflow import graph_util

    sess = tf.Session()
    # 出力ノードの名前を指定
    converted_graph = graph_util.convert_variables_to_constants(sess, sess.graph_def, ['input',"prob"])
    # プロトコルバッファとして書き出し
    tf.train.write_graph(converted_graph, './tmp/beginner-export','beginner-const-graph.pb', as_text=False)

    # テキストで吐き出せる
    # tf.train.write_graph(converted_graph, './tmp/beginner-export','beginner-const-graph.pbtxt', as_text=True)


    # ===================================================================

    sess.close()
出力ノードの名前を指定のところで指定しておいたレイヤーをあとあとC#用にバインドされたTensorFlowSharpで読み出すことができます。
Unityでの読み込み、実行
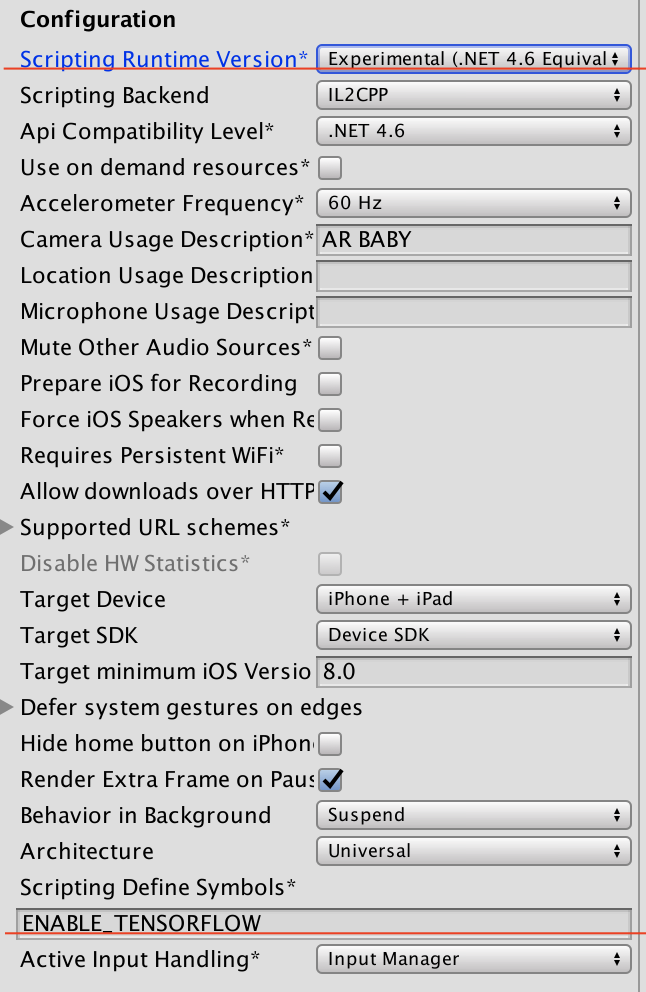
ここでは、TensorFlowで書かれたモデルをC#上にバインドするTensorFlowSharpを使います。UnityでのTensorFlowSharpはここからプラグインを導入してください。導入後は、Edit->'Project Settings'->'other settings'から、Scripting Runtime VersionをExperimental(.NET 4.6 Equivalent)に、Scripting Define SymbolsにENABLE_TENSORFLOWを追加します。
 (赤線のところ)
TensorFlowSharpについてはまだ勉強中なのですが、先人の文献を参考にこのように書きました。
using System.Collections;
using System.Collections.Generic;
using UnityEngine;
using TensorFlow;
using System.IO;
public class imagenet : MonoBehaviour {

	// Use this for initialization
	void Start () {
                                //画像ファイルの読み込み
		string file="Assets/cat.jpg";
		var labels = File.ReadAllLines("Assets/synset.txt");
		var tensor=CreateTensorFromImageFile(file);

		var graph=new TFGraph();
		string modelFile="Assets/plugins/beginner-const-graph.pb";
		var model=File.ReadAllBytes(modelFile);
		graph.Import(model,"");
		using (var session=new TFSession(graph)){
			var runner=session.GetRunner();
			runner.AddInput(graph["input"][0],tensor);
			runner.Fetch(graph["prob"][0]);
			var output=runner.Run();
			var result=output[0];


                var bestIdx = 0;
                float best = 0;
                // 尤も確率が高いものを調べて表示する
                var probabilities = ((float[][])result.GetValue(true))[0];

                for (int i = 0; i < probabilities.Length; i++)
                {

                    if (probabilities[i] > best)
                    {
                        bestIdx = i;
                        best = probabilities[i];
                    }
                }
                Debug.Log($"{file} best match: [{bestIdx}] {best * 100.0}% {labels[bestIdx]}");
		}


	}

	// Update is called once per frame
	void Update () {

	}
	public static TFTensor CreateTensorFromImageFile (string file, TFDataType destinationDataType = TFDataType.Float)
		{
			var contents = File.ReadAllBytes (file);

			// DecodeJpeg uses a scalar String-valued tensor as input.
			var tensor = TFTensor.CreateString (contents);

			TFGraph graph;
			TFOutput input, output;

			// Construct a graph to normalize the image
			ConstructGraphToNormalizeImage (out graph, out input, out output, destinationDataType);

			// Execute that graph to normalize this one image
			using (var session = new TFSession (graph)) {
				var normalized = session.Run (
						 inputs: new [] { input },
						 inputValues: new [] { tensor },
						 outputs: new [] { output });

				return normalized [0];
			}
		}

		// The inception model takes as input the image described by a Tensor in a very
		// specific normalized format (a particular image size, shape of the input tensor,
		// normalized pixel values etc.).
		//
		// This function constructs a graph of TensorFlow operations which takes as
		// input a JPEG-encoded string and returns a tensor suitable as input to the
		// inception model.
		private static void ConstructGraphToNormalizeImage (out TFGraph graph, out TFOutput input, out TFOutput output, TFDataType destinationDataType = TFDataType.Float)
		{
			// Some constants specific to the pre-trained model at:
			// https://storage.googleapis.com/download.tensorflow.org/models/inception5h.zip
			//
			// - The model was trained after with images scaled to 224x224 pixels.
			// - The colors, represented as R, G, B in 1-byte each were converted to
			//   float using (value - Mean)/Scale.

			const int W = 224;
			const int H = 224;
			const float Mean = 117;
			const float Scale = 1;

			graph = new TFGraph ();
			input = graph.Placeholder (TFDataType.String);

			output = graph.Cast (graph.Div (
				x: graph.Sub (
					x: graph.ResizeBilinear (
						images: graph.ExpandDims (
							input: graph.Cast (
								graph.DecodeJpeg (contents: input, channels: 3), DstT: TFDataType.Float),
							dim: graph.Const (0, "make_batch")),
						size: graph.Const (new int [] { W, H }, "size")),
					y: graph.Const (Mean, "mean")),
				y: graph.Const (Scale, "scale")), destinationDataType);
		}

}
pluginsフォルダ以下に先ほどpythonで出力したtmp/beginner-export/beginner-const-graph.pbを置いておきます。画像ファイルはコードを参考に適当に入れられます。また、識別結果を出力する際、出力結果はsoftmax関数の最大値として返ってくるので、それに対応したラベルを用意しておく必要があります。これは、VGG16のpythonモデルをダウンロードした際にvgg16.pyと同階層にあるsynset.txtが対応しているので同じく置いておきます。
後はスクリプトを適当なオブジェクトに貼り付けて実行するだけです!
今回は識別する画像としてこちらの猫を用意しました

81%の確率でEgyptian cat と識別出来ていますね!成功です!
まとめと問題点
ただし,起動するまでにかなり時間がかかります.これはmodelをロードする上での問題でしょうね
また,速さ的な点で言えばプラグインを書いてUnityからpythonを直で動かす方がいいです.これは強化学習で有名なml-agentsが実現しているのでうまいこと勉強したいですね
