はじめに
この記事は【マイスター・ギルド】本物のAdvent Calendar 2022の14日目の記事になります。
親要素にContainerウィジェットを使用し、
その子要素にRowもしくはColumnウィジェットの中に、複数のウィジェットを使う場面はよくあると思います。
また、複数の子要素の間に「余白」を表したいとき、色々な手段があると思います。
Spacer, SizedBox等のウィジェットや、
RowやColumnウィジェットのmainAxisAlignment, crossAxisAlignmentプロパティを使う.....etc
今回は、親要素の幅の初期値あるいは最小値を決めた後に、
余白を持つ複数の子要素がその制約を設けられた幅を越える際、
その越えた分に応じて、親要素の幅も伸ばす方法を紹介したいと思います。
開発環境
- macOS 13.0.1, intelチップ
- Flutter 3.3.5
状況例
まず今回の実装例の要件は以下のものとする。
- 親要素はContainerであり、widthの最小値を240、heightを固定で60とする
- 親要素のContainerのchildプロパティにRowを使用する
- Rowのchildrenプロパティの配列の中に子要素として、2つのContainerが存在する
- 子要素である2つにContaninerの表示の幅について、最初の親要素であるContainerのwidthに制約を受けており、
それぞれが端に位置しており、その間に余白が存在するものとする - 子要素の2つのContainerの少なくともいずれかの幅が変わり、240を越える場合は、
親要素のContainerのwidthもその240を越えた分、幅が変わるとする
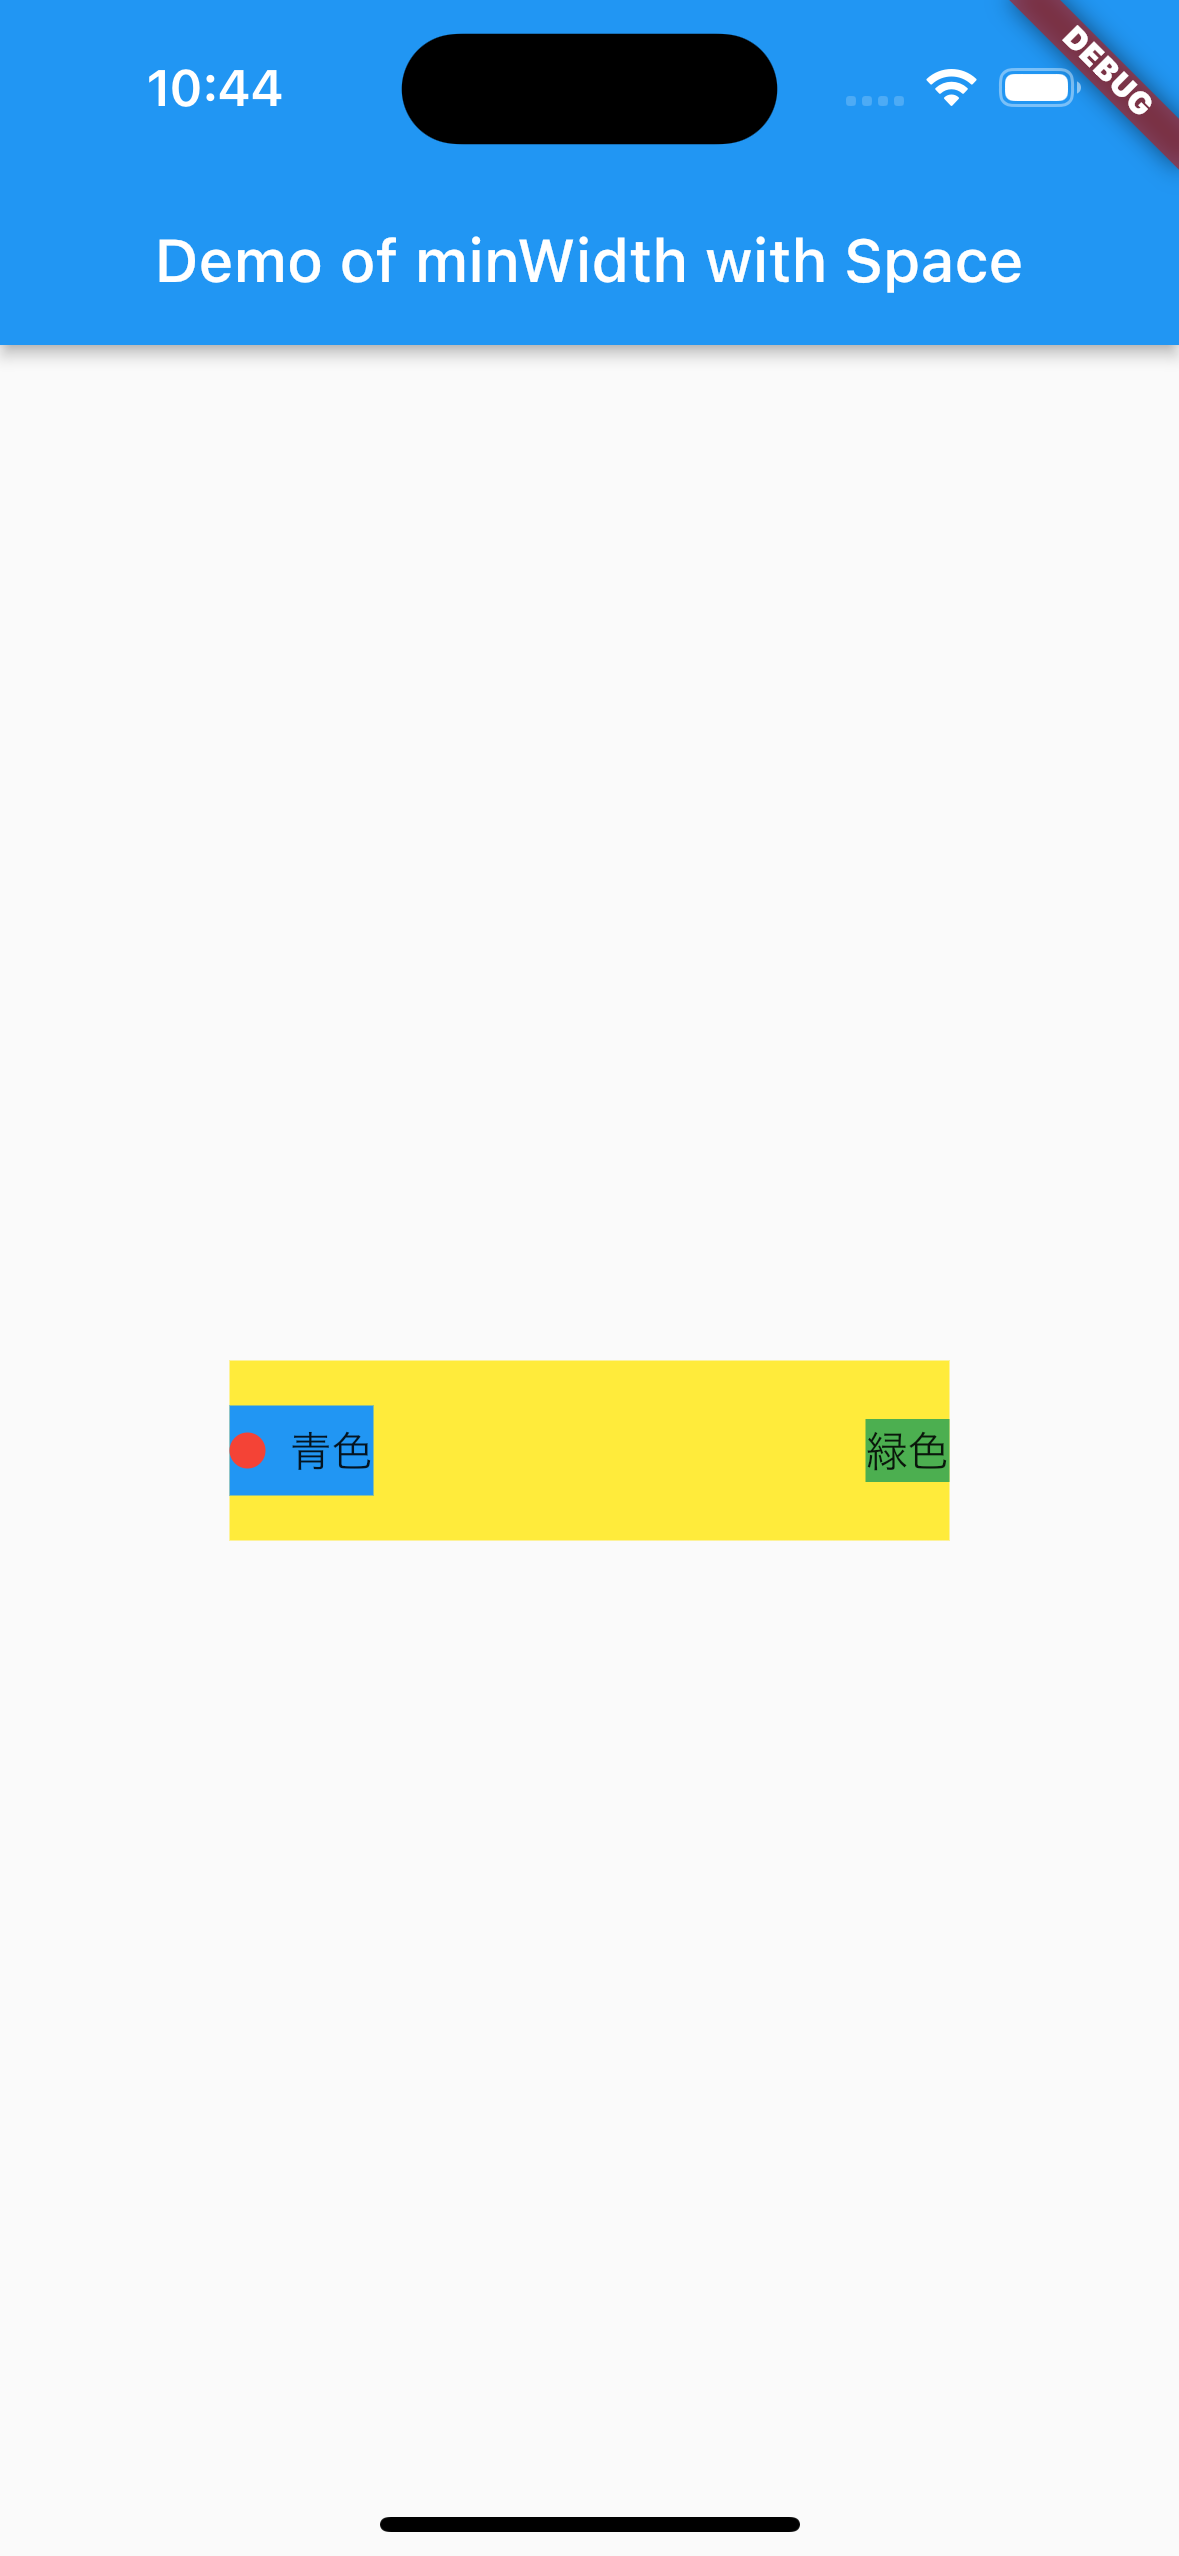
上記がイメージ図となります。
親要素が黄色のContainer、子要素が青のContainerと緑のContainerになります。
問題点の確認
とりあえず、細かいプロパティの設定を考えずに、
親にwidthが240で、heightが60のContainerを作成して、
その中に横並びの2つのContainerを表示させたいと思って、
実装してみると、以下の通りになります。
(今回はFlutterのプロジェクトを作成した際のデフォルトのコードを流用しています。なので、main.dartを弄ります。)
import 'package:flutter/material.dart';

void main() {
  runApp(const MyApp());
}

class MyApp extends StatelessWidget {
  const MyApp({super.key});

  @override
  Widget build(BuildContext context) {
    return MaterialApp(
      title: 'Demo of minWidth with Space',
      theme: ThemeData(
        primarySwatch: Colors.blue,
      ),
      home: const MyHomePage(title: 'Demo of minWidth with Space'),
    );
  }
}

class MyHomePage extends StatefulWidget {
  const MyHomePage({super.key, required this.title});
  final String title;

  @override
  State<MyHomePage> createState() => _MyHomePageState();
}

class _MyHomePageState extends State<MyHomePage> {
  @override
  Widget build(BuildContext context) {
    return Scaffold(
      appBar: AppBar(
        title: Text(widget.title),
      ),
      body: Center(
         /// 親の黄色のContainer
        child: Container(
          // ・・・①
          width: 240,
          height: 60,
          color: Colors.yellow,
          child: Row(
            // ・・・②
            children: [
              /// 子の青のContainer
              Container(
                color: Colors.blue,
                height: 30,
                child: Row(
                  children: [
                    Container(
                      height: 12,
                      width: 12,
                      decoration: const BoxDecoration(
                        shape: BoxShape.circle,
                        color: Colors.red,
                      ),
                    ),
                    const SizedBox(
                      width: 8.0,
                    ),
                    const Text('青色'),
                  ],
                ),
              ),
              /// 子の緑のContainer
              Container(
                // ・・・③
                color: Colors.green,
                child: Row(
                  children: const [
                    Text('緑'),
                    Text('色'),
                  ],
                ),
              ),
            ],
          ),
        ),
      ),
    );
  }
}

一旦こんな感じで、Rowの中の、青と緑のContainerが左端に位置しています。
これにプロパティの設定を追加していきます。
ちなみに
             Container(
                // ・・・③
                color: Colors.green,
                child: Row(
-                  children: const [
-                   Text('緑'),
+                  children: [
+                   Text('緑' * 15),
                   Text('色'),
                  ],
                ),
              ),
こんな感じで、もし緑のContainerの中のTextの文字列が増えてしまった場合、
最初の親要素の黄色のContainerの240で収まっていたものが、

固定的にwidthを240にしていたために、overflowが発生します。
これを両端に位置しつつ、親要素を可変型にしていきます。
解決策
結論としまして、すべき実装は、
- 親要素のContainerのconstraintsプロパティにminWidthで最小値の幅を指定する
- 親要素の最小値を指定するために必要
- 親要素のContainer直下のRowのmainAxisSizeプロパティをMainAxisSize.minを指定する
- 配列として入っている複数の子要素を含めた大きさを決めるために必要
- デフォルトだとMainAxisSize.maxなので、限界まで伸びるため、親要素で設定されたconstraintsプロパティのminWidthを越えてくるため
- 配列として入っている複数の子要素を含めた大きさを決めるために必要
- 親要素のContainer直下のRowのmainAxisAlignmentプロパティをMainAxisAlignment.spaceBetweenを指定する
- 具体的な子要素の配置を決めるために必要
具体的に実装すると、
class _MyHomePageState extends State<MyHomePage> {
  @override
  Widget build(BuildContext context) {
    return Scaffold(
      appBar: AppBar(
        title: Text(widget.title),
      ),
      body: Center(
        /// 親の黄色のContainer
        child: Container(
          // ・・・①
-         width: 240,
+         constraints: const BoxConstraints(
+           minWidth: 240,
+         ),
          height: 60,
          color: Colors.yellow,
          child: Row(
            // ・・・②
+           mainAxisSize: MainAxisSize.min,
+           mainAxisAlignment: MainAxisAlignment.spaceBetween,
            children: [
              /// 子の青のContainer
              Container(
                color: Colors.blue,
                height: 30,
                child: Row(
                  children: [
                    Container(
                      height: 12,
                      width: 12,
                      decoration: const BoxDecoration(
                        shape: BoxShape.circle,
                        color: Colors.red,
                      ),
                    ),
                    const SizedBox(
                      width: 8.0,
                    ),
                    const Text('青色'),
                  ],
                ),
              ),
              /// 子の緑のContainer
              Container(
                // ・・・③
                color: Colors.green,
                child: Row(
                  children: const [
                    Text('緑'),
                    Text('色'),
                  ],
                ),
              ),
            ],
          ),
        ),
      ),
    );
  }
}
上記の感じになります。
こうすることで、要素の位置を決めつつ、子要素のサイズが変わったとしても、
親要素がその分サイズが変わるようになります。
注意
ちなみに両端に位置することを実現するために、
- 親要素のContainer直下のRowのmainAxisAlignmentプロパティをMainAxisAlignment.spaceBetweenを指定する
上記のやり方ではなくて、Spacerを使用した場合について、
限界まで伸びていくため、
最小値で設定したconstraintsプロパティのminWidthを越えていきます。
そのため、最小値で収まるべき幅が収まらなくなります。
実装してみると以下のようになります。
class _MyHomePageState extends State<MyHomePage> {
  @override
  Widget build(BuildContext context) {
    return Scaffold(
      appBar: AppBar(
        title: Text(widget.title),
      ),
      body: Center(
        /// 親の黄色のContainer
        child: Container(
          // ・・・①
-         width: 240,
+         constraints: const BoxConstraints(
+           minWidth: 240,
+         ),
          height: 60,
          color: Colors.yellow,
          child: Row(
            // ・・・②
+           mainAxisSize: MainAxisSize.min,
            children: [
              /// 子の青のContainer
              Container(
                color: Colors.blue,
                height: 30,
                child: Row(
                  children: [
                    Container(
                      height: 12,
                      width: 12,
                      decoration: const BoxDecoration(
                        shape: BoxShape.circle,
                        color: Colors.red,
                      ),
                    ),
                    const SizedBox(
                      width: 8.0,
                    ),
                    const Text('青色'),
                  ],
                ),
              ),
+             const Spacer(),
              /// 子の緑のContainer
              Container(
                // ・・・③
                color: Colors.green,
                child: Row(
                  children: const [
                    Text('緑'),
                    Text('色'),
                  ],
                ),
              ),
            ],
          ),
        ),
      ),
    );
  }
}

このように伸びていきます。
BoxConstraintsのminWidthのように最小値を設定し、要素の幅に応じて可変型になるようにしたい場合、
SpacerやExpandedのように限界まで伸びるものと併用をすると実現が難しくなります。
位置に関する制御は、mainAxisAlignmentプロパティを利用するのがシンプルだと思います。
おまけ

上記のように、最小値を持つ可変型のContainerが複数並んでいるとします。
その際に、悩みどころは、どの階層に最小値の設定を設けるconstraintsを入れるかっていう点だと思います。
ちなみに、この2つのContainerの親要素であるColumnにconsttraintsを入れて、
一括して、最小値を設定しようとすると上手くいきません。
class _MyHomePageState extends State<MyHomePage> {
  @override
  Widget build(BuildContext context) {
    return Scaffold(
      appBar: AppBar(
        title: Text(widget.title),
      ),
      body: Center(
        /// 一括して、constraintsの設定を入れようと試みる
+       child: Container(
+         constraints: const BoxConstraints(
+           minWidth: 240,
+         ),
+         child: Column(
+           mainAxisSize: MainAxisSize.min,
+           children: [
              /// 親の黄色のContainer
              Container(
                // ・・・①
-                constraints: const BoxConstraints(
-                  minWidth: 240,
-                ),
                height: 60,
                color: Colors.yellow,
                child: Row(
                  // ・・・②
                  mainAxisSize: MainAxisSize.min,
                  mainAxisAlignment: MainAxisAlignment.spaceBetween,
                  children: [
                    /// 子の青のContainer
                    Container(
                      color: Colors.blue,
                      height: 30,
                      child: Row(
                        children: [
                          Container(
                            height: 12,
                            width: 12,
                            decoration: const BoxDecoration(
                              shape: BoxShape.circle,
                              color: Colors.red,
                            ),
                          ),
                          const SizedBox(
                            width: 8.0,
                          ),
                          const Text('青色'),
                        ],
                      ),
                    ),
                    /// 子の緑のContainer
                    Container(
                      // ・・・③
                      color: Colors.green,
                      child: Row(
                        children: const [
                          Text('緑'),
                          Text('色'),
                        ],
                      ),
                    ),
                  ],
                ),
              ),
+             const SizedBox(
+               height: 16,
+             ),

+             Container(
+               height: 60,
+               color: Colors.yellow,
+               child: Row(
+                 mainAxisSize: MainAxisSize.min,
+                 mainAxisAlignment: MainAxisAlignment.spaceBetween,
+                 children: [
+                   Container(
+                     color: Colors.blue,
+                     height: 30,
+                     child: Row(
+                       children: [
+                         Container(
+                           height: 12,
+                           width: 12,
+                           decoration: const BoxDecoration(
+                             shape: BoxShape.circle,
+                             color: Colors.red,
+                           ),
+                         ),
+                         const SizedBox(
+                           width: 8.0,
+                         ),
+                         const Text('青色'),
+                       ],
+                     ),
+                   ),
+                   Container(
+                     color: Colors.green,
+                     child: Row(
+                       children: [
+                         Text('緑' * 16),
+                         Text('色'),
+                       ],
+                     ),
+                   ),
+                 ],
+               ),
+             ),

+           ],
+         ),
+       ),
      ),
    );
  }
}
上記のようにすると、Columnにconstraintsを入れると

可変型にはなるが、幅が設定した最小値の240まで伸びずに、可能な限り縮小してしまいます。
複数を扱う場合は注意が必要になります。
ちなみに、この場合で解決するためには、
Columnにconstraintsを含めて一括設定するのではなく、
子要素のContainerの各々にconstraintsの設定すると、縮小問題は解決します。
class _MyHomePageState extends State<MyHomePage> {
  @override
  Widget build(BuildContext context) {
    return Scaffold(
      appBar: AppBar(
        title: Text(widget.title),
      ),
      body: Center(
        child: Container(
-          constraints: const BoxConstraints(
-            minWidth: 240,
-          ),
          child: Column(
            mainAxisSize: MainAxisSize.min,
            children: [
              /// 親の黄色のContainer
              Container(
                // ・・・①
+               constraints: const BoxConstraints(
+                 minWidth: 240,
+               ),
                height: 60,
                color: Colors.yellow,
                child: Row(
                  // ・・・②
                  mainAxisSize: MainAxisSize.min,
                  mainAxisAlignment: MainAxisAlignment.spaceBetween,
                  children: [
                    /// 子の青のContainer
                    Container(
                      color: Colors.blue,
                      height: 30,
                      child: Row(
                        children: [
                          Container(
                            height: 12,
                            width: 12,
                            decoration: const BoxDecoration(
                              shape: BoxShape.circle,
                              color: Colors.red,
                            ),
                          ),
                          const SizedBox(
                            width: 8.0,
                          ),
                          const Text('青色'),
                        ],
                      ),
                    ),
                    /// 子の緑のContainer
                    Container(
                      // ・・・③
                      color: Colors.green,
                      child: Row(
                        children: const [
                          Text('緑'),
                          Text('色'),
                        ],
                      ),
                    ),
                  ],
                ),
              ),
              const SizedBox(
                height: 16,
              ),

              Container(
+               constraints: const BoxConstraints(
+                 minWidth: 240,
+               ),
                height: 60,
                color: Colors.yellow,
                child: Row(
                  mainAxisSize: MainAxisSize.min,
                  mainAxisAlignment: MainAxisAlignment.spaceBetween,
                  children: [
                    Container(
                      color: Colors.blue,
                      height: 30,
                      child: Row(
                        children: [
                          Container(
                            height: 12,
                            width: 12,
                            decoration: const BoxDecoration(
                              shape: BoxShape.circle,
                              color: Colors.red,
                            ),
                          ),
                          const SizedBox(
                            width: 8.0,
                          ),
                          const Text('青色'),
                        ],
                      ),
                    ),
                    Container(
                      color: Colors.green,
                      child: Row(
                        children: [
                          Text('緑' * 16),
                          Text('色'),
                        ],
                      ),
                    ),
                  ],
                ),
              ),
            ],
          ),
        ),
      ),
    );
  }
}

こうすることで、縮小問題は解決できます。
おわり
以上、『【Flutter】親要素の幅の最小値を設定した状態で、子要素が動的に変化した際に親要素の幅を可変型にする方法』についての記事でした。
本記事が誰かの助けになれば嬉しいです。
最後までご覧いただきありがとうございました。

