
外出中、iPhoneから自宅PCに接続してリモート操作したいシーンがそこそこあります。幸いiOSにはVPN機能を使えるので、PPTPを使ってVPN接続していましたが、最近のiOSではPPTPが非サポートになってしまった&最近のルーター(注.ぼくはBuffalo信者)は最高級機でないとVPN機能がサポートされないという状況になってしまっています。
コロナ禍だった時は出張も無かったのであまり気に留めていなかったのですが、コロナ禍後になり国内外への出張も再開されてからというものの、やっぱりVPN使いたいなぁというシーンが出始めており…でもVPN機能搭載のルーターは高過ぎるし…
それじゃ、機能が無いんなら作ればいいじゃない?というワケで、現行iOSのVPNでサポートされているL2TP/IPsecサーバを構築してみました。
ちなみに最近のAndroidだとL2TPはサポートされてないようですが…そのうち余力ができたときにIKEv2でのVPNにチャレンジしようかな…と。
L2TP/IPsecとは
手抜きして、ChatGPT大先生に以下の解説パート書いてもらいましたw
L2TP(Layer 2 Tunneling Protocol)は、インターネット上で安全にデータ通信を行うためのトンネリングプロトコルの一つです。
- 目的: ネットワーク上で「仮想的な専用回線」を作ること
- 層: OSI参照モデルの 第2層(データリンク層) に相当
- 特徴: 暗号化機能は持たない(単体ではセキュアではない)
仕組み
-
トンネル作成
- クライアントとVPNサーバの間に「L2TPトンネル」を作ります。
- データはこのトンネルを通って送受信されます。
-
暗号化は別プロトコルで補う
- L2TP単体では暗号化されません。
- 通常は IPsecと組み合わせて(L2TP/IPsec)暗号化 します。
- これにより、インターネット経由でも安全に通信可能。
-
データのカプセル化
- 元のパケットを「カプセル化」して送信。
- トンネルの外側はIPsecで暗号化され、盗聴や改ざんを防ぎます。
特徴まとめ
| 項目 | L2TP単体 | L2TP/IPsec |
|---|---|---|
| 暗号化 | なし | あり(IPsec) |
| 認証 | ユーザ認証可能 | IPsec認証+ユーザ認証 |
| 使用例 | トンネル構築 | VPN接続(Windows, iOS, macOS, Linux) |
| 安全性 | 低 | 高(IPsecと組み合わせ) |
- L2TP = トンネリングプロトコル
- 暗号化は別途IPsecで行うのが一般的
- IKEv2より古いプロトコルだが、広くサポートされている
システム構成
以下の構成で構築しました。
- RedHat Enterprise Linux 9.3
- xl2tpd-1.3.17-1.el9.x86_64
- libreswan-4.15-8.el9.x86_64
- lsof-4.94.0-3.el9.x86_64
RHELは最小インストールで問題ありません。IPv6は必要なので無効化しないでください。
インストール後、SELinuxとFirewalldは無効化してしまいましょう。
ついでにパッケージのアップデートも済ませておいてください。
dnf update -y
ちなみに真面目にFirewalldを設定される場合は以下の設定でイケるようです。
(ぼくは自宅用だし面倒なので手抜きしました汗)
firewall-cmd --add-service="ipsec" firewall-cmd --runtime-to-permanent
インストールと設定
-
EPELリポジトリ追加
EPELのパッケージも利用するので、まずはEPELリポジトリを追加します。dnf install https://dl.fedoraproject.org/pub/epel/epel-release-latest-9.noarch.rpm -y -
カーネルパラメータの設定
/etc/sysctl.d/50-libreswan.con を以下のように設定します(新規作成)。# when using 1 interface for two networks when using NETKEY, the kernel # thinks it can be clever by sending a redirect (cause it cannot tell # an encrypted packet came in, but a decrypted packet came out), # so it sends a bogus ICMP redirect # # We disable redirects for XFRM/IPsec net.ipv6.conf.default.accept_redirects = 0 net.ipv6.conf.all.accept_redirects = 0 net.ipv4.conf.default.send_redirects = 0 net.ipv4.conf.default.accept_redirects = 0 net.ipv4.conf.all.send_redirects = 0 net.ipv4.conf.all.accept_redirects = 0 net.ipv4.ip_forward = 1 net.ipv4.conf.default.rp_filter = 0 net.ipv4.conf.all.rp_filter = 0 net.ipv4.conf.default.rp_filter = 0 net.ipv4.conf.ens34.rp_filter = 0 net.ipv4.conf.ppp.rp_filter = 0/usr/lib/sysctl.d/50-redhat.conf を以下のように設定します(該当箇所を修正)。
# https://bugzilla.redhat.com/show_bug.cgi?id=1689346
kernel.kptr_restrict = 1

# Source route verification
net.ipv4.conf.default.rp_filter = 0
net.ipv4.conf.*.rp_filter = 0
-net.ipv4.conf.all.rp_filter
/usr/lib/sysctl.d/50-default.conf を以下のように設定します(該当箇所を修正)。
# Source route verification
net.ipv4.conf.default.rp_filter = 0
net.ipv4.conf.*.rp_filter = 0
-net.ipv4.conf.all.rp_filter
以下のコマンドでシステムに反映、rp_filter関連の設定が反映されていることを確認します。
sysctl --system以下のコマンドでも個別に確認できます(0が出力されればOK)。
cat /proc/sys/net/ipv4/conf/all/rp_filter cat /proc/sys/net/ipv4/conf/default/rp_filter -
パッケージインストール
以下のコマンドでパッケージをインストールします。dnf install xl2tpd libreswan lsof -y起動設定します。
# 自動起動
systemctl enable ipsec
systemctl enable xl2tpd
# 再起動
systemctl restart ipsec
systemctl restart xl2tpd
# 状態確認
systemctl status ipsec
systemctl status xl2tpd
ipsecとxl2tpdが正常動作していればインストール完了です。
-
設定
/etc/ppp/chap-secrets[username] xl2tpd [password] *username: ユーザ名
password: 任意のパスワード/etc/ppp/options.xl2tpd
ipcp-accept-local
ipcp-accept-remote

name xl2tpd
refuse-pap
refuse-chap
refuse-mschap
require-mschap-v2
persist
logfile /var/log/xl2tpd.log

auth
idle 1800
mtu 1410
mru 1410
proxyarp
defaultroute
debug
connect-delay 5000
/etc/xl2tpd/xl2tpd.conf
[global]
listen-addr = [server ip]
port = 1701

; requires openswan-2.5.18 or higher - Also does not yet work in combination
; with kernel mode l2tp as present in linux 2.6.23+
; ipsec saref = yes
; Use refinfo of 22 if using an SAref kernel patch based on openswan 2.6.35 or
;  when using any of the SAref kernel patches for kernels up to 2.6.35.
; saref refinfo = 30
;
; force userspace = yes
;
; debug tunnel = yes

[lns default]
ip range = [ip range]
local ip = [server ip]
require chap = yes
refuse pap = yes
require authentication = yes
name = xl2tpd
ppp debug = yes
pppoptfile = /etc/ppp/options.xl2tpd
length bit = yes
listen-addr: L2TPサーバのIP(ex. 192.168.1.100)
ip range: クライアントに割り当てるIPアドレスのレンジ(ex. 192.168.1.231-192.168.1.239)
local ip: L2TPサーバのIP(ex. 192.168.1.100)/etc/ipsec.d/default.secrets
: PSK "[pre shared key over 32 char]"PSK: 事前共有鍵(32文字以上英数字推奨)
/etc/ipsec.d/l2tp-ipsec.conf
conn L2TP-PSK
    authby=secret
    pfs=no
    auto=add
    rekey=no
    left=[server ip]
    right=%any
    ikev2=never
    type=transport
    leftprotoport=17/1701
    rightprotoport=17/%any
    dpddelay=15
    dpdtimeout=30
    dpdaction=clear
    forceencaps=yes

conn L2TP-PSK-NAT
	also=L2TP-PSK
    rightsubnet=0.0.0.0/0
    dpddelay=10
    dpdtimeout=20
    dpdaction=clear
    forceencaps=yes
left: : L2TPサーバのIP(ex. 192.168.1.100)
/etc/ipsec.conf
config setup
    # If logfile= is unset, syslog is used to send log messages too.
    # Note that on busy VPN servers, the amount of logging can trigger
    # syslogd (or journald) to rate limit messages.
    #logfile=/var/log/pluto.log
    #
    # Debugging should only be used to find bugs, not configuration issues!
    # "base" regular debug, "tmi" is excessive (!) and "private" will log
    # sensitive key material (not available in FIPS mode). The "cpu-usage"
    # value logs timing information and should not be used with other
    # debug options as it will defeat getting accurate timing information.
    # Default is "none"
    # plutodebug="base"
    # plutodebug="tmi"
    #plutodebug="none"
    #
    # Some machines use a DNS resolver on localhost with broken DNSSEC
    # support. This can be tested using the command:
    # dig +dnssec DNSnameOfRemoteServer
    # If that fails but omitting '+dnssec' works, the system's resolver is
    # broken and you might need to disable DNSSEC.
    # dnssec-enable=no
    #
    # To enable IKE and IPsec over TCP for VPN server. Requires at least
    # Linux 5.7 kernel or a kernel with TCP backport (like RHEL8 4.18.0-291)
    # listen-tcp=yes
    # To enable IKE and IPsec over TCP for VPN client, also specify
    # tcp-remote-port=4500 in the client's conn section.
    ikev1-policy = accept   ### 要追加 ###


    # if it exists, include system wide crypto-policy defaults
    #include /etc/crypto-policies/back-ends/libreswan.config  ### 要コメントアウト ###
動作確認
xl2tpdのログファイルを作成した後、設定ファイルのチェックをします。
touch /var/log/xl2tpd.log
ipsec verify
以下のように全てOKになれば設定完了です。
Verifying installed system and configuration files

Version check and ipsec on-path                         [OK]
Libreswan 4.15
Checking for IPsec support in kernel                    [OK]
 NETKEY: Testing XFRM related proc values
         ICMP default/send_redirects                    [OK]
         ICMP default/accept_redirects                  [OK]
         XFRM larval drop                               [OK]
Pluto ipsec.conf syntax                                 [OK]
Checking rp_filter                                      [OK]
Checking that pluto is running                          [OK]
 Pluto listening for IKE on udp 500                     [OK]
 Pluto listening for IKE/NAT-T on udp 4500              [OK]
 Pluto ipsec.secret syntax                              [OK]
Checking 'ip' command                                   [OK]
Checking 'iptables' command                             [OK]
Checking 'prelink' command does not interfere with FIPS [OK]
Checking for obsolete ipsec.conf options                [OK]
問題無ければサービスを再起動します。
systemctl restart ipsec
systemctl restart xl2tpd
systemctl status ipsec
systemctl status xl2tpd
iPhone/iPadの設定
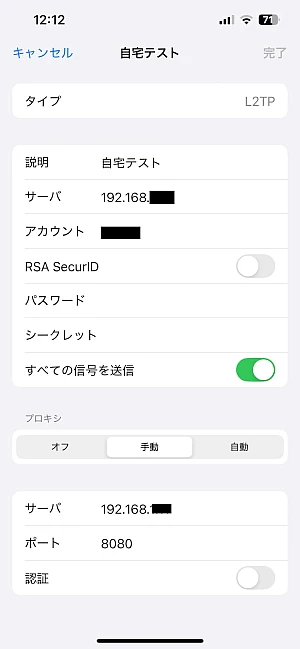
- 説明: 任意の説明文
- サーバ: L2TPサーバのIPもしくはFQDN、外部から接続する場合は固定IPもしくはDDNSなどでアクセス可であること
- アカウント: /etc/ppp/chap-secrets で設定したユーザ名
- パスワード: /etc/ppp/chap-secrets で設定したパスワード
- シークレット: /etc/ipsec.d/default.secrets で設定した事前共有鍵
なお、プロキシを設定することでVPN接続中でもインターネットアクセスが可能になります。
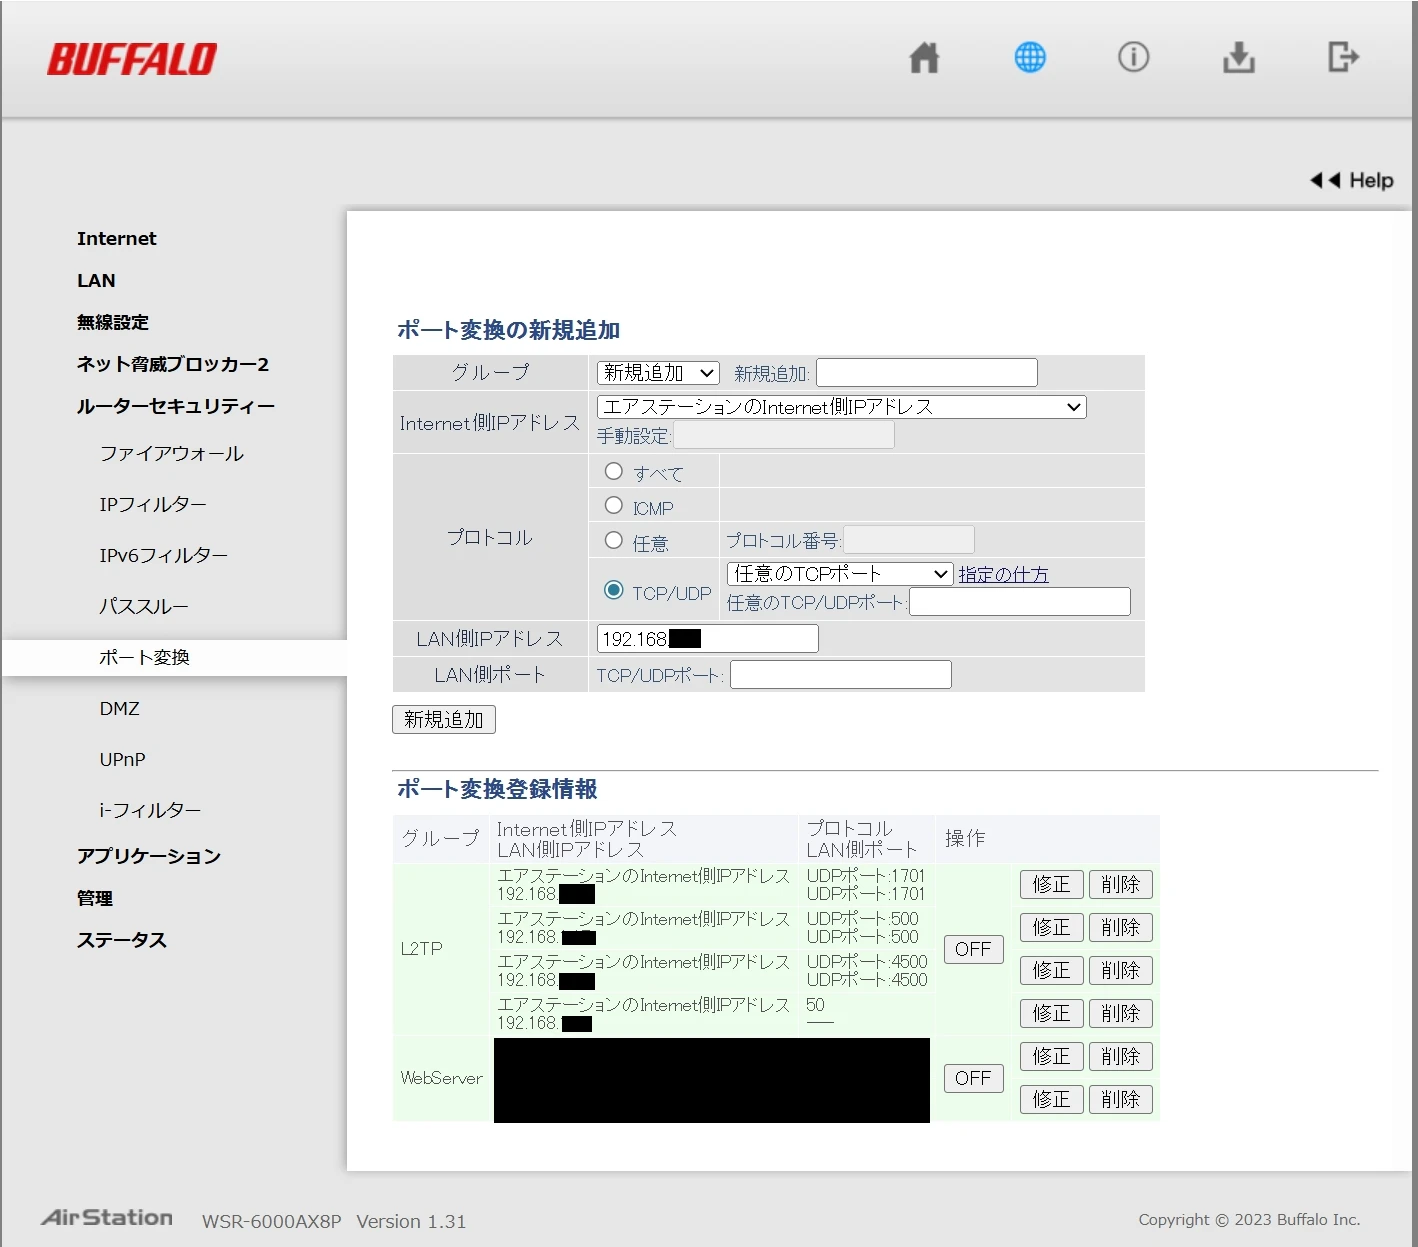
また、外部からアクセスするためにはルーター側でNAPT設定が必要になりますので、こちらも併せて実施しましょう。500/udp、1701/udp、4500/udp、プロトコル番号50の転送が必要です。
ウチのバッファローのルーターの場合はこのように設定しています。
ちなみにiOS側でのRDPアプリは「Windows App Mobile」、SSHアプリは「Termius - Modern SSH Client」を使っています。
Windows App Mobile
Termius - Modern SSH Client
あとWindowsの場合は以下のレジストリを設定しないとNAT越えでの接続に失敗するので要注意。
キー:   HKEY_LOCAL_MACHINE\SYSTEM\CurrentControlSet\Services\PolicyAgent
名前:   AssumeUDPEncapsulationContextOnSendRule
種類:   DWORD (32bit)
値:     2