この記事はDiscord Advent Calendar 2018の16日目の記事です。
OS: WSL(Ubuntu)
環境: Ruby2.5.1, Discordrb3.3.0
はじめに
個人的にRubyでDiscordBotを作る上で困ったことや、discordrbの便利だと思った機能について、ケース別に紹介したいと思います。
discordrbってなに?って方や、Botの基本的な作り方がわからない方は、拙作?のイチからDiscord Bot 。for Rubyを御覧ください。
また、忙しい人のために、各ケースで何を使ったか簡単にListにしておきます。
- Case1. コマンド実行権限を設定したい
- Discordrb::Commands::CommandBot#set_user_permission
- Discordrb::Commands::CommandBot#set_role_permission
- Discordrb::Commands::CommandContainer#command
- Case2. botが起動したときに何かさせたい
- Discord::EventContainer#ready
- Case3. 定期的に投稿したい
- Discord::EventContainer#heartbeat
- Case4. リッチな文を埋め込みたい
- Discordrb::Webhooks::Embed
- Discordrb::Events::Respondable#send_embed
Case1. コマンド実行権限を設定したい。
chmodなんてないよ。
実行権限を使いたい場合、「Bot側での許可レベル」を設定することで実現できます。
「Bot側での許可レベル」というのが曲者で、Discord Advent Calendar 2017 2日目で紹介されていたDiscordで提供されている権限とはまた違います。
「Bot側での許可レベル」は、事前にユーザーごとや役職ごとに設定しなければなりません。役職については、上の記事を参照してください。
require 'discordrb'

bot = Discordrb::Commands::CommandBot.new(
  token: TOKEN,
  client_id: CLIENT_ID,
  prefix: PREFIX)

bot.set_user_permission(USER_ID, PERMISSION_LEVEL)
bot.set_role_permission(ROLE_ID, PERMISSION_LEVEL)

bot.command(:hoge, permission_level: 3) do |event|
  event << "fuga"
end
上のコードのbot.set_user_permissionがユーザーごとの許可レベル設定、bot.set_role_permissionが役職ごとの許可レベル設定に当たります。USER_IDとROLE_IDにはそれぞれ該当のIDを、PERMISSION_LEVELにはお好みの数字を入れてください。
数字が大きいほど、権限は強いです。
さらにDiscord::Commandbot#commandの引数で、そのコマンドを実行できるレベルを設定します。keyに':permission_level'、valueに実行できる下限のレベルを指定します。
参考: www.rubydoc.info/github/meew0/discordrb/Discordrb%2FCommands%2FCommandContainer:command
Case2. botが起動したときに何かさせたい
例えばCase2のパーミッション設定をサーバーにいるユーザーと照らし合わせて設定したい場合、botが起動してからじゃないとDiscordのサーバーからは情報をとれません。そんな時にDiscord::Commandbot#readyは便利です。
permission:
 - name: foo
   level: 3
 - name: hoge
   level: 2
bot.ready do |event|
  bot.servers.each_value do |srv|
  #サーバからユーザーを取得
    srv.users.each do |user|
    #configと比較
      CONF['permission'].each do |pms|
        if pms['name'] == user.name then
          bot.set_user_permission(user.id, pms['level'].to_i)
        else
          puts "そんな人おらんで"
        end
      end
    end
  end
end
Discord::Commandbot#readyはサーバに接続したとき、一回だけブロック内が実行されます。上にあげた例以外にも、セットアップに使うことを推奨してるみたいです。
This event is raised when the READY packet is received, i.e. servers and channels have finished initialization. It's the recommended way to do things when the bot has finished starting up.
Case3. 定期的に投稿したい
cronを使えばいいだけですが、場合によっては実行中のプロセスの中で行いたいこともあるかもしれません。(Discord上からコマンドで定期実行をON/OFFとか)
そんな時、裏技的ですが定期的に実行できる機能があります。
Discordでは、サーバーの生死確認のために約40秒ごとにHeartBeatを送っています。こいつを使ってやろうということです。
require 'Date'
previous = Date.today
bot.heartbeat do |event|
  now = Date.today
  if previous < now then
    bot.send_message(CHANNEL_OBJECT, "はよ寝ろ")
    previous = now
  end
end
例では、日付を超えたときにCHANNEL_OBJECTへ投稿しています。注意点として、ブロックに渡されるのはDiscordrb::Events::HeartbeatEventなので、#<< などが使えない点です。私はこれで1時間はまりました。
また、discordrbのrubydocには、
This event is raised every time the bot sends a heartbeat over the galaxy. This happens roughly every 40 seconds, but may happen at a lower rate should Discord change their interval. It may also happen more quickly for periods of time, especially for unstable connections, since discordrb rather sends a heartbeat than not if there's a choice. (You shouldn't rely on all this to be accurately timed.)
とあり、正確な定期実行には向かないようです。
Case4. リッチな文を埋め込みたい
Embedというものが用意されています。簡単に試したいなら、適当なチャンネルにTwitterのURLを張ってみて下さい。URLの下にツイートの内容が出てきますが、それがEmbedを利用した投稿です。これはDiscordのほうで変換しているようですがBotからも投稿できます。
Embedを送る
まず注意してほしいのは、Embed関連のクラスはDiscordrb::EmbedとDiscordrb::Webhooks::Embedの2つあることです。
前者は公開されていないAPIを含めた読み込み専用のクラスで、前述のYoutubeなどのURL投稿時生成されるEmbedをbotで読むためのものです。送信には仕えません。
後者は今から使う、botがEmbedを送信するときに使うものです。
私はrubydocを読んでたときに引っかかりました。
送るときは、Discordrb::Events::Respondable#send_embedを使います。Discordrb::Commands::CommandEventにincludeされているので、CommandEventのメソッドとして使えます。ブロック使えていい感じ。
次項にコードを載せています。
Embedの要素
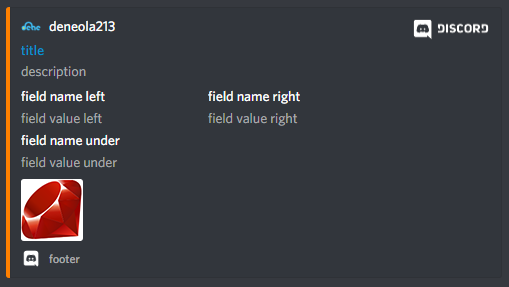
Embedは様々な要素からできています。結構量があるので、よく使う要素についてコードとその出力結果の画像で説明します。
bot.command :embed do |event|
  event.send_embed do |embed|
    embed.title = "title"
    embed.url = "http://example.com/"
    embed.colour = 0xFF8000
    embed.description = "description"
    embed.add_field(
      name: "field name left",
      value: "field value left",
      inline: true
    )
    embed.add_field(
      name: "field name right",
      value: "field value right",
      inline: true
    )
    embed.add_field(
      name: "field name under",
      value: "field value under",
      inline: false
    )
    embed.image = Discordrb::Webhooks::EmbedImage.new(url: 'https://www.ruby-lang.org/images/header-ruby-logo.png')
    embed.thumbnail = Discordrb::Webhooks::EmbedThumbnail.new(url: 'https://discordapp.com/assets/e7a3b51fdac2aa5ec71975d257d5c405.png')
    embed.footer = Discordrb::Webhooks::EmbedFooter.new(
      text: "footer",
      icon_url: 'https://discordapp.com/assets/28174a34e77bb5e5310ced9f95cb480b.png'
    )
    embed.author = Discordrb::Webhooks::EmbedAuthor.new(
      name: 'deneola213',
      url: 'https://qiita.com/deneola213',
      icon_url: 'https://qiita-image-store.s3.amazonaws.com/0/122913/profile-images/1532764209'
    )
  end
end
title & url
タイトルにはurlで設定したリンクが貼られます。
colour
Integerでカラーコードを設定すると、左側のバー?の色が指定されます。デフォルトは灰色です。
description
一応説明文を書くとのことですが、後述のfieldを使わずに大体ここに本文書いて済ませることが多い気がします。
field
fieldを設定するには、上のコードで使った#add_field以外にも、#<<があります。これは、引数でname,value,inlineを指定するadd_fieldとは違い、Discordrb::Webhooks::EmbedFieldのオブジェクトを引数にする必要があります。
embed << Discordrb::Webhooks::EmbedField.new name: "NAME", value: "VALUE", inline: true
また、inlineで横につなげて出力するか、縦につなげるかを指定できます。
image
Discordrb::Webhooks::EmbedImageのオブジェクトを作って、代入する必要があります。URLの文字列だけではだめです。
出力結果では、Rubyのロゴがimage要素です。
thumbnail
未だに用途がわかりませんが、サムネイル画像を指定できます。これも、Discordrb::Webhooks::EmbedThumbnailのオブジェクトを作って代入してください。
出力結果では、右上のDiscordのロゴがthumbnail要素です。
footer
フッターです。文とは別に、icon_urlが指定できます。これも、Discordrb::Webhooks::EmbedFooterのオブジェクトを作って代入してください。
author
作成者などのユーザー情報などを追加できます。Discordのアカウントとは関係ないです。例では私のQiitaアカウントを表示しています。これも、Discordrb::Webhooks::EmbedAuthorのオブジェクトを作って代入してください。
出力結果では、左上の私のアカウント画像と名前がauthor要素です。
さいごに
おかげさまで、前投稿したイチからDiscord Bot 。for Rubyは多くの記事にリンクしていただきました。
今回の記事は、DiscordのデベロッパーページとDiscordrbRubyDocページとGoogle翻訳を往復して調べたことをアウトプットしようと思って書きました。誰かの参考になればと思います。
最近のDiscordは Rich Presenceや Discord Storeが実装され、ますます多機能になってきたので、そのへんも追っかけていかなきゃなあと思うこの頃。
