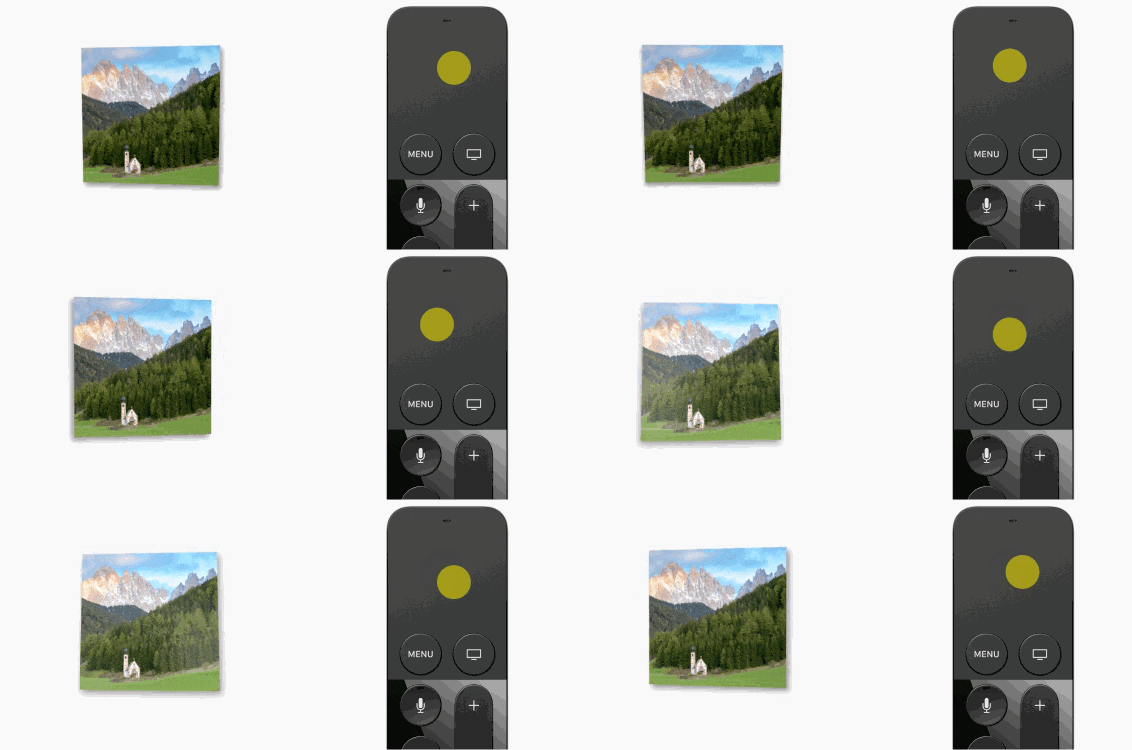
tvOS Advent Calendar 2017 11日目担当の @dekatotoroです。
今日はフォーカスエフェクトの独自カスタム実装についてです。
フォーカスした時に影や拡大、モーションに応じてアニメーションします。
UIImageViewはadjustsImageWhenAncestorFocusedをtrueにすることで下記のようなエフェクトがつきます。

https://developer.apple.com/tvos/human-interface-guidelines/app-architecture/focus-and-selection/
Parallaxエフェクトについては2日目の@toshi0383による tvOSのParallaxエフェクトとはも見てみてください。
今回はこの動作の独自実装に挑戦してみたいと思います。
完成イメージ
UIButton
UICollectionViewCell
実装
UIButtonのカスタム実装で説明していきたいと思います。UIButtonのtypeをsystemにした場合は、デフォルトでフォーカス時の影と拡大、押下した時のアニメーションもつきます。しかしtypeをcustomにするとフォーカス時の処理は自前で実装する必要があります。
- 影と拡大アニメーション -
まずはフォーカスされた時の影と拡大アニメーションをつけます。
didUpdateFocusをoverrideして実装します。

class CustomFocusableButton: UIButton {

    private let scaleValue: CGFloat = 1.1

    override func awakeFromNib() {
        super.awakeFromNib()

        backgroundColor = .black
        tintColor = .white
        setTitleColor(.white, for: .normal)

        layer.shadowColor = UIColor.clear.cgColor
        layer.cornerRadius = 4
        layer.masksToBounds = false
        layer.shadowOpacity = 0.5
        layer.shadowRadius = 20
        layer.shadowOffset = CGSize(width: 0, height: 20)
    }

    override func didUpdateFocus(in context: UIFocusUpdateContext, with coordinator: UIFocusAnimationCoordinator) {
        if self.isFocused {
            coordinator.addCoordinatedAnimations({
                self.transform = CGAffineTransform(scaleX: self.scaleValue, y: self.scaleValue)
                self.layer.shadowColor = UIColor.black.cgColor
            }, completion: nil)
        } else {
            coordinator.addCoordinatedAnimations({
                self.transform = CGAffineTransform.identity
                self.layer.shadowColor = UIColor.clear.cgColor
            }, completion: nil)
        }
    }
}
- 押下した時のアニメーション -
class CustomFocusableButton: UIButton {

    private var pressInitialTransform: CGAffineTransform?
    private var scaleValue: CGFloat = 1.1

    ...

    override func pressesBegan(_ presses: Set<UIPress>, with event: UIPressesEvent?) {
        guard
            pressInitialTransform == nil,
            presses.filter({ $0.type == .select }).count > 0 else {
                return
        }

        pressInitialTransform = CGAffineTransform(scaleX: scaleValue, y: scaleValue)

        UIView.animate(withDuration: 0.3,
                       delay: 0,
                       usingSpringWithDamping: 1,
                       initialSpringVelocity: 1,
                       options: UIViewAnimationOptions.curveEaseOut,
                       animations: { () -> Void in
                        if let initialTransform = self.pressInitialTransform {
                            self.transform = initialTransform.scaledBy(x: 0.9, y: 0.9)
                        }
        }, completion: nil)
    }

    override func pressesCancelled(_ presses: Set<UIPress>, with event: UIPressesEvent?) {
        pressesEnded()
    }
    override func pressesEnded(_ presses: Set<UIPress>, with event: UIPressesEvent?) {
        pressesEnded()
    }

    private func pressesEnded() {
        UIView.animate(withDuration: 0.2,
                       delay: 0,
                       usingSpringWithDamping: 1,
                       initialSpringVelocity: 1,
                       options: UIViewAnimationOptions.curveEaseOut,
                       animations: { () -> Void in
                        if let initialTransform = self.pressInitialTransform {
                            self.transform = initialTransform
                        }
        }, completion: { _ in
            self.pressInitialTransform = nil
        })
    }
}
- フォーカス時のエフェクト -
いい感じになってきました。次にフォーカスした状態でリモコンをグリグリした時の動きをつけたいと思います。
まずUIMotionEffectを作ります。UIButtonだけでなくUIImageViewなどでも使えるようにtypeをつくっています。
CATransform3Dを駆使してUIMotionEffectを作成して、純正の動作に近づくように調整していきます。

enum MotionEffectsType {
    case image
    case button
    case shine(CGSize)

    private static func transform(scale: CGFloat, perspectiveX: CGFloat, perspectiveY: CGFloat, translationX: CGFloat, translationY: CGFloat) -> CATransform3D {
        return CATransform3D(
            m11: scale,             m12: 0.0,               m13: 0.0,               m14: perspectiveY,
            m21: 0.0,               m22: scale,             m23: 0.0,               m24: perspectiveX,
            m31: 0.0,               m32: 0.0,               m33: 1.0,               m34: 0.0,
            m41: translationX,      m42: translationY,      m43: 0.0,               m44: 1.0)
    }

    var effects: [UIMotionEffect] {

        switch self {
        case .image(let scale),
             .button(let scale):
            let scale: CGFloat = 1.1
            let xTranslation: CGFloat = 10
            let yTranslation: CGFloat = 10
            let perspective: CGFloat = 0.00012

            let xTransform = UIInterpolatingMotionEffect(keyPath: "layer.transform", type: .tiltAlongVerticalAxis)
            let xMinTransform = MotionEffectsType.transform(scale: scale,
                                                            perspectiveX: perspective,
                                                            perspectiveY: 0.0,
                                                            translationX: 0.0,
                                                            translationY: -yTranslation)
            let xMaxTransform = MotionEffectsType.transform(scale: scale,
                                                            perspectiveX: -perspective,
                                                            perspectiveY: 0.0,
                                                            translationX: 0.0,
                                                            translationY: yTranslation)
            xTransform.minimumRelativeValue = NSValue(caTransform3D: xMinTransform)
            xTransform.maximumRelativeValue = NSValue(caTransform3D: xMaxTransform)

            let yTransform = UIInterpolatingMotionEffect(keyPath: "layer.transform", type: .tiltAlongHorizontalAxis)
            let yMinTransform = MotionEffectsType.transform(scale: 1.0,
                                                            perspectiveX: 0.0,
                                                            perspectiveY: perspective,
                                                            translationX: -xTranslation,
                                                            translationY: 0.0)
            let yMaxTransform = MotionEffectsType.transform(scale: 1.0,
                                                            perspectiveX: 0.0,
                                                            perspectiveY: -perspective,
                                                            translationX: xTranslation,
                                                            translationY: 0.0)
            yTransform.minimumRelativeValue = NSValue(caTransform3D: yMinTransform)
            yTransform.maximumRelativeValue = NSValue(caTransform3D: yMaxTransform)

            return [xTransform, yTransform]

        case .shine(let size):
            let translationModifier: CGFloat = 16
            let scale: CGFloat = 1.0
            let xTranslation: CGFloat = (size.width - translationModifier)
            let yTranslation: CGFloat = (size.height - translationModifier + 32)
            let perspective: CGFloat = 0.0

            let xTransform = UIInterpolatingMotionEffect(keyPath: "layer.transform", type: .tiltAlongVerticalAxis)
            let xMinTransform = MotionEffectsType.transform(scale: scale,
                                                            perspectiveX: perspective,
                                                            perspectiveY: 0.0,
                                                            translationX: 0.0,
                                                            translationY: -yTranslation)
            let xMaxTransform = MotionEffectsType.transform(scale: scale,
                                                            perspectiveX: -perspective,
                                                            perspectiveY: 0.0,
                                                            translationX: 0.0,
                                                            translationY: yTranslation)

            xTransform.minimumRelativeValue = NSValue(caTransform3D: xMinTransform)
            xTransform.maximumRelativeValue = NSValue(caTransform3D: xMaxTransform)

            let yTransform = UIInterpolatingMotionEffect(keyPath: "layer.transform", type: .tiltAlongHorizontalAxis)
            let yMinTransform = MotionEffectsType.transform(scale: 1.0,
                                                            perspectiveX: 0.0,
                                                            perspectiveY: perspective,
                                                            translationX: -xTranslation,
                                                            translationY: 0)
            let yMaxTransform = MotionEffectsType.transform(scale: 1.0,
                                                            perspectiveX: 0.0,
                                                            perspectiveY: -perspective,
                                                            translationX: xTranslation,
                                                            translationY: 0.0)

            yTransform.minimumRelativeValue = NSValue(caTransform3D: yMinTransform)
            yTransform.maximumRelativeValue = NSValue(caTransform3D: yMaxTransform)
            return [xTransform, yTransform]
        }
    }
}
追加しやすいようにextensionもつくっておきます。
extension UIView {

    func addMotionEffects(type: MotionEffectsType) {
        motionEffects = []
        let motionGroup = UIMotionEffectGroup()
        motionGroup.motionEffects = type.effects
        addMotionEffect(motionGroup)
    }
}
カスタムボタンのdidUpdateFocusでフォーカス時にボタン用のMotionEffectsを追加、アンフォーカスで削除します。
class CustomFocusableButton: UIButton {

    ...
    override func didUpdateFocus(in context: UIFocusUpdateContext, with coordinator: UIFocusAnimationCoordinator) {
        if self.isFocused {
            addMotionEffects(type: .button(scaleValue))
            coordinator.addCoordinatedAnimations({
                self.layer.shadowColor = UIColor.black.cgColor
            }, completion: nil)
        } else {
            motionEffects = []
            coordinator.addCoordinatedAnimations({
                self.layer.shadowColor = UIColor.clear.cgColor
            }, completion: nil)
        }
    }
    ...
- 光の反射 -
最後に、画像の角度によって光が反射しているようなエフェクトを入れてみます。

光用のViewを用意します。
class ShineView: UIImageView {

    init() {
        super.init(frame: .zero)
    }

    required init?(coder aDecoder: NSCoder) {
        fatalError("init(coder:) has not been implemented")
    }

    override func layoutSubviews() {
        super.layoutSubviews()
        image = Shine.image(size: bounds.size)
    }
}

enum Shine {

    private static var imageCache: [String: UIImage] = [:]

    static func convertSize(_ size: CGSize) -> CGSize {
        let maxDimension = max(size.width, size.height)
        let shineDimension = maxDimension * 1.2
        return CGSize(width: shineDimension, height: shineDimension)
    }

    static func image(size: CGSize) -> UIImage? {
        let shineSize = Shine.convertSize(size)
        let key = Shine.key(size: shineSize)
        if let image = Shine.imageCache[key] {
            return image
        }

        let image = Shine.create(size: shineSize)
        if let image = image {
            Shine.imageCache[key] = image
        }
        return image
    }

    private static func key(size: CGSize) -> String {
        return "\(size.width).\(size.height)"
    }

    private static func create(size: CGSize) -> UIImage? {
        let size = CGSize(width: size.width, height: size.height)
        let locations: [CGFloat] = [0.0, 0.5, 1.0]

        UIGraphicsBeginImageContextWithOptions(size, false, 1.0)
        guard let context = UIGraphicsGetCurrentContext() else {
            return nil
        }

        let colors = [0.2, 0.14, 0].map { UIColor(white: 1.0, alpha: $0).cgColor }
        guard let gradient = CGGradient(colorsSpace: CGColorSpaceCreateDeviceGray(),
                                        colors: colors as CFArray,
                                        locations: locations) else {
                                            return nil
        }

        let center = CGPoint(x: size.width / 2.0, y: size.height / 2.0)
        let radius = size.width / 2.0
        let centerRadius = size.width * 0.1
        context.drawRadialGradient(gradient,
                                   startCenter: center,
                                   startRadius: centerRadius,
                                   endCenter: center,
                                   endRadius: radius,
                                   options: [.drawsBeforeStartLocation])

        let image = UIGraphicsGetImageFromCurrentImageContext()
        UIGraphicsEndImageContext()
        return image
    }
}
CustomFocusableButtonに作成したShineViewを追加します。
光用のViewはmaskしたいのでcontainerも用意しています。
didUpdateFocus時にShineViewの追加とエフェクトの追加を行います。
class CustomFocusableButton: UIButton {

    private let shineContainer = UIView()
    private let shineView = ShineView()
    private var pressInitialTransform: CGAffineTransform?
    private var scaleValue: CGFloat = 1.1

    override func awakeFromNib() {
        super.awakeFromNib()
        ...

        shineContainer.backgroundColor = .clear
        shineContainer.layer.masksToBounds = true
        addSubview(shineContainer)
    }

    override func layoutSubviews() {
        super.layoutSubviews()

        shineContainer.frame = bounds

        let shineSize = Shine.convertSize(bounds.size)
        let shineRect = CGRect(origin: CGPoint(x: bounds.midX - (shineSize.width / 2.0), y: -(shineSize.height / 2.0) - 20), size: shineSize)
        let rect = convert(shineRect, to: shineContainer)
        shineView.frame = rect
    }

    override func didUpdateFocus(in context: UIFocusUpdateContext, with coordinator: UIFocusAnimationCoordinator) {
        if self.isFocused {
            addMotionEffects(type: .button(scaleValue))
            shineContainer.addSubview(shineView)
            shineView.addMotionEffects(type: .shine(bounds.size))

            coordinator.addCoordinatedAnimations({
                self.layer.shadowColor = UIColor.black.cgColor
            }, completion: nil)
        } else {
            motionEffects = []
            shineView.removeFromSuperview()
            shineView.motionEffects = []
            coordinator.addCoordinatedAnimations({
                self.layer.shadowColor = UIColor.clear.cgColor
            }, completion: nil)
        }
    }
    ...
}
完成イメージのところで載せましたが、この実装をUICollectionViewCellに適用すると以下のような感じになります。UIImageViewのadjustsImageWhenAncestorFocusedはfalseにした状態で独自実装の動作です。

まとめ
少しコードが長くなってしまいましたがいかがでしたでしょうか。
今回の実装では純正のエフェクトに比べると細かい部分でまだ色々調整しなければならない部分がたくさんあります。やはり純正はよくできているなぁというのと、独自で実装するのはけっこう大変だということがわかりました。
tvOS Advent Calendar 2017 明日は再び @toshi0383 で 「フォーカスされてるセルが隣のセルの下に潜ってしまう」 です!


