AWS AmplifyとAmplify UI VueとVue.jsでログイン機能を構築してみました 
2年くらい前に書いた「AWS AmplifyとVue.jsでログイン機能を構築してみた」の記事では、Amplify UI Componentsは「aws-amplify-vue」を利用していましたが、最新だとVue v2「ui-vue」やVue v3「ui-components」が推奨のため今回ログイン機能を最新にしてみました ![]()
事前準備
-
AWS Amplify CLIのインストールと設定
下記リンクがとてもわかりやすく説明されています。
AWS Amplify CLIの使い方〜インストールから初期セットアップまで〜 -
Vue.jsの環境準備
今回はVue.jsとVuetifyの構成にしました。詳細はpackage.jsonをご確認いただければと思います。
全体の構成はできるだけシンプルに。
バックエンド - ユーザー管理
- Amazon Cognito
フロントエンド - ログイン機能
- AWS Amplify
- Vue.js v2
- Vuetify
バックエンド
まずは、バックエンドを構築していきます。
今までは、Amazon Cognito等のサービスも自分で設定する必要があり設定だけでも苦労したのですが、AWS Amplify CLIが登場したことにより、コマンドのみでほぼ設定が完了することが可能なりました。
認証機能のみであれば2コマンドで実装可能です!
amplify add auth
amplify push
これだけでバックエンドの構築は完了になります ![]()
フロントエンド
次に、フロントエンドを構築していきます。
実行環境
- node v16.3.0
- npm v7.15.1
まず、プロジェクトに必要なパッケージを2つインストールします。
npm install aws-amplify
npm install @aws-amplify/ui-vue
最後に、実際にログイン機能のコードを記述していきます。
基本的には、routerに認証部分のコードを記述し、UIは既にあるコンポーネントを指定することでそのまま表示することが可能です。
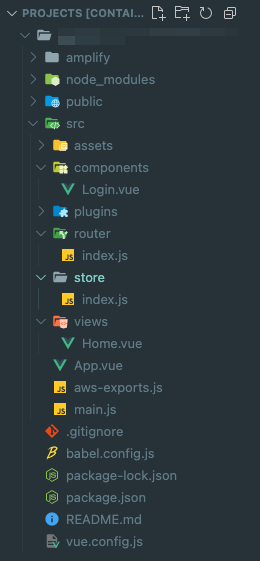
全体構成
package.json
{
  "name": "amplify_prj",
  "version": "0.1.0",
  "private": true,
  "scripts": {
    "serve": "vue-cli-service serve",
    "build": "vue-cli-service build",
    "lint": "vue-cli-service lint"
  },
  "dependencies": {
    "@aws-amplify/ui-vue": "^1.0.12",
    "aws-amplify": "^4.1.1",
    "core-js": "^3.6.5",
    "vue": "^2.6.11",
    "vue-router": "^3.2.0",
    "vuetify": "^2.4.0",
    "vuex": "^3.4.0"
  },
  "devDependencies": {
    "@vue/cli-plugin-babel": "~4.5.0",
    "@vue/cli-plugin-eslint": "~4.5.0",
    "@vue/cli-plugin-router": "~4.5.0",
    "@vue/cli-plugin-vuex": "~4.5.0",
    "@vue/cli-service": "~4.5.0",
    "babel-eslint": "^10.1.0",
    "eslint": "^6.7.2",
    "eslint-plugin-vue": "^6.2.2",
    "sass": "~1.32.0",
    "sass-loader": "^10.0.0",
    "vue-cli-plugin-vuetify": "~2.4.1",
    "vue-template-compiler": "^2.6.11",
    "vuetify-loader": "^1.7.0"
  },
  "eslintConfig": {
    "root": true,
    "env": {
      "node": true
    },
    "extends": [
      "plugin:vue/essential",
      "eslint:recommended"
    ],
    "parserOptions": {
      "parser": "babel-eslint"
    },
    "rules": {}
  },
  "browserslist": [
    "> 1%",
    "last 2 versions",
    "not dead"
  ]
}
/src
main.js
import Vue from 'vue'
import App from './App.vue'
import router from './router'
import store from './store'
import vuetify from './plugins/vuetify'

// Amplify読み込み
import '@aws-amplify/ui-vue'
import Amplify from 'aws-amplify'
import awsconfig from './aws-exports'
Amplify.configure(awsconfig)

Vue.config.productionTip = false

new Vue({
  router,
  store,
  vuetify,
  render: h => h(App)
}).$mount('#app')
/src/store
index.js
import Vue from 'vue'
import Vuex from 'vuex'

Vue.use(Vuex)

const store = new Vuex.Store({
  state: {
    user: null
  },
  mutations: {
    setUser(state, user) {
      state.user = user
    },
  },
  getters: {
    isSignIn: (state) => {
      return state.user !== null
    },
  },
  actions: {},
  modules: {}
});

export default store
/src/router
index.js
import Vue from 'vue'
import Router from 'vue-router'
import Home from '../views/Home.vue'
import Login from '../components/Login.vue'

import store from '../store/index.js'

// Amplify読み込み
import { Hub } from "@aws-amplify/core"
import Auth from "@aws-amplify/auth"

Vue.use(Router)

let user;

// ユーザー管理
getUser().then((user) => {
    if (user) {
        router.push({path: '/'});
    }
});

function getUser() {
    return Auth.currentAuthenticatedUser().then((data) => {
        if (data && data.signInUserSession) {
            store.commit('setUser', data);
            return data;
        }
    }).catch(() => {
        store.commit('setUser', null);
        return null;
    });
}

// ログイン状態管理
Hub.listen("auth", async (data) => {
    if (data.payload.event === 'signOut'){
        user = null;
        store.commit('setUser', null);
        router.push({path: '/login'});
    } else if (data.payload.event === 'signIn') {
        user = await getUser();
        router.push({path: '/'});
    }
});

// ルーティング設定
const router = new Router({
    mode: 'history',
    routes: [
        {
            // ログインページ
            path: '/login',
            name: 'login',
            component: Login
        },
        {
            // トップページ
            path: '/',
            name: 'home',
            component: Home,
            meta: { requiresAuth: true}
        }
    ]
});

// リダイレクト設定
router.beforeResolve(async (to, from, next) => {
    if (to.matched.some(record => record.meta.requiresAuth)) {
        user = await getUser();
        if (!user) {
            return next({
                path: '/login'
            });
        }
        return next()
    }
    return next()
});

export default router
src/views
Home.vue
<template>
    <div class="home">
        <v-container>
            <v-row>
                <v-col>
                    <h1>ログイン済</h1>
                </v-col>
            </v-row>
            <v-row>
                <v-col>
                    <!--ログアウトコンポーネント-->
                    <amplify-sign-out></amplify-sign-out>
                </v-col>
            </v-row>
        </v-container>
    </div>
</template>

<script>
    export default {
        name: 'home',
        components: {
        }
    }
</script>

<style>
    .home {
        padding-top: 100px;
    }
</style>
/src/components
Login.vue
<template>
    <div class="login">
        <!--ログインコンポーネント-->
        <amplify-authenticator></amplify-authenticator>
    </div>
</template>

<script>
    export default {
        name: 'login'
    }
</script>
簡易ローカルサーバーで確認してみます。
npm run serve
ローカルサーバーを立ち上げて、ログイン画面でユーザーを登録しログインしてみます ![]()
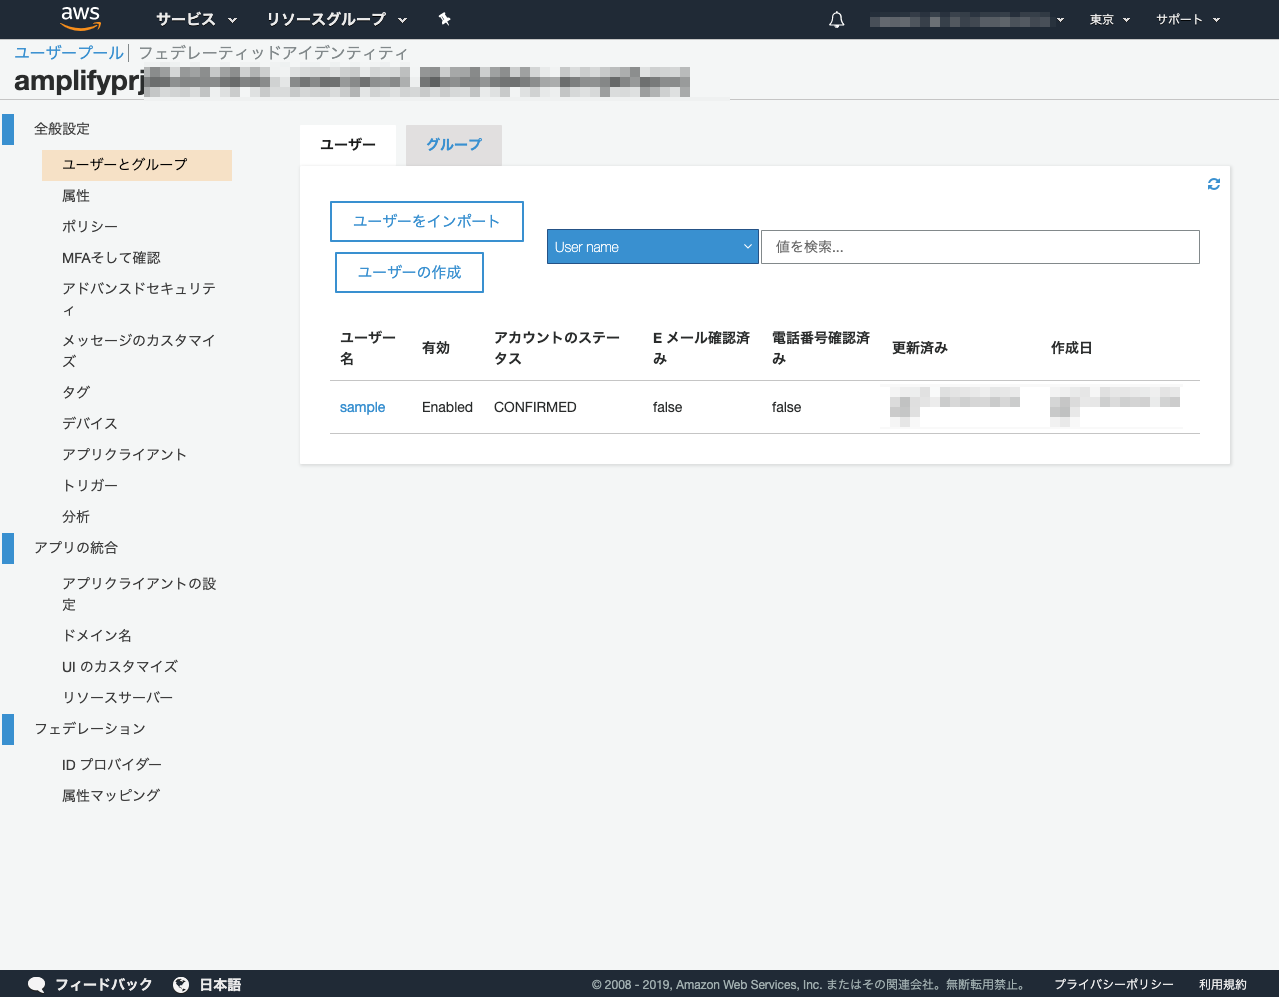
AWSのコンソールを確認するとユーザーも正常に登録さています。
AWS AmplifyとAmplify UI VueとVue.jsを利用することで、手軽にログイン機能の構築ができました 
AWS Amplify CLIが登場したことにより、Amplifyを利用する場合に以前よりサーバーレス設定周りがめちゃくちゃ便利になったのでおすすめです。Amplify UI Componentsについては、前回の「aws-amplify-vue」から「ui-vue」に変更したことで一部コードの変更があったので参考にして頂ければと思います ![]()
Vue.jsについて、他にも記事を書いています。よろしければぜひ ![]()
tags - Vue.js
やってみたシリーズ ![]()
tags - Try
AWS AmplifyとVue.jsでログイン機能を構築してみた


