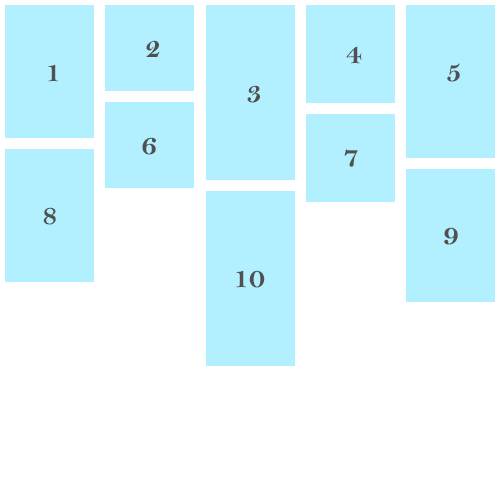
pinterestやjQuery Masonry のようにコンテンツをタイル状に並べるレイアウトがありますが、それをjQueryを使って自分で作ってみました。横幅はひとつの値に固定です。
デモ
実行とoption
JSファイルをダウンロードするとプラグイン状にしてあるのでJSファイルを設置すると以下のコードで実行できます。
$(function(){
  $('外枠のidかclass').bricks();
});
またoptionで以下の設定が出来ます。
- space:コンテンツ間隔 (デフォルトは5)
- type:「line」行ごとに並べる「low」:高さが低い所から配置する(デフォルトはlow) ※後述
- time:読み込み時に初期位置から該当位置までのアニメーションする時間。0にするとアニメーションなし(デフォルトは0)
- start:配置アニメーションの初期位置。leftTop rightTop centerTopのどれかを指定する(デフォルトはleftTop) ※timeが0だと特に指定する意味が無い
- easing:配置アニメーションのイージングの仕方。jquery.easing.jsがない場合はliner or swingのどちらかを入れる(デフォルトはswing) ※timeが0だと特に指定する意味が無い
type
今回はコンテンツの並び方を2種類作ってみました。
最初の「line」は、コンテンツが長いものがあると凄い偏った列が出来ます。
ウインドウサイズが変更されると並び替えるようになっています。またoptionでアニメーション指定もしています。
その他の動作に関係があるHTMLとCSSとJSファイル内容が以下になります。
HTML
<div class="bricks">
  <div class="cluster">
    <h2>コンテンツ内容1</h2>
    <p><img src="img.gif" width="100%" alt=""></p>
    <p>Lorem ipsum dolor sit amet, consectetur adipisicing elit. Quam distinctio perspiciatis consequatur id quisquam labore molestiae doloribus, architecto error aspernatur natus reiciendis nulla nihil eveniet aperiam, veniam libero placeat repudiandae.</p>
    <p>Lorem ipsum dolor sit amet, consectetur adipisicing elit. Quam distinctio perspiciatis consequatur id quisquam labore molestiae doloribus, architecto error aspernatur natus reiciendis nulla nihil eveniet aperiam, veniam libero placeat repudiandae.</p>
  </div>
  <div class="cluster">
    <h2>コンテンツ内容2</h2>
    <p>Lorem ipsum dolor sit amet, consectetur adipisicing elit. Quam distinctio perspiciatis consequatur id quisquam labore molestiae doloribus, architecto error aspernatur natus reiciendis nulla nihil eveniet aperiam, veniam libero placeat repudiandae.</p>
  </div>
  ~~中略~~
</div>
bricksというclassが外枠でその下のclusterというclassの位置を調整してます。
CSS
動作に関係があるCSSは以下の箇所です。
.bricks {
  position: relative;
}

.cluster {
  width: 200px;
}
外枠にrelativeを指定することで、もし横幅を指定してもそれに沿って配置してくれるようにしています。
JavaScript
(function($){
  $.fn.bricks = function(options){
    var defaults = {
      space : 5,
      type: 'low',
      time: 0,
      start: 'leftTop',
      easing: 'swing'
    };
    var setting = $.extend(defaults,options);
    var wrap = $(this);
    var wrapWidth;
    var content = wrap.children('.cluster')
    var contentWidth;
    var wrapColumn;
    content.css({
      'position': 'absolute'
    });

    //アニメーションの開始位置
    if(setting.start == 'leftTop'){
      content.css({
        'top': 0,
        'left': 0
      });
    }else if(setting.start == 'rightTop') {
      content.css({
        'top': 0,
        'right': 0
      });
    }else if(setting.start == 'centerTop') {
      content.css({
        'top': 0,
        'left': (wrapWidth / 2) - (contentWidth / 2)
    });
  }

  function goMove(){
    wrapWidth = wrap.outerWidth();
    contentWidth = $(content).outerWidth() + (setting.space * 2);
    var contentNum = 0;//何番目 画面端まで来ると0に戻る
    var contentLine = 0;//何行目
    var contentCount = 1;//何番目
    var contentPos = [];//そのコンテンツの位置情報
    wrapColumn = Math.floor(wrapWidth / contentWidth);//横に何カラム並ぶか
    if (setting.type == 'line') {
      content.each(function() {
        if( ($(this).outerWidth() + setting.space * 2) * (contentNum + 1) > wrapWidth){
          contentNum = 0;
          contentLine++;
        }
        if( contentLine == 0 ){
          var topPos = 0 + (setting.space * contentLine);
          var leftPos = (contentWidth * contentNum) + setting.space;
          $(this).stop().animate({
            'top' : topPos,
            'left': leftPos
          },setting.time,setting.easing);
        }else {
          var topPos = content.eq((contentCount - 1) - wrapColumn).offset().top + content.eq((contentCount - 1) - wrapColumn).outerHeight() + setting.space;
          var leftPos = (contentWidth * contentNum) + setting.space
          $(this).stop().animate({
            'top' : topPos,
            'left' : leftPos
          },setting.time,setting.easing);
        }
        contentPos[contentCount - 1] = $(this).offset({top: topPos + setting.space ,left: leftPos});
        contentNum++;
        contentCount++;
      });
    }

    if(setting.type == 'low'){
      var contentHeight= new Array(wrapColumn);//コンテンツ列のそれぞれの合計高さ
      for (var c = 0; c < wrapColumn; c++) {
      contentHeight[c] = 0;
    }
    var lowHeight;//一番小さい値
    var lowHeightNum;//一番小さい値が何番目にあるか
    content.each(function() {
      if( ($(this).outerWidth() + (setting.space * 2)) * (contentNum + 1) > wrapWidth){
        contentNum = 0;
        contentLine++;
      }
      var thisHeight = $(this).outerHeight() + setting.space;
      if( contentLine == 0 ){
        $(this).animate({
        'top' : 0 + (setting.space * contentLine),
        'left': (contentWidth * contentNum) + setting.space},setting.time,setting.easing);
        contentHeight[contentNum] = contentHeight[contentNum] + thisHeight + setting.space;
      }else {
        lowHeight = Math.min.apply(null,contentHeight);
        lowHeightNum = $.inArray(lowHeight,contentHeight)
        $(this).animate({
          'top': contentHeight[lowHeightNum],
          'left': (contentWidth * lowHeightNum) + setting.space
        },setting.time,setting.easing);
        contentHeight[lowHeightNum] = contentHeight[lowHeightNum] + thisHeight + setting.space;
      }
      contentNum++;
      });
    }
  }
  goMove();

  //リサイズ処理
  var timer = false;
    $(window).resize(function() {
      if (timer !== false) {
        clearTimeout(timer);
      }
      timer = setTimeout(function() {
      goMove();
      }, 500);
    });
  };
})(jQuery);
lineの仕組みは、そのコンテンツの上になるコンテンツの位置と高さをだして配置する位置を決めています。
lowの方は、それぞれの列の高さを比べて低い列からコンテンツを配置するようにしています。

