はじめに
右も左もわからない未経験エンジニアが書く初めての投稿です。
膨大な勉強量の中で、気になったことや発見などを書いていこうと思います。
間違いや記事を見て良かったことなど
気軽にコメントを残して頂けると活力に繋がりますのでよろしくおねがいします![]()
今回、Rails6系を使用しているためBootstrapの導入方法がRails5系とは違います。
詳しくは今後、Dockerを使った環境構築をまとめて記事にしようと考えておりますので、そこで説明させて頂きたいと思います!
開発環境
Rails 6.1.3.2
ruby 2.5.1
Docker version 20.10.6
Bootstarp v4.5
内容について
表題のとおり、簡単にスライドショーが実装できるCarouselの上にコンテンツを重ねる方法を記述します。
様々なサイトでやり方が書いてあるのですが、
「とりあえずアプリ全体のイメージをつかみたいから乗っけたいだけ」
と考えた時に複雑なコーディングをしたくなく、力技でねじ込んでみました。
初めてBootstrapを使用する方向けに画像付きでCarousel導入の仕方も記載しております。
「重ね方だけ知りたい!」という方は carousel上にコンテンツを載せる までスキップしてください
Carouselの導入準備
Rails6であり、yarnのinstallが終わっているものとします
$ yarn add jquery bootstrap popper.js
上記コードを実行することでnode_modulesディレクトリ配下に必要なものが配置されます
バージョンなどはGemfileには記述されず、package.jsonやyarn.lockに記述されます
次にconfig/environment.js
const { environment } = require('@rails/webpacker')

# ============== ここから ==================
const webpack = require('webpack')
environment.plugins.prepend('Provide',
  new webpack.ProvidePlugin({
    $: 'jquery/src/jquery',
    jQuery: 'jquery/src/jquery',
    Popper: ['popper.js', 'default']
  })
)
# 4・5行目は環境によって変わります
# 私はsrcディレクトリを作っているのでこの記述になります
# 作っていない方は'jquery'のみで試してください
# ============ ここまでを記述確認 =====================

module.exports = environment
javascript配下にstylesheets/application.scssを作成し
@import '~bootstrap/scss/bootstrap';
を記述(ファイル内の一番上で良いと思います)
javascript/packs/application.js内に
import "bootstrap"

import "../stylesheets/application.scss"
を記述
あとはlayout/application.html.erbで
    <%= stylesheet_pack_tag 'application', media: 'all', 'data-turbolinks-track': 'reload' %>
    <%= javascript_pack_tag 'application', 'data-turbolinks-track': 'reload' %>
の記述確認をすれば準備は完了です
~ 補足 ~
webpackerを使わず、assetsパイプラインを使用したい方ははこちらの記事がおすすめです♪
コードの導入
Bootstrapのサイトへ行きます

「Bootstrap5」と書いてありますが
気をつけましょう!!!
上記「開発環境」でも記述しましたがこの記事で使用するバージョンは
「Bootstrap4.5」です。
4系と5系ではコード差違がある ため、使用するコンポーネントによって機能しないものがあります。
それを踏まえ、ドキュメントへ移動します。
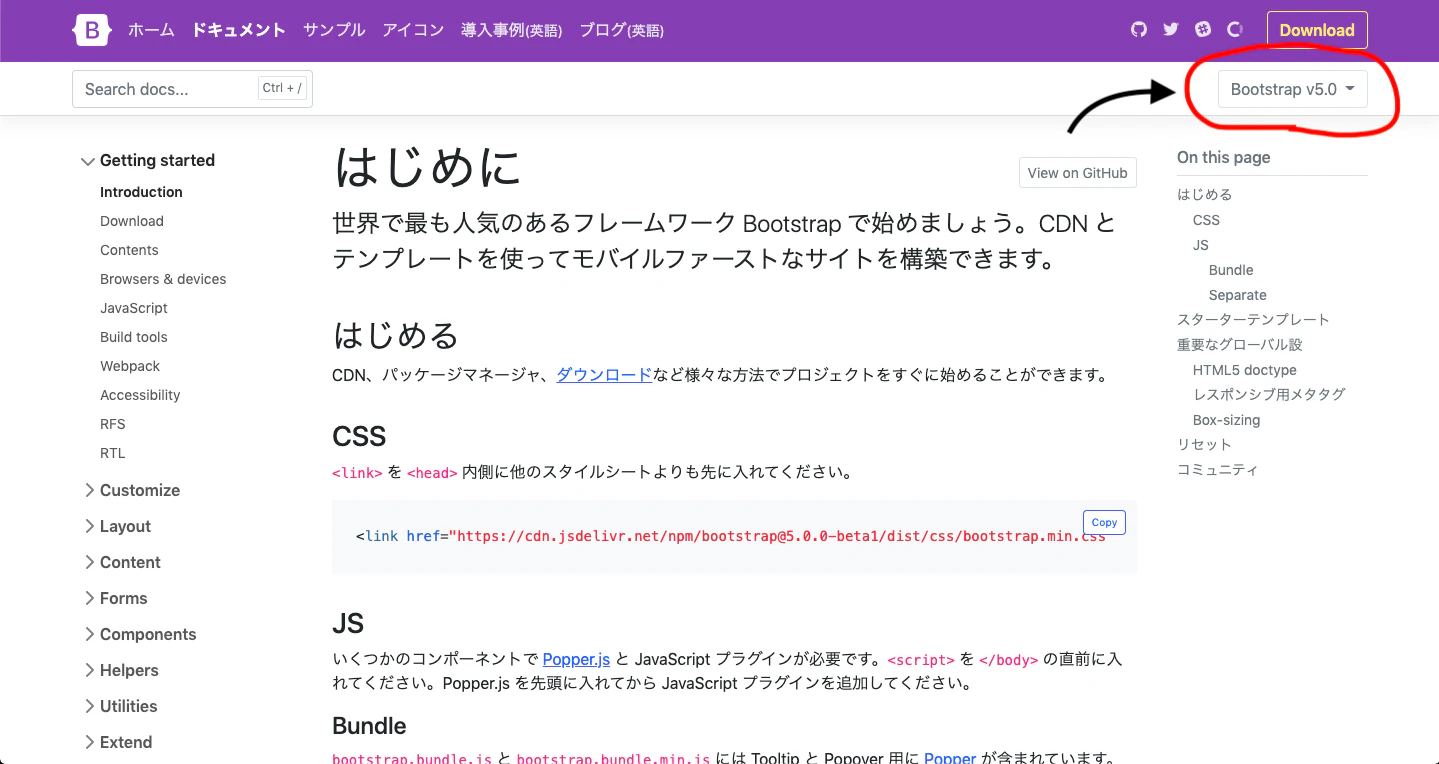
ここでまずバージョンのチェックをしましょう。
v5.0を使うならそのまま。プルダウンを開けば4系があります。
その後、左側リスト内にある「Components」を選ぶと、中に「Carousel」がいます。
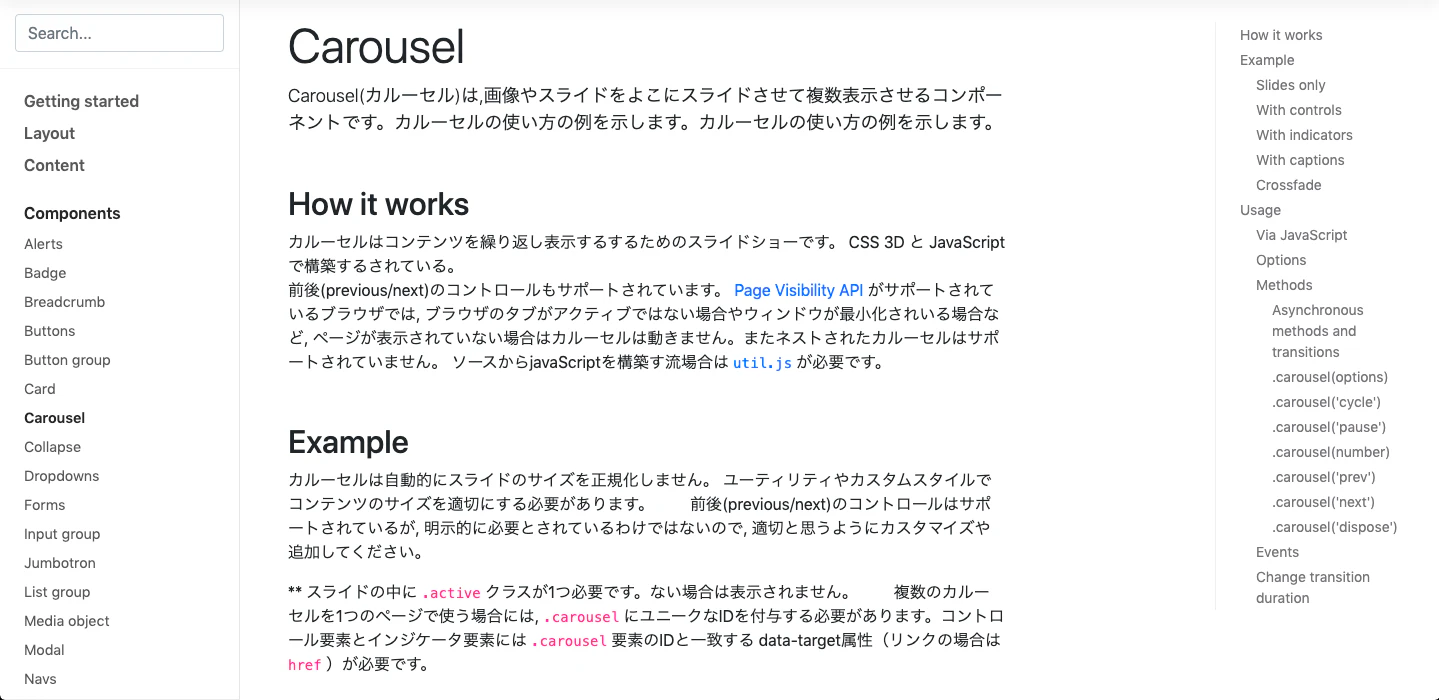
このページではCarouselを導入する際の注意点や、種類ごとのコードが記載されています。
今回はこのWith indicatorsをベースに初めたいと思います

ここに記載されているコードを使用したいhtmlファイルへコピーします。
<div id="carouselExampleIndicators" class="carousel slide" data-ride="carousel">
  <ol class="carousel-indicators">
    <li data-target="#carouselExampleIndicators" data-slide-to="0" class="active"></li>
    <li data-target="#carouselExampleIndicators" data-slide-to="1"></li>
    <li data-target="#carouselExampleIndicators" data-slide-to="2"></li>
  </ol>
  <div class="carousel-inner">
    <div class="carousel-item active">
      <svg class="bd-placeholder-img bd-placeholder-img-lg d-block w-100" width="800" height="400" xmlns="http://www.w3.org/2000/svg" preserveAspectRatio="xMidYMid slice" focusable="false" role="img" aria-label="Placeholder: First slide"><title>Placeholder</title><rect width="100%" height="100%" fill="#777"/><text x="50%" y="50%" fill="#555" dy=".3em">First slide</text></svg>
    </div>
    <div class="carousel-item">
      <svg class="bd-placeholder-img bd-placeholder-img-lg d-block w-100" width="800" height="400" xmlns="http://www.w3.org/2000/svg" preserveAspectRatio="xMidYMid slice" focusable="false" role="img" aria-label="Placeholder: Second slide"><title>Placeholder</title><rect width="100%" height="100%" fill="#666"/><text x="50%" y="50%" fill="#444" dy=".3em">Second slide</text></svg>
    </div>
    <div class="carousel-item">
      <svg class="bd-placeholder-img bd-placeholder-img-lg d-block w-100" width="800" height="400" xmlns="http://www.w3.org/2000/svg" preserveAspectRatio="xMidYMid slice" focusable="false" role="img" aria-label="Placeholder: Third slide"><title>Placeholder</title><rect width="100%" height="100%" fill="#555"/><text x="50%" y="50%" fill="#333" dy=".3em">Third slide</text></svg>
    </div>
  </div>
  <a class="carousel-control-prev" href="#carouselExampleIndicators" role="button" data-slide="prev">
    <span class="carousel-control-prev-icon" aria-hidden="true"></span>
    <span class="sr-only">Previous</span>
  </a>
  <a class="carousel-control-next" href="#carouselExampleIndicators" role="button" data-slide="next">
    <span class="carousel-control-next-icon" aria-hidden="true"></span>
    <span class="sr-only">Next</span>
  </a>
</div>
さらにカルーセルに説明文を載せるWith captionsを追加します。
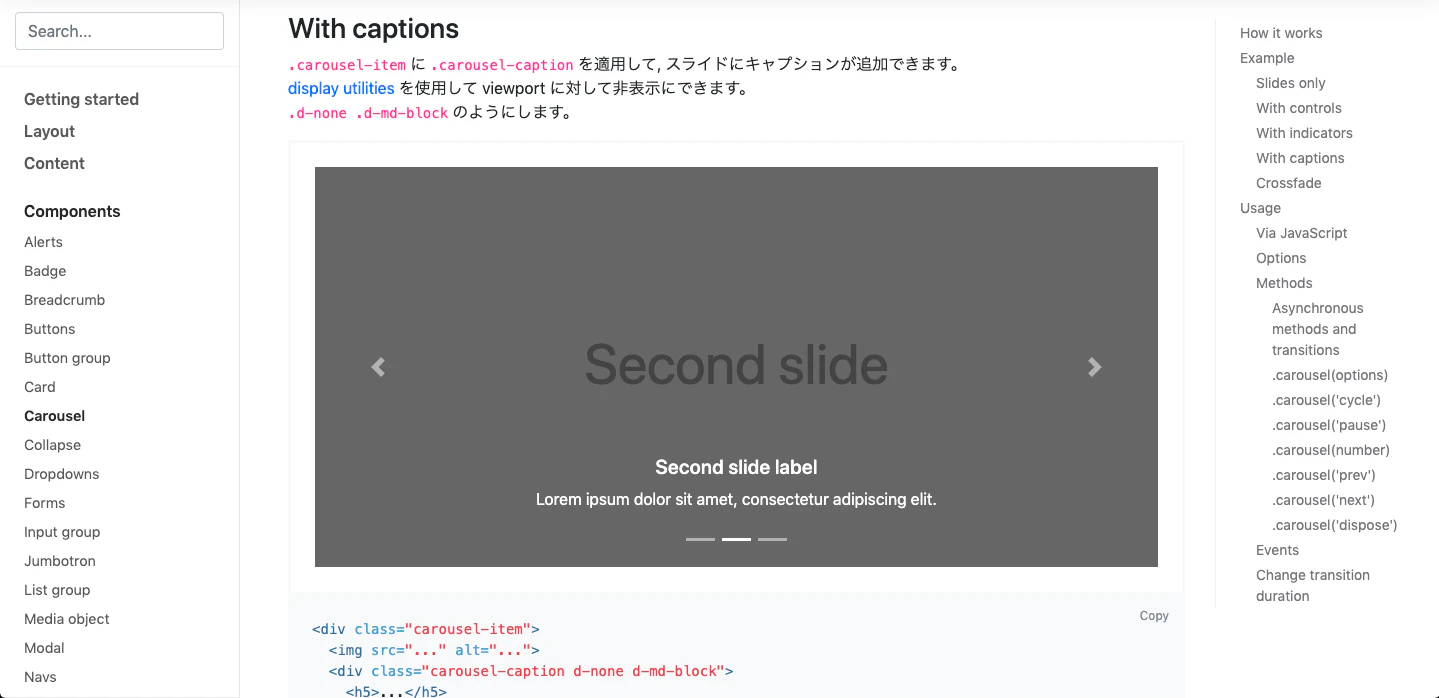
デフォルトのCarouselは3つのパターンで構成されています(class carousel-itemがパターン枠)
なので、With captionsも3つ追記します
<div id="carouselExampleIndicators" class="carousel slide" data-ride="carousel">
  <ol class="carousel-indicators">
    <li data-target="#carouselExampleIndicators" data-slide-to="0" class="active"></li>
    <li data-target="#carouselExampleIndicators" data-slide-to="1"></li>
    <li data-target="#carouselExampleIndicators" data-slide-to="2"></li>
  </ol>
  <div class="carousel-inner">
    <div class="carousel-item active">
      <svg class="bd-placeholder-img bd-placeholder-img-lg d-block w-100" width="800" height="400" xmlns="http://www.w3.org/2000/svg" preserveAspectRatio="xMidYMid slice" focusable="false" role="img" aria-label="Placeholder: First slide"><title>Placeholder</title><rect width="100%" height="100%" fill="#777"/><text x="50%" y="50%" fill="#555" dy=".3em">First slide</text></svg>
      <!-- ------------以下追加------------------ -->
      <div class="carousel-caption d-none d-md-block">
        <h5>...</h5>
        <p>...</p>
      </div>
            <!-- ------------ここまで---------------- -->
    </div>
    <div class="carousel-item">
      <svg class="bd-placeholder-img bd-placeholder-img-lg d-block w-100" width="800" height="400" xmlns="http://www.w3.org/2000/svg" preserveAspectRatio="xMidYMid slice" focusable="false" role="img" aria-label="Placeholder: Second slide"><title>Placeholder</title><rect width="100%" height="100%" fill="#666"/><text x="50%" y="50%" fill="#444" dy=".3em">Second slide</text></svg>
      <!-- ------------以下追加------------------ -->
      <div class="carousel-caption d-none d-md-block">
        <h5>...</h5>
        <p>...</p>
      </div>
            <!-- ------------ここまで---------------- -->
    </div>
    <div class="carousel-item">
      <svg class="bd-placeholder-img bd-placeholder-img-lg d-block w-100" width="800" height="400" xmlns="http://www.w3.org/2000/svg" preserveAspectRatio="xMidYMid slice" focusable="false" role="img" aria-label="Placeholder: Third slide"><title>Placeholder</title><rect width="100%" height="100%" fill="#555"/><text x="50%" y="50%" fill="#333" dy=".3em">Third slide</text></svg>
      <!-- ------------以下追加------------------ -->
      <div class="carousel-caption d-none d-md-block">
        <h5>...</h5>
        <p>...</p>
      </div>
      <!-- ------------ここまで---------------- -->
    </div>
  </div>
  <a class="carousel-control-prev" href="#carouselExampleIndicators" role="button" data-slide="prev">
    <span class="carousel-control-prev-icon" aria-hidden="true"></span>
    <span class="sr-only">Previous</span>
  </a>
  <a class="carousel-control-next" href="#carouselExampleIndicators" role="button" data-slide="next">
    <span class="carousel-control-next-icon" aria-hidden="true"></span>
    <span class="sr-only">Next</span>
  </a>
</div>
これで土台は仕上がりました
確認してみるとこんな感じになっていると思います
(cssをいじっているのでみなさんとは表示が違う可能性があります)

carousel上にコンテンツを載せる
まずはclassを設定するため、冒頭で作成したapplication.scssに下記コードを記述します
.ps-relative {
  position: relative;
}
.ps-absolute {
  position: absolute;
  top: 0;
  left: 0;
}
次にviewファイルに追加で
<div class="ps-relative"> <!-- これを追加 -->
  <div id="carouselExampleIndicators" class="carousel slide" data-ride="carousel">
    <ol class="carousel-indicators">
      <li data-target="#carouselExampleIndicators" data-slide-to="0" class="active"></li>
      <li data-target="#carouselExampleIndicators" data-slide-to="1"></li>
      <li data-target="#carouselExampleIndicators" data-slide-to="2"></li>
    </ol>
    <div class="carousel-inner">
      <div class="carousel-item active">
        <svg class="bd-placeholder-img bd-placeholder-img-lg d-block w-100" width="800" height="400" xmlns="http://www.w3.org/2000/svg" preserveAspectRatio="xMidYMid slice" focusable="false" role="img" aria-label="Placeholder: First slide"><title>Placeholder</title><rect width="100%" height="100%" fill="#777"/><text x="50%" y="50%" fill="#555" dy=".3em">First slide</text></svg>
        <div class="carousel-caption d-none d-md-block">
          <h5>...</h5>
          <p>...</p>
        </div>
      </div>
      <div class="carousel-item">
        <svg class="bd-placeholder-img bd-placeholder-img-lg d-block w-100" width="800" height="400" xmlns="http://www.w3.org/2000/svg" preserveAspectRatio="xMidYMid slice" focusable="false" role="img" aria-label="Placeholder: Second slide"><title>Placeholder</title><rect width="100%" height="100%" fill="#666"/><text x="50%" y="50%" fill="#444" dy=".3em">Second slide</text></svg>
        <div class="carousel-caption d-none d-md-block">
          <h5>...</h5>
          <p>...</p>
        </div>
      </div>
      <div class="carousel-item">
        <svg class="bd-placeholder-img bd-placeholder-img-lg d-block w-100" width="800" height="400" xmlns="http://www.w3.org/2000/svg" preserveAspectRatio="xMidYMid slice" focusable="false" role="img" aria-label="Placeholder: Third slide"><title>Placeholder</title><rect width="100%" height="100%" fill="#555"/><text x="50%" y="50%" fill="#333" dy=".3em">Third slide</text></svg>
        <div class="carousel-caption d-none d-md-block">
          <h5>...</h5>
          <p>...</p>
        </div>
      </div>
    </div>
    <a class="carousel-control-prev" href="#carouselExampleIndicators" role="button" data-slide="prev">
      <span class="carousel-control-prev-icon" aria-hidden="true"></span>
      <span class="sr-only">Previous</span>
    </a>
    <a class="carousel-control-next" href="#carouselExampleIndicators" role="button" data-slide="next">
      <span class="carousel-control-next-icon" aria-hidden="true"></span>
      <span class="sr-only">Next</span>
    </a>
  </div>
    <!-- ここから -->
  <div class="ps-absolute">
    <h1>Hello World</h1>
  </div>
  <!-- ここまでも追加 -->
</div> <!-- これも忘れずに -->
svgタグの部分は色々書いてありますが難しく考えず、
いつも使っているようにimageタグなどで補完してあげれば、任意の写真を配置できますので試してみてください
ここまでやると以下のようになっていると思います
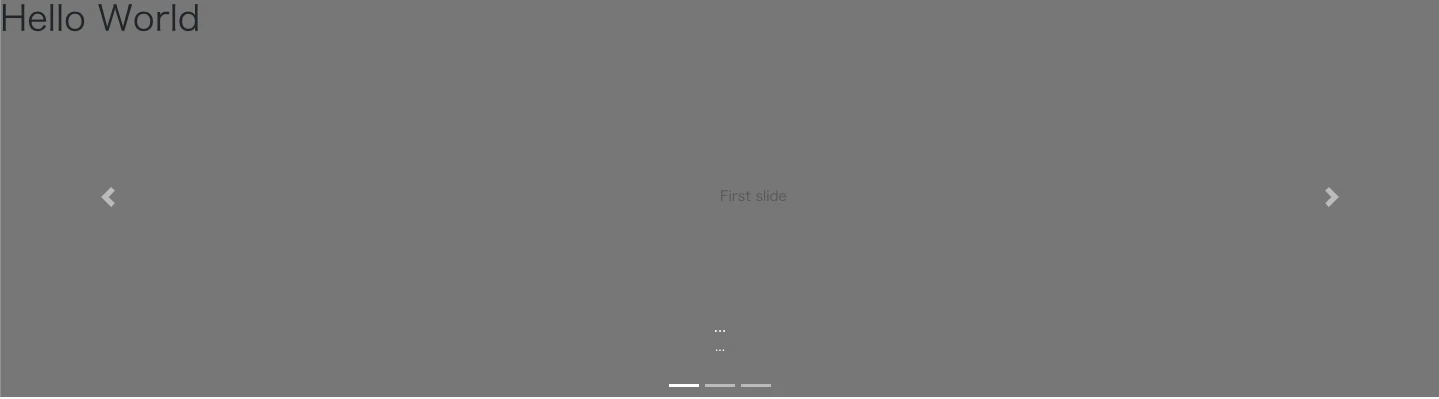
わかりづらいですがこうして「Hello Wordl」の文字がcarousel上に表示されます
かなり適当ですが
  <div class="ps-absolute" style="top: 45%; left: 42%;"> <!-- styleを追加 -->
    <h1>Hello World</h1>
  </div>
こうすれば

こうなります♪
あとはこの class="absolute" 配下に好きなコンテンツを追加していき、調整してあげるだけでOK!
もちろん、carouselが動いてもこの文字は動きません。
なので、トップページでのサイト説明などをcarousel上で行う際に使えるかなといったところです
ちなみに写真を導入する際は
    <div class="carousel-inner" style="height: 600px;"> <!-- height設定例 -->
      <div class="carousel-item active">
        <svg class="bd-placeholder-img bd-placeholder-img-lg d-block w-100" width="800" height="400" xmlns="http://www.w3.org/2000/svg" preserveAspectRatio="xMidYMid slice" focusable="false" role="img" aria-label="Placeholder: First slide"><title>Placeholder</title><rect width="100%" height="100%" fill="#777"/><text x="50%" y="50%" fill="#555" dy=".3em">First slide</text></svg>
        <div class="carousel-caption d-none d-md-block">
          <h5>...</h5>
          <p>...</p>
        </div>
      </div>
      <div class="carousel-item">
というふうにcarousel-innerに対し、heightで調整してあげましょう♪
carouselを暗くして背景として使う場合はこちらを見てください♪
最後に
勉強を始めたばかりで知識もなく、拙い文章ですがアウトプットすることで頭の中を整理しつつ、どなたかのお役に立てれば良いなと思い投稿させて頂きました。
最後まで見て頂きありがとうございました!