この記事は「Androidアプリ開発 これどうやって実装するんだっけ?」の第二回です。
メインターゲットは私のような「そろそろググることを覚えた初中級者」を(勝手に)想定しています。
JavaとKotlinの両方について解説しているので、「Javaでの実装はわかるけど、Kotlinだとどう書くの?」という人にも
お役に立つかと思います。
第一回はButton編でした。
本企画のサンプルは下のリンクにあります。masterブランチがKotlinのソースコード、javaブランチがJavaのソースコードです。
いろんなText、使ってみた
第一回でもうText使ってんじゃんというツッコミはなしで。
それくらい必須の機能ですね。
ただ単純にTextViewを置くのもつまらないので
サンプルとして、
- 文字を長押ししてコピーとかできるTextView
- ここだけ普通のEditText
- なんか補完機能で見つけた、TextClock
- みんな大好きMaterial Designが簡単に作れる、TexInputLayout/EditText
さらに、これらを使って簡単なログインフォームみたいな機能もつけました。
環境
Android Studio 3.0+
Android 8.0で動作確認
apply plugin: 'com.android.application'

apply plugin: 'kotlin-android'

apply plugin: 'kotlin-android-extensions'

android {
    compileSdkVersion 27
    defaultConfig {
        applicationId "net.ddns.dai.samplecodeprograms"
        minSdkVersion 17
        targetSdkVersion 27
        versionCode 1
        versionName "1.0"
        testInstrumentationRunner "android.support.test.runner.AndroidJUnitRunner"
    }
    buildTypes {
        release {
            minifyEnabled false
            proguardFiles getDefaultProguardFile('proguard-android.txt'), 'proguard-rules.pro'
        }
    }
}

dependencies {
    implementation fileTree(dir: 'libs', include: ['*.jar'])
    implementation "org.jetbrains.kotlin:kotlin-stdlib-jre7:$kotlin_version"
    implementation 'com.android.support:appcompat-v7:27.1.0'
    implementation 'com.android.support.constraint:constraint-layout:1.0.2'
    implementation 'com.android.support:design:27.1.0'
    implementation 'com.android.support:customtabs:27.1.0'
    testImplementation 'junit:junit:4.12'
    androidTestImplementation 'com.android.support.test:runner:1.0.1'
    androidTestImplementation 'com.android.support.test.espresso:espresso-core:3.0.1'
}
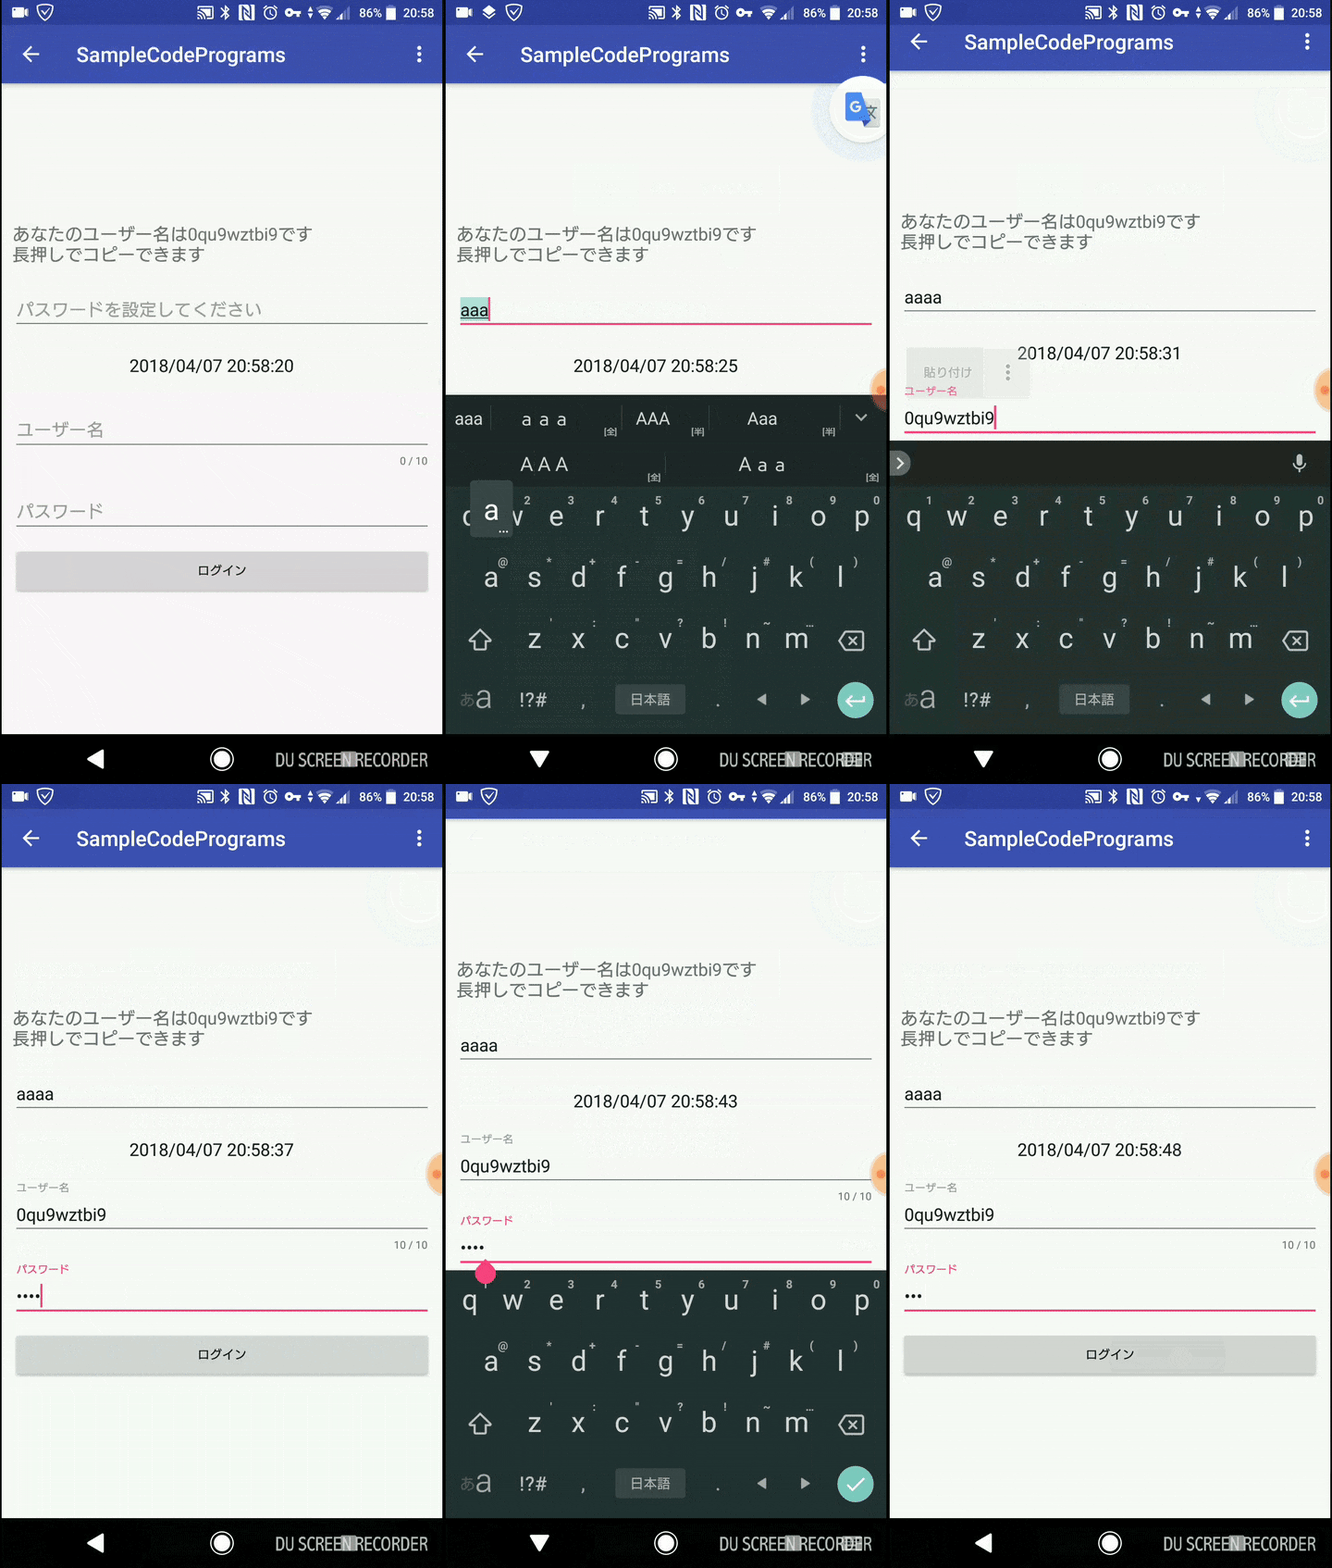
動作デモ
XMLの解説
<?xml version="1.0" encoding="utf-8"?>
<LinearLayout
    xmlns:android="http://schemas.android.com/apk/res/android"
    xmlns:app="http://schemas.android.com/apk/res-auto"
    xmlns:tools="http://schemas.android.com/tools"
    android:layout_width="match_parent"
    android:layout_height="match_parent"
    android:orientation="vertical"
    android:gravity="center"
    android:padding="10dp"
    tools:context=".TextSampleActivity">

    <TextView
        android:id="@+id/userName"
        android:layout_width="match_parent"
        android:layout_height="wrap_content"
        android:hint="あなたのユーザー名は◯◯です\n長押しでコピーできます"
        android:textSize="20sp"
        android:textIsSelectable="true"/>

    <EditText
        android:id="@+id/editPassword"
        android:layout_width="match_parent"
        android:layout_height="wrap_content"
        android:hint="パスワードを設定してください"
        android:textSize="20sp"
        android:maxLines="1"
        android:layout_marginTop="20dp" />

    <TextClock
        android:id="@+id/currentTime"
        android:layout_width="wrap_content"
        android:layout_height="wrap_content"
        android:layout_marginTop="20dp"
        android:hint="yyyy/MM/dd HH:mm:ss"
        android:textSize="20sp"
        android:timeZone="Asia/Tokyo"
        android:format12Hour="yyyy/MM/dd HH:mm:ss"
        android:format24Hour="yyyy/MM/dd HH:mm:ss"/>

    <android.support.design.widget.TextInputLayout
        android:id="@+id/nameTextInputLayout"
        android:layout_width="match_parent"
        android:layout_height="wrap_content"
        android:layout_marginTop="20dp"
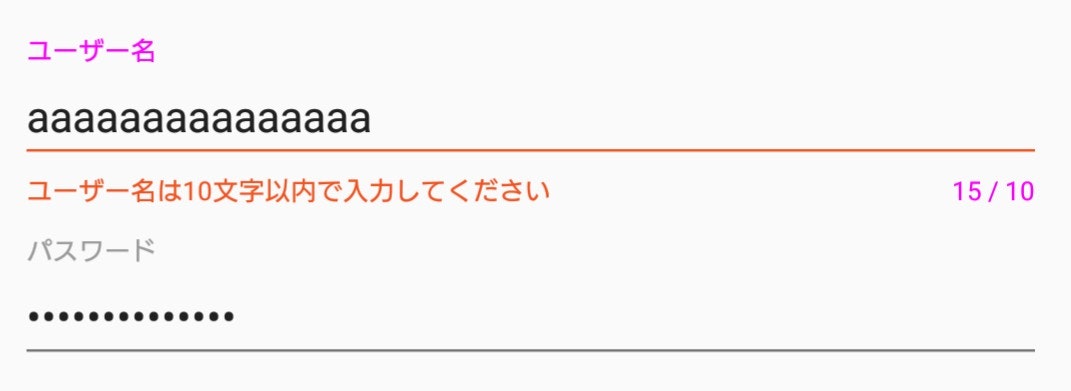
        app:counterEnabled="true"
        app:counterMaxLength="10"
        app:errorEnabled="true"
        app:hintAnimationEnabled="true"
        app:hintEnabled="true">

        <android.support.design.widget.TextInputEditText
            android:id="@+id/userNameInput"
            android:layout_width="match_parent"
            android:layout_height="wrap_content"
            android:hint="ユーザー名"
            android:maxLines="1"
            android:textSize="20sp" />

    </android.support.design.widget.TextInputLayout>


    <android.support.design.widget.TextInputLayout
        android:id="@+id/passwordTextInputLayout"
        android:layout_width="match_parent"
        android:layout_height="wrap_content"
        app:counterEnabled="false"
        app:errorEnabled="false"
        app:hintAnimationEnabled="true"
        app:hintEnabled="true">

        <android.support.design.widget.TextInputEditText
            android:id="@+id/userPassWordInput"
            android:layout_width="match_parent"
            android:layout_height="wrap_content"
            android:inputType="textPassword"
            android:hint="パスワード"
            android:maxLines="1"
            android:textSize="20sp" />

    </android.support.design.widget.TextInputLayout>

    <Button
        android:id="@+id/loginButton"
        android:layout_width="match_parent"
        android:layout_height="wrap_content"
        android:layout_marginTop="10dp"
        android:text="ログイン"/>

</LinearLayout>
<TextView/>で文字を表示できます。

-
android:textSizeの単位はspが推奨されている。端末のフォントサイズ設定により伸縮される。 -
android:textIsSelectableをtrueにすると表示されている文字をタップして範囲選択できる。
<EditText/>で文字の入力が行えます。

-
android:hintで何も入力されていないときに、ユーザーに入力を促す文字列を設定できる。
(TextViewなどではAndroid StudioのPreview画面で確認する用に使っている) -
android:maxLinesで入力中に改行しても、指定行数までしか入力スペースが拡大されない。
(文字が見えなくなるだけで実際は改行されている)
<TextClock/>は現在の日付や時刻を書式設定された文字列として表示できます。

-
android:format12Hourとandroid:format24Hourで、それぞれ12時間形式・24時間形式での書式設定が行えます。
サンプルでは、yyyy(西暦)/MM(月)/dd(日) HH(時):mm(分):ss(秒)です。
<TextInputLayout/>と<TextInputEditText/>はセットで使います(入力欄を2つ用意するときはそれぞれ2つ用意する)。
これを利用すると、マテリアルデザインなアニメーションを持ったEditTextが実装できます。

使う際はbuild.gradleにimplementation 'com.android.support:design:(version)をお忘れなく。
また、xmlでapp:~を使う際は、xmlns:app="http://schemas.android.com/apk/res-auto"をお忘れなく。
-
app:counterEnabledをtrueにすると右下に入力した文字数が表示される -
app:counterMaxLengthを指定すると0/10といった感じで文字数制限が可視化できる
(これだけだと文字数オーバーしても入力し続けられる) -
app:errorEnabledをtrueにすると -
app:hintEnabledをtrueにすると、入力中に左上にhint文字列が表示される -
app:hintAnimationEnabledをtrueにすると、hint文字列にアニメーションが適用される
Activityの解説
Java編
TextViewやEditTextで表示されている文字や入力した文字を扱うときによく使うのが、
getTextとsetTextです。
 //getTextの返り値はTextView型なので、toStringなどでCast(型変換)して代入すると良い
String str = textView.getText().toString();

textView.setText("文字列");
TextInputEditTextも基本的に同じ使い方です。
サンプルでは、generateUserNameメソッドで10桁の乱数を生成してユーザー名を勝手に決め、
「パスワードを設定してください」のhintがあるEditTextで、任意の文字列でパスワードを設定。
ログインボタンが押されると、「ユーザー名」と「パスワード」のhintがあるTextInputEditTextに入力された文字列とそれぞれ文字列比較される処理になっています。
TextInputLayoutとTextInputEditTextについて
マテリアルデザインなEditTextを使いたいと思ったので使ってみました。
基本的にはxmlに追加すれば勝手に動いてくれるのですが、
コード側ではxmlで指定したapp:counterMaxLengthの数字よりも多く入力された場合に
エラーメッセージを表示させました。
userNameInput.addTextChangedListener(new TextWatcher() {
            @Override
            public void beforeTextChanged(CharSequence charSequence, int start, int count, int after) {

            }

            @Override
            public void afterTextChanged(Editable editable) {

            }

            @Override
            public void onTextChanged(CharSequence charSequence, int start, int before, int count) {
                if (charSequence.length() > nameTextInputLayout.getCounterMaxLength()){
                    nameTextInputLayout.setError("ユーザー名は10文字以内で入力してください");
                }else{
                    nameTextInputLayout.setError(null);
                }
            }


        });
userNameInputは、ユーザー名を入力する場所のTextInputLayoutになります。
これにListenerを追加し、TextWatcherで入力されている文字を監視しています。
beforeTextChanged(CharSequence charSequence, int start, int count,int after)
- 文字列が修正される直前に呼び出されるメソッド
- CharSequence charSequence
現在EditTextに入力されている文字列 - int start
charSequenceの文字列で新たに追加される文字列のスタート位置 - int count
charSequenceの文字列の中で変更された文字列の総数 - int after
新規に追加された文字列の数
- CharSequence charSequence
onTextChanged(CharSequence charSequence, int start, int before, int count)
- 文字1つを入力した時に呼び出される
- CharSequence charSequence
現在EditTextに入力されている文字列 - int start
charSequenceの文字列で新たに追加される文字列のスタート位置 - int before
削除される既存文字列の数 - int count
charSequenceの文字列の中で変更された文字列の総数
- CharSequence charSequence
afterTextChanged(Editable editable)
- 最後にこのメソッドが呼び出される
- Editable editable
最終的にできた修正可能な、変更された文字列
- Editable editable
エラーメッセージの表示はsetErrorメソッドを使い、何も表示しない場合は引数にnullを指定すれば大丈夫です。
テキスト関係以外の説明は省略しましたが、以下がソースコードになります。
public class TextSampleActivity extends AppCompatActivity {

    private final int NoInput = -2;
    private final int LOGIN = 1;
    private final int ERROR = -1;

    @SuppressLint("SetTextI18n")
    @Override
    protected void onCreate(Bundle savedInstanceState) {
        super.onCreate(savedInstanceState);
        setContentView(R.layout.activity_text_sample);

        ActionBar actionBar = getSupportActionBar();
        if (actionBar != null){
            actionBar.setDisplayHomeAsUpEnabled(true);
        }

        final String name = generateUserName();

        TextView userName = findViewById(R.id.userName);
        userName.setText("あなたのユーザー名は " + name + " です\n長押しでコピーできます");

        Button loginButton = findViewById(R.id.loginButton);
        final EditText editPassWord = findViewById(R.id.editPassword);
        final TextInputEditText userNameInput = findViewById(R.id.userNameInput);
        final TextInputEditText userPassWordInput = findViewById(R.id.userPassWordInput);

        final TextInputLayout nameTextInputLayout = findViewById(R.id.nameTextInputLayout);

        loginButton.setOnClickListener(new View.OnClickListener() {
            @Override
            public void onClick(View view) {
                String yourPassWord = editPassWord.getText().toString();
                String inputUserName = userNameInput.getText().toString();
                String inputUserPassWord = userPassWordInput.getText().toString();

                if (inputUserName.equals("")){
                    //yourPassWordの入力を促す
                    showResult(view, NoInput);
                }else{
                    boolean loginResult = name.equals(inputUserName) && yourPassWord.equals(inputUserPassWord);

                    if (loginResult){
                        //login
                        showResult(view, LOGIN);
                    }else{
                        //error
                        showResult(view, ERROR);
                    }
                }

            }
        });

        userNameInput.addTextChangedListener(new TextWatcher() {
            @Override
            public void beforeTextChanged(CharSequence charSequence, int start, int count, int after) {

            }

            @Override
            public void afterTextChanged(Editable editable) {

            }

            @Override
            public void onTextChanged(CharSequence charSequence, int start, int before, int count) {
                if (charSequence.length() > nameTextInputLayout.getCounterMaxLength()){
                    nameTextInputLayout.setError("ユーザー名は10文字以内で入力してください");
                }else{
                    nameTextInputLayout.setError(null);
                }
            }


        });

    }

    private String generateUserName(){

        final String letters = "abcdefghijklmnopqrstuvwxyz0123456789";
        Random random = new Random();
        StringBuilder stringBuilder = new StringBuilder();

        while (stringBuilder.length() < 10){
            int val = random.nextInt(letters.length());
            stringBuilder.append(letters.charAt(val));
        }

        return stringBuilder.toString();

    }

    @SuppressLint("SimpleDateFormat")
    private void showResult(View view, int result){

        String showText = "";
        DateFormat dateFormat = new SimpleDateFormat("yyyy/MM/dd HH:mm:ss");
        Date date = new Date(System.currentTimeMillis());

        switch (result){
            case NoInput:
                showText = "パスワードを設定してください";
                break;

            case LOGIN:
                showText = dateFormat.format(date) + "にログインしました!";
                break;

            case ERROR:
                showText = "入力されたユーザー名やパスワードが正しくありません";
        }

        Snackbar.make(view, showText, Snackbar.LENGTH_LONG)
                .setAction("Action", null).show();

    }
}
editPassWord、userNameInput、userPassWordInputと名付けた変数になぜfinal修飾子を付けなければならなかったかというと、
匿名クラスを定義しているOnClickListenerなどの処理中に値が変更されるのを防ぐためですね。
もし処理中にカウントアップのような処理をしたい場合は、クラスのメンバ変数を使えばいいと思います。
Kotlin編
KotlinでのgetText、setTextに当たる書き方はちょっとイケてます。
val str = textView.text.toString()  //setTextとして使用

textView.text = "文字列"  //getTextとして使用
なんと両方共、.textで済ませることができます。
特にgetTextとして使用するときは、javaのように引数にString型を渡すのではなく
代入という形で表現します。
余談ですが、Kotlinでは文字列中に変数を組み込みたいときに$を使うことで自然に表現できます。PHPとかと一緒ですね。
userName.text = "あなたのユーザー名は${name}です\n長押しでコピーできます"

//変数の前後にスペースを入れるときはこれで大丈夫
userName.text = "あなたのユーザー名は $name です\n長押しでコピーできます"
以下、Kotlinでのサンプルアプリのソースコードになります。
class TextSampleActivity : AppCompatActivity() {

    private val noInput = -2
    private val login = 1
    private val error = -1

    @SuppressLint("SetTextI18n")
    override fun onCreate(savedInstanceState: Bundle?) {
        super.onCreate(savedInstanceState)
        setContentView(R.layout.activity_text_sample)

        val actionBar = supportActionBar
        actionBar!!.setDisplayHomeAsUpEnabled(true)

        //yourNameを作成
        val name = generateUserName(10)
        userName.text = "あなたのユーザー名は${name}です\n長押しでコピーできます"

        loginButton.setOnClickListener { view ->
            val yourPassWord = editPassword.text.toString()
            val inputUserName = userNameInput.text.toString()
            val inputUserPassWord = userPassWordInput.text.toString()

            if (inputUserPassWord == ""){
                //yourPassWordの入力を促す
                showResult(view, noInput)
            }else{
                val loginResult = name == inputUserName && yourPassWord == inputUserPassWord

                if (loginResult){
                    //login
                    showResult(view, login)
                }else{
                    //error
                    showResult(view, error)
                }
            }

        }

        userNameInput.addTextChangedListener(object: TextWatcher {
            override fun beforeTextChanged(charSequence: CharSequence, start: Int, count: Int, after: Int) {}
            override fun afterTextChanged(editable: Editable) {}
            override fun onTextChanged(charSequence: CharSequence, start: Int, before: Int, count: Int) {
                if (charSequence.length > nameTextInputLayout.counterMaxLength) {
                    nameTextInputLayout.error = "ユーザー名は10文字以内で入力してください"
                } else {
                    nameTextInputLayout.error = null
                }
            }
        })

    }

    //引数の値の桁数で乱数作成
    private fun generateUserName(length: Int): String {

        val letters = "abcdefghijklmnopqrstuvwxyz0123456789"

        var str = ""
        while (str.length < length) {
            str += letters[Random().nextInt(letters.length)]
        }

        return str

    }

    @SuppressLint("SimpleDateFormat")
    private fun showResult(view: View, result: Int){

        var showText = ""
        val dateFormat = SimpleDateFormat("yyyy/MM/dd HH:mm:ss")
        val date = Date(System.currentTimeMillis())

        when (result) {
            noInput -> {
                showText = "パスワードを設定してください"
            }
            login -> {
                showText = "${dateFormat.format(date)}にログインしました!"
            }
            error -> {
                showText = "入力されたユーザー名やパスワードが正しくありません"
            }
        }

        Snackbar.make(view, showText, Snackbar.LENGTH_LONG)
                .setAction("Action", null).show()

    }
}
参考
TextInputLayoutについては、こちらの記事を元に学びました。
次回予告
もうすでに何回も使ってますが、ToastやSnackBarについて。
もしかしたら省略して別のものについてやる...かも
決してネタ切れというわけではございませんよ
あとがき
大学の後輩などにも見せたいですが、Qiitaユーザーの皆さんからも需要があればコメント頂けると嬉しいです
間違い等あれば修正リクエストの方して頂けると助かります。
