はじめに
IBMのCode Patternsの1つである架空の医療会社のExample HealthのOpenShiftによるJava EEアプリケーションのモダナイゼーションの5回目の投稿です。
今回の概要

前回の投稿OpenShiftによるJava EEアプリケーションのモダナイゼーションをやってみた(4)では開発環境でビルドしたコンテナイメージを使って検証、本番環境へのアプリケーションのリリースを、「oc」コマンドを使った手動でオペレーションで行う方法を体感しました。
今回はJenkinsを使って自動で実施する方法を順に試したいと思います。
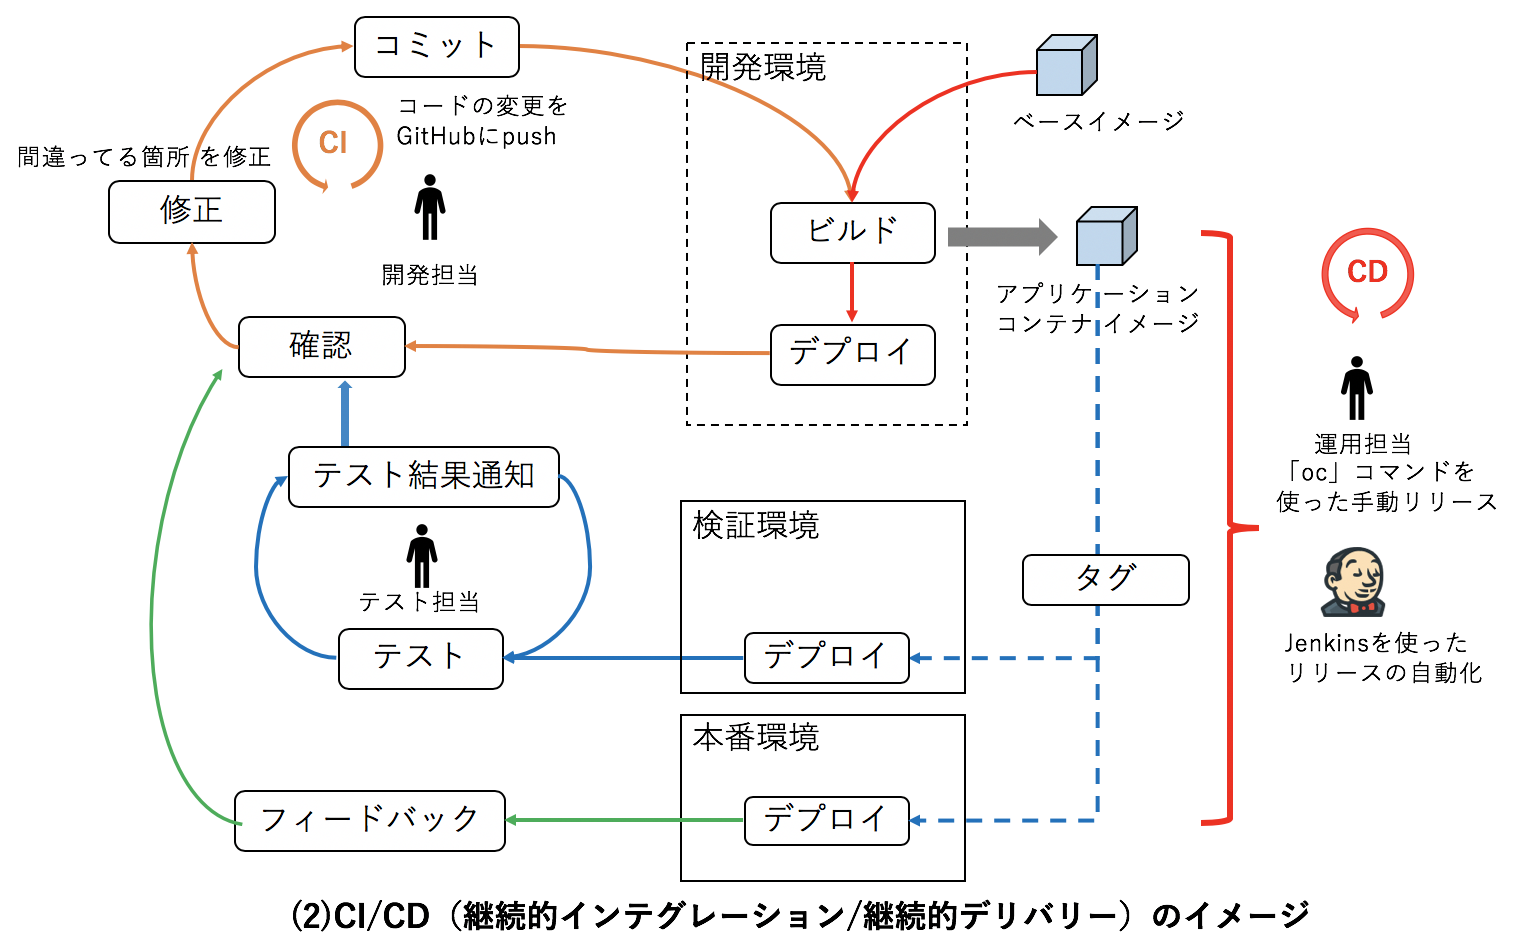
Jenkinsを使ったリリースの自動化と可視化
OpenShiftには、JenkinsをOpenShiftで使うためにカスタマイズされたJenkinsのイメージが標準で用意されています。これまで手作業で実施した開発環境から本番環境までのアプリケーションのリリース手順をJenkins Pipelineに変えてリリースを自動化したいと思います。
下図では、上部が「oc」コマンドを使用して手動で行なっていたフロー、下部が、Jenkins Pipelineで行う場合のフローになります。
@ITの記事では、新しいプロジェクトにJenkinsと新たに患者用UIアプリケーションを作成しましたが、今回は、新しいプロジェクト(patient-admin-pipeline)にJenkinsのみ作成して、Jenkinsが開発環境(healthプロジェクト)、検証環境(health-testingプロジェクト)、本番環境(health-productionプロジェクト)の健康記録管理者用のPHPアプリケーションのアプリケーションのリリースを行います。
事前準備
1.GitHubのリポジトリをクローンします。クローンするとpatientui-pipelineフォルダが作成されます。
$ git clone https://github.com/daihiraoka/patient-admin-pipeline.git
$ cd patient-admin-pipeline
$ ls
patient-admin-pipeline.yaml  patient-admin-template.yaml
 README.md
patient-admin-pipeline.yamlがJenkins Pipelineビルドの設定、patient-admin-template.yamlは健康記録管理者用のPHPアプリケーションのテンプレートファイル(DeploymentConfig,Service,ImageStream,Route)です。
2.開発環境(health)のデプロイ設定(DeploymentConfig)は、ビルドでコンテナイメージが生成するとコンテナイメージのデプロイを開始するImageChangeトリガーが有効になっています。今回は、Jenkinsがコンテナイメージのデプロイを制御するので、 ImageChangeトリガーを無効にします。
開発環境(health)のpatient-adminのDeploymentConfigを編集します。
$ oc get dc
NAME           REVISION  DESIRED  CURRENT  TRIGGERED BY
mysql          1         1        1        config,image(mysql:latest)
patient-admin  3         1        1        config,image(patient-admin:latest)
patientui      1         1        1        config,image(patientui:latest)

$ oc edit dc patient-admin
imageChangeParams.automatic: trueのtrueをfalseに変更します。変更することによって、ビルドでコンテナイメージが生成されてもデプロイは開始されなくなります。
  triggers:
  - type: ConfigChange
  - imageChangeParams:
      automatic: true  <-- trueをfalseに変更
      containerNames:
      - patient-admin
      from:
        kind: ImageStreamTag
        name: patient-admin:latest
        namespace: health
3.検証環境(health-testingプロジェクト)、本番環境(health-productionプロジェクト)にテンプレート(patient-admin-template.yaml)を使ってDeploymentConfig, ImageStream, Service, Routeを作成します。
その前に、ビジネスロジック用のJava EEアプリケーションにAPI接続するための変数apiBaseUrlを定義する前に、Java EEアプリケーションのホスト名を設定します。
$ oc get route example-health-api -n health
NAME                 HOST/PORT                                         PATH      SERVICES             PORT      TERMINATION   WILDCARD
example-health-api   example-health-api-health.192.168.42.218.nip.io             example-health-api   http                    None
次にテンプレートを登録します。 -eが環境変数の定義で、apiBaseUrlを上記で取得したホスト名を使います。
$ oc project health-testing
$ oc new-app -f patient-admin-template.yaml -e apiBaseUrl="http://example-health-api-health.192.168.42.218.nip.io"
--> Deploying template "health-testing/patient-admin" for "patient-admin-template.yaml" to project health-testing

     patient-admin
     ---------
     patient-admin sample

--> Creating resources ...
    deploymentconfig.apps.openshift.io "patient-admin" created
    imagestream.image.openshift.io "patient-admin" created
    service "patient-admin" created
    route.route.openshift.io "patient-admin" created
--> Success
    Access your application via route 'patient-admin-health-testing.192.168.42.218.nip.io'
    Run 'oc status' to view your app.
この時点では、コンテナイメージは無いので、Pod(コンテナ)は起動していません。また、開発環境でビルドするので、BuildConfigが無いのもポイントです。
4.本番環境(health-productionプロジェクト)にも同様にテンプレート(patient-admin-template.yaml)を使ってDeploymentConfig, ImageStream, Service, Routeを作成します。
$ oc project health-production
$ oc new-app -f patient-admin-template.yaml -e apiBaseUrl="http://example-health-api-health.192.168.42.218.nip.io"
Pipelineの設計
今回のPipelineは5つのステージで構成されています。
- ビルド(開発環境)
- デプロイ(開発環境)
- タグ付け(開発環境)履歴管理
- タグ付け(検証環境)タグ付けによりイメージ更新で自動デプロイ
- タグ付け(本番環境)タグ付けによりイメージ更新で自動デプロイ
environmentにはJenkinsfile内で利用する変数を定義します。
environment {
  version = "2.0"
  devTag = "${version}-${BUILD_NUMBER}"
}
今回はイメージのタグづけするためにdevTagの変数を使います。
versionは任意の数字、手動で1.0をつけたので、今回は2.0を設定、
BUILD_NUMBERはJenkins Jobのビルド番号が格納されるデフォルトの環境変数です。
Jenkins Pipelineが実行されるとdevTagは2.0-1, 2.0-2, 2.0-3とBUILD_NUMBERが+1加算されるのを利用して履歴管理に使います。
1.ビルド(開発環境)
stage("Build Image") {
  steps {
    script {
      openshift.withCluster() {
         openshift.withProject() {
            def bld = openshift.startBuild('patient-admin')
            bld.untilEach {
              return it.object().status.phase == "Complete"
            }
このステージでは開発環境(health)でビルドが始まりSource-to-Image (S2I)でコンテナイメージを作成します。
スクリプトの中ではdef bld = openshift.startBuild('patient-admin')でpatientuiのビルドが開始し、bld.untilEach {} で ビルドのステータスが"Complete"になるまでループしてビルドが終わるのを待っています。
2.デプロイ(開発環境)
stage("Deploy Image") {
  steps {
    script {
      openshift.withCluster() {
        openshift.withProject() {
          def dc = openshift.selector('dc', 'patient-admin')
          dc.rollout().latest()
開発環境で作成したコンテナイメージを開発環境にデプロイします。
3.タグ付け(開発環境)履歴管理
stage("Tagging Image Development latest to devTag") {
  steps {
    script {
      openshift.withCluster() {
        openshift.withProject() {
          // Tag the patient-admin:latest image as patient-admin:${devTag}
          openshift.tag("patient-admin:latest", "patient-admin:${devTag}")
openshift.tagでImageStreamのタグを作成します。ここではImageStreamに履歴を残すために現在動作している最新のコンテナイメージであるlatestをpatient-admin:${devTag}でタグ付けします。
4.検証環境にデプロイ
stage("Promote Image Development to Testing") {
  steps {
    script {
      openshift.withCluster() {
        openshift.withProject() {
          // Tag the patient-admin:${devTag} image as health-testing/patient-admin:${devTag}
          openshift.tag("patient-admin:${devTag}", "health-testing/patient-admin:${devTag}")
          openshift.tag("health-testing/patient-admin:${devTag}", "health-testing/patient-admin:latest")
開発環境(health)のpatient-admin:${devTag}のImageStreamを検証環境(health-testing)のpatient-admin:${devTag}へタグ付けして履歴管理します。
そして、検証環境へのデプロイは、ImageStreamのタグを${devTag}からlatestに移動することでイメージが更新され、自動的に新しいデプロイが開始します。
5.本番環境にデプロイ
stage("Promote Image Testing to Production") {
  steps {
    script {
      openshift.withCluster() {
        openshift.withProject('health-testing') {
          // Tag the patientui:${devTag} image as health-testing/patient-admin:${devTag}
          openshift.tag("patient-admin:${devTag}", "health-production/patient-admin:${devTag}")
          openshift.tag("health-production/patient-admin:${devTag}", "health-production/patient-admin:latest")
検証環境と似ていますが、本番環境も検証環境と同様にImageStreamのタグを${devTag}からlatestに移動することでイメージが更新され、自動的に新しいデプロイが開始します。
openshift.withProject('health-testing') とプロジェクトをした場合は、検証環境(health-testingプロジェクト)に移動してタグ付けを行なっています。ちなみにopenshift.withProject()をプロジェクト指定しない場合はJenkinsがデプロイされているプロジェクトで実行されます。
これで準備が整いましたので、Pipelineから新しいデプロイを実行できるようにJenkinsインスタンスを起動します。
手順
1.Jenkins Pipeline用のプロジェクトpatient-admin-pipelineを作成します。
$ oc new-project patient-admin-pipeline
2.「oc new-app」コマンドを使用してテンプレートからJenkins Pipelineと患者用UIのアプリケーションを作成します。
$ oc new-app -f patient-admin-pipeline.yaml
--> Deploying template "patient-admin-pipeline/patient-admin-pipeline" for "patient-admin-pipeline.yaml" to project patient-admin-pipeline

     patient-admin-pipeline
     ---------
     patient-admin Pipeline sample

--> Creating resources ...
    buildconfig.build.openshift.io "patient-admin-pipeline" created
--> Success
    Use 'oc start-build patient-admin-pipeline' to start a build.
    Run 'oc status' to view your app.
3.Podの起動を確認するとjenkins-1-deployとJenkinsのデプロイが始まりました。多少時間はかかりますが、JenkinsのPod(コンテナ)のみ起動するまでしばらく待ちます。
- 「oc new-app」実行した直後
$ oc get pod
NAME               READY     STATUS    RESTARTS   AGE
jenkins-1-cthzv    0/1       Running   0          1m
jenkins-1-deploy   1/1       Running   0          1m

- しばらくすると...
$ oc get pod
NAME               READY     STATUS    RESTARTS   AGE
jenkins-1-cthzv   1/1       Running   0          7m
- ビルド設定(BuildConfig)を確認します。
$ oc get bc
NAME                     TYPE              FROM      LATEST
patient-admin-pipeline   JenkinsPipeline             0
BuildConfigにはJenkins Pipelineのpatient-admin-pipelineができています。
このJenkinsPipelineを使って、開発、検証、本番環境の健康記録管理者用のPHPアプリケーションのアプリケーションのリリースを行います。
Jenkinsへの権限作成
5.patient-admin-pipelineプロジェクトで動作しているJenkinsが開発環境(healthプロジェクト)、検証環境(health-testingプロジェクト)、本番環境(health-productionプロジェクト)のような他のプロジェクトに対して実行できるようにするには、開発、検証、本番環境の編集(edit)ロールをpatient-admin-pipelineプロジェクトのjenkinsサービスアカウントに追加します。
- 開発環境(health)
$ oc policy add-role-to-user  \
    edit system:serviceaccount:patient-admin-pipeline:jenkins -n health
role "edit" added: "system:serviceaccount:patient-admin-pipeline:jenkins"

- 検証環境(health-testing)
$ oc policy add-role-to-user  \
    edit system:serviceaccount:patient-admin-pipeline:jenkins -n health-testing
role "edit" added: "system:serviceaccount:patient-admin-pipeline:jenkins"

- 本番環境(health-production)
$ oc policy add-role-to-user  \
    edit system:serviceaccount:patient-admin-pipeline:jenkins -n health-production
role "edit" added: "system:serviceaccount:patient-admin-pipeline:jenkins"
6.検証環境、本番環境から開発環境のImageStreamのイメージを参照できるようにsystem:image-pullerロールをdefault(全てのPod)サービスアカウントに追加します。
- 検証環境(health-testing)
$ oc policy add-role-to-user  \
    system:image-puller system:serviceaccount:health-testing:default  \
    -n health
role "system:image-puller" added: "system:serviceaccount:health-testing:default"
- 本番環境(health-production)
$ oc policy add-role-to-user  \
    system:image-puller system:serviceaccount:health-production:default  \
    -n health
role "system:image-puller" added: "system:serviceaccount:health-production:default"
Pipelineビルドの実行
8.Pipelineビルドを開始します。
$ oc start-build patient-admin-pipeline
build.build.openshift.io/patient-admin-pipeline-1 started
- ビルドの進行状況を確認するとpatient-admin-pipeline-1がRunning(進行中)であることが確認できます。
$ oc get build
 oc get build
NAME                       TYPE             FROM    STATUS  STARTED          DURATION
patient-admin-pipeline-1   JenkinsPipeline          Running 5 seconds ago
11.OpenShiftのWebコンソールにログインし、patient-admin-pipelineプロジェクトを選択して、「Build」、 「Pipelines」と推していきます。

12.patient-admin-pipelineパイプラインの結果が表示され、各ステージの成功・不成功、所要時間がわかります。「start pipeline」ボタンを押すことで新しいPipeline Buildを始めることもできます。


13.次にJenkinsの画面に行くためにpatient-admin-pipelineプロジェクトの左側メニューの「Overview」をクリックし表示されるjenkins-ephemeralアプリケーションのFQDNをクリックします。
 14.Jenkins Pipelineビルドは、しばらく放置してからこの画面をみたので、すでに終了しており各ステージの処理結果と各ステージの所要時間が表示されます。
 上図の「Stage View」では各ステージの処理の内容についてはわかりませんが、各ステージのコンソールの出力は記録されていて参照することができます。「Build Image」ステージのログを確認するとGitHubリポジトリからソースコードを取得してビルドを行い、patientui-admin:latestにpushしていることがわかります。
15.次に、Jenkins Pipelineビルドによって作成されたImageStreamのタグを確認します。「oc get is」コマンドでそれぞれImageStreamを確認するとバージョン(2.0-1)でタグ付けされていることがわかります。
- 開発環境
$ oc get is -n health
NAME            DOCKER REPO                            TAGS           UPDATED
patient-admin   172.30.1.1:5000/health/patient-admin   2.0-1,latest   About an hour ago

- 検証環境
$ oc get is -n health-testing
NAME            DOCKER REPO                                    TAGS                 UPDATED
patient-admin   172.30.1.1:5000/health-testing/patient-admin   2.0-1,latest,1.0-1   About an hour ago

- 本番環境
$ oc get is -n health-production
NAME            DOCKER REPO                                       TAGS                 UPDATED
patient-admin   172.30.1.1:5000/health-production/patient-admin   2.0-1,latest,1.0-1   About an hour ago
16.最後に各環境にデプロイしたアプリケーションを確認するとTotal Patientsが11であるのをはじめ同じ内容が全ての環境で表示されていることがわかります。
新しいJenkins Pipelineビルドの開始
新しいJenkins Pipelineビルドを始めるためには、開発担当のアプリケーションのソースコードの変更がリポジトリにプッシュした後、Jenkins Pipelineビルドを開始するだけです。 ビルドにWebhookトリガーを有効にすれば、この手順も必要ないですね。
$ oc start-build patientui-pipeline
build "patientui-pipeline-2" started
これで開発環境のアプリケーションのビルド、検証環境と本番環境のアプリケーションのデプロイをJenkins Pipelineビルドを使って展開することができました。Jenkinsを使って全てのステップを自動化、可視化することで、アプリケーションのリリースが短縮できますし、オペレーションミスなど意図しない変更が発生しなくなります。
みなさんがそれぞれの要件で配信プロセスを作るときは前述のOpenShift 4.2の製品ドキュメント 5.4. PIPELINE ビルド、赤帽エンジニアブログ OpenShift Jenkins Pipeline (DSL) Plugin 入門に加えてOpenShiftの開発者ガイド「2.3. 環境全体におけるアプリケーションのプロモート」も参考にするといいと思います。
補足
この投稿は@ITに公開した「Red Hat OpenShift on IBM Cloud」によって、CI/CD(継続的インテグレーション/継続的デリバリー)パイプラインの構築はどれほど簡単になるのか?」と連動した自習用コンテンツです。
本投稿では、Qiita投稿の「OpenShiftによるJava EEアプリケーションのモダナイゼーションをやってみた(3)」の健康記録管理者用のPHPアプリケーションの機能追加のモダナイゼーションを題材に書きましたが、
@ITの記事では、Qiita投稿の「OpenShiftによるJava EEアプリケーションのモダナイゼーションをやってみた(2)」の患者用UI(ユーザーインターフェイス)のモダナイゼーションを題材に書いてます。
どちらか1つ読めば言いたいことはわかっていただけます。練習用にはアットマークIT記事、Qiita投稿、両方やってみたらいいと思います。
