はじめに
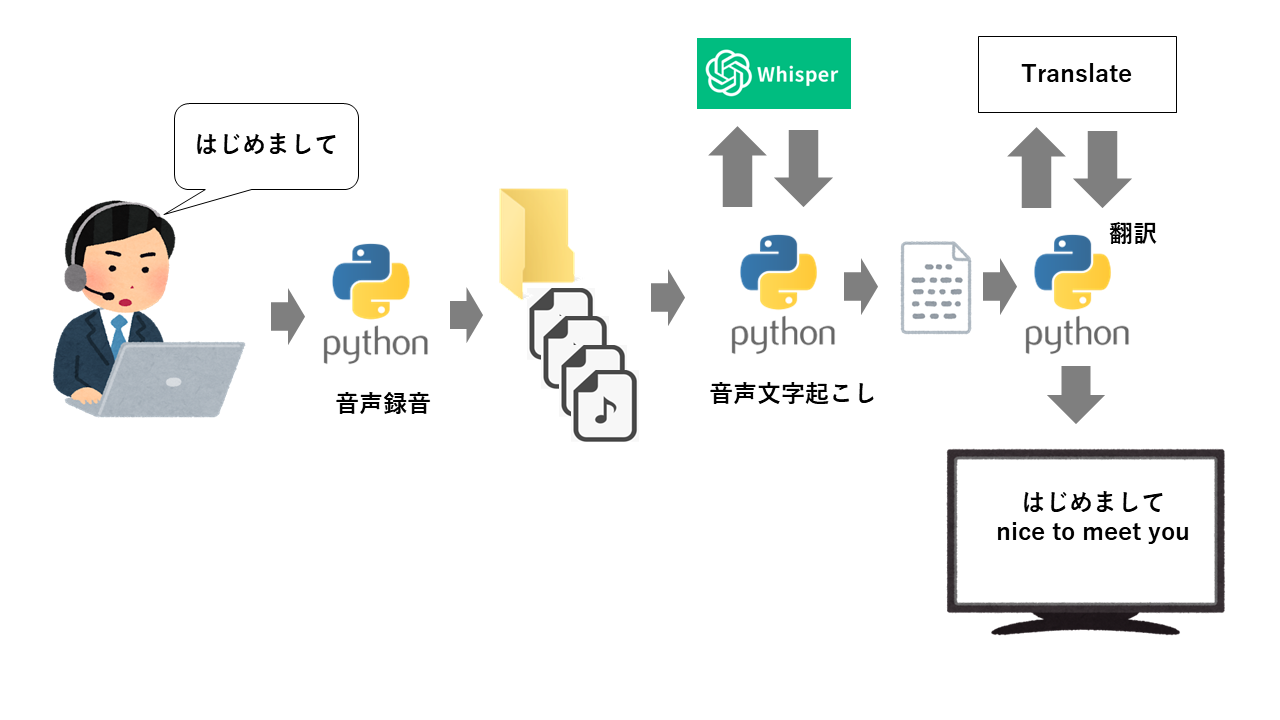
Pythonでパソコンのマイクで話した音声をOpanAI社の音声文字認識エンジンのWhisperを使って、文字起こしをし、その文字をgoogletransで音声文字起こしをする同時翻訳アプリを作成しました。
尚、このプログラムの大部分はChatGPTで作成しました。
その様子は、Youtube動画で公開していますので、ぜひ、ご覧ください。
https://youtu.be/J66Eui1-ifM
環境
Windows10
Python3.8.8
VSCode
使用ライブラリー
openai
pyaudio
audioop
googletrans(googletrans==4.0.0-rc1)
shutil
処理の流れ:
Windowsパソコンのマイクで話した音声を音声ファイルに変換します。
その際、音声が1秒以上無音になるか、スペースキーが押される都度、音声ファイルを分割するようにしています。
作成した音声ファイルは1つのフォルダに日付、時間付きファイルとして保存します。
保存された音声ファイルは、監視ログラムによって監視し、作成された音声ファイルはWhipserで音声文字起こしをします。
そして、その文字をGoogletransライブラリーを使って、同時翻訳し出力するプログラムです。

YouTubeでの解説:
上記の作業の流れをYoutubeで詳しく解説していますので、ぜひ、ご覧ください。
サンプルプログラムソース:
動画内でご紹介しているマイクで話した音声を音声ファイルとして保存するプログラムの途中経過のプログラムです。
完成版は、Youtube動画をご覧頂き、概要欄に掲載している限定公開版のURLからご確認ください。
import pyaudio
import wave
import audioop

def is_silent(data, threshold):
    rms = audioop.rms(data, 2)
    return rms < threshold

def record_audio_with_silence_detection(output_prefix, silence_threshold=200, min_silence_duration=3, sample_rate=44100, chunk_size=1024, channels=2):
    audio_format = pyaudio.paInt16
    p = pyaudio.PyAudio()

    stream = p.open(format=audio_format,
                    channels=channels,
                    rate=sample_rate,
                    input=True,
                    frames_per_buffer=chunk_size)

    print("Recording with silence detection")

    frames = []
    recording = False
    current_file_number = 1
    silence_duration = 0

    for _ in range(0, int(sample_rate / chunk_size * min_silence_duration)):
        # 最初の無音時間のカウントのために無音をチェックする
        data = stream.read(chunk_size)
        if is_silent(data, silence_threshold):
            silence_duration += 1
        else:
            silence_duration = 0
            break

    while True:
        data = stream.read(chunk_size)
        frames.append(data)

        if recording and is_silent(data, silence_threshold):
            silence_duration += 1
            if silence_duration >= int(sample_rate / chunk_size * min_silence_duration):
                print(f"Silence duration reached {min_silence_duration} seconds. Stopping recording.")
                recording = False
                save_audio(f"{output_prefix}_{current_file_number}.wav", frames, sample_rate, channels, audio_format)
                current_file_number += 1
                frames = []
        else:
            silence_duration = 0

            if not recording and not is_silent(data, silence_threshold):
                print("Sound detected. Starting recording.")
                recording = True

    print("Finished recording with silence detection.")

    stream.stop_stream()
    stream.close()
    p.terminate()

def save_audio(filename, frames, sample_rate, channels, audio_format):
    wf = wave.open(filename, 'wb')
    wf.setnchannels(channels)
    wf.setsampwidth(pyaudio.get_sample_size(audio_format))
    wf.setframerate(sample_rate)
    wf.writeframes(b''.join(frames))
    wf.close()

if __name__ == "__main__":
    output_prefix = "recorded_audio"  # 保存する音声ファイルの接頭辞
    silence_threshold = 300  # 無音と判定する閾値
    min_silence_duration = 1  # 無音と判定する最小の時間(秒)

    record_audio_with_silence_detection(output_prefix, silence_threshold, min_silence_duration)
Youtube動画でご紹介している後半の音声ファイルを移動するプログラムです。
この後、Whisperによる文字起こしと、翻訳の記述を書き加えることになります。
import os
import shutil

def move_wav_files(source_folder, destination_folder):
    try:
        # 移動先フォルダが存在しない場合は作成
        if not os.path.exists(destination_folder):
            os.makedirs(destination_folder)

        # 移動元フォルダ内のファイル一覧を取得し、更新日時でソート
        files = os.listdir(source_folder)
        files.sort(key=lambda x: os.path.getmtime(os.path.join(source_folder, x)))

        # .wavファイルを見つけて移動
        for file in files:
            if file.endswith(".wav"):
                source_file = os.path.join(source_folder, file)
                destination_file = os.path.join(destination_folder, file)
                try:
                    shutil.move(source_file, destination_file)
                    print(f"Moved {file} to {destination_folder}")
                except Exception as e:
                    print(f"Error moving {file}: {str(e)}. Skipping.")

        print("File moving completed.")

    except Exception as e:
        print("An error occurred:", str(e))

if __name__ == "__main__":
    source_folder = "/path/to/source/folder"  # 移動元フォルダのパスを指定
    destination_folder = "/path/to/destination/folder"  # 移動先フォルダのパスを指定

    move_wav_files(source_folder, destination_folder)
最後に:
今回は、音声を同時翻訳するアプリケーションをご紹介しました。
今後も、役立ちそうなプログラムをご紹介していきたいと思います。