SwiftUIチュートリアル
初心者にはこちらがとにかくおすすめです。
ランドマークのアプリを実践形式で実装することができます。
リストの取得や詳細ページへの遷移、地図の表示、タブナビゲーション、ユーザー入力などアプリに必要なメソッドが詰まっています。
https://developer.apple.com/tutorials/swiftui/
環境
- Xcode 11
- MacOS 15以上 ※2021年2月現在
※MacやXcodeは頻繁にアップデートされるので常に公式ページを参照してください
プロジェクト作成や新規swiftファイル作成などXcodeの使い方は説明しません。
公式チュートリアルをみてください。
ことはじめ
①View
こちらにUIを構成していく
ContentViewは一番初めに表示されるスクリーン
②Preview
プレビューするためのコード。こちらを入れておくと端末やシュミレーターを作動させなくても、コンパイルして描画してくれる。
import SwiftUI

// ①View
struct ContentView: View {
    var body: some View {
        Text("Hello, World!")
    }
}

// ②Preview
struct ContentView_Previews: PreviewProvider {
    static var previews: some View {
        ContentView()
    }
}
VStack 縦にグループ化したい場合に使用
HStack 横にグループ化したい場合に使用
ZStack 重ねて表示したい場合に使用
Text("") テキスト表示
Spacer() スペースを入れる
Divider() 罫線を入れる
スタイルを追加
.font() フォント指定
.foregroundColor() ファントカラー
.padding() パディングを入れる
import SwiftUI

struct ContentView: View {
    var body: some View {
        VStack {
            VStack(alignment: .leading) {
                Text("Turtle Rock")
                    .font(.title)
                HStack {
                    Text("Joshua Tree National Park")
                        .font(.subheadline)
                    Spacer()
                    Text("California")
                        .font(.subheadline)
                }
                .font(.subheadline)
                .foregroundColor(.secondary)

                Divider()

                Text("About Turtle Rock")
                    .font(.title2)
                Text("Descriptive text goes here.")
            }
            .padding()

            Spacer()
        }
    }
}

struct ContentView_Previews: PreviewProvider {
    static var previews: some View {
        ContentView()
    }
}
Image挿入
Assets.xcassetsフォルダを開いて任意の画像をドラッグ&ドロップ
Image("")
スタイルを追加
.clipShape(Circle()) マスクをつける(Circle()で円にクリップ)
.overlay Viewの上にViewを重ねて表示
.stroke 罫線をつける
.shadow 影をつける
import SwiftUI

struct CircleImage: View {
    var body: some View {
        Image("turtlerock")
            .clipShape(Circle())
            .overlay(Circle().stroke(Color.white, lineWidth: 4))
            .shadow(radius: 7)
    }
}

struct CircleImage_Previews: PreviewProvider {
    static var previews: some View {
        CircleImage()
    }
}
Mapを表示
@Stateを使ってViewの値を変更可能にすることで、経度・緯度を指定して描画することができる。
@Stateに関してはこちらを参照 https://www.isoroot.jp/blog/2381/
MapKitモジュールをインポート
import MapKit
import SwiftUI
import MapKit

struct MapView: View {
    @State private var region = MKCoordinateRegion(
        center: CLLocationCoordinate2D(latitude: 34.011_286, longitude: -116.166_868),
        span: MKCoordinateSpan(latitudeDelta: 0.2, longitudeDelta: 0.2)
    )

    var body: some View {
        Map(coordinateRegion: $region)
    }
}

struct MapView_Previews: PreviewProvider {
    static var previews: some View {
        MapView()
    }
}
ImageとMapをContentViewに表示させる
SwiftUIではCircleImage()、MapView()というように書くと別のViewでも表示させることが可能
.ignoresSafeArea セーフエリアを画面上いっぱいまで指定
.frame(height: 300) 高さ指定
.offset(y: -130) オブジェクトの移動
import SwiftUI

struct ContentView: View {
    var body: some View {
        VStack {
            // 追加
            MapView()
                .ignoresSafeArea(edges: .top)
                .frame(height: 300)
            CircleImage()
                .offset(y: -130)
                .padding(.bottom, -130)
            // ここまで追加
            VStack(alignment: .leading) {
                Text("Turtle Rock")
                    .font(.title)
                HStack {
                    Text("Joshua Tree National Park")
                        .font(.subheadline)
                    Spacer()
                    Text("California")
                        .font(.subheadline)
                }
                .font(.subheadline)
                .foregroundColor(.secondary)

                Divider()

                Text("About Turtle Rock")
                    .font(.title2)
                Text("Descriptive text goes here.")
            }
            .padding()

            Spacer()
        }
    }
}

struct ContentView_Previews: PreviewProvider {
    static var previews: some View {
        ContentView()
    }
}
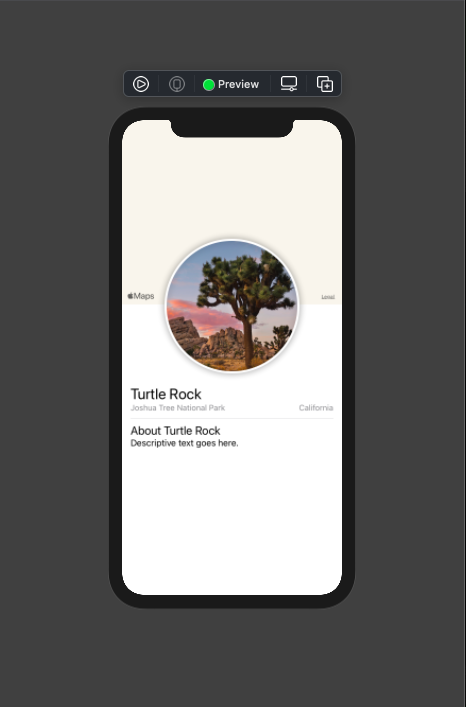
最終的にこのような表示なれば成功です!