はじめに
実案件で始めて Azure Batch を使う時などを考慮して、なるべく画面ベースで簡易な方法で、手元の Python のコードを動かす手順です。
Azure Batch では Container を使うツール/Framework として、Batch Shipyardという手法が提供されています。ただし、いきなりそれを使うと、内部の動きが理解しずらい事もありますので、ここではそれも使いません😊
つまり、少し Hack を一緒にしてみましょう!
Batch Shipyard:
https://github.com/Azure/batch-shipyard/tree/master/recipes
残念ながら、既存ドキュメントやサンプルではこの部分のドキュメントが少し足らないですので、ここで補足をします。
Azure Batch とは
Python で複数コンピューターを使う処理といえば、Horovod などを使っての Deep learning での大規模処理を思い浮かべる方も多いと思います。それだけでなく、大量の計算を Python で制御したいケースもあります。処理の重たさがデータ処理であれば、Spark なども選択肢ですし、そうでなく純粋な計算が多い場合は、Azure Batch は有力な選択肢になります。
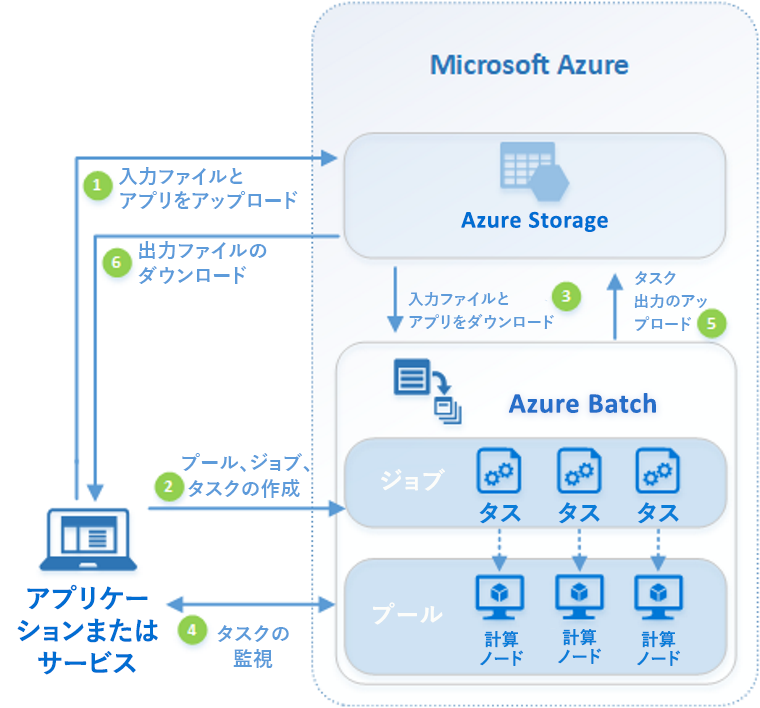
Azure Batch は、以下の様なアーキテクチャをしています。
処理の入出力は Azure Storage へ行います。クラウドでの永続ストレージですので、当然ですね。
Azure Batch とは:
https://docs.microsoft.com/ja-jp/azure/batch/batch-technical-overview
アーキテクチャを考える
いろんな考慮事項がありますが、なるべくPythonのコードと、データ分割以外の基本アーキテクチャを踏襲したものにします。よって、以下の検討事項は、この入門編ではありますが、以下は入れ込みます。
計算途中でのノード間通信をするMPIを使った処理などは一切使いません。MPIにご興味のある方は、こちらを参照ください。
Batch でのマルチインスタンス タスクを使用した Message Passing Interface (MPI) アプリケーションの実行:
https://docs.microsoft.com/ja-jp/azure/batch/batch-mpi
1. Python アプリの課題
あちこちで議論されていますが。
主に、以下の様な課題があるので Container 化する事が多いです。
- ライブラリーの依存関係が複雑になりがち。一つのライブラリーのバージョンアップで、動かなくなる事もありえる
- 環境構築の際に pip などでライブラリーをインターネットからダウンロードするとして時間がかかる。またはインターネット接続がそこで出来ない事もある
今回は、Python のアプリは、Container 化をする前提です。結果として、Azure Batch の Compute は Ubuntu を選択します。私の好みです😁
Azure Batch で コンテナー アプリケーションを実行する:
https://docs.microsoft.com/ja-jp/azure/batch/batch-docker-container-workloads
2. 読み書きするファイルの扱い
1つのタスクでは、シンプルに、Blob上の1ファイルを読み込んで、結果をBlob上の1ファイルに出力する、というアーキテクチャにします。
ファイルのやり取りについては、Azure Blob Storage 上のファイル構造をマウントする方式をとります。Linux 仮想マシンの場合は blobfuse という方式がとれるので、それを使います。
といっても、これが Azure Batchの典型的な設計パターンだと思います😊
Batch を使って大規模な並列コンピューティング ソリューションを開発する - ファイルとディレクトリ:
https://docs.microsoft.com/ja-jp/azure/batch/batch-api-basics#files-and-directories
仮想ファイル システムを Batch プールにマウントする:
https://docs.microsoft.com/ja-jp/azure/batch/virtual-file-mount
ちなみに、Azure Batch では、各ノードで扱うタスク数を選択できます。CPU、DiskとNetwork の使用量のバランスを考慮しますが... 1 CPU x 2 Task くらいが良いかもしれませんね。そして CPU 1つは OS用に空けておきたいですね。つまり最低限コア数は2で。
ここで役割を明確に分けます。
- 計算処理: 入出力ファイルについては、引数として取得。コード内部で呼び出さない。Azure Batch の仮想マシンの内部で動作させる。
- ジョブ起動側: Blob マウントをし、入出力ファイル名を確定。計算処理を呼び出す。Azure Batch の外部で動作させる。
ジョブ起動側は、Azure Batchのジョブそのものを外部から呼び出す事になります。
API化するなり、Azure Automationでスケジューリング化するなり。はたまた Azure Functions などで、クラウド側のイベント発生時に呼び出すなり。
ここでは Python で記述しますが、それに拘る必要はありません。
用意するもの
この手順の実行に必要なものです。
-
Azure Subscription
-
ローカル開発用に、手元の Python Runtime は 3.x に!
-
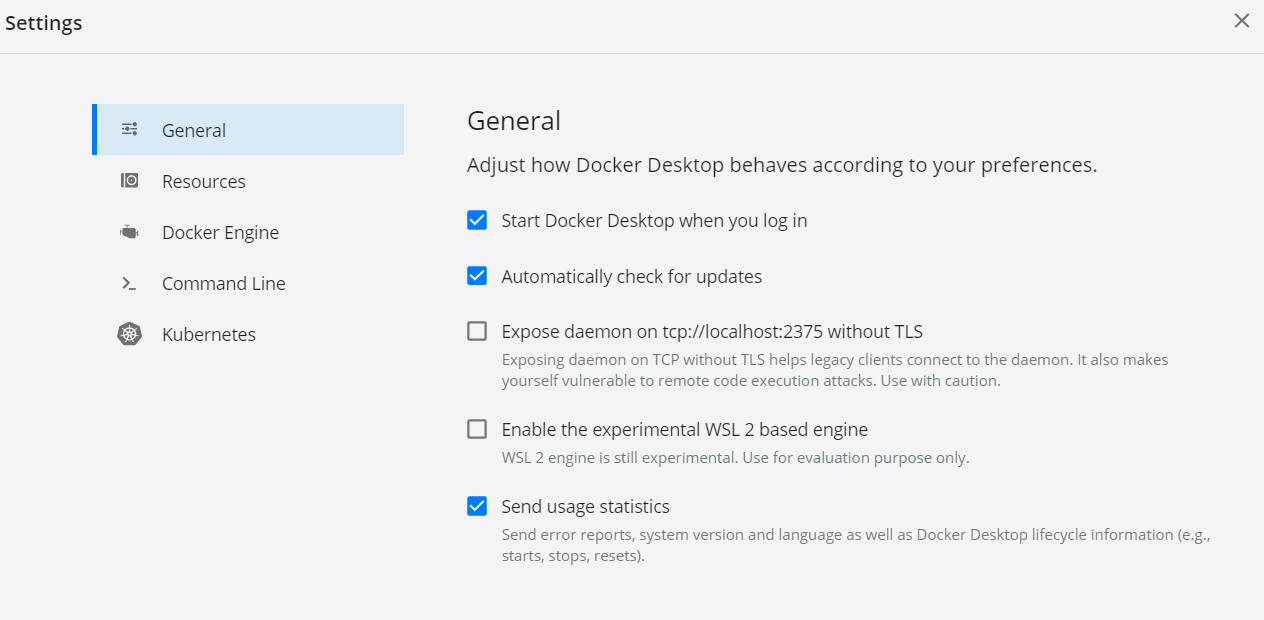
Docker Desktop for Windows / Mac --- ご自分の環境に合わせて。
-
ここでは、Windows を使います。
-
WSL2 Integrationは、ここではオフにしてください。これも好みですね。WSL2でやってもいいのですが。 -
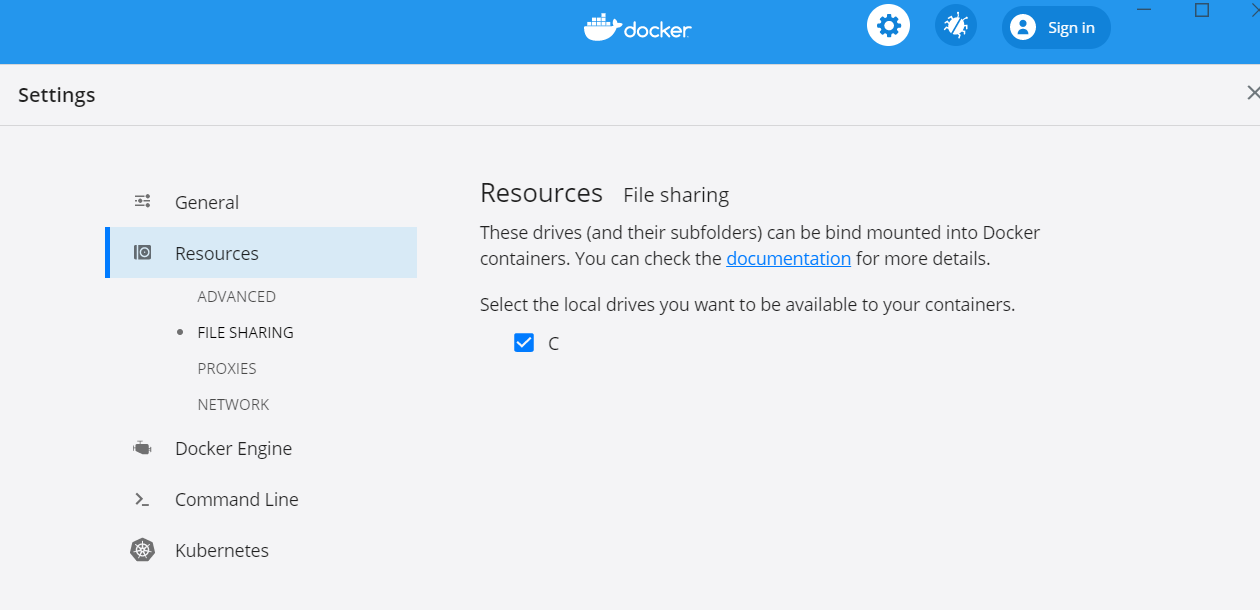
FILE SHARINGのオプションをオンに
-
-
(オプション) Visual Studio Code
- 以下のExtensionを入れる
- Python Extension
- Docker Extension
- Azure Account
-
(オプション) Azure Storage Explorer
- https://azure.microsoft.com/ja-jp/features/storage-explorer/
- Blob Storage にファイルをコピーするのに便利です。azcopy を内部実行させることもできます。
- Azure Portal にも Storage Explorer があるので、Web ブラウザーだけでも作業はできますが。
-
Azure Batch Explorer
- https://azure.github.io/BatchExplorer/
- Azure Batch の殆どの (もしかして全部?) API を呼び出してくれます
- デバッグ時と、稼働環境でも監視に便利です
開発開始!
以下の手順で作っていきます。
1. Python アプリのコード
シンプルに。
初期のフォルダー構造
├─ src
|   └─ app.py    --- 計算処理
└─ data
    └─ src.txt   --- テスト用ファイル
app.py の内容
src.txt を全行読み込んで、result.txtファイルに出力するだけです。
# Usage: python ./src/app.py ./data/src.txt ./data/result.txt
import sys
import os

if len(sys.argv) != 3:
    print("Usage: $python app.py <input file> <output file>")
    exit(1)

rfname = sys.argv[1]
wfname = sys.argv[2]
fcontents = ""

if os.path.exists(rfname):

    with open(rfname, "r") as readFile:
        fcontents = readFile.readlines()
        i = 1
        print("file contents:")
        for line in fcontents:
            print("  {}: {}".format(i, line))
            i = i + 1

    with open(wfname, "w") as writeFile:
        for line in fcontents:
            writeFile.write(line)
else:
    print("[error] file not found from container:{}".format(rfname))

print("Complete")
実行して、挙動確認。これ大事。
C:\Work\AzureBatchPython>python ./src/app.py ./data/src.txt ./data/result.txt
file contents:
    1: Daiyu Hatakeyama

    2: Awsome
Complete

C:\Work\AzureBatchPython>
2. Container 化
docker コマンドでもいいのですが。ここでは Visual Studio Code の Docker Extension で楽をします😊
参考:
https://code.visualstudio.com/docs/containers/overview
2.1. Docker File の自動生成
-
VS Code のコマンドパレットを表示します (Ctl+Shift+p)
-
Add Docker Files to Workspaceコマンドを選択 -
Application Platform :
Python Generalを選択 -
Include Optional Docker Composer Files? :
Noを選択 -
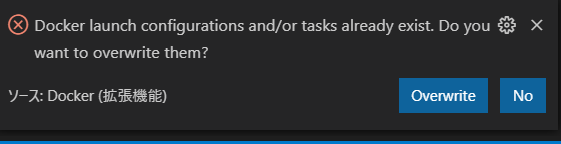
(Option) 既存の Docker 設定がある場合は、以下のポップアップが表示されます。ここでは
Overwriteを選択します -
アプリケーションのエントリーポイントのPythonファイルを指定します : ここでは
app.py -
DockerFileと.dockerignoteの2つのファイルが作成されます -
自動生成された DockerFile を修正します
-
今回のapp.pyは、アプリケーションのルートディレクトリではなく、src ディレクトリに置きました。これを DockerFile 内で追加します。
-
追加の依存ファイルも無いので、requirements.txt に関するものも、削除します。
# For more information, please refer to https://aka.ms/vscode-docker-python
FROM python:3.8

# Keeps Python from generating .pyc files in the container
ENV PYTHONDONTWRITEBYTECODE 1

# Turns off buffering for easier container logging
ENV PYTHONUNBUFFERED 1

WORKDIR /app
ADD ./src /app

# During debugging, this entry point will be overridden. For more information, refer to https://aka.ms/vscode-docker-python-debug
CMD ["python", "app.py"]
Working with containers - Generating Docker files:
https://code.visualstudio.com/docs/containers/overview#_generating-docker-files
2.2. Docker Image の作成
継続して、Visual Studio Code で右クリック作戦😊
-
DockerFileを右クリックして、Build Imageを選択
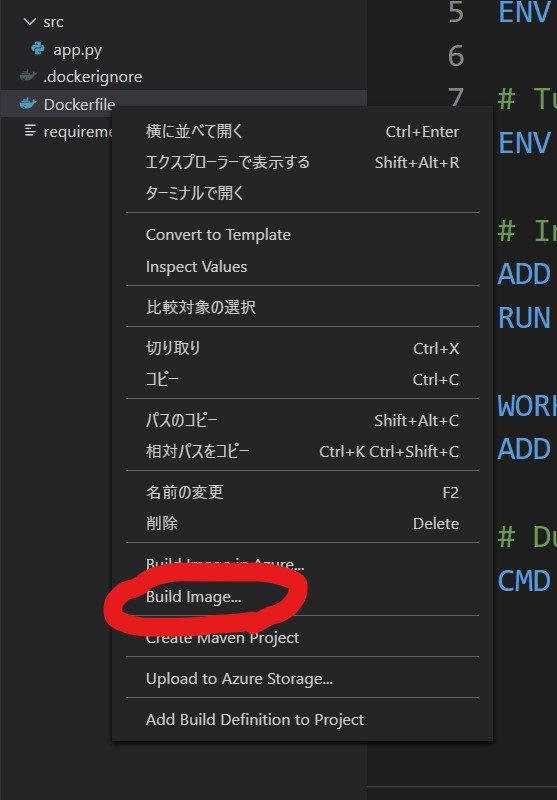
Visual Studio Code のターミナル で docker build コマンドが実行されているのを確認できます。
デフォルトのタグ名が気に入らない場合は、この出力結果を参考に、書き換えて実行してください。
ターミナルの出力例:
> Executing task: docker-build <

> docker build --rm -f "c:\Work\AzureBatchPython/Dockerfile" --label "com.microsoft.created-by=visual-studio-code" -t "azurebatchpython:latest" "c:\Work\AzureBatchPython" <

Sending build context to Docker daemon  7.168kB
Step 1/7 : FROM python:3.8
 ---> f88b2f81f83a
Step 2/7 : ENV PYTHONDONTWRITEBYTECODE 1
 ---> Using cache
 ---> 3b123c939251
Step 3/7 : ENV PYTHONUNBUFFERED 1
 ---> Using cache
 ---> fa89560ba9fd
Step 4/7 : WORKDIR /app
 ---> Running in e032f2f760df
Removing intermediate container e032f2f760df
 ---> 6714fa225b89
Step 5/7 : ADD ./src /app
 ---> 99d868bd6330
Step 6/7 : CMD ["python", "app.py"]
 ---> Running in a3526405f28d
Removing intermediate container a3526405f28d
 ---> 4eb63fcec1ce
Step 7/7 : LABEL com.microsoft.created-by=visual-studio-code
 ---> Running in c072f2b56a28
Removing intermediate container c072f2b56a28
 ---> 76809d56ac5f
Successfully built 76809d56ac5f
Successfully tagged azurebatchpython:latest
SECURITY WARNING: You are building a Docker image from Windows against a non-Windows Docker host. All files and directories added to build context will have '-rwxr-xr-x' permissions. It is recommended to double check and reset permissions for sensitive files and directories.

ターミナルはタスクで再利用されます、閉じるには任意のキーを押してください。
2.3. ローカルでの Container のテスト
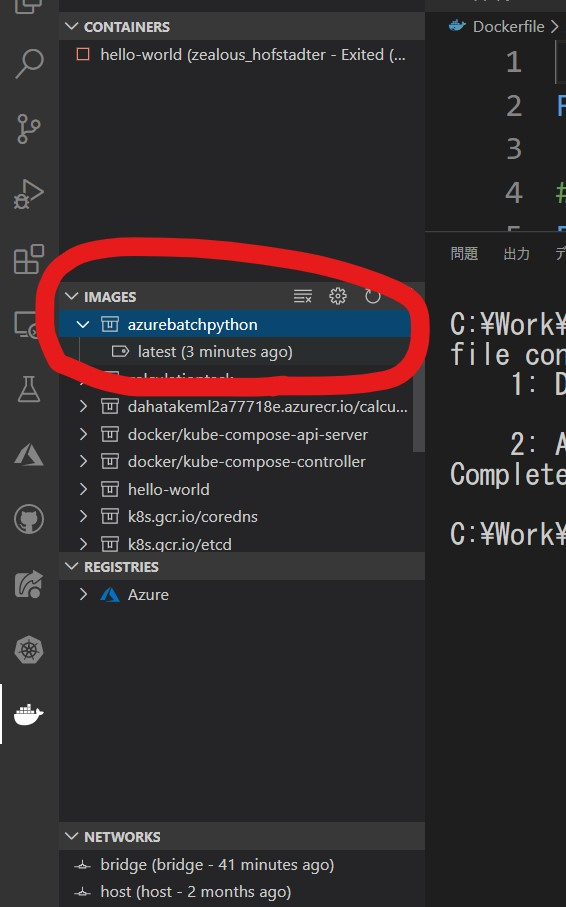
ここでも Visual Studio Code を使って Container を実行させます。
-
Docker View に移動します
-
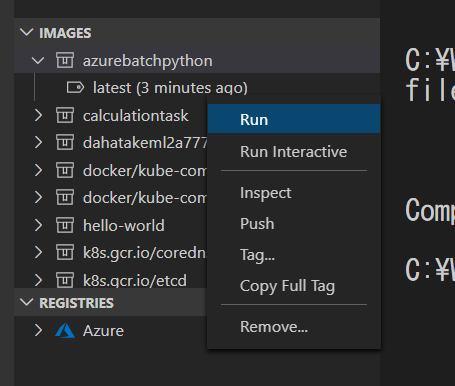
IMAGESの中で、先に作成した Docker Image が出来ているのが確認できます -
当該 Image を右クリックして
Runで実行します

実行結果 例:
C:\Work\AzureBatchPython>docker run --rm -d  azurebatchpython:latest
4b23c26b84bb817e94d216153ea1066bff7b37daf725b67d14429bf6e67eb463

C:\Work\AzureBatchPython>
Docker コマンド、忘れそうになります😅
さて、このままだと -d オプションでバックグランドで実行していて、状況がわかりません。なので、ターミナルで、以下のコマンドをそのまま実行してみます。
docker run --rm azurebatchpython:latest
出力結果:
C:\Work\AzureBatchPython>docker run --rm azurebatchpython:latest
Usage: $python app.py <input file> <output file>

C:\Work\AzureBatchPython>
素晴らしい。ちゃんと引数が無いので、エラーメッセージを出力してくれていますね😊
さて、これだと全部動いたわけではないので、Docker Host と ローカルの Windows のファイルシステムをマウントして、ファイルの読み書きをさせます。
docker run --rm -v C:/Work/AzureBatchPython/data:/data azurebatchpython:latest python app.py /data/src.txt /data/result.txt
Docker Desktop for Windows を使っての情報が、比較的少ないので、パラメータの解説をします。
| 項目 | 説明 |
|---|---|
| --rm | イメージを実行したら、すぐにそのイメージを削除します |
| --v | ローカルのファイルシステムをマウントします。 ここでは、ローカルのC:/Work/AzureBatchPython/data を、コンテナ内の /data にマウントしています。 マウント先がubuntuですので。 |
| [ARG] | 調査が終わっていませんが😅 ファイルパスの指定をするとエラーになります。Python app.py 引数1 引数2 と指定することで、ファイルパスが引数としてコンテナに渡せます |
これで、コンテナ化が完了しました。
3. Azure Container Registry への登録
コンテナのリポジトリとして Docker Hub でも構いませんが。
ここでは、Azure で容易に Private リポジトリとして使える Azure Container Registory を使います。
Azure のプライベート Docker コンテナー レジストリの概要:
https://docs.microsoft.com/ja-jp/azure/container-registry/container-registry-intro
3.1. Azure Container Registry の作成
こちらのドキュメントに従って作成します。
クイック スタート:Azure portal を使用したプライベート コンテナー レジストリの作成:
https://docs.microsoft.com/ja-jp/azure/container-registry/container-registry-get-started-portal
| 項目 | 値 | 説明 |
|---|---|---|
| SKU | Basic | 何でもいいです😊 |
3.2. 作成したコンテナの Azure Container Registry への登録
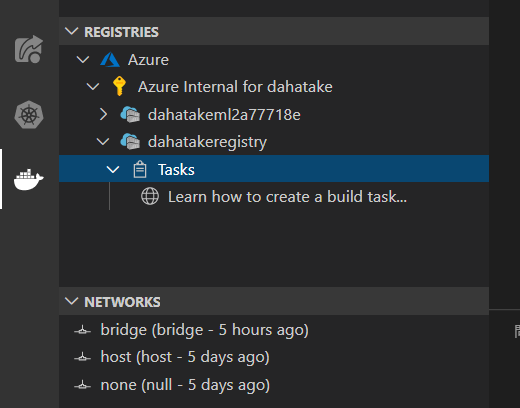
ここでも Visual Studio Code を使います。もちろん docker コマンドでも出来ます。
- [Docker] タブで、作成した Azure Container Registryのインスタンスが閲覧出来る事を確認します。
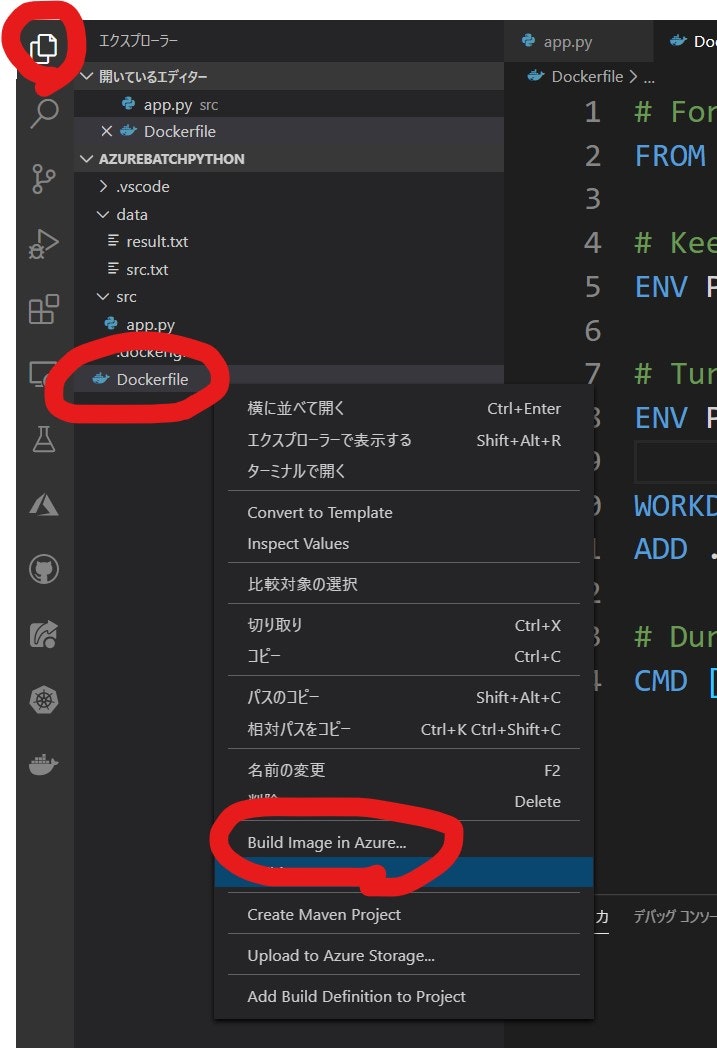
- [エクスプローラー] タブで、Dockerfile を右クリックして [Build Image in Azure...] を選択します。
- [コマンドパレット]が表示されます。Visual Studio Codeの画面上部ですね。で、Image名とタグ名を設定します。
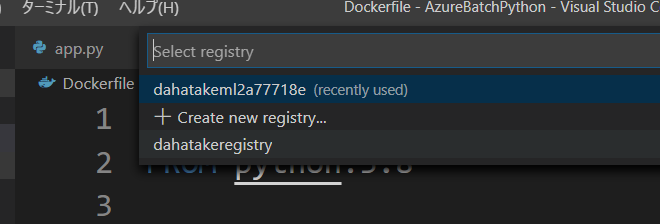
- 次に、リポジトリを選択します。先に作成した Azure Container Registry ですね。
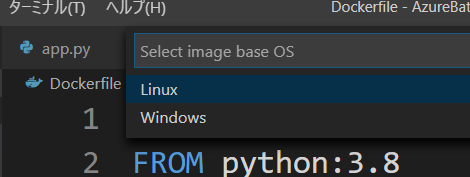
- 次に Base OS Image を選択します。Linux ですね。

Visual Studio Code のターミナルに、ImageのBuild 状況 と Azure Container Registry へのアップロード状況が出力されます。
以下は出力例です。
Setting up temp file with 'sourceArchive116382.tar.gz'
   Sending source code to temp file
   Getting build source upload URL
   Getting blob info from upload URL
   Creating blob service
   Creating block blob
Uploaded source code to C:\Users\dahatake\AppData\Local\Temp\sourceArchive116382.tar.gz
Set up run request
Scheduled run ce1
2020/03/23 05:51:55 Downloading source code...
2020/03/23 05:51:56 Finished downloading source code
2020/03/23 05:51:57 Using acb_vol_bef6d508-e07b-4875-bc80-2c757973eb84 as the home volume
2020/03/23 05:51:57 Setting up Docker configuration...
2020/03/23 05:51:58 Successfully set up Docker configuration
2020/03/23 05:51:58 Logging in to registry: dahatakeregistry.azurecr.io
2020/03/23 05:51:59 Successfully logged into dahatakeregistry.azurecr.io
2020/03/23 05:51:59 Executing step ID: build. Timeout(sec): 28800, Working directory: '', Network: ''
2020/03/23 05:51:59 Scanning for dependencies...
2020/03/23 05:51:59 Successfully scanned dependencies
2020/03/23 05:51:59 Launching container with name: build
Sending build context to Docker daemon   7.68kB

Step 1/6 : FROM python:3.8
3.8: Pulling from library/python
50e431f79093: Pulling fs layer
dd8c6d374ea5: Pulling fs layer
c85513200d84: Pulling fs layer
55769680e827: Pulling fs layer
f5e195d50b88: Pulling fs layer
94cdd3612287: Pulling fs layer
3b37b69935d4: Pulling fs layer
b9add85f08c4: Pulling fs layer
aa1f4a29beac: Pulling fs layer
55769680e827: Waiting
f5e195d50b88: Waiting
b9add85f08c4: Waiting
94cdd3612287: Waiting
3b37b69935d4: Waiting
aa1f4a29beac: Waiting
dd8c6d374ea5: Verifying Checksum
dd8c6d374ea5: Download complete
c85513200d84: Verifying Checksum
c85513200d84: Download complete
50e431f79093: Verifying Checksum
50e431f79093: Download complete
55769680e827: Verifying Checksum
55769680e827: Download complete
94cdd3612287: Verifying Checksum
94cdd3612287: Download complete
b9add85f08c4: Verifying Checksum
b9add85f08c4: Download complete
3b37b69935d4: Verifying Checksum
3b37b69935d4: Download complete
f5e195d50b88: Verifying Checksum
f5e195d50b88: Download complete
aa1f4a29beac: Verifying Checksum
aa1f4a29beac: Download complete
50e431f79093: Pull complete
dd8c6d374ea5: Pull complete
c85513200d84: Pull complete
55769680e827: Pull complete
f5e195d50b88: Pull complete
94cdd3612287: Pull complete
3b37b69935d4: Pull complete
b9add85f08c4: Pull complete
aa1f4a29beac: Pull complete
Digest: sha256:de4dad989417bdb9375e49b17602984a6883fbe4fa92e7a432983ef602bfcc28
Status: Downloaded newer image for python:3.8
 ---> f88b2f81f83a
Step 2/6 : ENV PYTHONDONTWRITEBYTECODE 1
 ---> Running in 6b26f95fd3fa
Removing intermediate container 6b26f95fd3fa
 ---> 79a1d83f14a0
Step 3/6 : ENV PYTHONUNBUFFERED 1
 ---> Running in 10873c752bd4
Removing intermediate container 10873c752bd4
 ---> 1a082a963105
Step 4/6 : WORKDIR /app
 ---> Running in ca23f5a03f96
Removing intermediate container ca23f5a03f96
 ---> 372cf5af723e
Step 5/6 : ADD ./src /app
 ---> 0633d9d9b816
Step 6/6 : CMD ["python", "app.py"]
 ---> Running in 0a745c15c8f3
Removing intermediate container 0a745c15c8f3
 ---> 5309b2885f5d
Successfully built 5309b2885f5d
Successfully tagged dahatakeregistry.azurecr.io/azurebatchpython:ce1
2020/03/23 05:52:31 Successfully executed container: build
2020/03/23 05:52:31 Executing step ID: push. Timeout(sec): 1800, Working directory: '', Network: ''
2020/03/23 05:52:31 Pushing image: dahatakeregistry.azurecr.io/azurebatchpython:ce1, attempt 1
The push refers to repository [dahatakeregistry.azurecr.io/azurebatchpython]
b3a7166a7615: Preparing
1a0cf85e58eb: Preparing
fbefc7d9db96: Preparing
bd436d37b328: Preparing
8b6dde37c5c4: Preparing
3dffd131f01f: Preparing
271910c4c150: Preparing
6670e930ed33: Preparing
c7f27a4eb870: Preparing
e70dfb4c3a48: Preparing
1c76bd0dc325: Preparing
3dffd131f01f: Waiting
271910c4c150: Waiting
6670e930ed33: Waiting
c7f27a4eb870: Waiting
e70dfb4c3a48: Waiting
1c76bd0dc325: Waiting
bd436d37b328: Pushed
1a0cf85e58eb: Pushed
b3a7166a7615: Pushed
fbefc7d9db96: Pushed
8b6dde37c5c4: Pushed
3dffd131f01f: Pushed
c7f27a4eb870: Pushed
e70dfb4c3a48: Pushed
1c76bd0dc325: Pushed
6670e930ed33: Pushed

271910c4c150: Pushed
ce1: digest: sha256:9ebbdbb9493d1165403a18048b32add62274600e45c5aa1d3ae0f3cc6d522daa size: 2630
2020/03/23 05:53:20 Successfully pushed image: dahatakeregistry.azurecr.io/azurebatchpython:ce1
2020/03/23 05:53:20 Step ID: build marked as successful (elapsed time in seconds: 31.848759)
2020/03/23 05:53:20 Populating digests for step ID: build...
2020/03/23 05:53:21 Successfully populated digests for step ID: build
2020/03/23 05:53:21 Step ID: push marked as successful (elapsed time in seconds: 49.055933)
2020/03/23 05:53:21 The following dependencies were found:
2020/03/23 05:53:21
- image:
    registry: dahatakeregistry.azurecr.io
    repository: azurebatchpython
    tag: ce1
    digest: sha256:9ebbdbb9493d1165403a18048b32add62274600e45c5aa1d3ae0f3cc6d522daa
  runtime-dependency:
    registry: registry.hub.docker.com
    repository: library/python
    tag: "3.8"
    digest: sha256:de4dad989417bdb9375e49b17602984a6883fbe4fa92e7a432983ef602bfcc28
  git: {}

Run ID: ce1 was successful after 1m29s
-
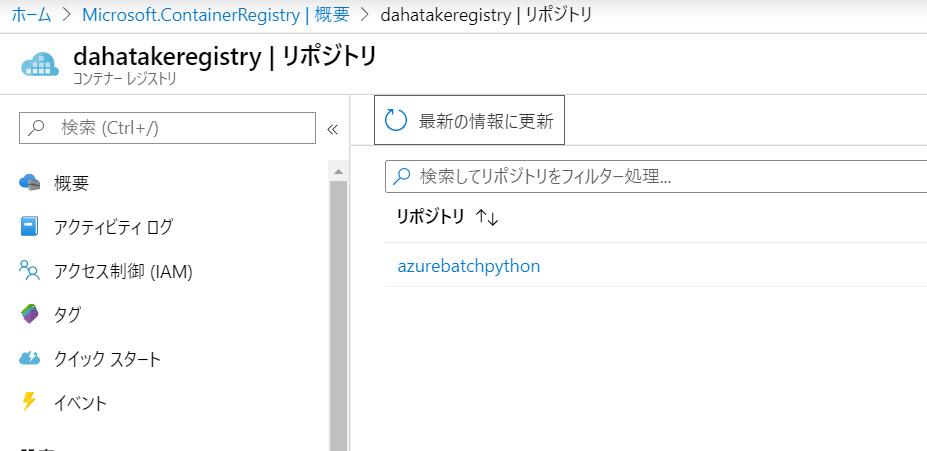
Azure Portal で、登録状況を確認できます。
-
また、Visual Studio Code の[Docker] タブでも、確認できます。
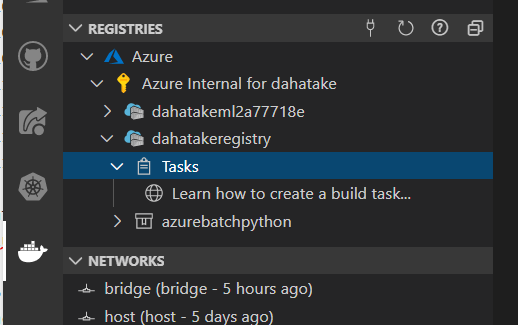
これで コンテナのデプロイ準備は完了です。
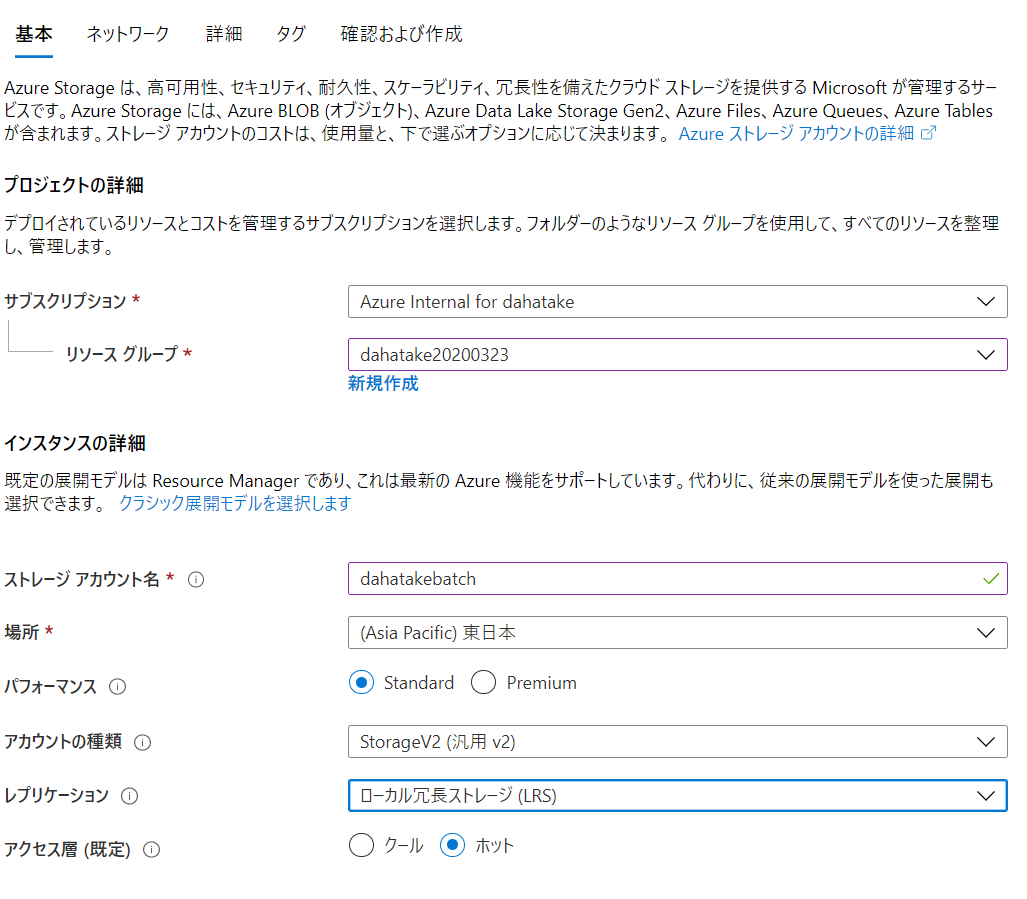
4. Azure Storage の作成
クラウド上の永続化ストレージである Azure Storage を作成します。
動かす事を目的としますので、どんなタイプのストレージでも良いです。
Azure Storage アカウントの作成:
https://docs.microsoft.com/ja-jp/azure/storage/common/storage-account-create?tabs=azure-portal
5. Azure Batch の作成
長かったですねー ようやくです。
5.1. Azure Batch アカウントの作成
こちらの手順に沿って作成します。画面が既に変わっていますが細かい事は気にしないでください。
クイック スタート:Azure portal で最初の Batch ジョブを実行する:
https://docs.microsoft.com/ja-jp/azure/batch/quick-create-portal
こちらが作成例です。
- 基本
- 詳細

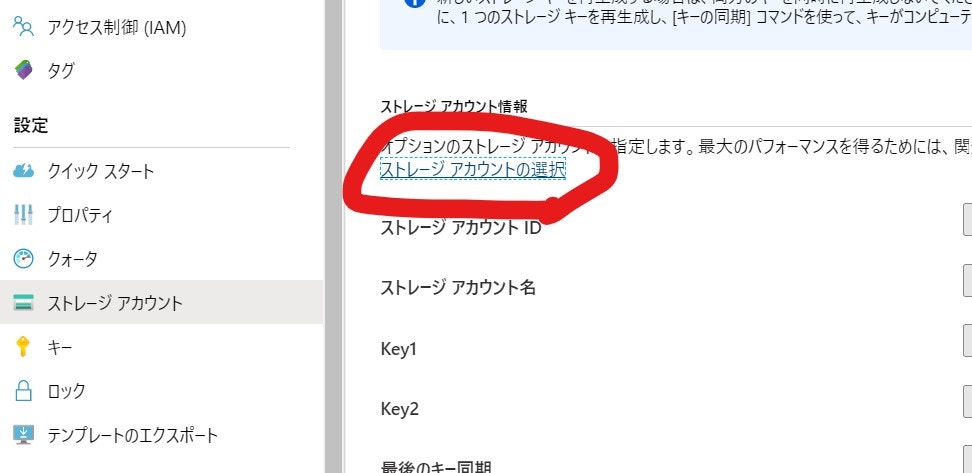
5.2. Storage アカウントの紐づけ
Azure Batch では、コンピューターの入出力結果を Azure Blob Storage へ保存します。どの Azure Storage アカウントを使うのかを設定します。
- ポータルの [ストレージ アカウント]へ移動します
- 文章中の[ストレージの選択]をクリックします
5.3. プール の作成の準備
Azure Batch でプールは、コンピューターのクラスターを指します。ジョブは、このプールに投入されることになります。
ここでは、Azure Portal から作成をします
プールの作成時には、仮想マシンの初期構成を一気に設定します。ですので、事前準備を念入りに行う必要があります。
うまくいかなかったら、プールは作り直した方が早いです😊 私も何度もプールの作り直しをしました。理解のために。
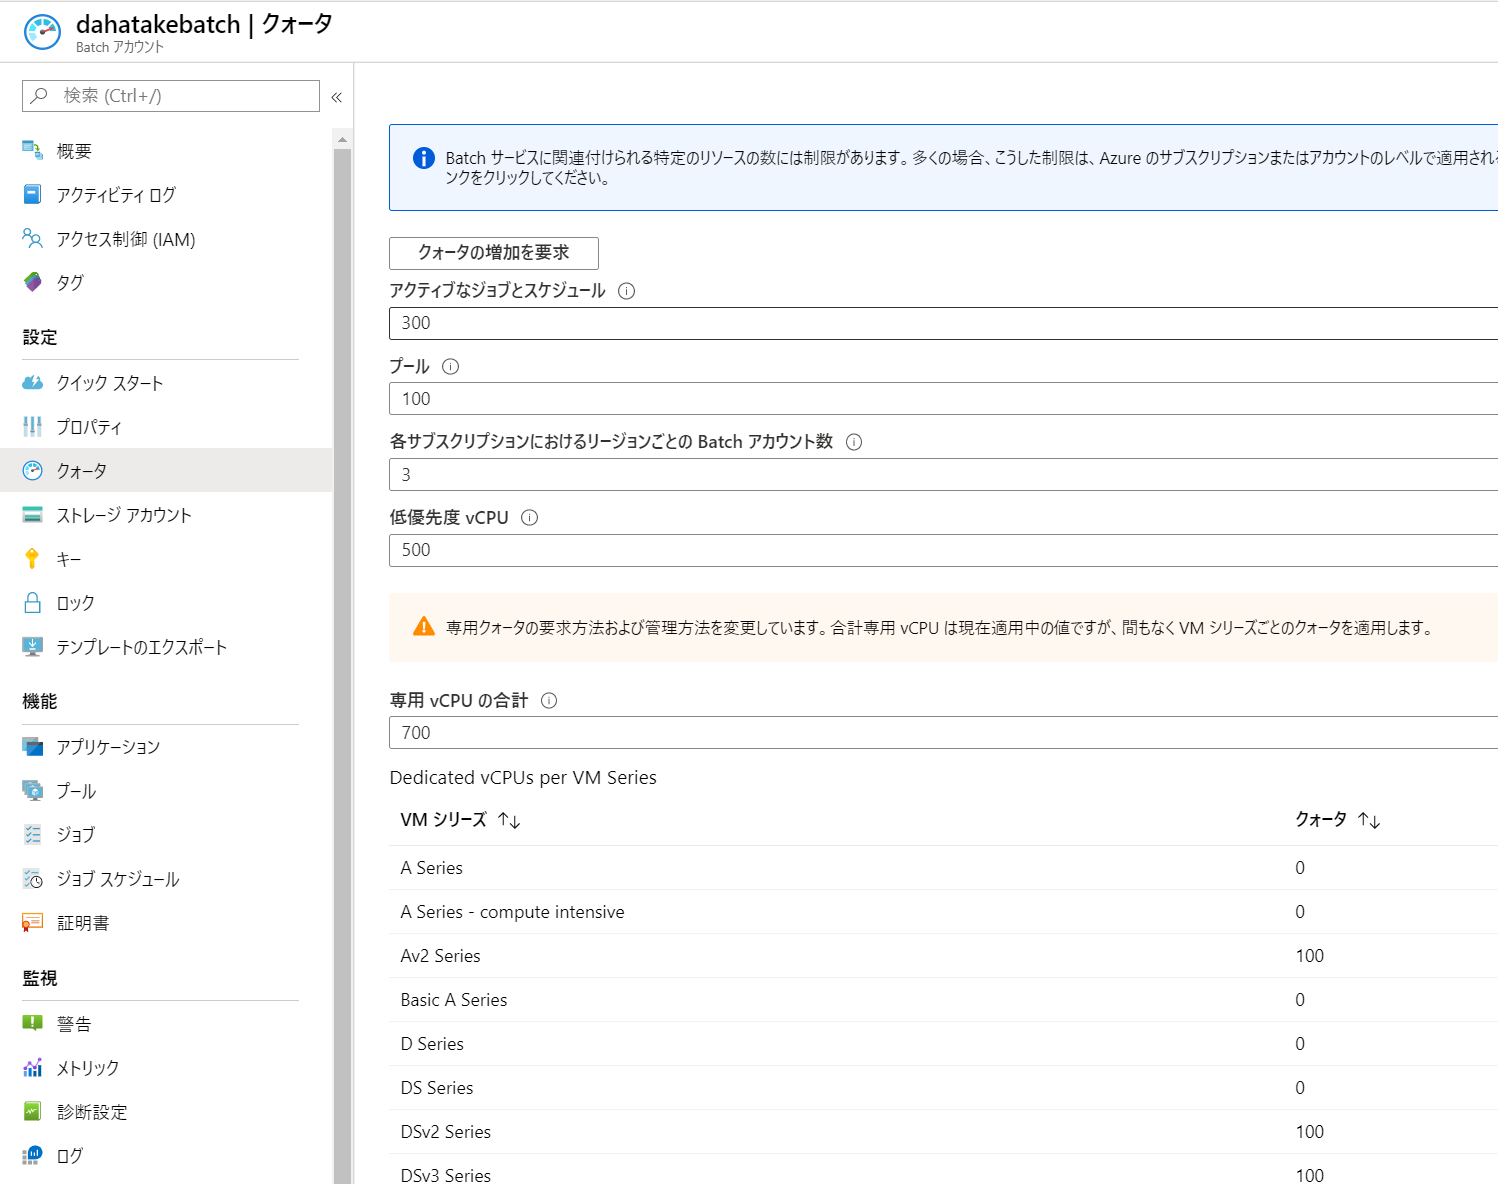
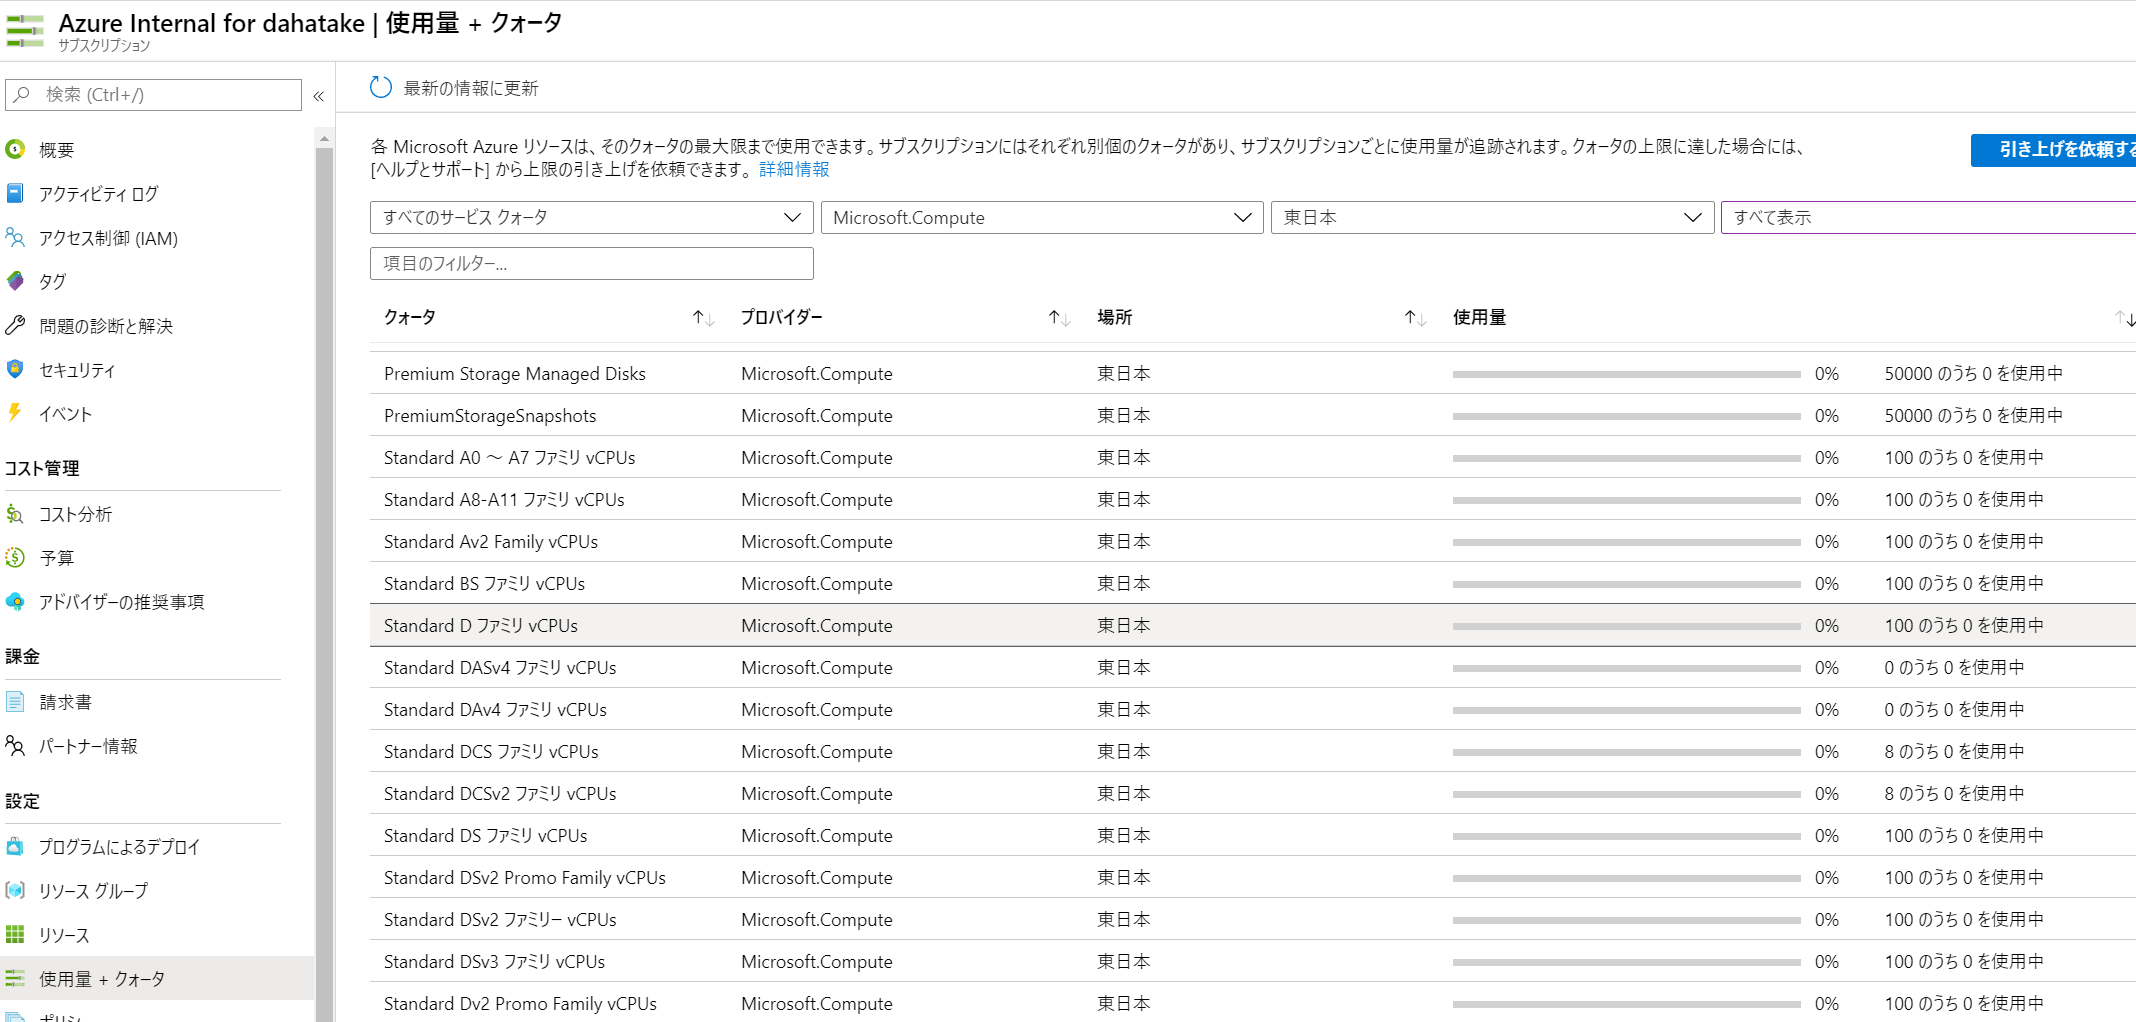
5.3.1. CPUコア数の事前確認
ここで仕様する仮想マシンは、Azure Batchで別管理されているものです。よって、CPUコア数のクォーターは、通常の仮想マシンと「別」です。
Azure Batch のポータルの [クォータ]でCPUコア数を確認してください。
必要に応じてコア数増加のリクエストをしてください。
- 私の環境の場合は、D Series のコア数が別です。
- Azure Batch のCPUコア数クォータ:
- Azure Subscription のCPUコア数クォータ:
- Azure Batch のCPUコア数クォータ:
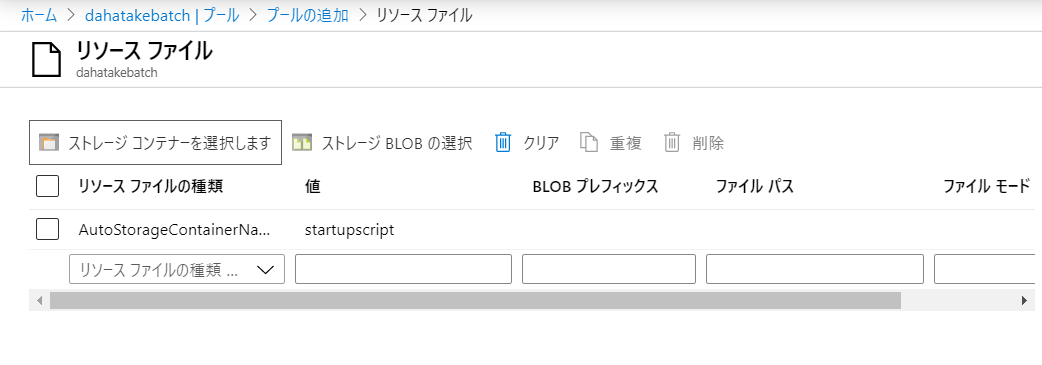
5.3.2. Blob とのやり取りのための Blobfuse の設定 - リソースファイルの利用
現状、Linux 仮想マシンとのやり取りが最速である、Blobfuse を使います。
blobfuse を使用して Blob Storage をファイル システムとしてマウントする方法:
https://docs.microsoft.com/ja-jp/azure/storage/blobs/storage-how-to-mount-container-linux
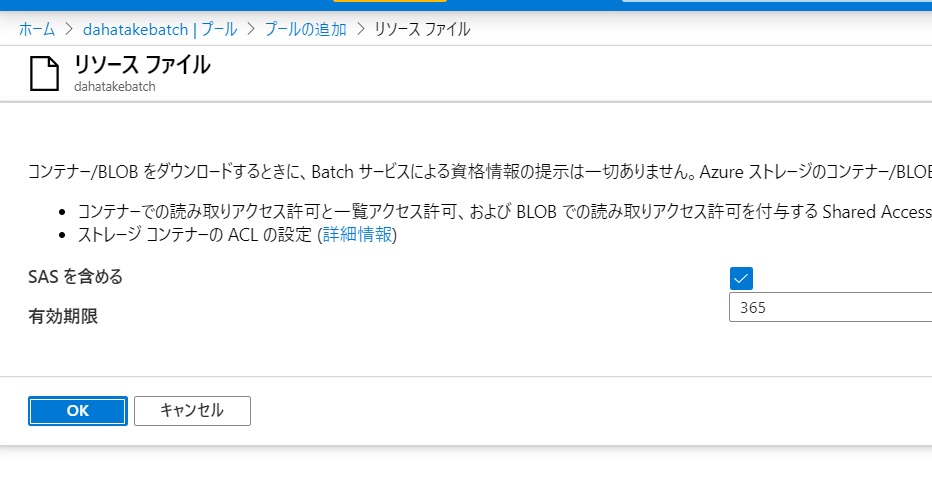
ここでは、仮想マシン起動時 にリソース ファイルでとして、Blob Storage に置いたスクリプトファイルを Linux 仮想マシンにコピーして、それを起動させます。
リソース ファイルを作成して使用する:
https://docs.microsoft.com/ja-jp/azure/batch/resource-files
- 作業フォルダにファイルを追加します。
フォルダー構造
├─ src
|    ├─ app.py             --- 計算処理
├─ data
|    └─ src.txt            --- テスト用ファイル
└─ startupapp                  [NEW]
     ├─ startup.sh         --- [NEW] 起動スクリプト
     ├─ fuse_conn_in.cfg   --- [NEW] 入力フォルダ マウント用の認証情報ファイル
     └─ fuse_conn_out.cfg  --- [NEW] 出力フォルダ マウント用の認証情報ファイル
- 起動スクリプト (startup.sh) は以下です。
wget https://packages.microsoft.com/config/ubuntu/16.04/packages-microsoft-prod.deb
sudo dpkg -i packages-microsoft-prod.deb
sudo apt-get update
sudo apt-get install blobfuse

sudo mkdir /mnt/data-in
sudo mkdir /mnt/blobfusetmp-in -p
sudo blobfuse /mnt/data-in --tmp-path=/mnt/blobfusetmp-in  --config-file=fuse_conn_in.cfg -o attr_timeout=240 -o entry_timeout=240 -o negative_timeout=120 -o allow_other

sudo mkdir /mnt/data-out
sudo mkdir /mnt/blobfusetmp-out -p
sudo blobfuse /mnt/data-out --tmp-path=/mnt/blobfusetmp-out  --config-file=fuse_conn_out.cfg -o attr_timeout=240 -o entry_timeout=240 -o negative_timeout=120 -o allow_other
- ストレージアカウント 認証情報 (fuse_conn_in.cfg と fuse_conn_out.cfg) を作成します。
ストレージアカウントへアクセスのために認証情報を扱います。
ここでは動かす事を目的としますので、厳密にセキュアにしません。実際にはドキュメントを熟読の上、セキュアに管理ください。
ストレージ アカウントの資格情報を構成する
https://docs.microsoft.com/ja-jp/azure/storage/blobs/storage-how-to-mount-container-linux#configure-your-storage-account-credentials
- Windows で認証情報を作成時の改行コードの編集
先のドキュメントにも注意書きがありますが、Linuxでテキストファイルを扱うため、Windowsで作成したテキストファイルの場合は、改行コードを変換する必要があります。WSL (Windows Subsystem for Linux) でも実行できますので、忘れないように。 以下、WSL - Ubuntu の例です。
dahatake@dahatake-lp3:/mnt/c/Work/AzureBatchPython/config$ sudo apt-get install dos2unix
Reading package lists... Done
Building dependency tree
Reading state information... Done
The following packages were automatically installed and are no longer required:
  libc-ares2 libfreetype6 libhttp-parser2.7.1 nodejs-doc
Use 'sudo apt autoremove' to remove them.
The following NEW packages will be installed:
  dos2unix
0 upgraded, 1 newly installed, 0 to remove and 170 not upgraded.
Need to get 351 kB of archives.
After this operation, 1267 kB of additional disk space will be used.
Get:1 http://archive.ubuntu.com/ubuntu bionic/universe amd64 dos2unix amd64 7.3.4-3 [351 kB]
Fetched 351 kB in 3s (135 kB/s)
Selecting previously unselected package dos2unix.
(Reading database ... 41294 files and directories currently installed.)
Preparing to unpack .../dos2unix_7.3.4-3_amd64.deb ...
Unpacking dos2unix (7.3.4-3) ...
Setting up dos2unix (7.3.4-3) ...
Processing triggers for man-db (2.8.3-2ubuntu0.1) ...
dahatake@dahatake-lp3:/mnt/c/Work/AzureBatchPython/config$ dir
fuse_conn_in.cfg  fuse_conn_out.cfg
dahatake@dahatake-lp3:/mnt/c/Work/AzureBatchPython/config$ dos2unix fuse_conn_in.cfg
dos2unix: converting file fuse_conn_in.cfg to Unix format...
dahatake@dahatake-lp3:/mnt/c/Work/AzureBatchPython/config$ dos2unix fuse_conn_out.cfg
dos2unix: converting file fuse_conn_out.cfg to Unix format...
dahatake@dahatake-lp3:/mnt/c/Work/AzureBatchPython/config$
- Blob Storage にスクリプトファイルと認証情報ファイルをアップロード
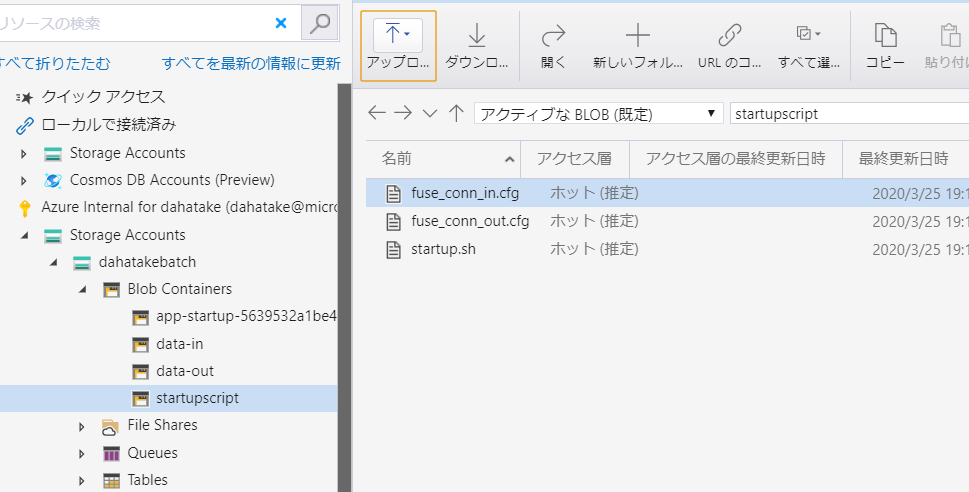
NOTE:
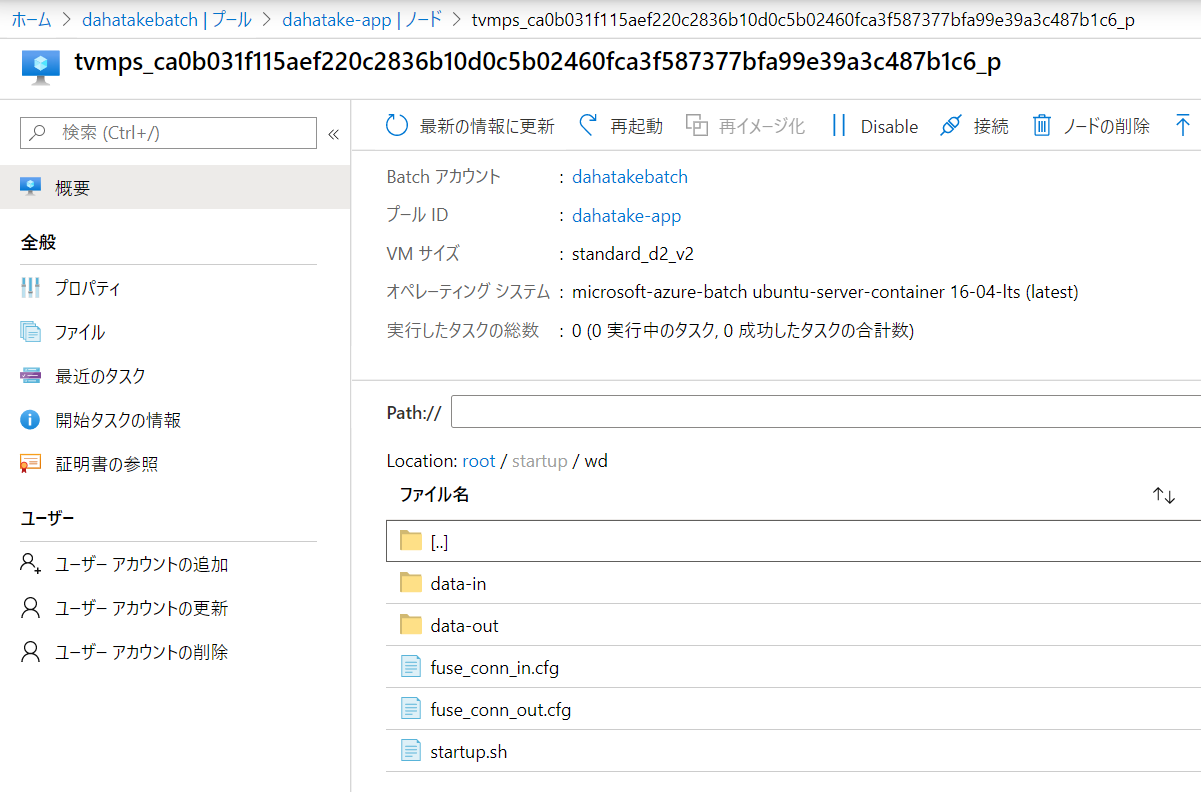
アップロード後にスタートアップジョブとして設定すると、/root/startup/wd にコピーされます。
プールとして仮想マシンを起動すると、[ノード]からノード内のファイルシステムは閲覧できるんです。こちらで内容が確認できます。
5.3.3. Container のプリフェッチ
仮想マシン起動時に、Container Image もダウンロードしておきます。
次のプールの作成時で行います。
5.4. プールの作成
事前準備の結果を、パラメーターとして設定していきます。かなり項目数が多いですが、一つ一つの意味が理解できるのではないかと思います。
ここで行う事を改めて整理します。
- 仮想マシンの作成
- Container Imageのプリフェッチ
- 開始タスクで、blobfuse を利用して、Blob Storageのコンテナをマウント
以下の手順で行います。
- [機能] - [プール]へ移動します
- [プールの追加]を選択します
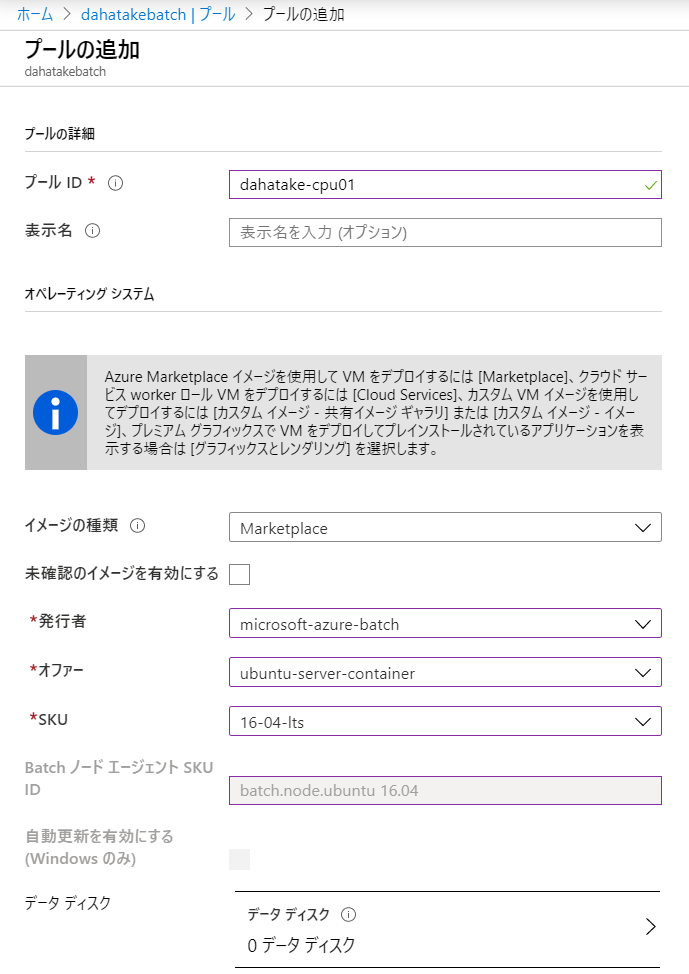
- プールの詳細 と オペレーティングシステム
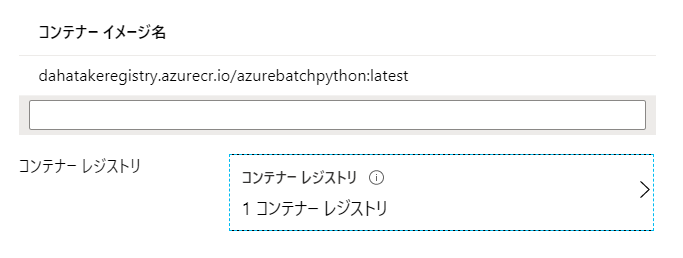
- コンテナーイメージ名
- コンテナーレジストリ
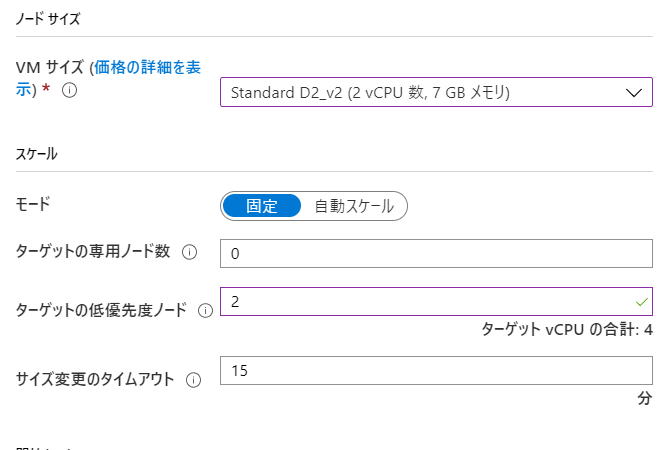
- ノードサイズ
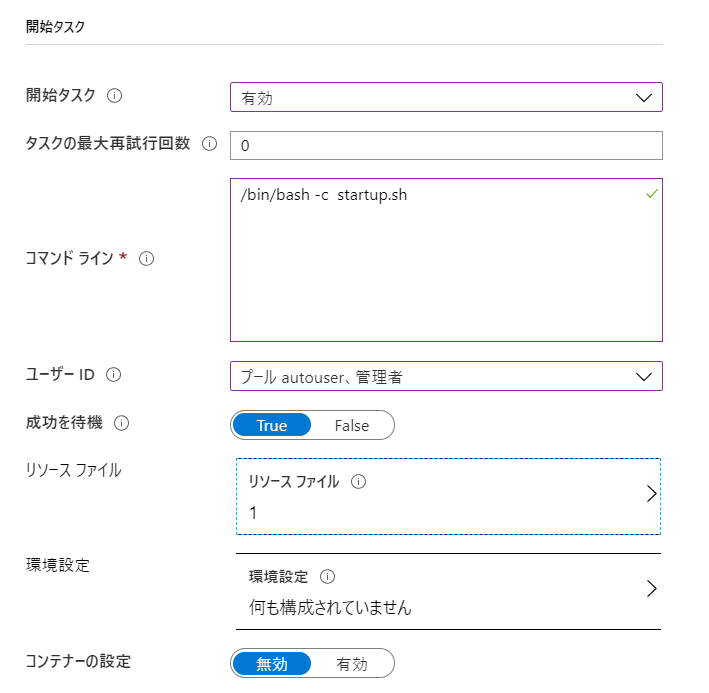
- 開始タスク
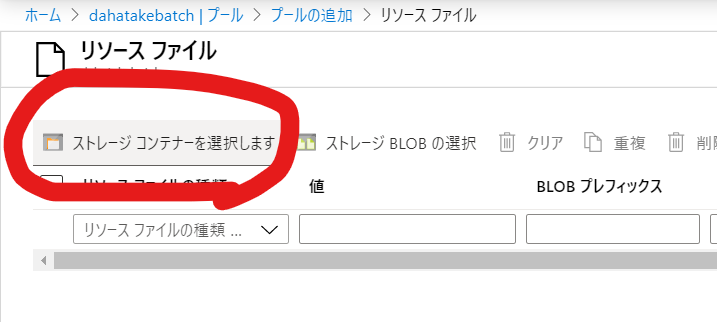
- リソースファイルの追加
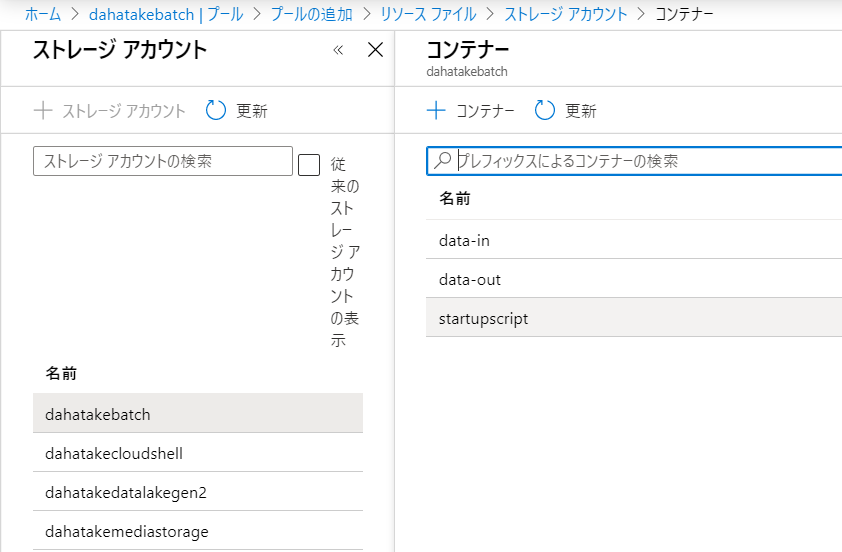
- [ストレージコンテナ]を選択
- 結果、こんな感じ
- プールの詳細 と オペレーティングシステム

残りは、そのままで...
以下、補足です。
| 項目 | 値 | 説明 |
|---|---|---|
| イメージの種類 | Marketplace | Azure Batch でコンテナ用を動かす場合は、こちらを選びます。もちろん、OS Image レベルでカスタマイズしたものを用意する場合は、そちらを選択します |
| 発行者 | microsoft-azure-batch | Azure Batch Team が用意しているものです。Docker互換の Moby などがインストール済みです |
| オファー | ubuntu-server-container | ubuntu を選びます。 私の好みです😊 |
| コンテナー構成 | カスタム | ここで利用する Container Image を指定します |
| コンテナー イメージ名 | container registry URL/image name:tag name 例: dahatakeregistry.azurecr.io/azurebatchpython:latest |
コンテナイメージの Full URL を指定します |
| コンテナー レジストリー | Azure Container Registry のURL | [追加]ボタンからウィザードで指定します |
| VMサイズ | Standard DS2_v2 | Aシリーズが古いので安定性には欠けます。また、CPUは2つ以上がより安定します |
| スケール | [固定] | 本当はオートスケールにしたいのですが、確実に動かす事をしてから、オートスケールにしましょう |
| ターゲットの体優先度ノード数 | 2 | 必要最低限。 1でも良いです! |
| サイズ変更のタイムアウト | 5 | 15分も待っていられないので。開発中は |
| 開始タスク | 有効 | ここで 仮想マシン起動時のスクリプトを設定します |
| 開始タスク - コマンドライン | /bin/bash -c startup.sh | シェルの起動から行います |
以下、補足です。
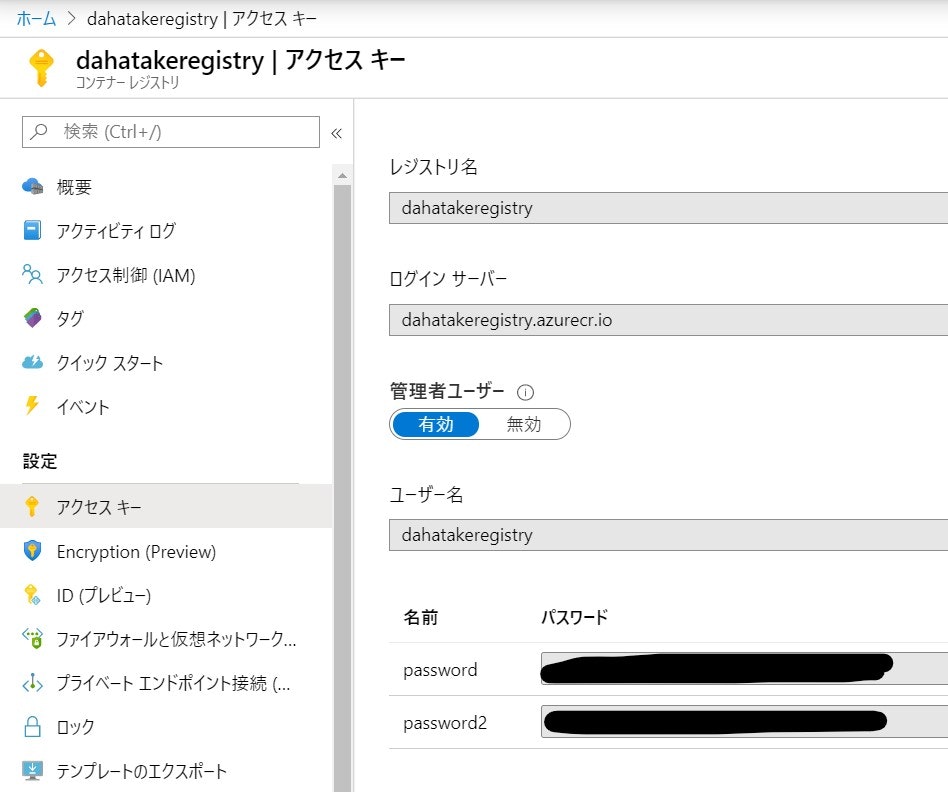
-
コンテナーレジストリーの認証情報は、ブラウザーのタブをもう一つ起動して、Azure Portalへログインし、Azure Container Registryの[アクセスキー]を開いておくと便利です。
-
開始のリクエストが送信されると、[割り当ての状態]が[サイズ変更中]になります
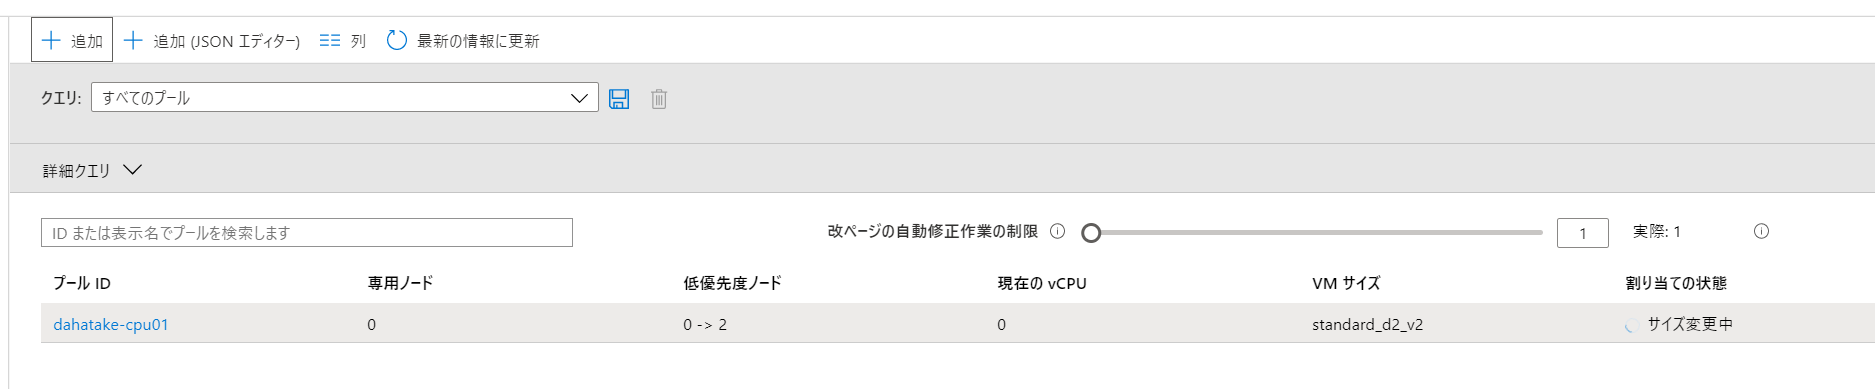
- ここで仮想マシンが起動されますので、仮想マシンの稼働時間に対して課金が開始されますので、ご注意ください!
- 効率化したい場合は、オートスケール設定で。
5.4.1 開発時の Tips
一気に設定をするので、問題発生時の切り分けは、難しくなりがちです。一つ一つ潰せるように以下をお伝えします。
実はプールの作成後に、仮想マシンに対して幾つか開発コードを後からも設定できます。
-
Azure Poral は2つのタブで常にアクセスしておく
- 認証情報など、様々な文字列をコピペすることが多いです。ストレージ、Container Registry など。現在の Azure Batch のポータルは、ピックアップしてくれず、テキストボックスに入力する方法をとっています。ですので、この方法が便利です。
- タイムアウトにはご注意ください😅
-
まずはスクリプト系を設定せずにプールを作成します。
- 低優先度が開発中はおススメです。仮想マシンの料金が、ざっくり60-80%安くなります!
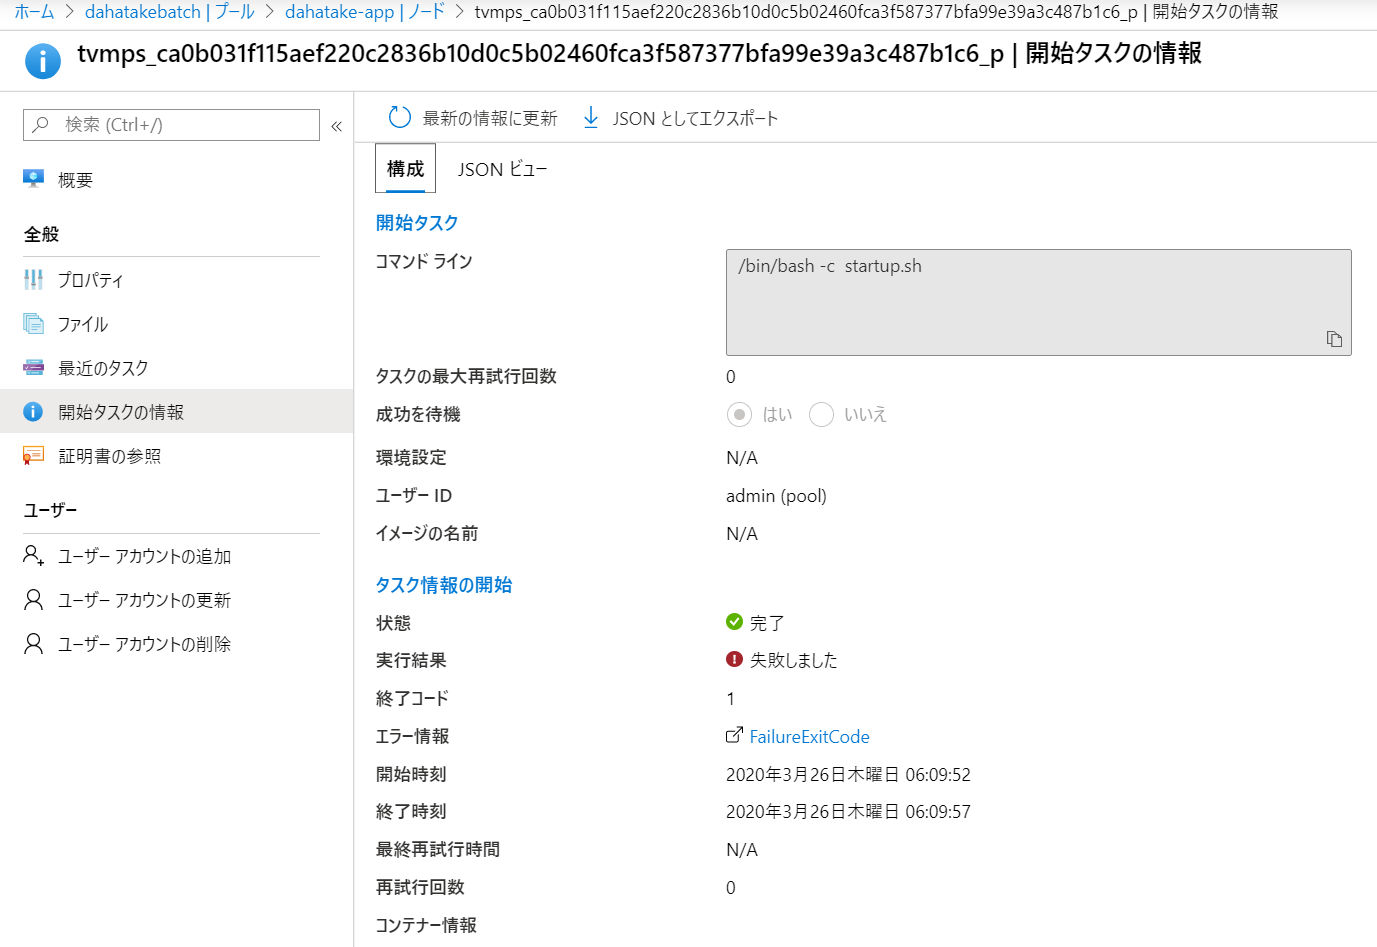
-
開始タスク
- プール作成後に、[プール] - [ノード]と選択します。個々の仮想マシンが確認できます。
- 特定の仮想マシンを1つ選択します。ハイパーリンクの部分ですね。
- そこで、[開始タスク]を選択し、コマンドラインやリソースファイルなどを設定します。

- エラー情報は、開始タスクの情報からも確認できます。
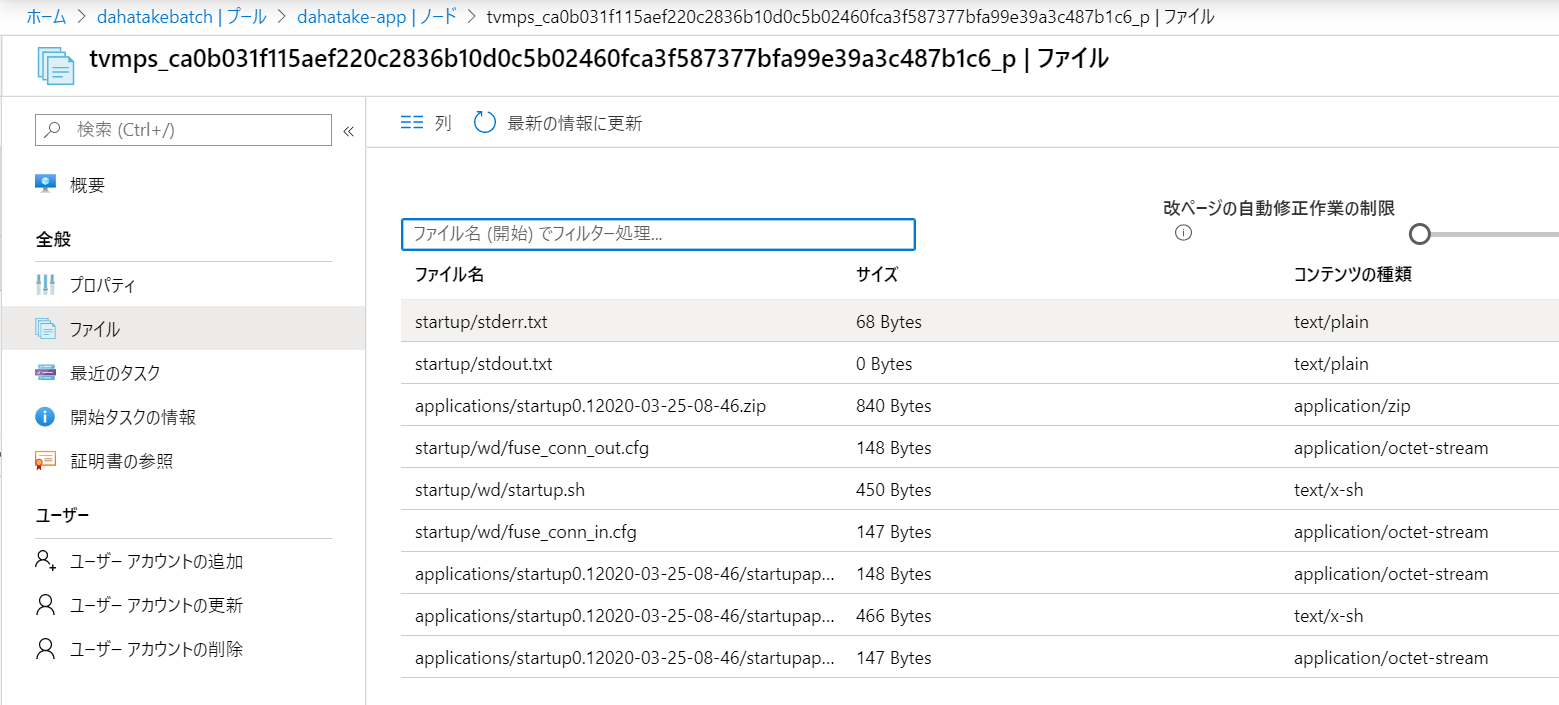
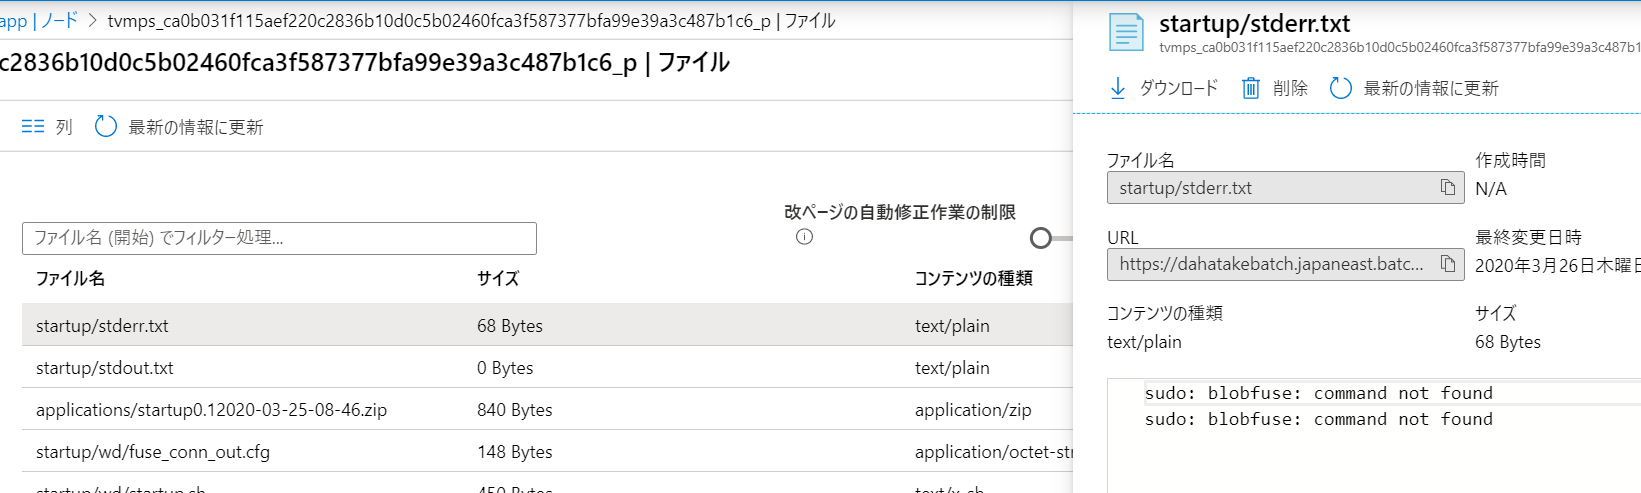
-
- まさにデバッグ中!
- [ファイル] から、startup/stderr.txt や startup/stdout.txt などを閲覧して、ログを確認してください。
-
- エラー例
- エラー例
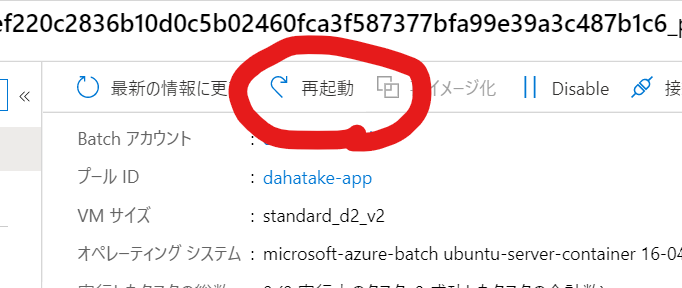
- 変更後は[再起動]で!
-
仮想マシンにsshでログイン
- [ノード]の[接続]から可能です。
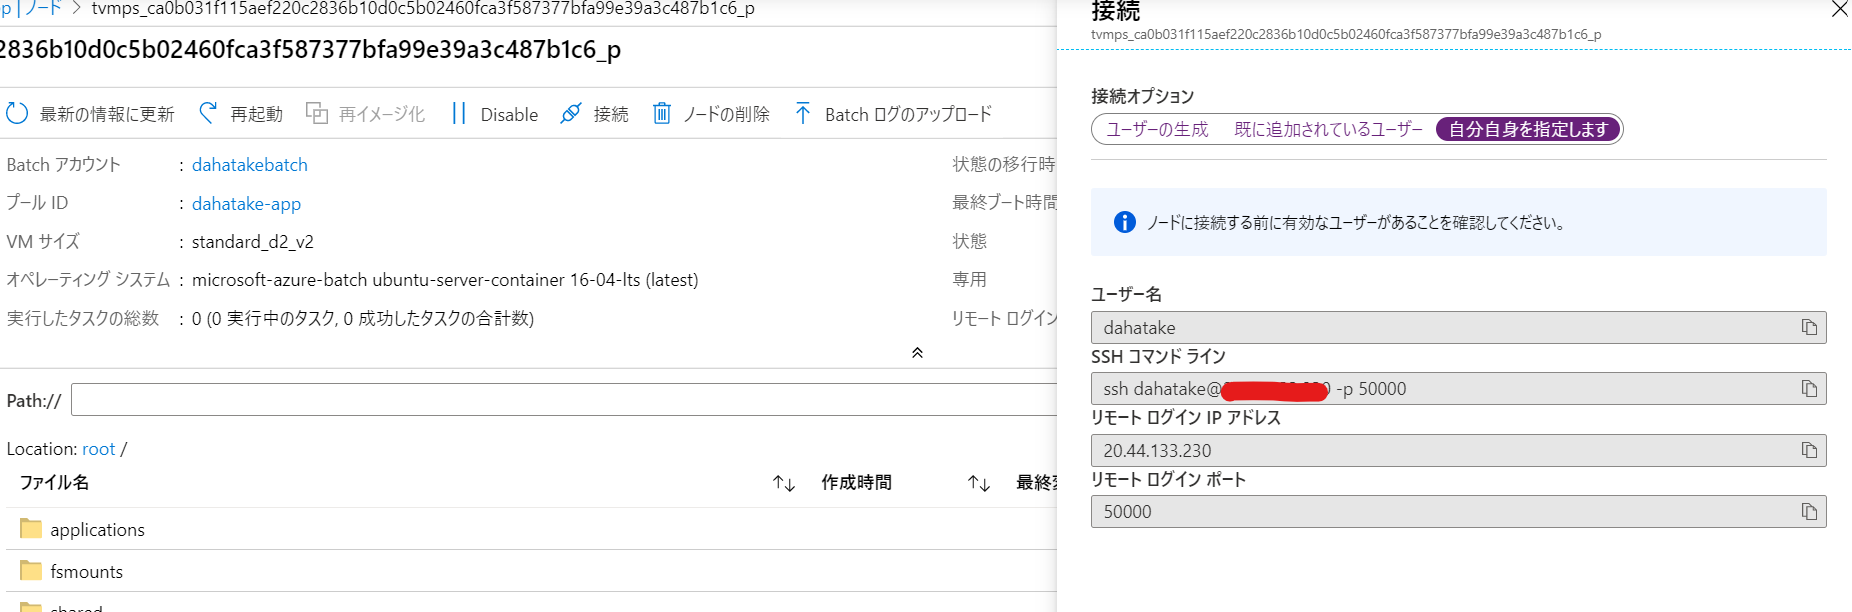
例えば Blobfuse したマウント結果などは、以下の様に WSL からでも確認ができます。
C:\>wsl
dahatake@dahatake-lp3:/mnt/c$ ssh dahatake@20.44.133.230 -p 50000
dahatake@20.44.133.230's password:
Welcome to Ubuntu 16.04.6 LTS (GNU/Linux 4.15.0-1075-azure x86_64)

 * Documentation:  https://help.ubuntu.com
 * Management:     https://landscape.canonical.com
 * Support:        https://ubuntu.com/advantage

 * Latest Kubernetes 1.18 beta is now available for your laptop, NUC, cloud
   instance or Raspberry Pi, with automatic updates to the final GA release.

     sudo snap install microk8s --channel=1.18/beta --classic

 * Multipass 1.1 adds proxy support for developers behind enterprise
   firewalls. Rapid prototyping for cloud operations just got easier.

     https://multipass.run/

16 packages can be updated.
0 updates are security updates.

New release '18.04.4 LTS' available.
Run 'do-release-upgrade' to upgrade to it.


Last login: Wed Mar 25 21:34:31 2020 from 122.134.161.68
dahatake@8d996a9545ea4eeaa4556f03dd7deea4000000:~$ ls
dahatake@8d996a9545ea4eeaa4556f03dd7deea4000000:~$ cd /
dahatake@8d996a9545ea4eeaa4556f03dd7deea4000000:/$ ls
bin   etc         initrd.img.old  lost+found  opt   run   srv  usr      vmlinuz.old
boot  home        lib             media       proc  sbin  sys  var
dev   initrd.img  lib64           mnt         root  snap  tmp  vmlinuz
dahatake@8d996a9545ea4eeaa4556f03dd7deea4000000:/$ cd /mnt
dahatake@8d996a9545ea4eeaa4556f03dd7deea4000000:/mnt$ ls
batch           blobfusetmp-out  DATALOSS_WARNING_README.txt  docker
blobfusetmp-in  data-in          data-out                     lost+found
dahatake@8d996a9545ea4eeaa4556f03dd7deea4000000:/mnt$ cd data-in
dahatake@8d996a9545ea4eeaa4556f03dd7deea4000000:/mnt/data-in$ ls
src01.txt  src02.txt
dahatake@8d996a9545ea4eeaa4556f03dd7deea4000000:/mnt/data-in$
6. Python コードからのジョブ起動
- 計算処理: 入出力ファイルについては、引数として取得。コード内部で呼び出さない
- ジョブ起動側: Blob マウントをし、入出力ファイル名を確定。計算処理を呼び出す
のジョブ起動側ですね。
冒頭にも書きましたが、これはAzure Batch のジョブ (=計算処理) を外部から呼び出す事になります。ジョブ分割は並列処理のインフラを最大限に活かすために重要な設計になりますので、十二分に配慮して行ってください。
今回は、ローカルのPython環境から起動させましょう。
フォルダー構造
├─ src
|    ├─ app.py                   --- 計算処理
├─ data
|    └─ src.txt                  --- テスト用ファイル
├─  startupapp
|    ├─ startup.sh               --- 起動スクリプト
|    ├─ fuse_conn_in.cfg         --- 入力フォルダ マウント用の認証情報ファイル
|    └─ fuse_conn_out.cfg        --- 出力フォルダ マウント用の認証情報ファイル
├─  config.py                    --- [NEW] ジョブ起動時のAzure Servicesへの認証情報
├─  python_quickstart_client.py  --- [NEW] ジョブ起動
└─  requirements.txt             --- [NEW] ジョブ起動スクリプト用 Python 関連モジュール
6.1. 実行環境作成
Azure Blob Storage と Azure Batch 呼び出し用のライブラリーをインストールします。関連ライブラリーは requirements.txt にあります。
- requirements.txt
azure-batch==6.0.0
azure-storage-blob==1.4.0
Azureのポータルから、それぞれの認証情報を取得ください。
- config.py
# -------------------------------------------------------------------------
#
# THIS CODE AND INFORMATION ARE PROVIDED "AS IS" WITHOUT WARRANTY OF ANY KIND,
# EITHER EXPRESSED OR IMPLIED, INCLUDING BUT NOT LIMITED TO THE IMPLIED WARRANTIES
# OF MERCHANTABILITY AND/OR FITNESS FOR A PARTICULAR PURPOSE.
# ----------------------------------------------------------------------------------
# The example companies, organizations, products, domain names,
# e-mail addresses, logos, people, places, and events depicted
# herein are fictitious. No association with any real company,
# organization, product, domain name, email address, logo, person,
# places, or events is intended or should be inferred.
# --------------------------------------------------------------------------

# Global constant variables (Azure Storage account/Batch details)

# import "config.py" in "python_quickstart_client.py "

_BATCH_ACCOUNT_NAME = ''  # Your batch account name
_BATCH_ACCOUNT_KEY = ''  # Your batch account key
_BATCH_ACCOUNT_URL = ''  # Your batch account URL
_STORAGE_ACCOUNT_NAME = ''  # Your storage account name
_STORAGE_ACCOUNT_KEY = ''  # Your storage account key
_POOL_ID = ''  # Your Pool ID
_JOB_ID = ''  # Job ID
ご自分のターミナル (コマンドプロンプト) から、pip でインストールします。
勿論、Anaconda などを使っても構いません。
pip install -r requirements.txt
6.2. 読み込み用ファイルを Blob Storage へアップロード
テキストファイルなら何でも構いません。Blob Storage へアップロードしてください。
blobfuse 設定時に指定したコンテナにアップロードするのをお忘れなく。この例だと data-in コンテナになります。

6.3. ジョブ起動コード実行
Azure Batch のクイックスタートのサンプルを流用します。
参考サンプルコード:
https://github.com/Azure-Samples/batch-python-quickstart
必要最低限の部分に変更しました。少し長いですが、こちらが参考です。
## install library before you run
## pip install -r requirements.txt

from __future__ import print_function
import datetime
import io
import os
import sys
import time
import config

try:
    input = raw_input
except NameError:
    pass

import azure.storage.blob as azureblob
import azure.batch.batch_service_client as batch
import azure.batch.batch_auth as batch_auth
import azure.batch.models as batchmodels

# Update the Batch and Storage account credential strings in config.py with values
# unique to your accounts. These are used when constructing connection strings
# for the Batch and Storage client objects.

def print_batch_exception(batch_exception):
    """
    Prints the contents of the specified Batch exception.

    :param batch_exception:
    """
    print('-------------------------------------------')
    print('Exception encountered:')
    if batch_exception.error and \
            batch_exception.error.message and \
            batch_exception.error.message.value:
        print(batch_exception.error.message.value)
        if batch_exception.error.values:
            print()
            for mesg in batch_exception.error.values:
                print('{}:\t{}'.format(mesg.key, mesg.value))
    print('-------------------------------------------')


def create_job(batch_service_client, job_id, pool_id):
    """
    Creates a job with the specified ID, associated with the specified pool.

    :param batch_service_client: A Batch service client.
    :type batch_service_client: `azure.batch.BatchServiceClient`
    :param str job_id: The ID for the job.
    :param str pool_id: The ID for the pool.
    """
    print('Creating job [{}]...'.format(job_id))

    job = batch.models.JobAddParameter(
        id=job_id,
        pool_info=batch.models.PoolInformation(pool_id=pool_id))

    batch_service_client.job.add(job)

def add_tasks(batch_service_client, job_id, input_files):
    """
    Adds a task for each input file in the collection to the specified job.

    :param batch_service_client: A Batch service client.
    :type batch_service_client: `azure.batch.BatchServiceClient`
    :param str job_id: The ID of the job to which to add the tasks.
    :param list input_files: A collection of input files. One task will be
     created for each input file.
    :param output_container_sas_token: A SAS token granting write access to
    the specified Azure Blob storage container.
    """

    print('Adding {} tasks to job [{}]...'.format(len(input_files.items), job_id))

    tasks = list()

    for idx, input_file in enumerate(input_files):

        command = "python app.py /data-in/{0} /data-out/{0}-result.txt".format(input_file.name)

        task_container_setting = batch.models.TaskContainerSettings(image_name="dahatakeregistry.azurecr.io/azurebatchpython:latest", container_run_options='--workdir /app --volume /mnt/data-in:/data-in --volume /mnt/data-out:/data-out')

        tasks.append(batch.models.TaskAddParameter(
            id='Task{}'.format(idx),
            command_line=command,
            container_settings=task_container_setting
            )
        )

    batch_service_client.task.add_collection(job_id, tasks)

def wait_for_tasks_to_complete(batch_service_client, job_id, timeout):
    """
    Returns when all tasks in the specified job reach the Completed state.

    :param batch_service_client: A Batch service client.
    :type batch_service_client: `azure.batch.BatchServiceClient`
    :param str job_id: The id of the job whose tasks should be to monitored.
    :param timedelta timeout: The duration to wait for task completion. If all
    tasks in the specified job do not reach Completed state within this time
    period, an exception will be raised.
    """
    timeout_expiration = datetime.datetime.now() + timeout

    print("Monitoring all tasks for 'Completed' state, timeout in {}..."
          .format(timeout), end='')

    while datetime.datetime.now() < timeout_expiration:
        print('.', end='')
        sys.stdout.flush()
        tasks = batch_service_client.task.list(job_id)

        incomplete_tasks = [task for task in tasks if
                            task.state != batchmodels.TaskState.completed]
        if not incomplete_tasks:
            print()
            return True
        else:
            time.sleep(1)

    print()
    raise RuntimeError("ERROR: Tasks did not reach 'Completed' state within "
                       "timeout period of " + str(timeout))


if __name__ == '__main__':

    container_name = "data-in"
    start_time = datetime.datetime.now()
    start_time_for_job = "{0:%Y%m%d%H%M}".format(start_time)
    print('Start: {}'.format(start_time))
    print()

    # Create a Batch service client. We'll now be interacting with the Batch
    # service in addition to Storage
    credentials = batch_auth.SharedKeyCredentials(config._BATCH_ACCOUNT_NAME,
                                                  config._BATCH_ACCOUNT_KEY)

    batch_client = batch.BatchServiceClient(
        credentials,
        batch_url=config._BATCH_ACCOUNT_URL)

    # Create the blob client, for use in obtaining references to
    # blob storage containers and uploading files to containers.
    blob_service_client = azureblob.BlockBlobService(
        account_name=config._STORAGE_ACCOUNT_NAME,
        account_key=config._STORAGE_ACCOUNT_KEY)

    # List the blobs in the container
    blob_list = blob_service_client.list_blobs(container_name)
    for blob in blob_list:
        print("\t" + blob.name)

    try:

        print("\nCreating Job...")
        job_name = "{}-{}".format(config._JOB_ID, start_time_for_job)

        # Create the job that will run the tasks.
        create_job(batch_client, job_name, config._POOL_ID)

        print("\nAdd task...")

        # Add the tasks to the job.
        add_tasks(batch_client, job_name, blob_list)

        # Pause execution until tasks reach Completed state.
        wait_for_tasks_to_complete(batch_client,
                                    job_name,
                                    datetime.timedelta(minutes=5))

        print("  Success! All tasks reached the 'Completed' state within the "
              "specified timeout period.")

    except batchmodels.BatchErrorException as err:
        print_batch_exception(err)
        raise

    # Print out some timing info
    end_time = datetime.datetime.now().replace(microsecond=0)
    print()
    print('Sample end: {}'.format(end_time))
    print('Elapsed time: {}'.format(end_time - start_time))
実行例です。
C:\Work\AzureBatchPython>python python_quickstart_client.py
Start: 2020-03-26 22:20:09.788129

        src01.txt
        src02.txt

Creating Job...
Creating job [PythonJob-202003262220]...

Add task...
Adding 2 tasks to job [PythonJob-202003262220]...
Monitoring all tasks for 'Completed' state, timeout in 0:05:00......
  Success! All tasks reached the 'Completed' state within the specified timeout period.

Sample end: 2020-03-26 22:20:14
Elapsed time: 0:00:04.211871

C:\Work\AzureBatchPython>
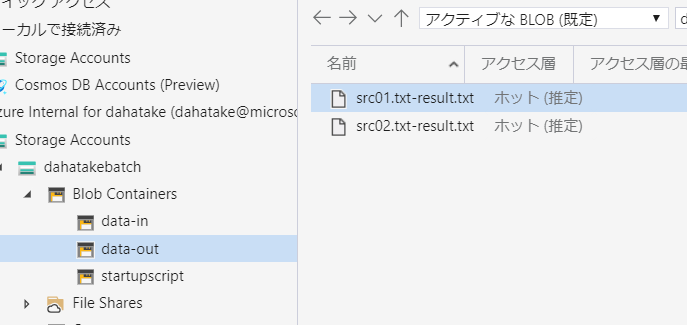
出力先の Blob Storage にファイルが出力されている事が確認できます。
ポイントとなる部分を解説します。
それはadd_tasks関数の中です。62行目から定義されていますね。
- 81行目
コンテナ上で実行するコマンドラインになります。入出力のフォルダの設定はこの後に行います。
command = "python app.py /data-in/{0} /data-out/{0}-result.txt".format(input_file.name)
- 83行目
Azure Batch でコンテナーの実行を行う再には、これが必須となります。
task_container_setting = batch.models.TaskContainerSettings(image_name="dahatakeregistry.azurecr.io/azurebatchpython:latest", container_run_options='--workdir /app --volume /mnt/data-in:/data-in --volume /mnt/data-out:/data-out')
| 項目 | 説明 |
|---|---|
| image_name | container image の名前です |
| container_run_options | create container のオプションです。通常のコンテナ起動と若干異なる設定も必要ですので、ドキュメント熟読ください。例えば -v の様な省略形はサポートされていません。--volumeの様に設定してください |
タスク用のコンテナー設定:
https://docs.microsoft.com/ja-jp/azure/batch/batch-docker-container-workloads#container-settings-for-the-task
- 85行目
コンテナ起動時のコマンドライン設定と、コンテナとして起動し、その際のコンテナ起動設定とともに、タスクとして登録します。
        tasks.append(batch.models.TaskAddParameter(
            id='Task{}'.format(idx),
            command_line=command,
            container_settings=task_container_setting
            )
        )
ようやく動きましたね!!!
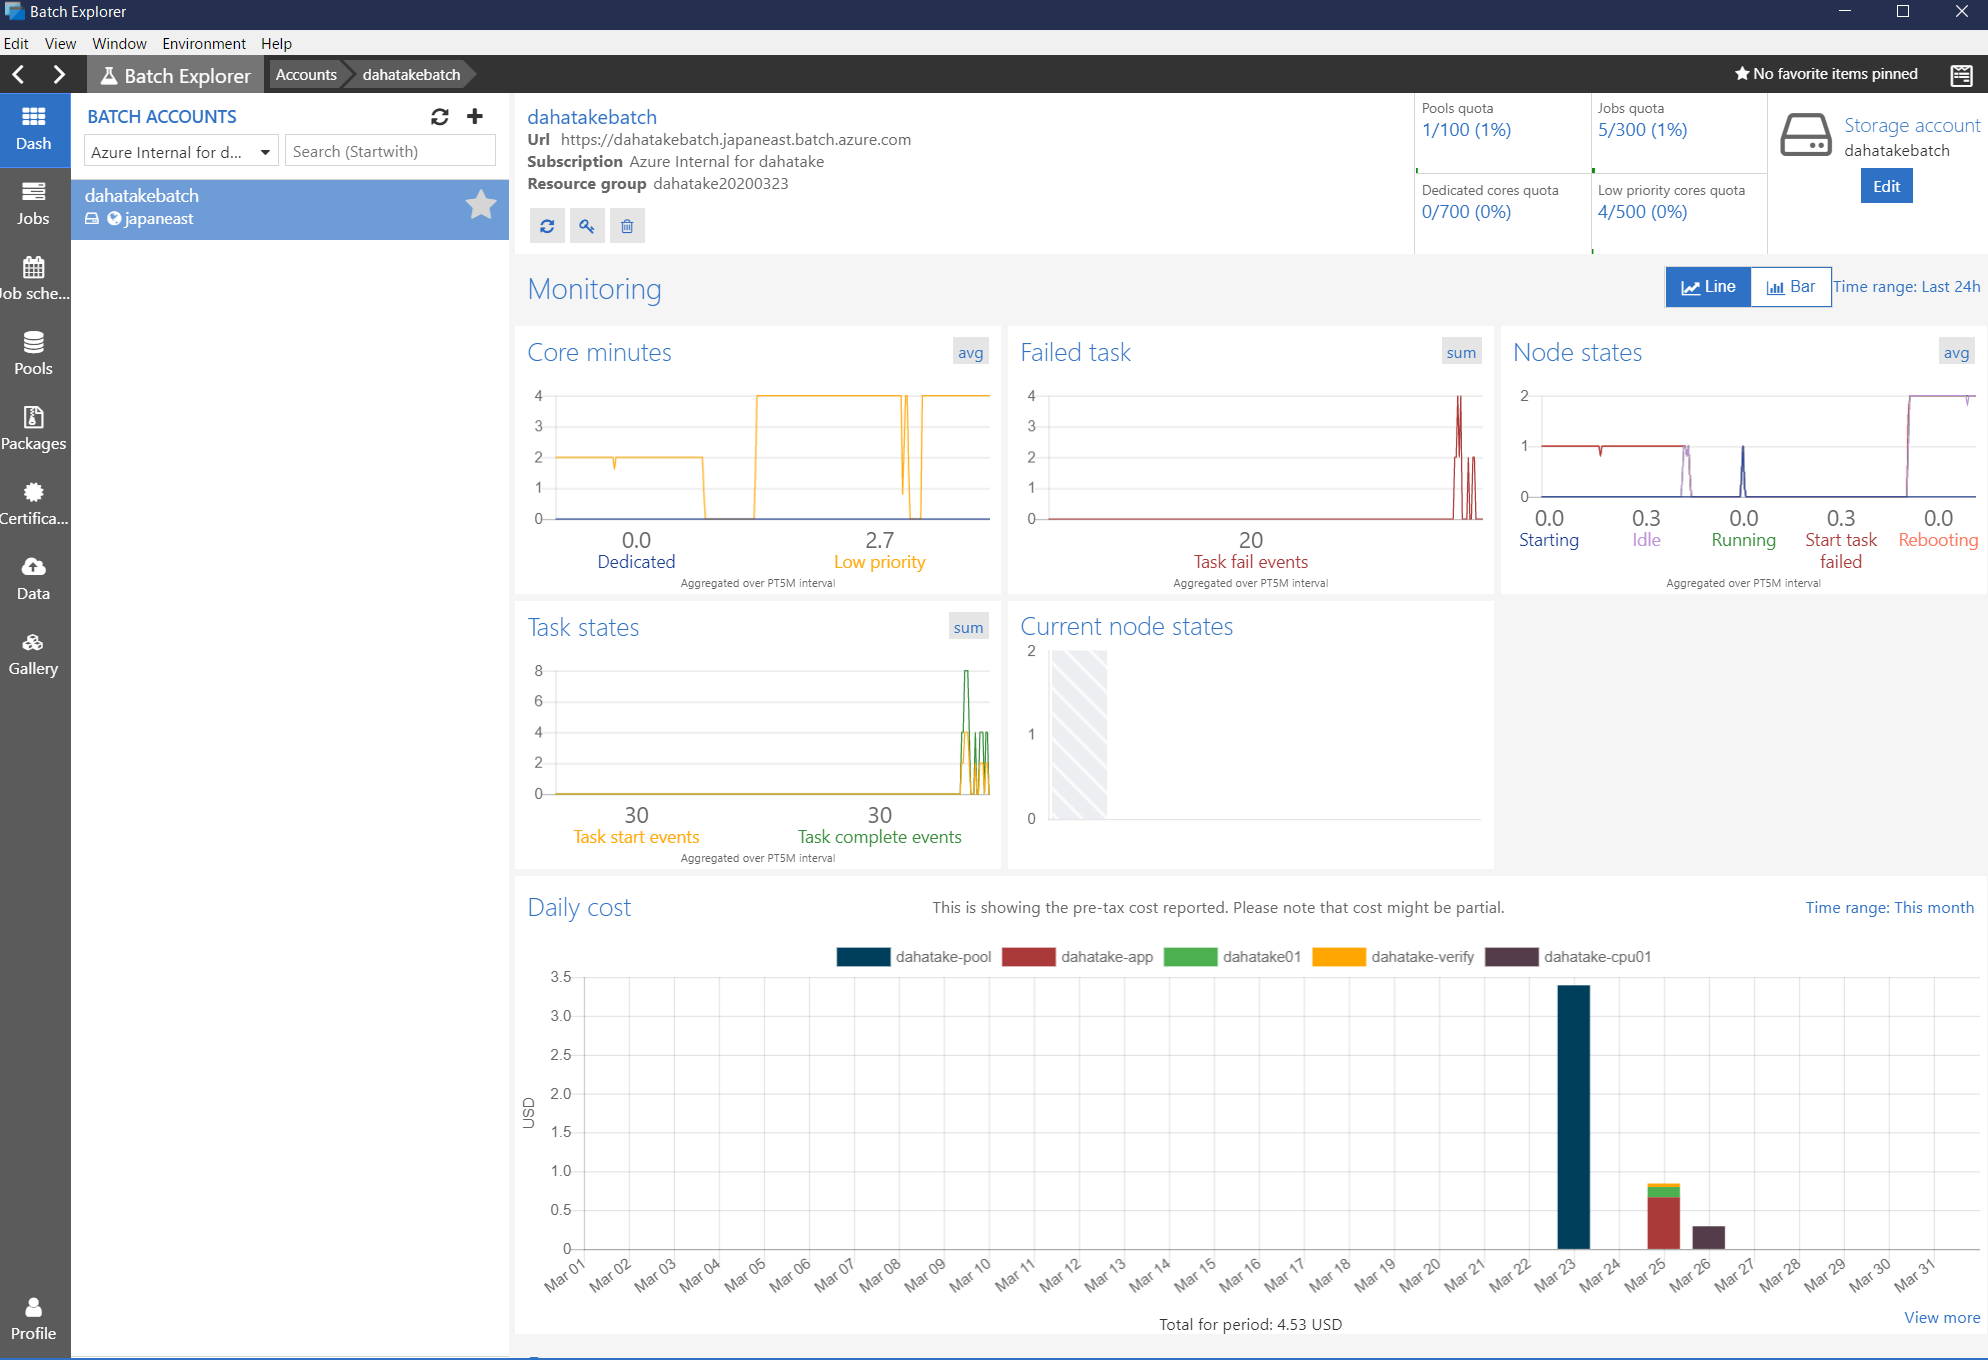
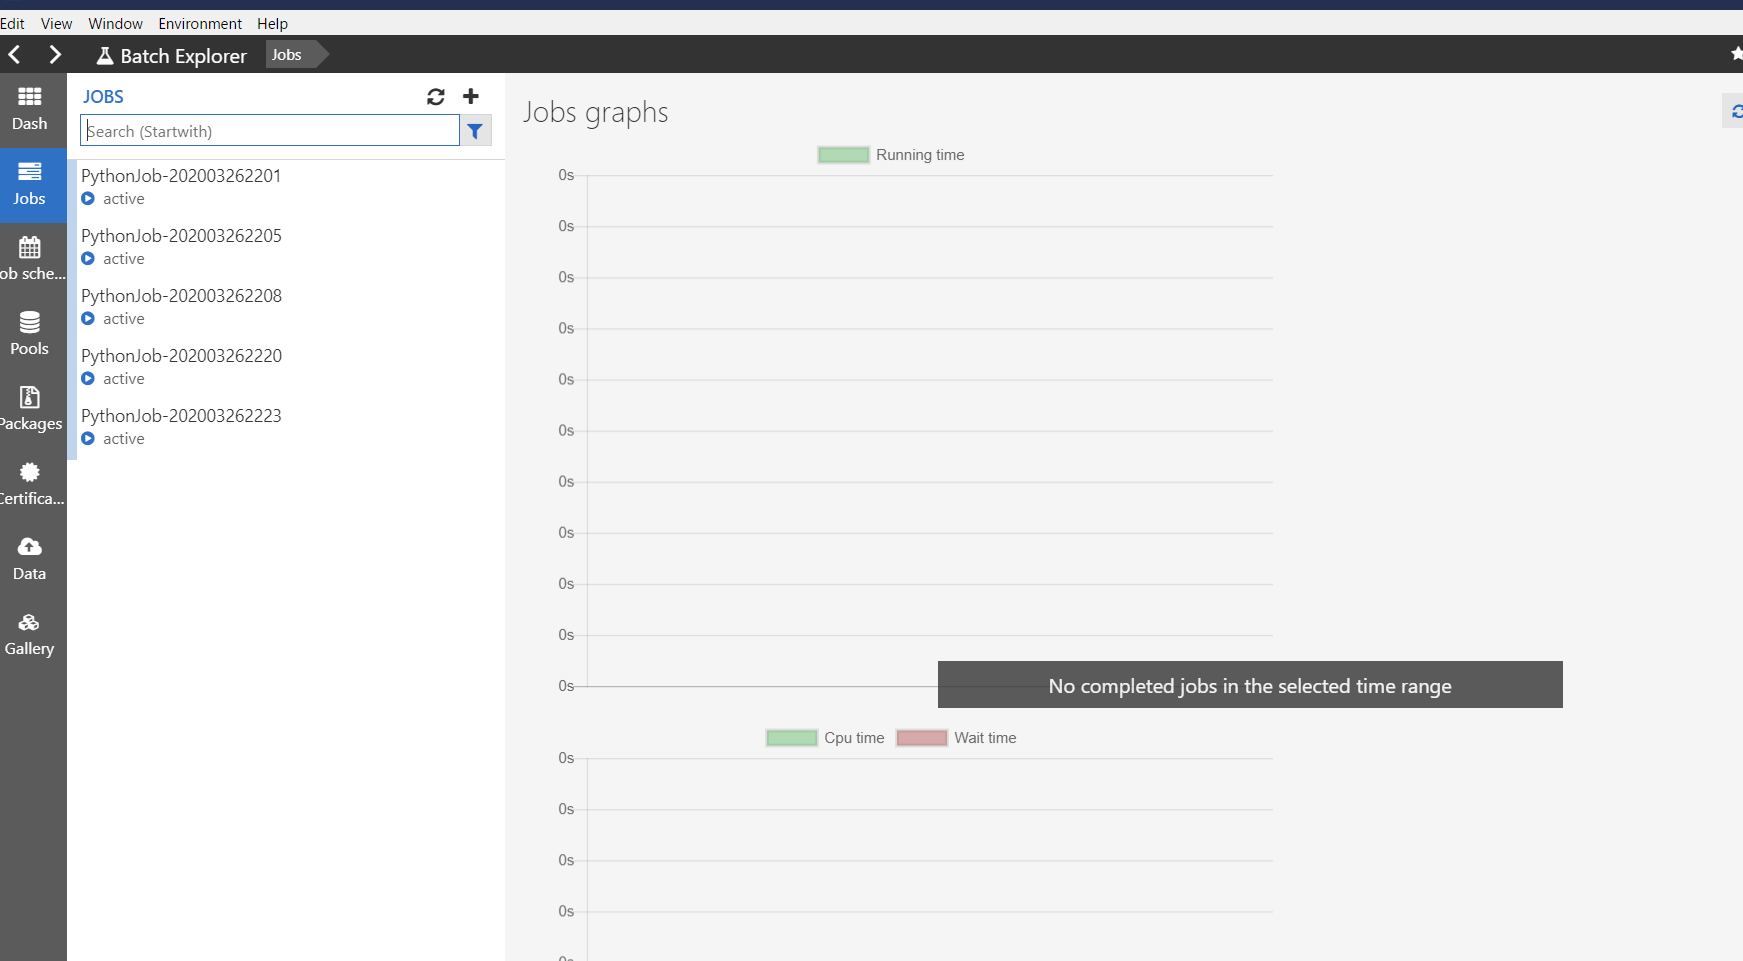
7. 開発時の友だち - Azure Batch Explorer
これ、必須ですね...超絶便利
何が閲覧できるのか、ご紹介しますね。
- Dash
概要です。なんと、使用料金まで可視化してくれます。
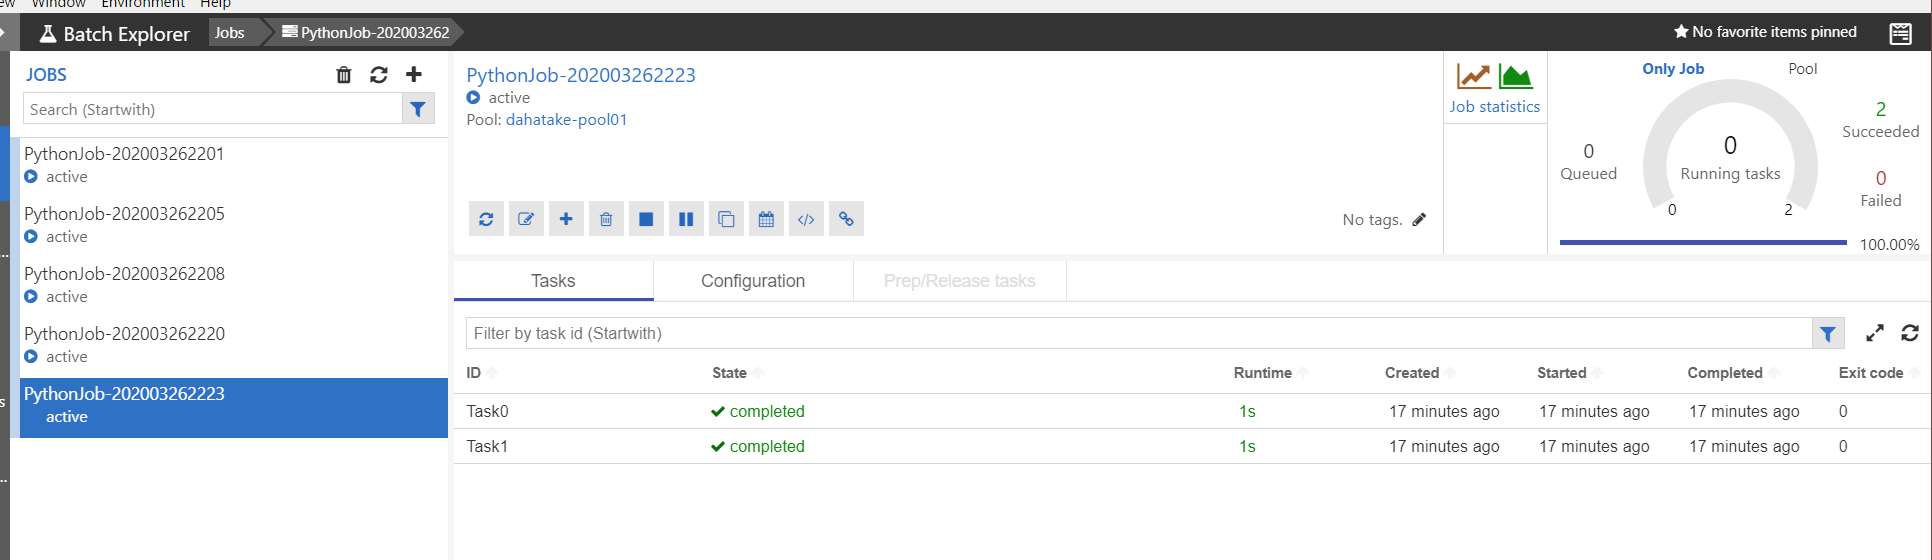
- Job
ジョブとタスクの開発中にはここを眺める事になると思います。
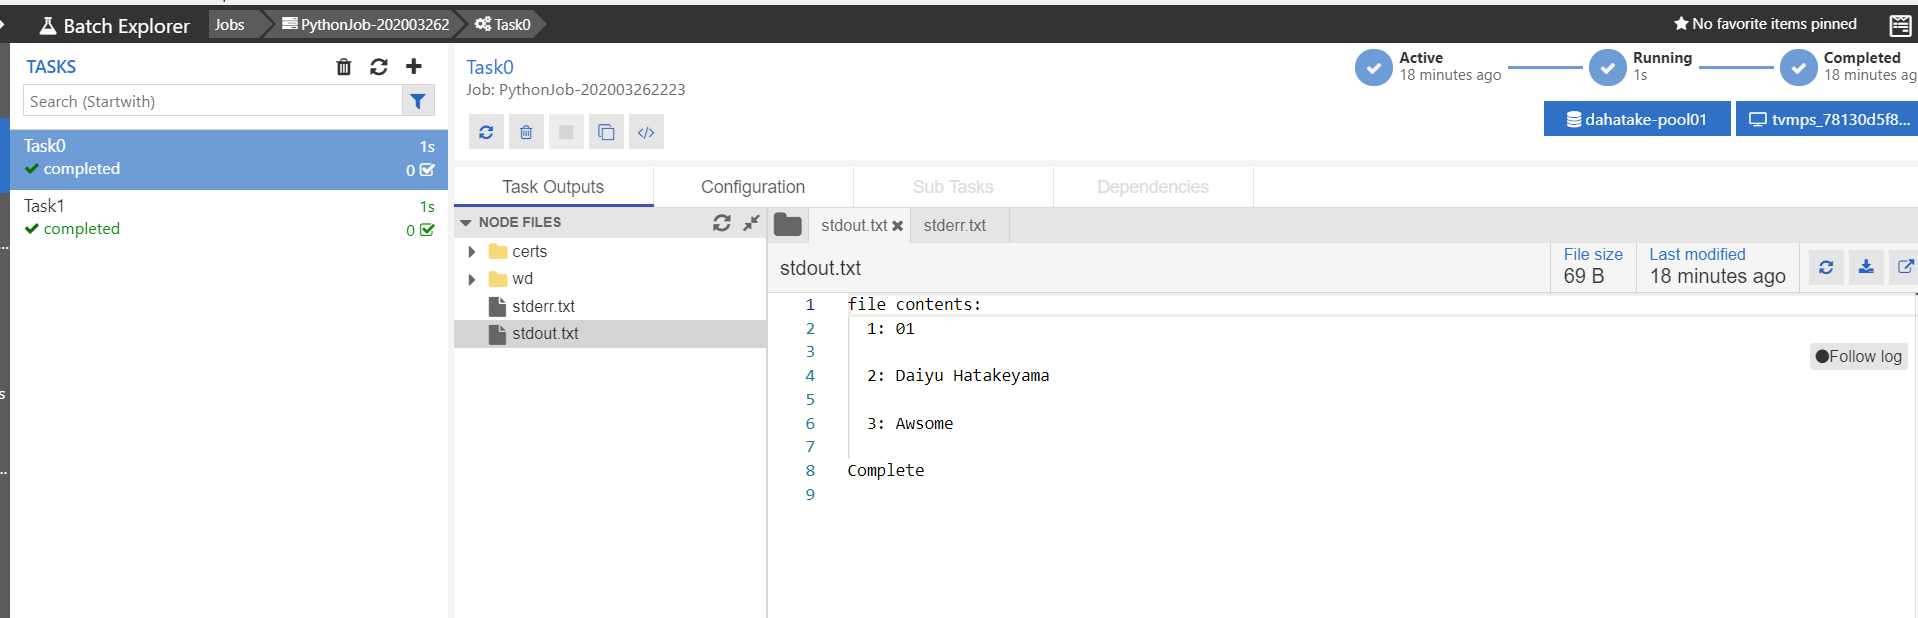
タスク実行中の標準出力と標準エラー出力の結果が閲覧できます。これは、Azure Batch のプールとして作成した仮想マシンの中に保存されています。
また、ジョブは作成後に適時削除してください。
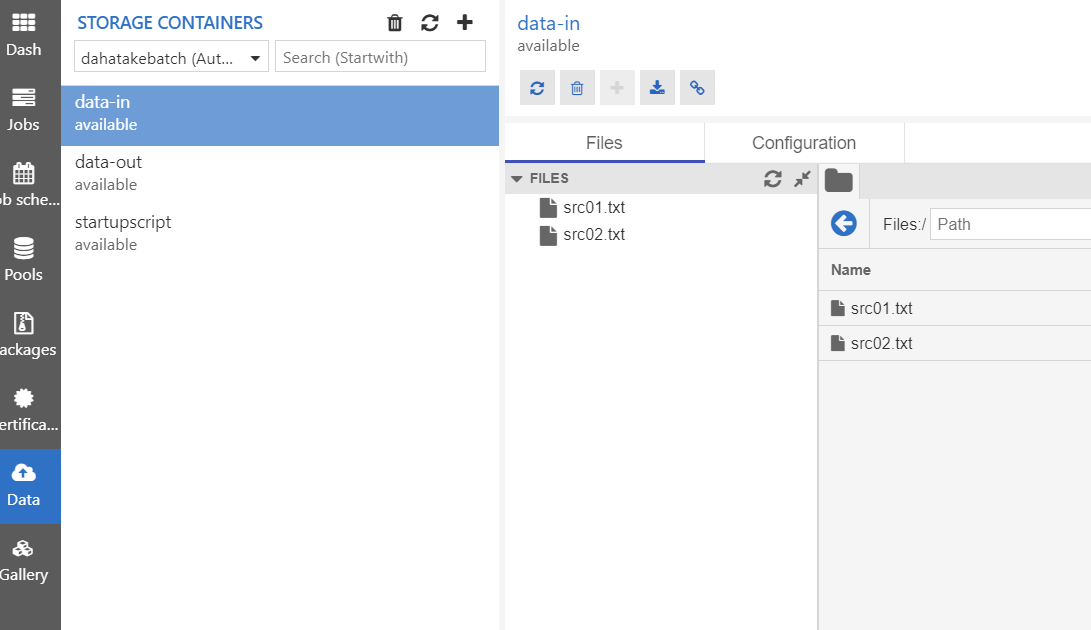
- Data
Azure Batch が接続している Blob Storage です。
Azure Storage Explorer よりもサクサク動きます。
まとめ
Azure Batch は同時に100VM起動するような並列処理に向いています。Azure Blob Storage もそもそも並列処理に強い構造を持っています。ただし、Container を使っての処理となると、ちょっと工夫が必要です。
ただ、この手順で一通りの流れを理解できたのではないでしょうか?
もし、皆さんが Azure で機械学習や深層学習などを行う場合は、Azure Machine Learning の Azure Machine Learning Compute を使ってください。実体が Azure Batch です。
さて、この先に進む方は、まずは以下をご一読ください。設計の参考になると思います。
Azure Batch のベスト プラクティス
https://docs.microsoft.com/ja-jp/azure/batch/best-practices
最後に今回のサンプルコードのURLを記載しておきます。
https://github.com/dahatake/azure-batch-python-sample