VPSを契約してRailsアプリを動かすまでの手順をまとめました。
似たような記事はいくつかありますが、本記事には以下のような特長があります。
- ツールのバージョンが比較的新しい
- Ruby2.7系、Rails6系、MySQL8系、CentOS7系
- アプリケーションサーバーにPumaを使用
- GitHubのプライベートリポジトリで管理されているアプリでもデプロイできる
- 独自ドメインに対応
- HTTPSに対応
- Railsアプリの開発環境をDockerで作成
以下、設定方法です。
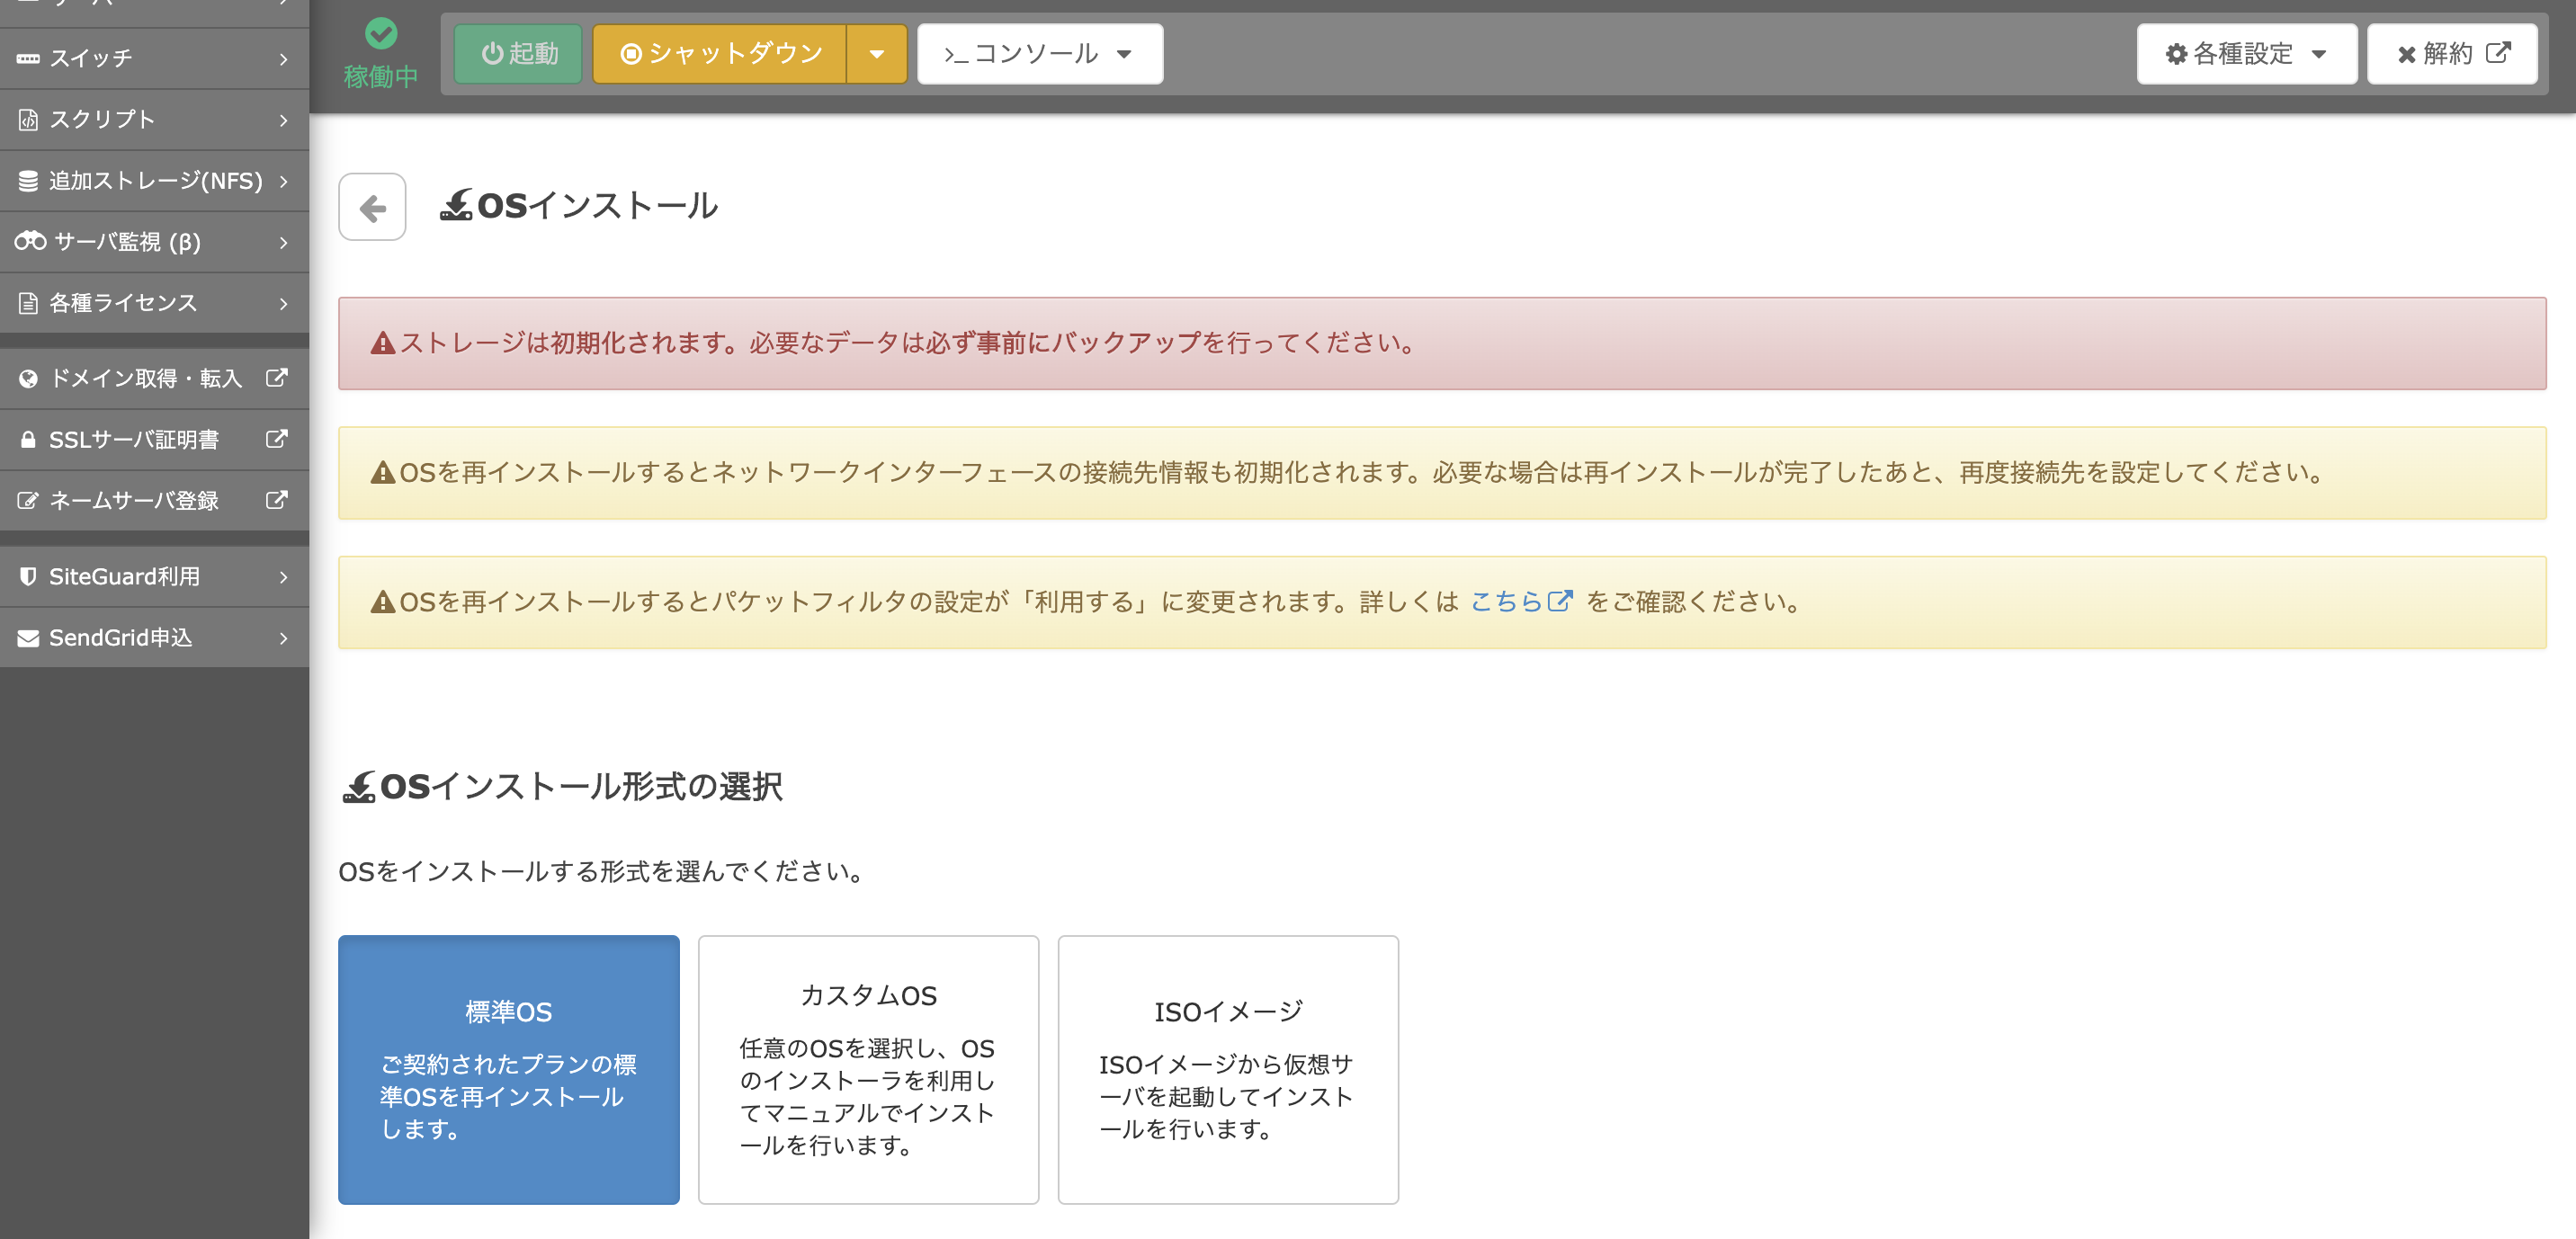
OSインストール
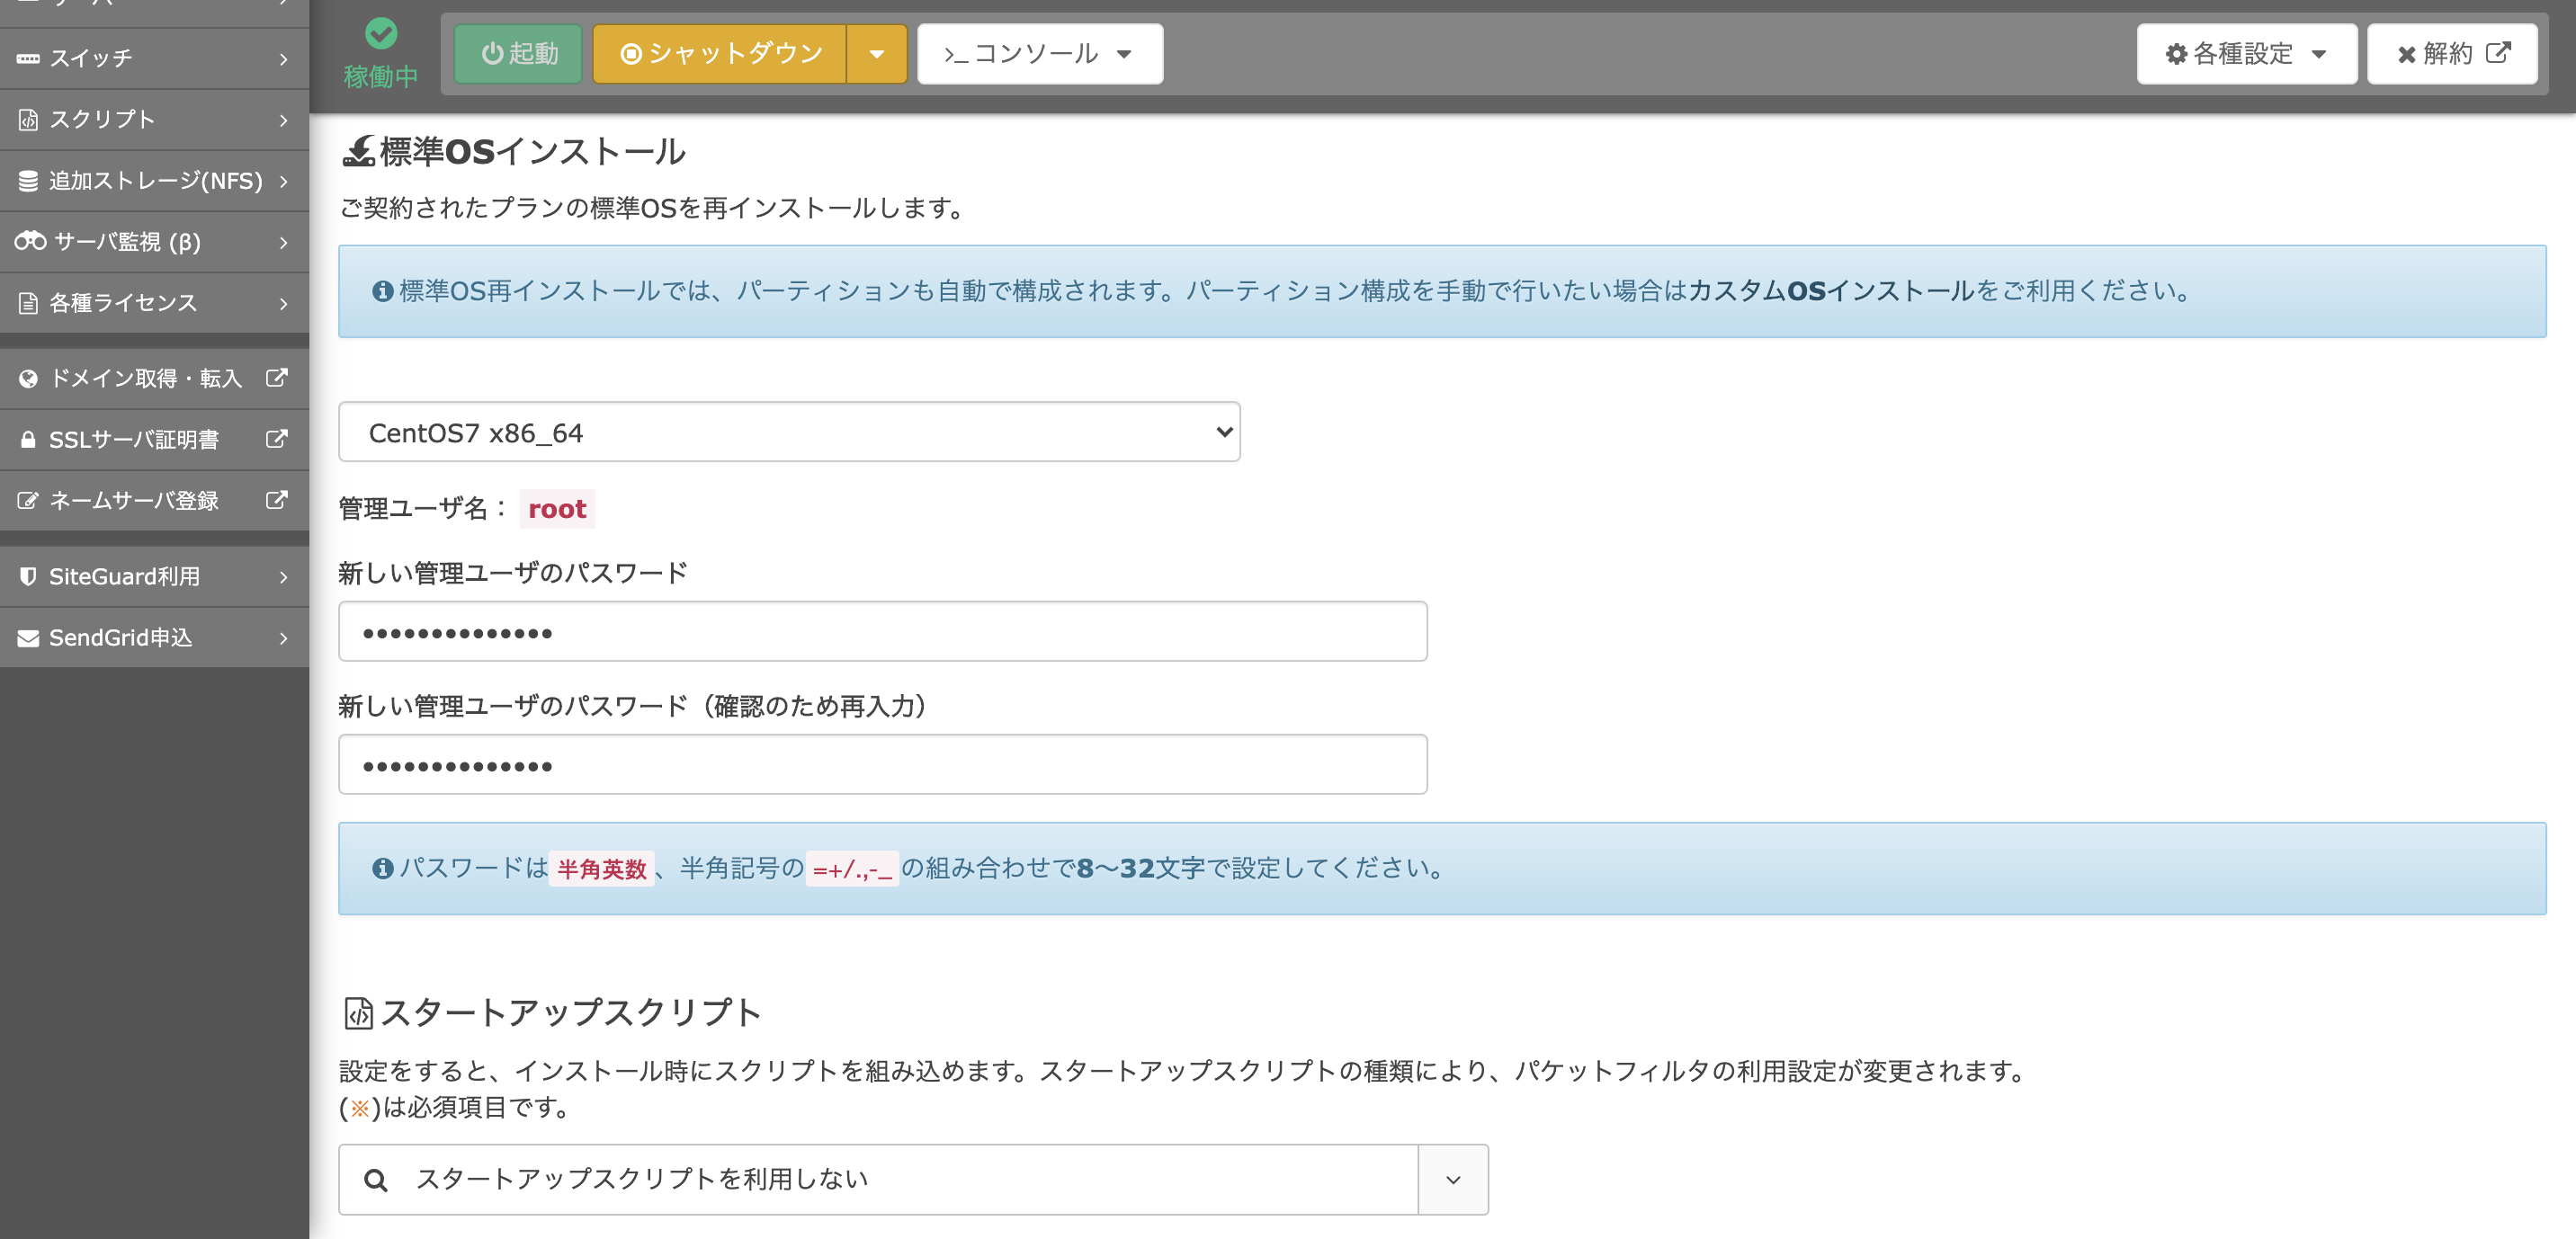
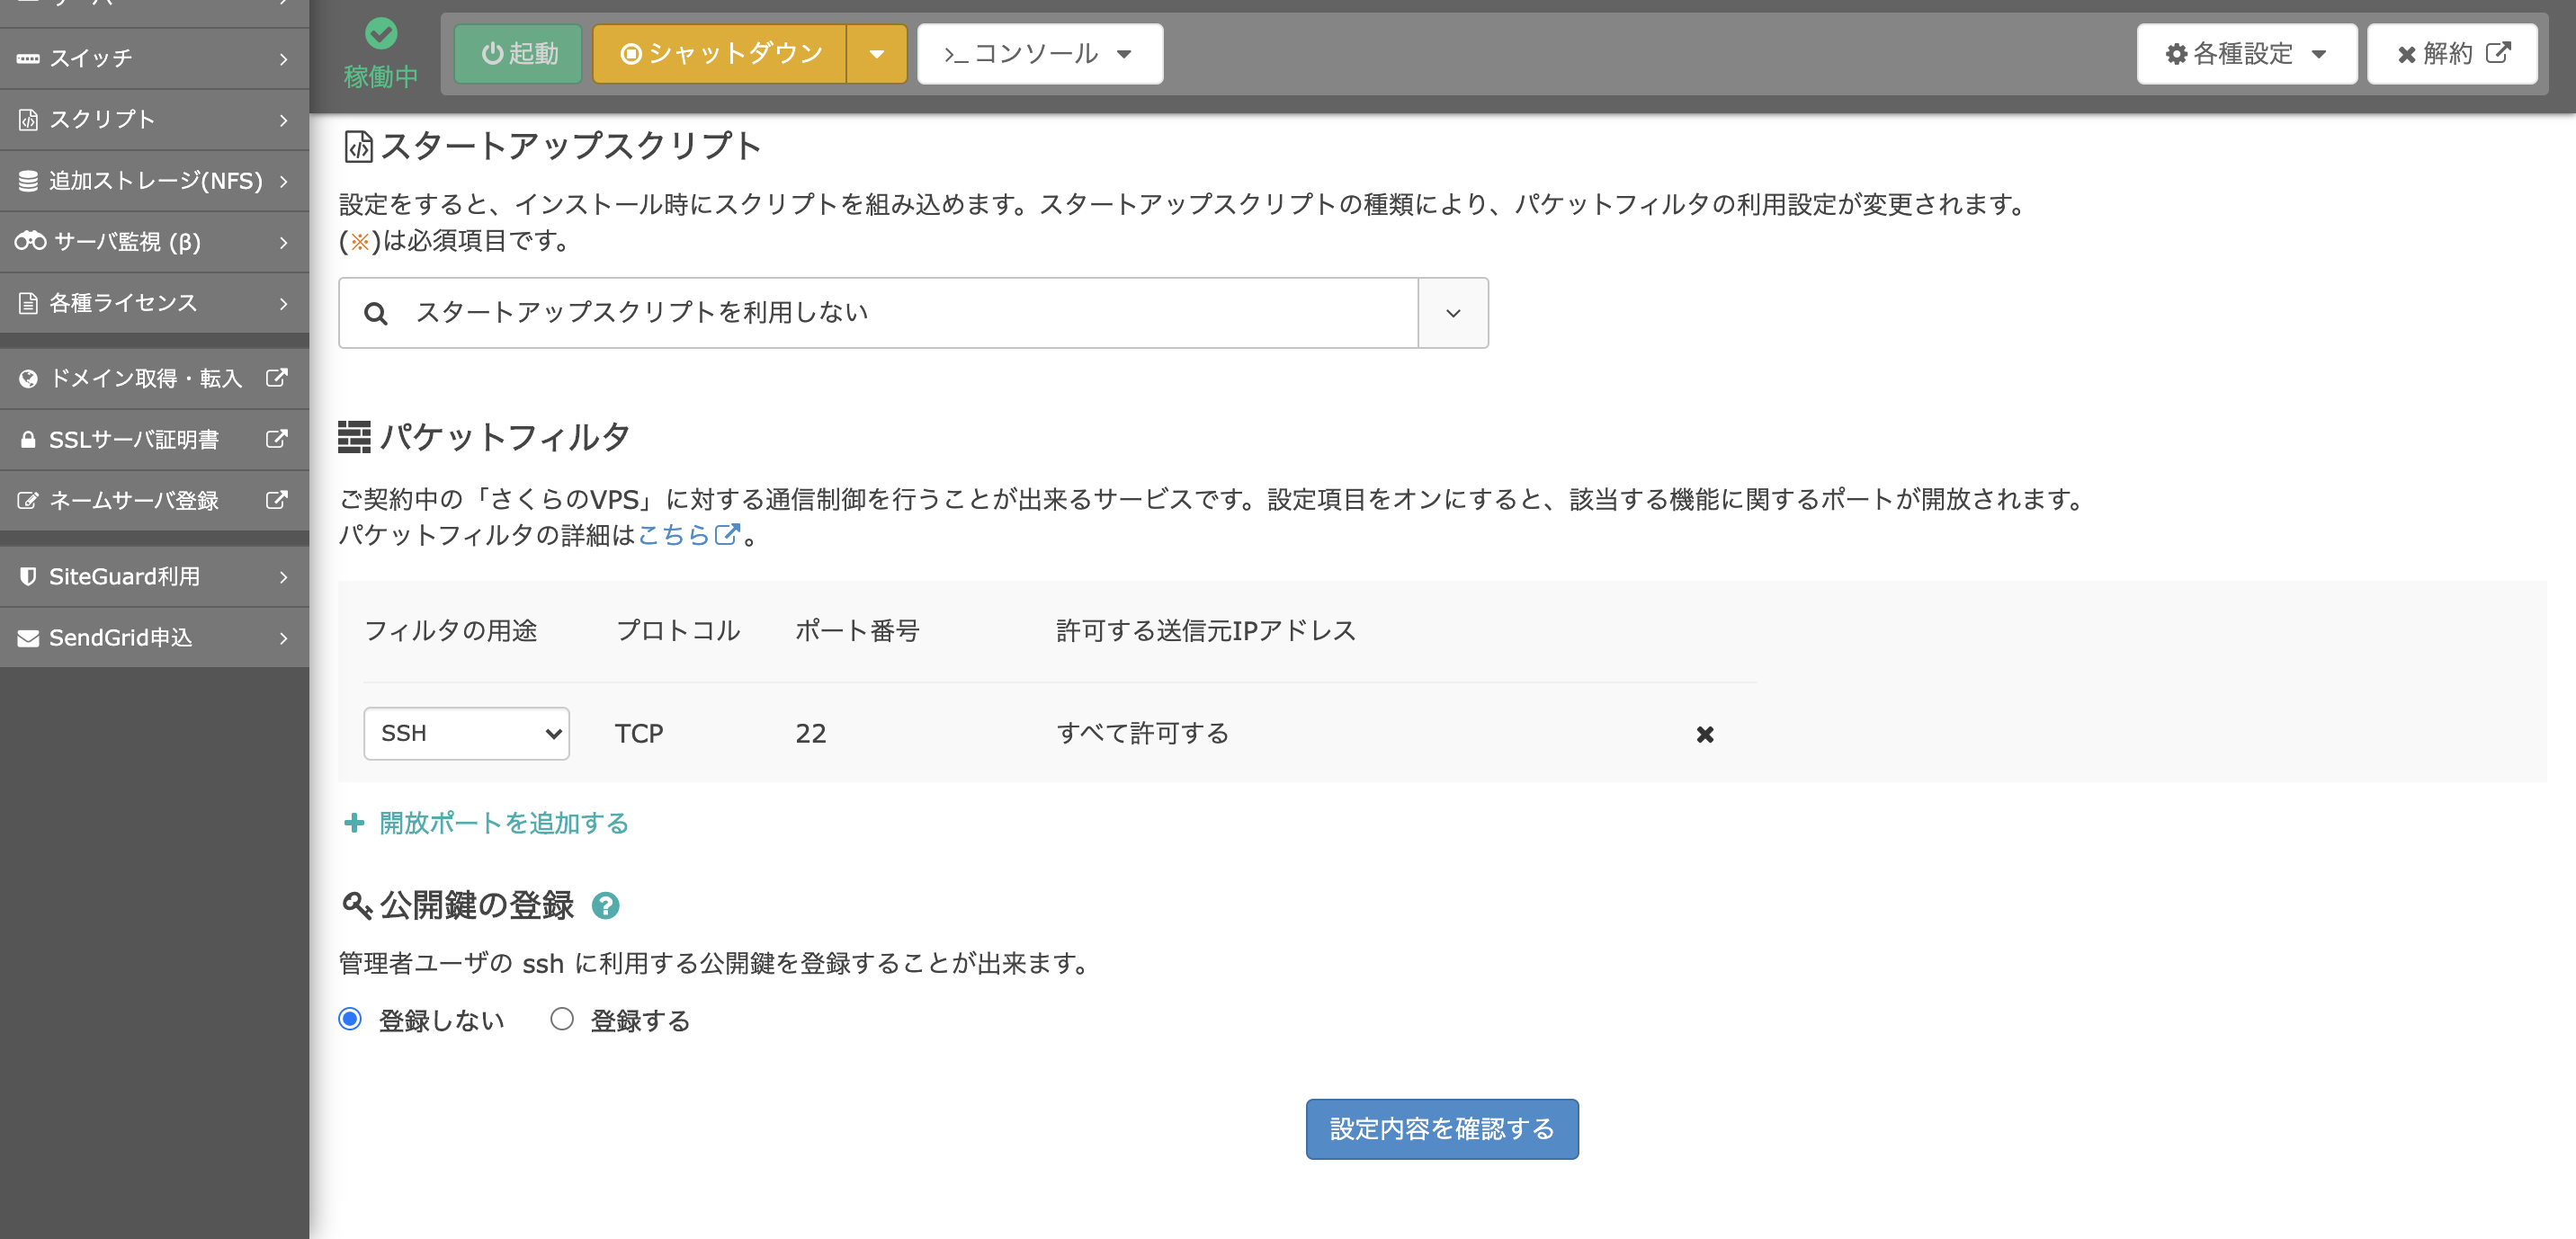
VPSサービスのコンパネからCentoOS7をインストールします。(以下はさくらのVPSの場合のキャプチャです)
rootユーザーでログイン
$ ssh root@xxx.xxx.xxx.xxx #ipアドレス

The authenticity of host 'xxx.xxx.xxx.xxx (xxx.xxx.xxx.xxx.xxx)' cant be established.
ECDSA key fingerprint is SHA256:+CMQV+bQVjTp+CJcpoj1u+J6LS24dAUWjv3tkxFYBSE.
Are you sure you want to continue connecting (yes/no)? #yesを入力
Password? # 先ほど作成したパスワードを入力

$ yum update -y
一般ユーザーを作成
$ adduser vpsuser
$ passwd vpsuser
Changing password for user vpsuser.
New password: #パスワードを設定
$ usermod -G wheel vpsuser # 作成したユーザーをwheelグループに追加
$ visudo # パスワードなしでsudoできるように設定を修正
## Same thing without a password
- # %wheel        ALL=(ALL)       NOPASSWD: ALL
+ %wheel        ALL=(ALL)       NOPASSWD: ALL
$ exit
$ ssh vpsuser@xxx.xxx.xxx.xxx #ipアドレス
$ sudo -l # パスワードなしでsudoできることを確認
ポート変更&rootユーザーでログインできないようにする
$ sudo vi /etc/ssh/sshd_config
- #PermitRootLogin yes
+ PermitRootLogin no
- Port 22
+ Port 50022
$ sudo systemctl restart sshd.service
$ exit
$ ssh vpsuser@xxx.xxx.xxx.xxx # デフォルトのポートでログインできないことを確認
ssh: connect to host xxx.xxx.xxx.xxx port 22: Connection refused
$ ssh root@xxx.xxx.xxx.xxx -p 50022 # rootユーザーでログインできないことを確認
permission denied...
$ ssh vpsuser@xxx.xxx.xxx.xxx -p 50022 # 50022番ポートでログインできることを確認
SAKURA Internet [Virtual Private Server SERVICE]
Firewallの設定
$ sudo vi /usr/lib/firewalld/services/ssh.xml # ssh接続のポート番号変更に対応
- <port protocol="tcp" port="22"/>
+ <port protocol="tcp" port="50022"/>
$ sudo systemctl start firewalld #firewallを起動
$ sudo systemctl enable firewalld.service #firewallの自動起動設定
$ sudo firewall-cmd --list-all # 許可されている接続を確認
$ sudo firewall-cmd --add-service=http --permanent #http接続を許可
$ sudo firewall-cmd --add-service=https --permanent # https接続を許可
$ sudo firewall-cmd --reload # 設定を反映
$ sudo firewall-cmd --list-all
$ sudo systemctl reboot #OSを再起動
SSHキーペアでログインできるようにする
キーペアを作成
$ cd ~/.ssh
$ mkdir sakura_vps
$ cd sakura_vps
$ ssh-keygen -f id_rsa
公開鍵をサーバーに登録
$ cat ~/.ssh/sakura_vps/id_rsa.pub | pbcopy
$ ssh vpsuser@xxx.xxx.xxx.xxx -p 50022 #ipアドレス
$ cd .ssh # or mkdir .ssh → cd .ssh
$ vi authorized_keys # クリップボードにコピーした公開鍵を登録
$ chmod 600 authorized_keys
$ chmod 700 ~/.ssh
$ exit
接続確認
$ ssh -i ~/.ssh/sakura_vps/id_rsa vpsuser@xxx.xxx.xxx.xxx -p 50022
$ exit
ssh configの設定
$ vim ~/.ssh/config
Host sakura_vps
 HostName xxx.xxx.xxx.xxx # ipアドレス
 Port 50022
 User vps_user
 IdentityFile ~/.ssh/sakura_vps/id_rsa
$ ssh sakura_vps
Nginxをインストール
$ sudo vim /etc/yum.repos.d/nginx.repo
[nginx]
name=nginx repo
baseurl=http://nginx.org/packages/centos/7/$basearch/
gpgcheck=0
enabled=1
$ sudo yum info nginx #インストールできるnginxのバージョンが良い感じになっていることを確認
$ sudo yum -y --enablerepo=nginx install nginx
$ nginx -v
$ sudo systemctl start nginx #起動
$ sudo systemctl enable nginx.service #自動起動設定
(さくらのVPSのみ)
コンパネからパケットフィルタの設定を変更し、80番、443番ポートを開放する必要があります。
ブラウザでipアドレスにアクセスして、nginxの初期画面が表示されることを確認
ドメインの紐付けと公開ディレクトリの設定
hoge.comというドメインを紐付け、hoge.comにアクセスがあった時のルートディレクトリを設定します。
ネームサーバーの設定
ドメインレジストラ(お名前ドットコムなど)の管理画面とVPSのコンパネからドメインの設定をします。設定方法はお使いのサービスによって異なるため割愛。
VPS側の設定
$ sudo mkdir -p /var/www/html/hoge
$ cd /var/www/html/hoge
$ sudo vim index.html
hello from hoge.com
$ cd /etc/nginx/conf.d
$ sudo vim hoge.com.conf
server {
    listen       80;
    server_name  hoge.com;
    location / {
        root   /var/www/html/hoge;
        index  index.html index.htm index.php;
    }
    error_page   500 502 503 504  /50x.html;
    location = /50x.html {
        root   /usr/share/nginx/html;
    }
}
$ sudo systemctl restart nginx
http://hoge.com にアクセスして、作成したファイルが表示されれば成功。
ブラウザのキャッシュでhttpsにリダイレクトされてしまうと場合は、シークレットモード等で確認。
HTTPS対応
$ sudo yum install -y certbot
$ sudo systemctl stop nginx
$ sudo certbot certonly --standalone -d hoge.com # メールアドレスとか聞かれるので答える
$ sudo systemctl start nginx
$ sudo vim /etc/nginx/conf.d/hoge.com.conf
server {
    listen       80;
    server_name  hoge.com;
    return 301 https://$host$request_uri;
}
server {
    listen  443 ssl;
    server_name     hoge.com;
    ssl_certificate       /etc/letsencrypt/live/hoge.com/fullchain.pem;
    ssl_certificate_key     /etc/letsencrypt/live/hoge.com/privkey.pem;
    location / {
        root   /var/www/html/hoge;
        index  index.html index.htm index.php;
    }
}
$ sudo systemctl restart nginx
http://hoge.com にアクセスして https://hoge.com にリダイレクトされれば成功
MySQLをインストール
MariaDBを削除
$ sudo yum remove -y mariadb-libs
$ rm -rf /var/lib/mysql
インストール
MySQL8系を入れていきます。
$ sudo rpm -ivh https://dev.mysql.com/get/mysql80-community-release-el7-2.noarch.rpm
$ sudo yum repolist all | grep mysql
$ sudo yum install -y mysql-community-server
$ mysql --version
起動設定
$ sudo systemctl start mysqld.service
$ sudo systemctl enable mysqld.service
初期設定
$ sudo grep password /var/log/mysqld.log #初期パスワードを確認(KckBT<u4#Tyc)
2020-06-15T03:05:59.186510Z 6 [Note] [MY-010454] [Server] A temporary password is generated for root@localhost: KckBT<u4#Tyc
$ mysql_secure_installation
Securing the MySQL server deployment.

Enter password for user root: # ログファイルから取得した初期パスワードを入力

The existing password for the user account root has expired. Please set a new password.

New password: # rootユーザの新規パスワードを入力(大文字小文字英数字+特殊文字で8文字以上で設定)

Re-enter new password: # 確認用にもう一度入力
The 'validate_password' plugin is installed on the server.
The subsequent steps will run with the existing configuration
of the plugin.
Using existing password for root.

Estimated strength of the password: 100
Change the password for root ? ((Press y|Y for Yes, any other key for No) : y # 本当にパスワードを変更して良いかの確認

By default, a MySQL installation has an anonymous user,
allowing anyone to log into MySQL without having to have
a user account created for them. This is intended only for
testing, and to make the installation go a bit smoother.
You should remove them before moving into a production
environment.

Remove anonymous users? (Press y|Y for Yes, any other key for No) : y # 匿名ユーザー(名前もパスワードも設定されていないユーザー。デフォルトで設定されているけどセキュリティ上消した方が良い)を削除
Success.


Normally, root should only be allowed to connect from
'localhost'. This ensures that someone cannot guess at
the root password from the network.

Disallow root login remotely? (Press y|Y for Yes, any other key for No) : y # localhost以外からrootアカウントでログインできないようにする
Success.

By default, MySQL comes with a database named 'test' that
anyone can access. This is also intended only for testing,
and should be removed before moving into a production
environment.


Remove test database and access to it? (Press y|Y for Yes, any other key for No) : y # testデータベースを削除
 - Dropping test database...
Success.

 - Removing privileges on test database...
Success.

Reloading the privilege tables will ensure that all changes
made so far will take effect immediately.

Reload privilege tables now? (Press y|Y for Yes, any other key for No) : y # リロードして設定を反映する
Success.

All done!
状態確認
$ mysql -u root -p
mysql> status
--------------
mysql  Ver 8.0.20 for Linux on x86_64 (MySQL Community Server - GPL)

Connection id:		11
Current database:
Current user:		root@localhost
SSL:			Not in use
Current pager:		stdout
Using outfile:		''
Using delimiter:	;
Server version:		8.0.20 MySQL Community Server - GPL
Protocol version:	10
Connection:		Localhost via UNIX socket
Server characterset:	utf8mb4
Db     characterset:	utf8mb4
Client characterset:	utf8mb4
Conn.  characterset:	utf8mb4
UNIX socket:		/var/lib/mysql/mysql.sock
Binary data as:		Hexadecimal
Uptime:			8 min 41 sec

Threads: 2  Questions: 16  Slow queries: 0  Opens: 131  Flush tables: 3  Open tables: 49  Queries per second avg: 0.030
--------------

mysql> show variables like "chara%";
+--------------------------+--------------------------------+
| Variable_name            | Value                          |
+--------------------------+--------------------------------+
| character_set_client     | utf8mb4                        |
| character_set_connection | utf8mb4                        |
| character_set_database   | utf8mb4                        |
| character_set_filesystem | binary                         |
| character_set_results    | utf8mb4                        |
| character_set_server     | utf8mb4                        |
| character_set_system     | utf8                           |
| character_sets_dir       | /usr/share/mysql-8.0/charsets/ |
+--------------------------+--------------------------------+

mysql> show variables like '%time_zone%';
+------------------+--------+
| Variable_name    | Value  |
+------------------+--------+
| system_time_zone | JST    |
| time_zone        | SYSTEM |
+------------------+--------+
mysql8から、デフォルトの文字コードがutf8mb4になっています。特にいじらなくてOK。
またsystem_time_zoneがJST、time_zoneがSYSTEM(system_time_zoneを参照する、という意味)で、どちらもJSTなのでタイムゾーンの設定はこのままでOK。
認証方式を変更
MySQL8から標準の認証方式がcaching_sha2_passwordというものに変更されており、このままだとRailsでエラーが発生するみたいなので修正。
mysql> select user, plugin from mysql.user;
mysql> alter user 'root'@'localhost' identified with mysql_native_password by 'P@ssw0rd!!'; # rootユーザーの認証方式を変更
mysql> exit
$ sudo vi /etc/my.cnf # 今後作成するユーザーのデフォルトの認証方式を修正
- # default_authentication_plugin=mysql_native_password
+ default_authentication_plugin=mysql_native_password
$ sudo systemctl restart mysqld
データベースと専用ユーザーを作成
$ mysql -u root -p
-- データベースを作成
CREATE DATABASE service1_db DEFAULT CHARACTER SET utf8mb4 COLLATE utf8mb4_general_ci;
-- ユーザーを作成
CREATE USER 'dbuser'@'localhost' IDENTIFIED BY 'set_your_password_here';
-- 作成したユーザーに作成したデータベースの操作権限を付与
GRANT ALL PRIVILEGES ON service1_db.* TO 'dbuser'@'localhost';
-- 設定を反映
FLUSH PRIVILEGES;
-- データベース一覧を表示
SHOW DATABASES;
-- ユーザー一覧を表示
SELECT host, user FROM mysql.user;

exit
Gitをインストール
$ git --version # もしインストールされていなければ以下を実行
$ sudo yum -y install git
Rubyをインストール
rbenvをsystemwideにインストール
$ sudo git clone git://github.com/sstephenson/rbenv.git /usr/local/rbenv # rbenv
$ sudo git clone git://github.com/sstephenson/ruby-build.git /usr/local/rbenv/plugins/ruby-build # rbenv installコマンドを叩くために必要なライブラリ
$ sudo yum -y install bzip2 gcc openssl-devel readline-devel zlib-devel #関連パッケージ
visudoを修正
$ sudo visudo
- Defaults secure_path = /sbin:/bin:/usr/sbin:/usr/bin
+ Defaults secure_path = /sbin:/bin:/usr/sbin:/usr/bin:/usr/local/rbenv/bin:/usr/local/rbenv/shims
+ Defaults env_keep += "RBENV_ROOT"
rbenvのセットアップ
$ sudo rbenv init -
$ sudo vim /etc/profile
export RBENV_ROOT=/usr/local/rbenv
export PATH="$RBENV_ROOT/bin:$PATH"
eval "$(rbenv init -)"
上記をファイル末尾に追加することで、どのユーザーからもrbenvが/user/local/rbenvにインストールされていることがわかるようになります。
読み込み
$ su -
$ source /etc/profile
$ exit
$ exit
rootユーザーに切り替えてからsourceコマンドを実行する必要があるようです。
Rubyをインストール
$ ssh sakura_vps
$ rbenv install -l
$ sudo rbenv install 2.7.1
$ sudo rbenv rehash
$ sudo rbenv global 2.7.1
一度ログアウトした後、再度ログインしてrubyのバージョンを確認
$ exit
$ ssh sakura_vps
$ ruby -v
ruby 2.7.1p83 (2020-03-31 revision a0c7c23c9c) [x86_64-linux]
Bundlerをインストール
$ sudo gem install bundler
Node.js、Yarnをインストール
$ sudo yum install -y nodejs # 古いバージョンのnodejsがインストールされる
$ sudo npm install -g n
$ sudo n stable # 最新安定版のnodejsがインストールされる
$ yum remove -y nodejs # 古いnodejsを削除する
$ exec $SHELL -l
$ node -v
$ npm -v
$ sudo npm install -g yarn
$ yarn -v
Railsアプリを作成
ここからしばらくローカルでの作業です。
前提
Docker for macがインストールされている。
You're on Railsを表示
$ mkdir sample_ror6
$ cd sample_ror6
$ touch Dockerfile docker-compose.yml Gemfile Gemfile.lock
FROM ruby:2.7.1

RUN curl -sS https://dl.yarnpkg.com/debian/pubkey.gpg | apt-key add - \
  && echo "deb https://dl.yarnpkg.com/debian/ stable main" | tee /etc/apt/sources.list.d/yarn.list

RUN apt-get update -qq && apt-get install -y nodejs vim yarn zsh

RUN mkdir /app_name
ENV APP_ROOT /app_name
WORKDIR $APP_ROOT

COPY ./Gemfile $APP_ROOT/Gemfile
COPY ./Gemfile.lock $APP_ROOT/Gemfile.lock

RUN bundle install
COPY . $APP_ROOT

RUN chsh -s /bin/zsh
version: "3"
services:
  db:
    image: mysql:8.0
    command: mysqld --default-authentication-plugin=mysql_native_password
    environment:
      - MYSQL_ALLOW_EMPTY_PASSWORD=1
    volumes:
      - mysql_data:/var/lib/mysql
    ports:
      - "3306:3306"
  web:
    build: .
    command: /bin/sh -c "rm -f tmp/pids/server.pid && bundle exec rails s -p 3000 -b '0.0.0.0'"
    volumes:
      - .:/app_name
    ports:
      - "3000:3000"
    links:
      - db
volumes:
  mysql_data:
source 'https://rubygems.org'
gem 'rails', '6.0.3'
# 空
$ docker-compose run web rails new . --force --database=mysql --skip-bundle #mysql2が無いって怒られるけどOK
$ docker-compose build
$ docker-compose run web rails webpacker:install
default: &default
  adapter: mysql2
  encoding: utf8mb4
  charset: utf8mb4
  collation: utf8mb4_general_ci
  pool: <%= ENV.fetch("RAILS_MAX_THREADS") { 5 } %>
  timeout: 5000
  username: root
  host: db

development:
  <<: *default
  database: app_name_development

test:
  <<: *default
  database: app_name_test

production:
  <<: *default
  # mysqlの設定のところで入力した情報を以下に記述
  database: service1_db
  host: localhost
  username: dbuser
  password: set_your_password_here
$ docker-compose up
$ docker-compose exec web rails db:create
http://localhost:3000 にアクセスして、Yay! You’re on Rails!を確認
適当なページを作成
$ docker-compose exec web rails g controller tests index
Rails.application.routes.draw do
  get 'tests/index'
  root to: 'tests#index'
end
http://localhost:3000 にアクセスして表示を確認
コミット
### Rails ###
*.rbc
capybara-*.html
.rspec
/public/system
/coverage/
/spec/tmp
*.orig
rerun.txt
pickle-email-*.html

# Ignore all logfiles and tempfiles.
/log/*
/tmp/*
!/log/.keep
!/tmp/.keep

# TODO Comment out this rule if you are OK with secrets being uploaded to the repo
config/initializers/secret_token.rb
config/master.key

# Only include if you have production secrets in this file, which is no longer a Rails default
# config/secrets.yml

# dotenv, dotenv-rails
# TODO Comment out these rules if environment variables can be committed
.env
.env.*

## Environment normalization:
/.bundle
/vendor/bundle

# these should all be checked in to normalize the environment:
# Gemfile.lock, .ruby-version, .ruby-gemset

# unless supporting rvm < 1.11.0 or doing something fancy, ignore this:
.rvmrc

# if using bower-rails ignore default bower_components path bower.json files
/vendor/assets/bower_components
*.bowerrc
bower.json

# Ignore pow environment settings
.powenv

# Ignore Byebug command history file.
.byebug_history

# Ignore node_modules
node_modules/

# Ignore precompiled javascript packs
/public/packs
/public/packs-test
/public/assets

# Ignore yarn files
/yarn-error.log
yarn-debug.log*
.yarn-integrity

# Ignore uploaded files in development
/storage/*
!/storage/.keep

# Others
config/database.yml
$ git add -A
$ git commit -m'First commit'
VscodeRemoteDevelopmentの設定
やりたい人だけ以下を参考に設定
VSCode Remote Containerが良い - Qiita
GitHubにSSH公開鍵を登録
すでに登録済みの場合はとばしてください。
$ mkdir -p ~/.ssh/github
$ cd ~/.ssh/github
$ ssh-keygen -f id_rsa
$ vim ~/.ssh/config
Host github.com #ここが「github」だと動かないので注意
  HostName github.com
  Port 22
  IdentityFile ~/.ssh/github/id_rsa
  User git
$ pbcopy < id_rsa.pub #公開鍵をクリップボードにコピー
その後以下の手順でGitHubに登録
- GitHubにログイン
- 右上のアイコン > Settings > SSH and GPG keys に移動
- New SSH keyをクリック
- クリップボードにコピーした公開鍵をペーストして保存
GitHubにリポジトリを作成してPush
- GitHubにログイン
- 画面右上のアイコン > Your repositoriesをクリック
- Newをクリック
- リポジトリ名を入力し Create repository をクリック
$ git remote add origin git@github.com:<githubのアカウント名>/<リポジトリ名>.git
$ git push -u origin master
Capistranoでデプロイ
サーバーにファイルを配置
Personal API tokenを取得
https://github.com/settings/tokens にアクセスして、トークンを取得します。
Generate new tokenをクリックして、repoの部分だけ全てチェックしました。
設定
group :development do
  gem 'capistrano'
  gem 'ed25519'
  gem 'bcrypt_pbkdf'
end
$ bundle install
$ bundle exec cap install
# 共通の設定を記述
set :application, "sample_ror6"
set :repo_url, 'https://set_personal_api_token_here:@github.com/d0ne1s/sample_ror6.git'
set :deploy_to, "/var/www/html/hoge"
# production環境固有の設定を記述
server "hoge.com", user: "vpsuser", port: '50022', roles: %w{app db web}
$ ssh sakura_vps
$ sudo chown -R vpsuser /var/www/html/hoge
$ exit
$ vim ~/.ssh/config
Host hoge.com
  HostName 111.222.33.44
  Port 50022
  User vpsuser
  IdentityFile ~/.ssh/sakura_vps/id_rsa
production.rbに記入したドメインと同名のホストがconfigに登録されていれば、デプロイのたびにパスワードを入力したり、OSを起動するたびに秘密鍵をssh-agentに登録する手間が省けます。
$ bundle exec cap production deploy
rbenv
group :development do
  gem 'capistrano-rbenv'
end
$ bundle install # gemのインストール後はローカルサーバーの再起動を忘れずに
require "capistrano/rbenv"
set :rbenv_type, :system
set :rbenv_ruby, '2.7.1' #rails6から.ruby-version内の記述が変わっていて File.read('.ruby-version').strip では動かないので注意
set :rbenv_path, '/usr/local/rbenv'
$ bundle exec cap production deploy
エラーが出なければ成功
Bundlerでgemをインストール
group :development do
  gem 'capistrano-bundler'
end
$ bundle install # gemのインストール後はローカルサーバーの再起動を忘れずに
require "capistrano/bundler
append :linked_dirs, '.bundle' # gemの保存先をシンボリックリンクにして、gemをリリース間で共有
サーバーにmysql-develをインストールしてデプロイ。gemをインストールするので、初回は時間がかかります。
$ ssh hoge.com
$ sudo yum install -y mysql-devel
$ exit
$ bundle exec cap production deploy
Railsの設定
- 共有ファイル、ディレクトリの定義
- デプロイのたびにmigrationを行う
- デプロイのたびにassetコンパイルを行う
group :development do
  gem 'capistrano-rails'
end
$ bundle install # gemのインストール後はローカルサーバーの再起動を忘れずに
require "capistrano/rails/assets"
require "capistrano/rails/migrations"
# capistrano3.5からはsetではなくappendを使う
append :linked_files, "config/database.yml", "config/master.key"
append :linked_dirs, ".bundle", "log", "tmp/pids", "tmp/cache", "tmp/sockets"
$ ssh hoge.com
$ mkdir /var/www/html/hoge/shared/config
$ exit
$ scp config/master.key config/database.yml hoge.com:/var/www/html/hoge/shared/config
$ bundle exec cap production deploy
pumaを起動
gem 'puma', '~> 4.1' # 元からある。念のため確認。

group :development do
  gem 'capistrano3-puma'
end
$ bundle install
require "capistrano/puma"
install_plugin Capistrano::Puma
# "capistrano/puma"で提供されるpuma:restartコマンドでは、うまく行かなかった
# puma:restartの後にpuma:stop→puma:startを走らせるタスクを作って対応
namespace :deploy do
  task :puma_restart_again do
    invoke  'puma:stop'
    invoke! 'puma:start'
  end
end

after 'puma:restart', 'deploy:puma_restart_again'
$ bundle exec cap production puma:config # サーバー上に設定ファイルが作られる
$ ssh hoge.com
$ sudo vim /var/www/html/hoge/shared/puma.rb
# 末尾に以下を追加
daemonize true
$ bundle exec cap production deploy
ローカルから以下のコマンドが使えるようになります。
$ bundle exec cap production puma:start
$ bundle exec cap production puma:stop
nginxとpumaの連携
$ ssh hoge.com
$ sudo vim /etc/nginx/conf.d/hoge.com.conf # 以下のように書き換える
upstream puma-production {
    server unix:/var/www/html/hoge/shared/tmp/sockets/puma.sock;
}

server {
    listen       80;
    server_name  hoge.com;
    return 301 https://$host$request_uri;
}

server {
    listen  443 ssl;
    server_name     hoge.com;
    ssl_certificate       /etc/letsencrypt/live/hoge.com/fullchain.pem;
    ssl_certificate_key     /etc/letsencrypt/live/hoge.com/privkey.pem;
    root   /var/www/html/hoge/current/public;
    location / {
        try_files $uri @app;
    }
    location @app {
        proxy_set_header Host $http_host;
        proxy_set_header X-Real-IP $remote_addr;
        proxy_set_header X-Forwarded-Host $host;
        proxy_set_header X-Forwarded-For $proxy_add_x_forwarded_for;
        proxy_pass http://puma-production;
    }
}
$ sudo systemctl restart nginx
https://hoge.com にアクセスして、表示を確認。
Railsアプリのトップページが表示されたら、これで終了です。
おつかれさまでした。