はじめに
毎々お世話になっております。OpenChain Japan WG Tooling sub groupの森下です。
突然ですが「OSSのライセンス、意味分からんな…」と感じたことはありませんか?私はあります。ありすぎます。エンジニアにとってOSSのライセンスは難解極まりないものです。今回はそんな、エンジニアを悩ませるOSSライセンスについて、内容解釈を助けるツールであるOLSV(OSS License Simple Viewer)をご紹介します。
OLSV(OSS License Simple Viewer)とは?
OLSV(OSS License Simple Viewer)は、トヨタ自動車、日立製作所、日立ソリューションズが共同で開発したオープンソースのツールです。
https://github.com/OLSV-oss/OSSLicenseSimpleViewer
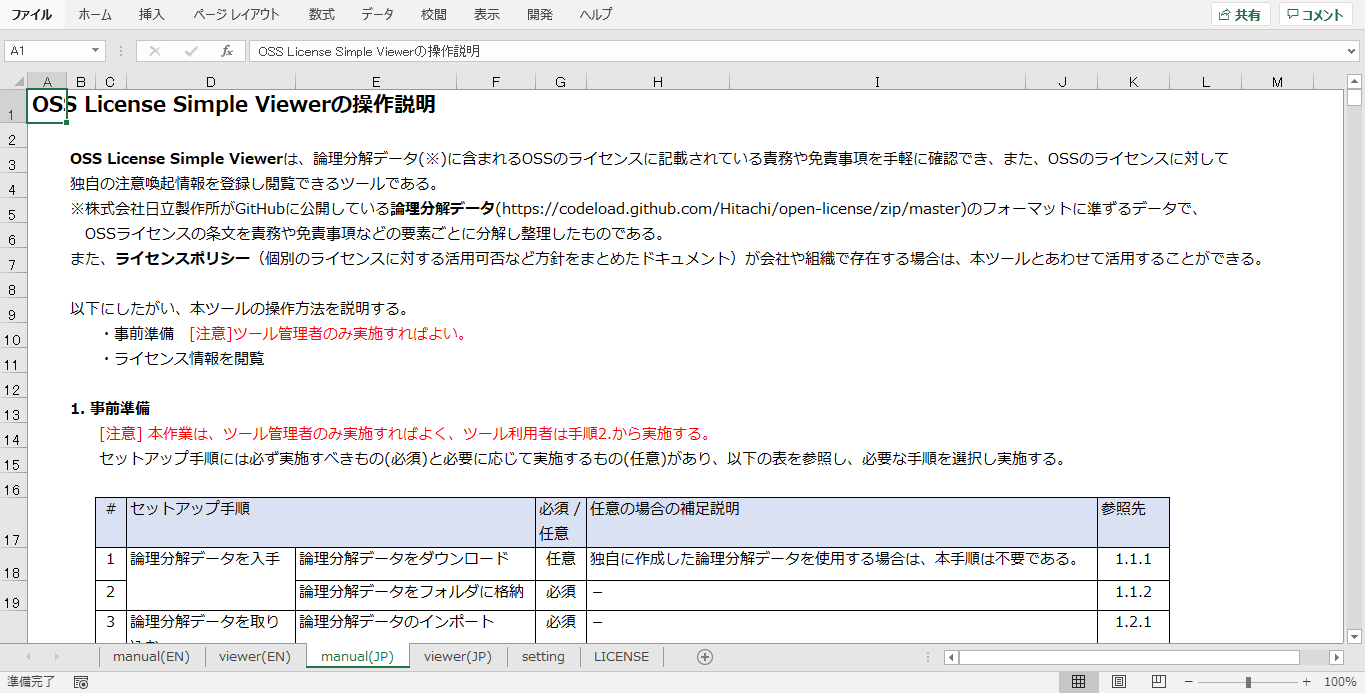
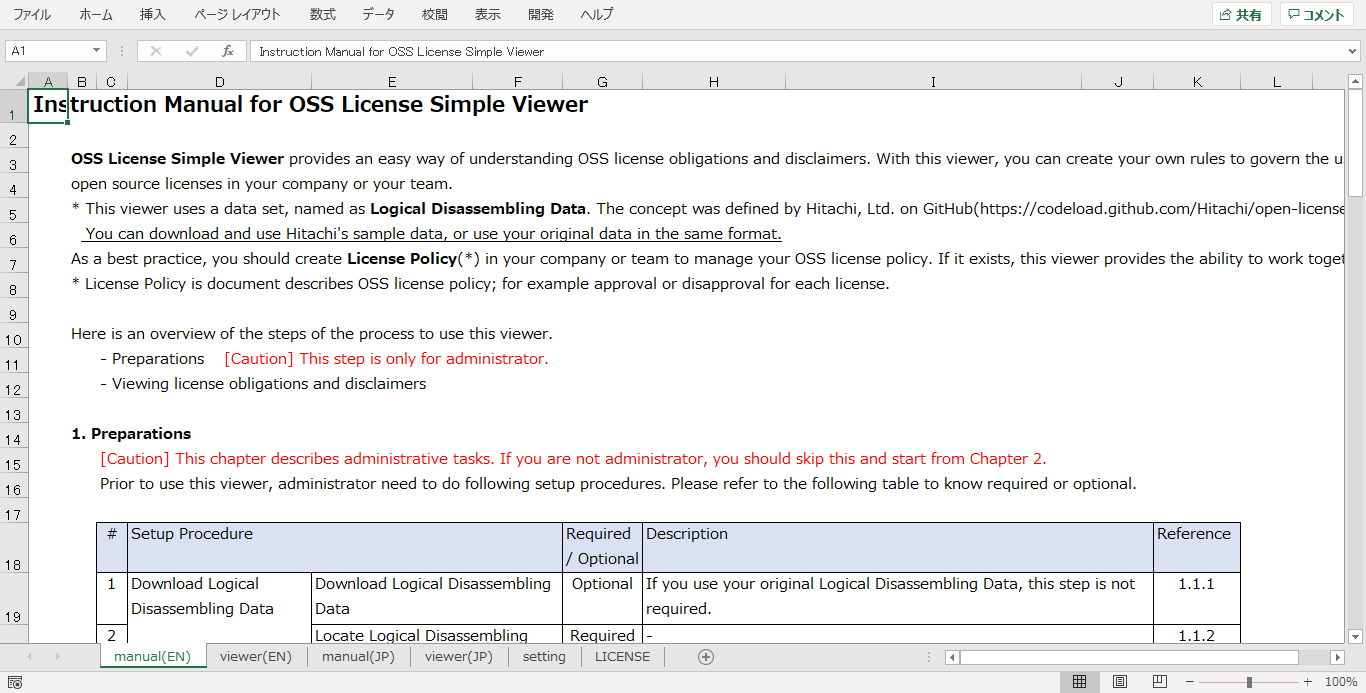
エンジニア向けのOSSライセンスリファレンスとして作成されたExcelベースのシンプルなツールで、ライセンスの論理分解データ(詳細は後述)を可視化することで、ライセンス内容の理解を支援します。
ユーザが選択した「ライセンス」と「ユースケース(使用方法)」に対して課せられるライセンスの責務(条件)を表示することができます。
※日本語にも対応しています。
OLSVの基本的な使い方
それでは使い方を紹介していきます。OLSVの操作方法については、後述するツール本体であるExcelファイルの「manual(JP)」シートにまとめて記載されていますので、そちらも参照ください。
事前準備
まず、ライセンス解釈を閲覧するための前準備を行います。
ライセンス解釈のデータである、論理分解データを用意します。ここでは、日立製作所が公開しているOSS License Open Dataをダウンロードします。
https://codeload.github.com/Hitachi/open-license/zip/master
上記URLにアクセスするとzipファイルがダウンロードされます。本zipファイルを任意のフォルダに展開し、以下4つのjsonファイルの存在を確認します。
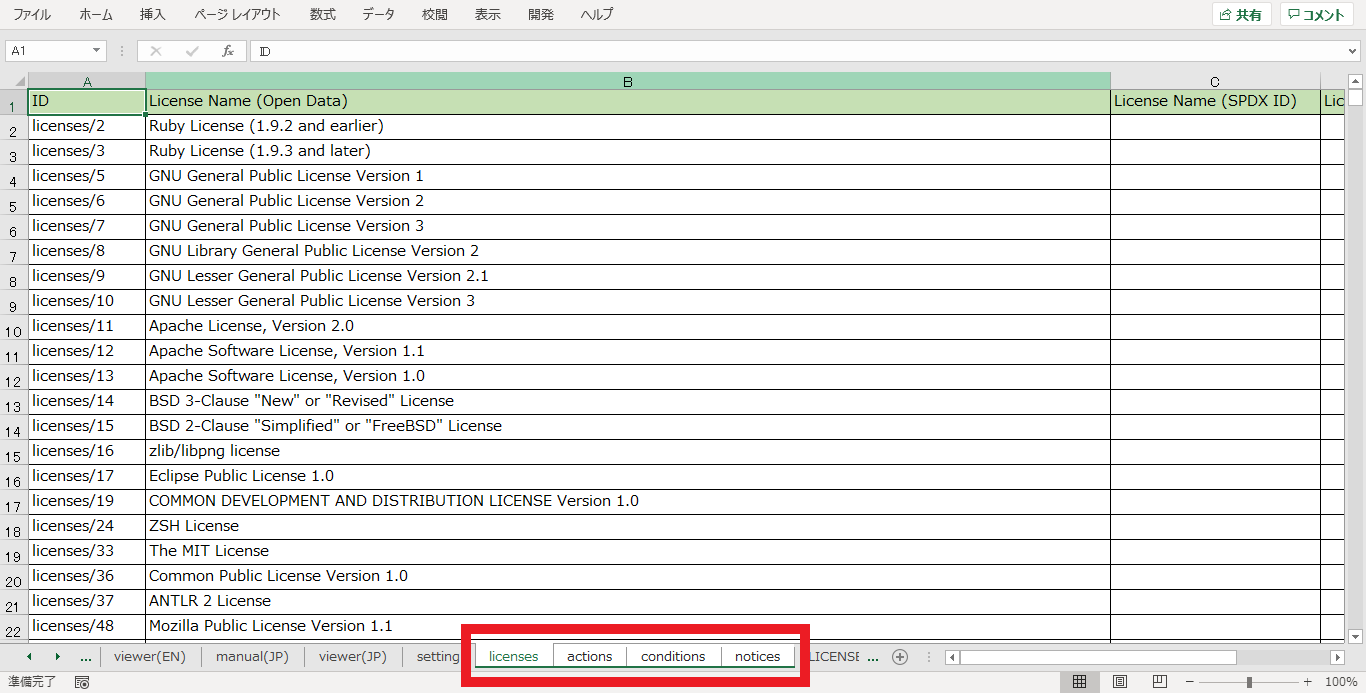
- data/licenses.json -> 論理分解データの中核となるデータを含むライセンスのリスト
- data/conditions.json -> 責務のリスト
- data/actions.json -> ユースケースのリスト
- data/notices.json -> 免責事項のリスト
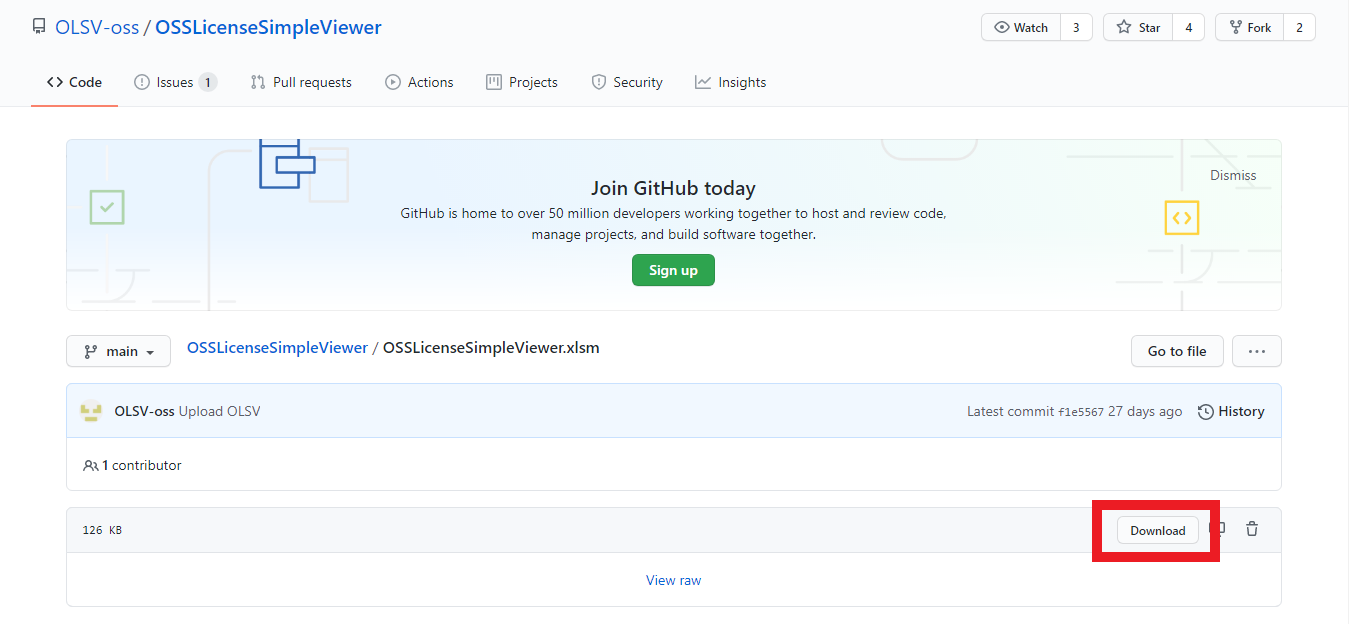
続いて、OLSVの本体をダウンロードします。
https://github.com/OLSV-oss/OSSLicenseSimpleViewer/blob/main/OSSLicenseSimpleViewer.xlsm

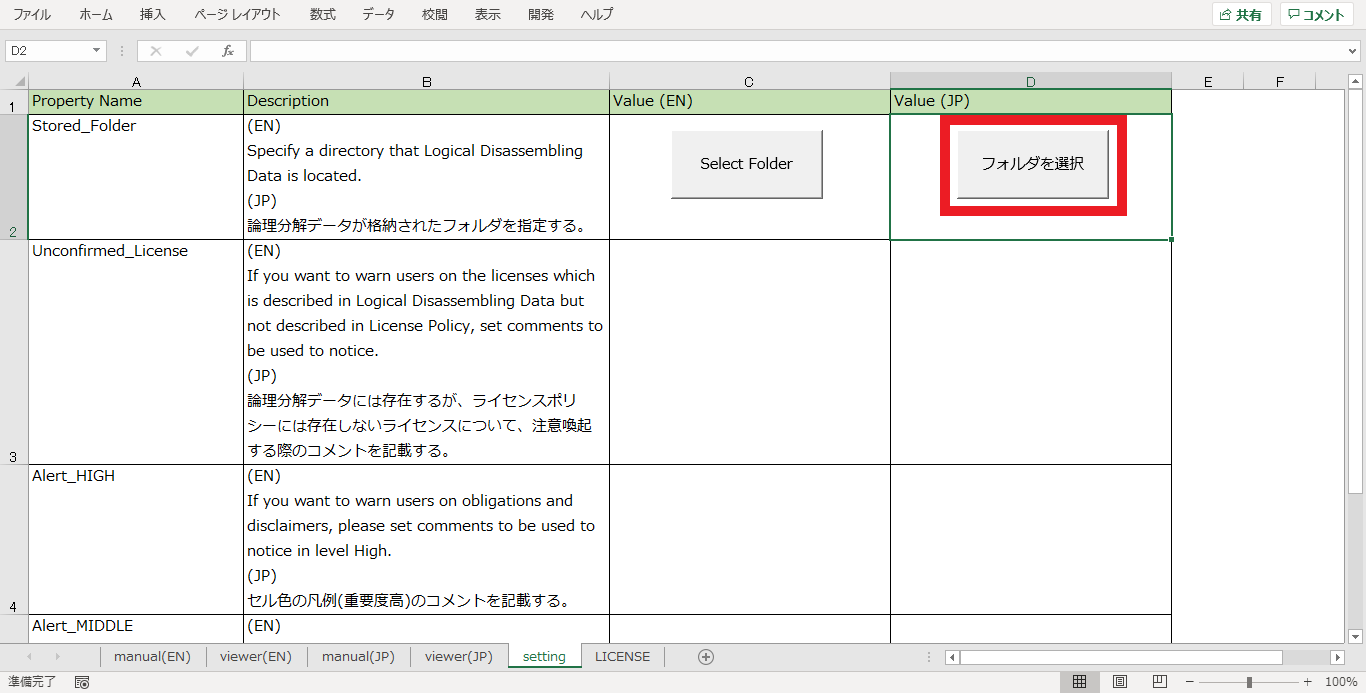
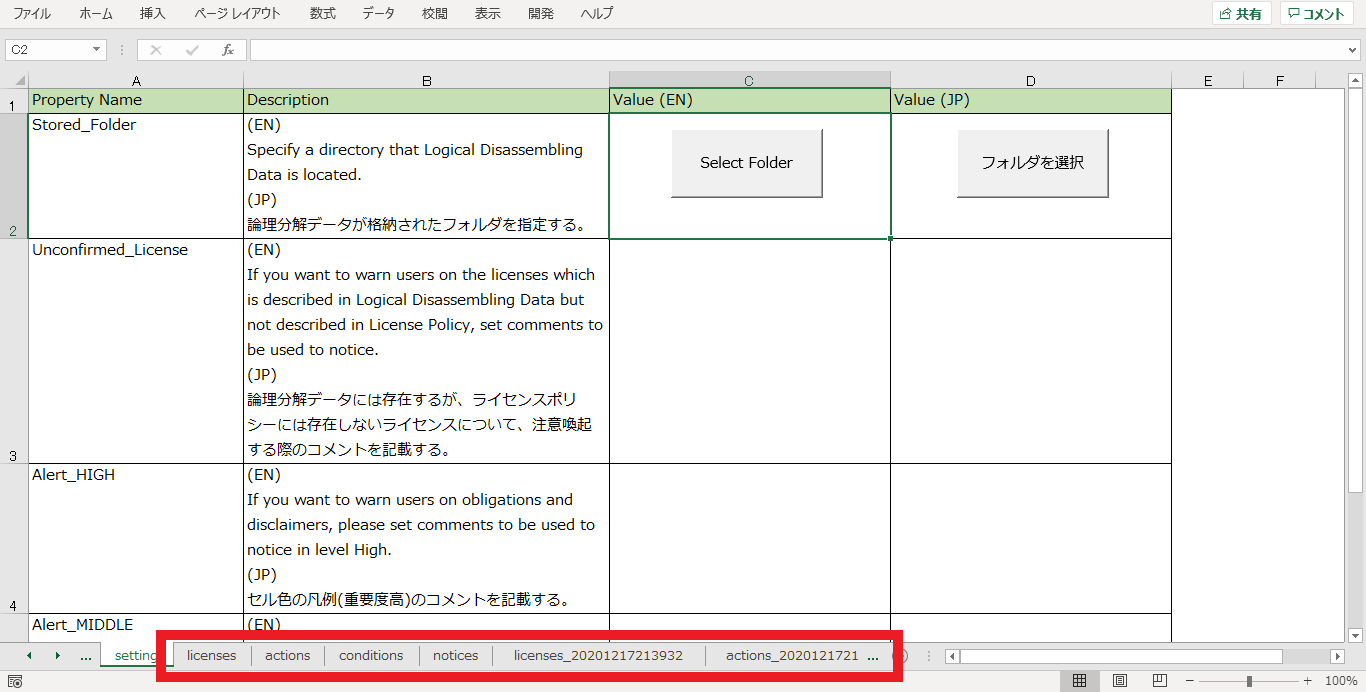
ダウンロードされたExcelファイルを開き、「setting」シートの「Value(JP)」の列にある「フォルダを選択」を押下します。
※マクロのセキュリティ警告が表示されている場合は「コンテンツの有効化」ボタンを押下してマクロを有効化してください。

フォルダ選択ダイアログが表示されるので、ダウンロードしておいた4つのjsonファイルが格納されたフォルダを選択し「OK」を選択します。インポートが開始されます。

しばらく待つと、インポートが完了します。エクセル内に新規に4つのシートが作成されます。これで最低限の前準備は完了です。
OSSライセンスの解釈の閲覧
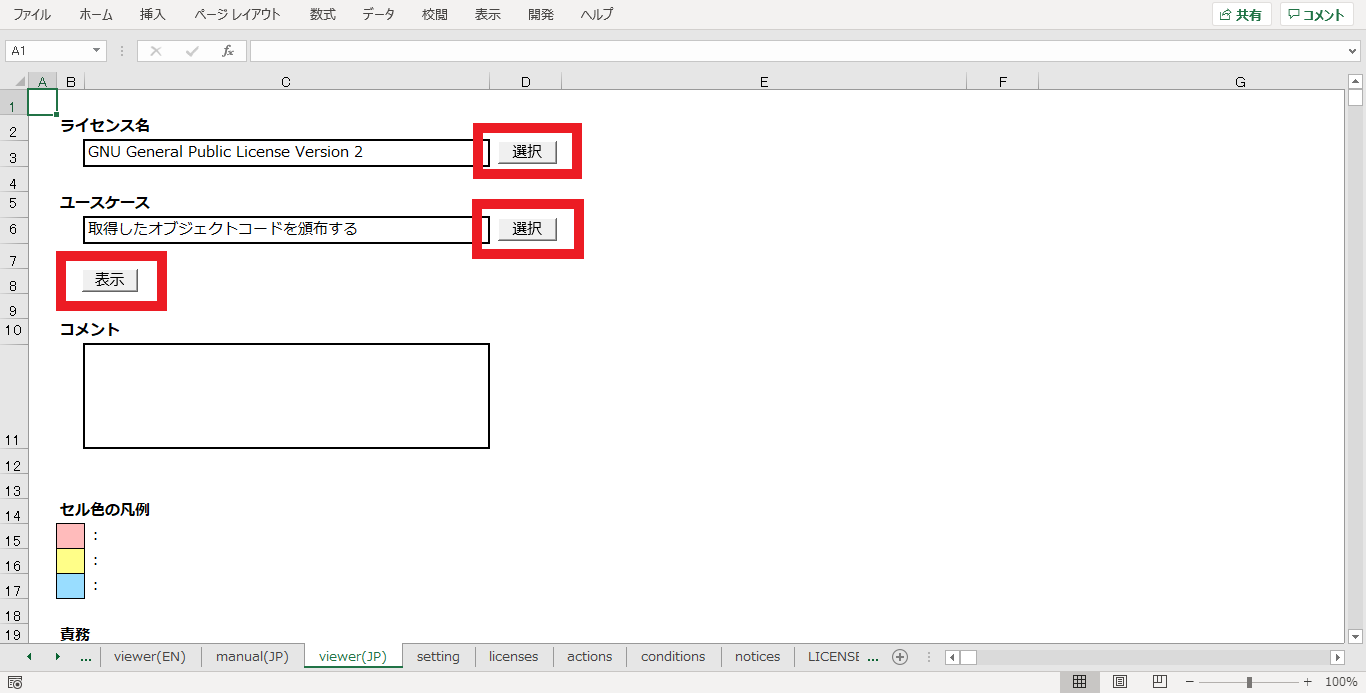
Excelファイルの「viewer(JP)」シートを開きます。
詳細を確認したいOSSのライセンスと、OSSの使い方(ユースケース)を選択し、「表示」を押下します。
例としてここでは、
- ライセンス:GNU General Public License 2.0(GPL-2.0)
- ユースケース:取得したオブジェクトコードを頒布する
を選択します。
※このタイミングで「オートメーションエラー」が表示される場合、.NET Framework 3.5が必要ですので環境に応じて適宜インストールしてください。
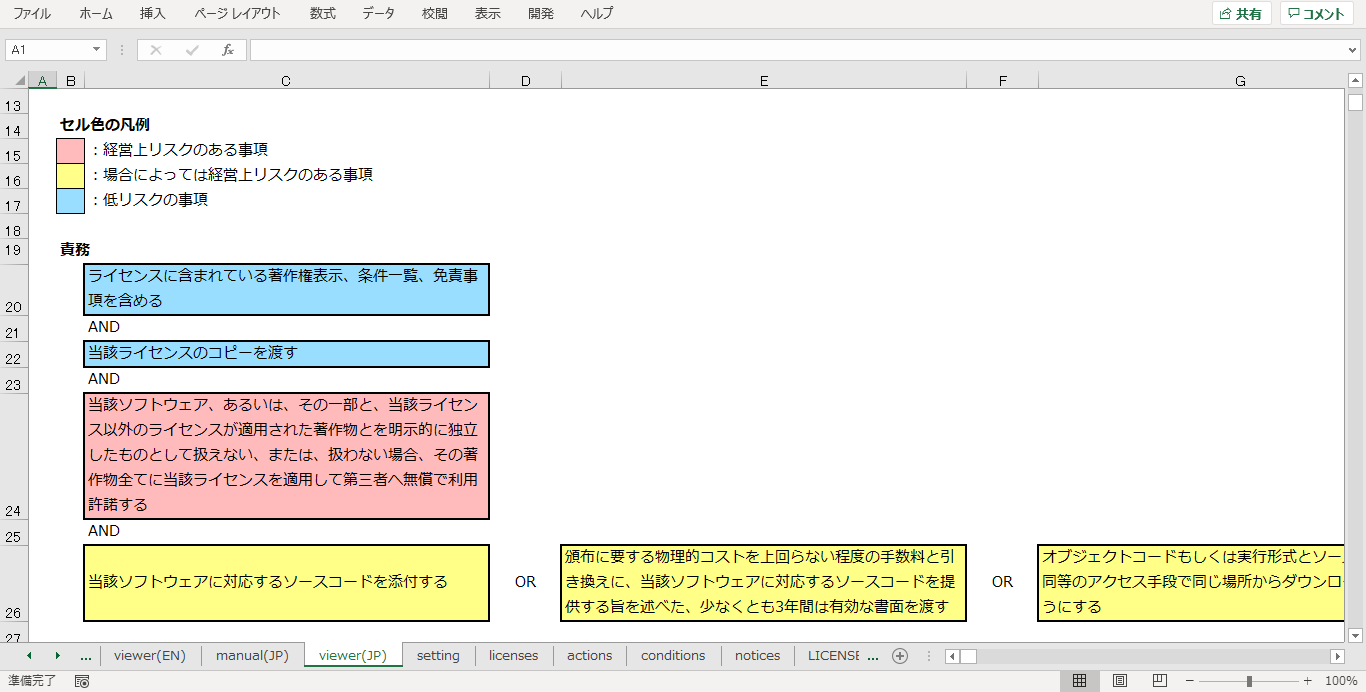
表示を押下後、指定した内容がExcelに反映されると、以下のとおり選択したライセンスとユースケースに応じた責務・免責事項が表示されます。
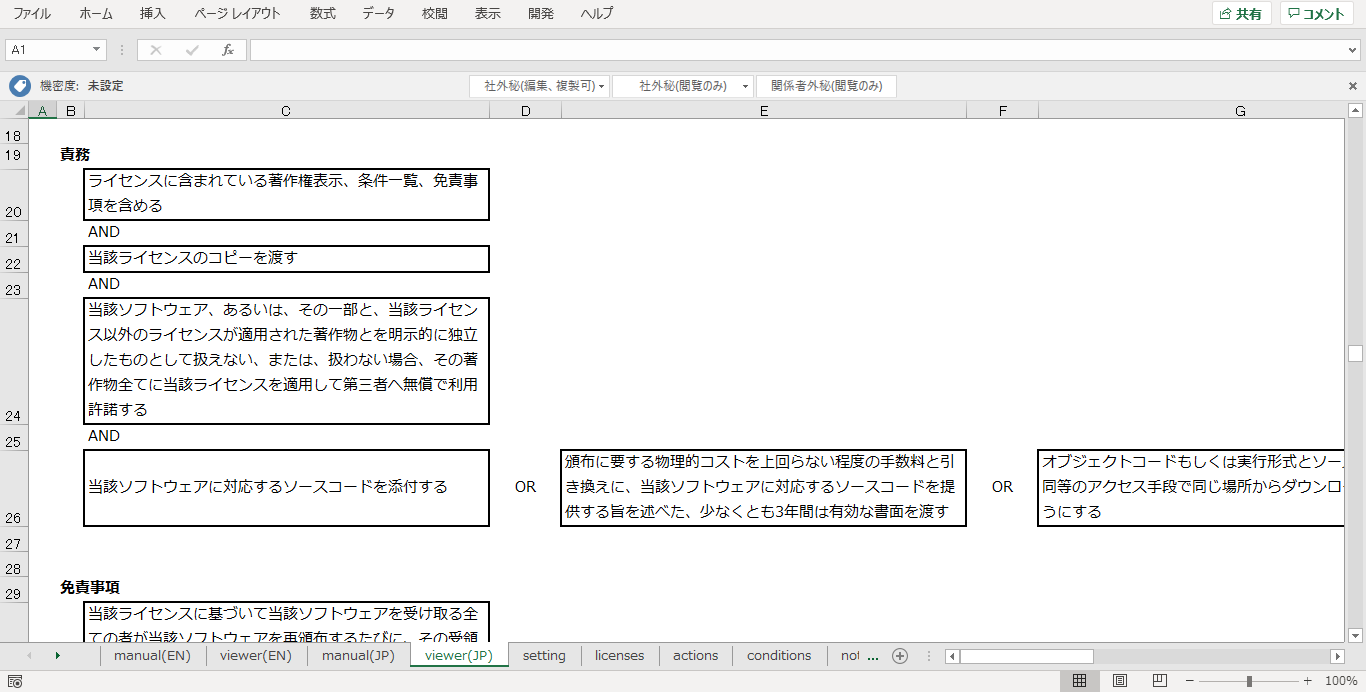
責務は、エンジニアがOSSを利用する場合に対応すべき事項です。
OLSVにおいては、この責務はAND/OR形式で表示されます。「何が必須事項なのか」「選択可能な事項は何か」といったことが、技術者にも分かりやすい形式で表示されます。
論理分解データについて
OLSVでは、ライセンス解釈の情報を表示するために論理分解データを使用しています。ここでは、このデータについて説明します。
概要
論理分解データは、OSSライセンスの内容を構造的に整理してまとめた情報のことです。ここまでの説明で示したとおり、OSSのライセンス、使用方法(ユースケース)、責務(条件)、免責事項といったデータで構成されます。
日立製作所は、数百種類におよぶOSSライセンスの解釈を、論理分解データとしてGitHubに公開しています。
OSS License Open Data
https://github.com/Hitachi/open-license
詳細
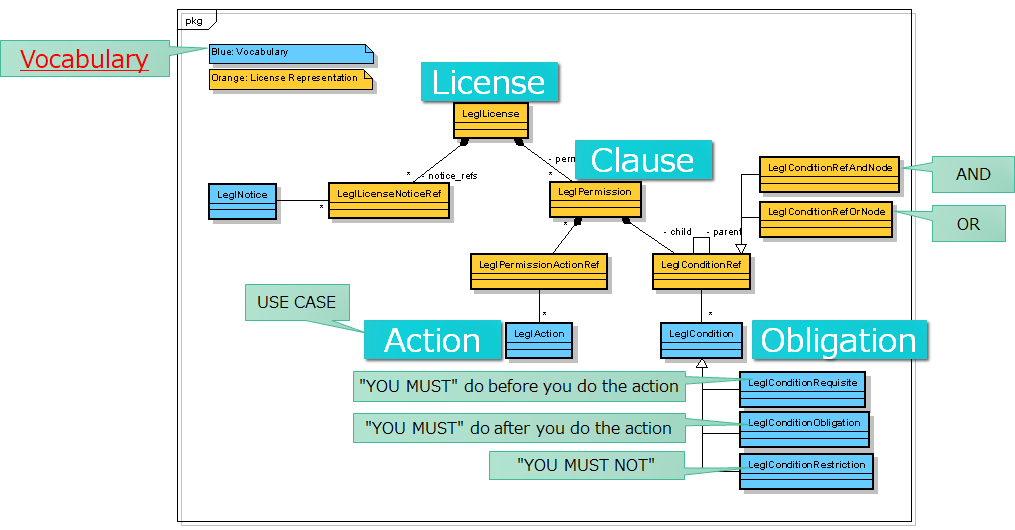
OSSのライセンスは、複数の「Clause」(条項)を含み、またClauseは「Action」(許諾される使い方)と「Obligation」(責務)で構成されます。これが論理分解の基本構造となります。
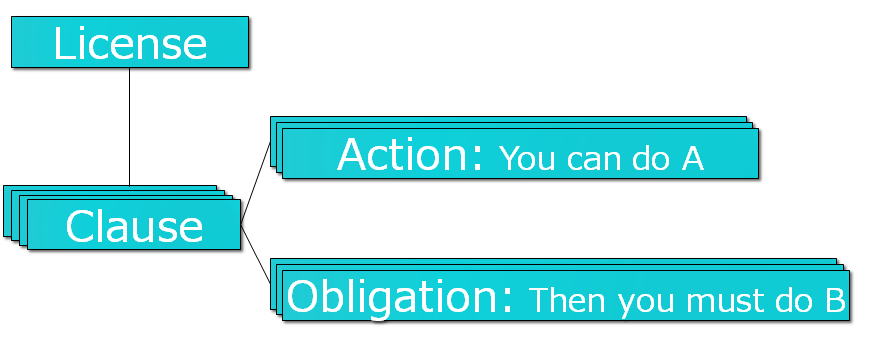
データモデルで表現すると、以下のような構造となります。Obligation(責務)はAND/ORの関連性を持ちます。

例えば、先ほど例として出したGPL-2.0の場合は、論理分解データは以下のような構成となります。

OLSVはこのようなデータを用意に閲覧できるようにするViewerです。このようなデータとViewerを活用することで、エンジニアによるOSSライセンス解釈の負荷を軽減でき、また企業間におけるOSSライセンスの理解を共通化してサプライチェーン間での認識の齟齬をなくすこともできます。
その他の機能
上記ではOLSVの基本的な使い方について紹介しましたが、OLSVには他にも以下のような機能があります。
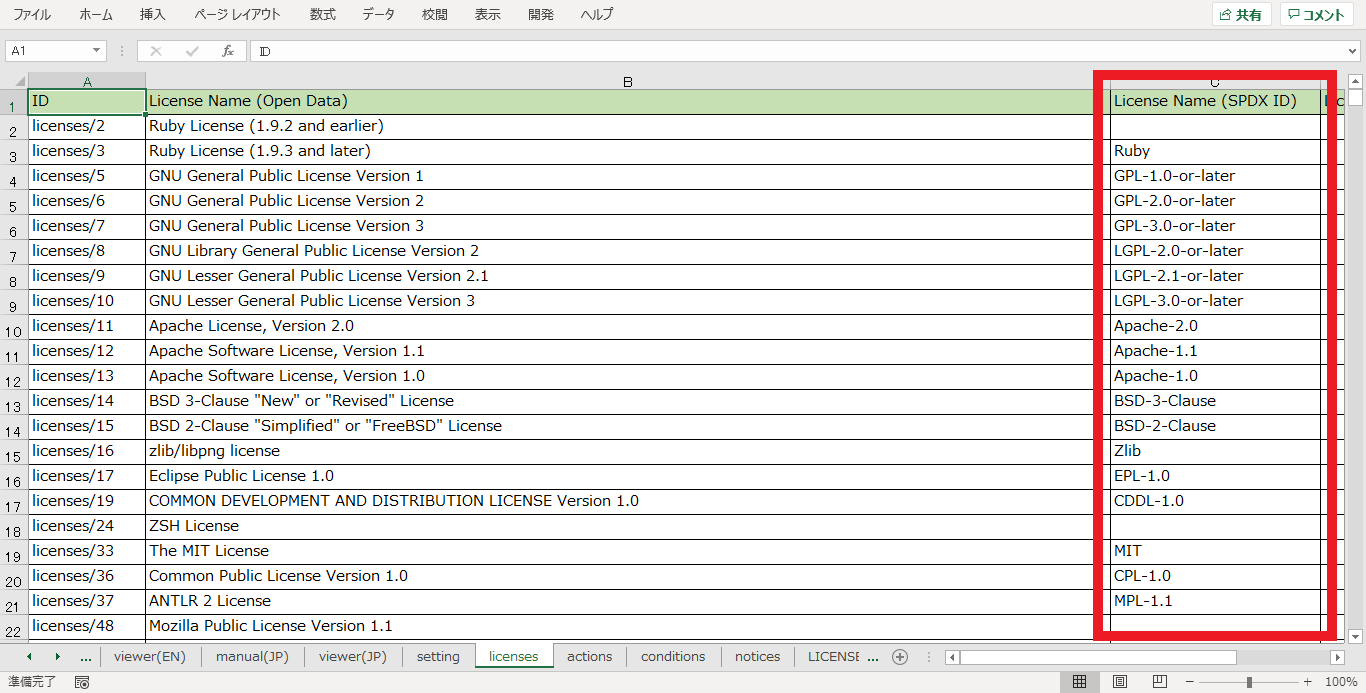
SPDX識別子の使用
SPDX識別子をライセンスの選択肢として加えることができます。
(1) licensesシートのLicense Name(SPDX ID)の項目に、ライセンスに対応するSPDX識別子を入力します。
(2) viewer(JP)シートにおいて、ライセンス選択時にSPDX識別子を選択できるようになります。
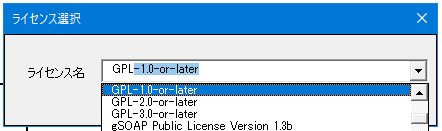
選択すると、該当ライセンスに対応する論理分解データが表示されます。
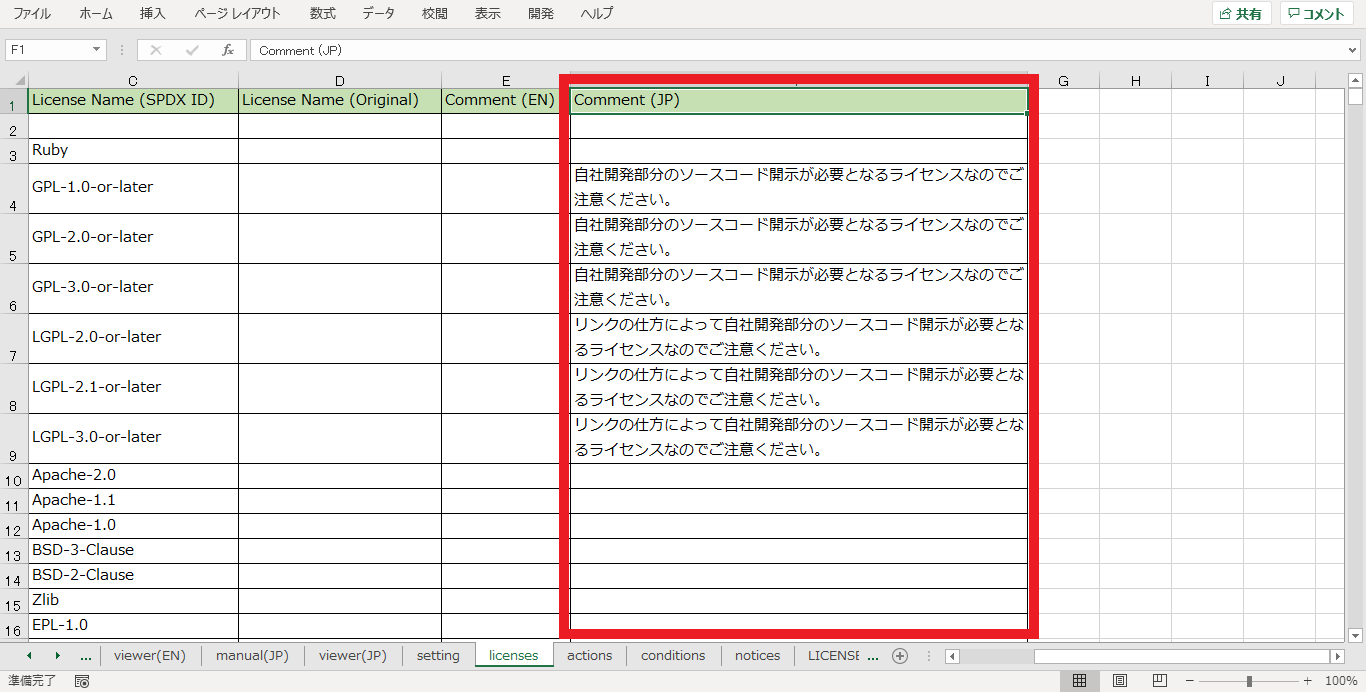
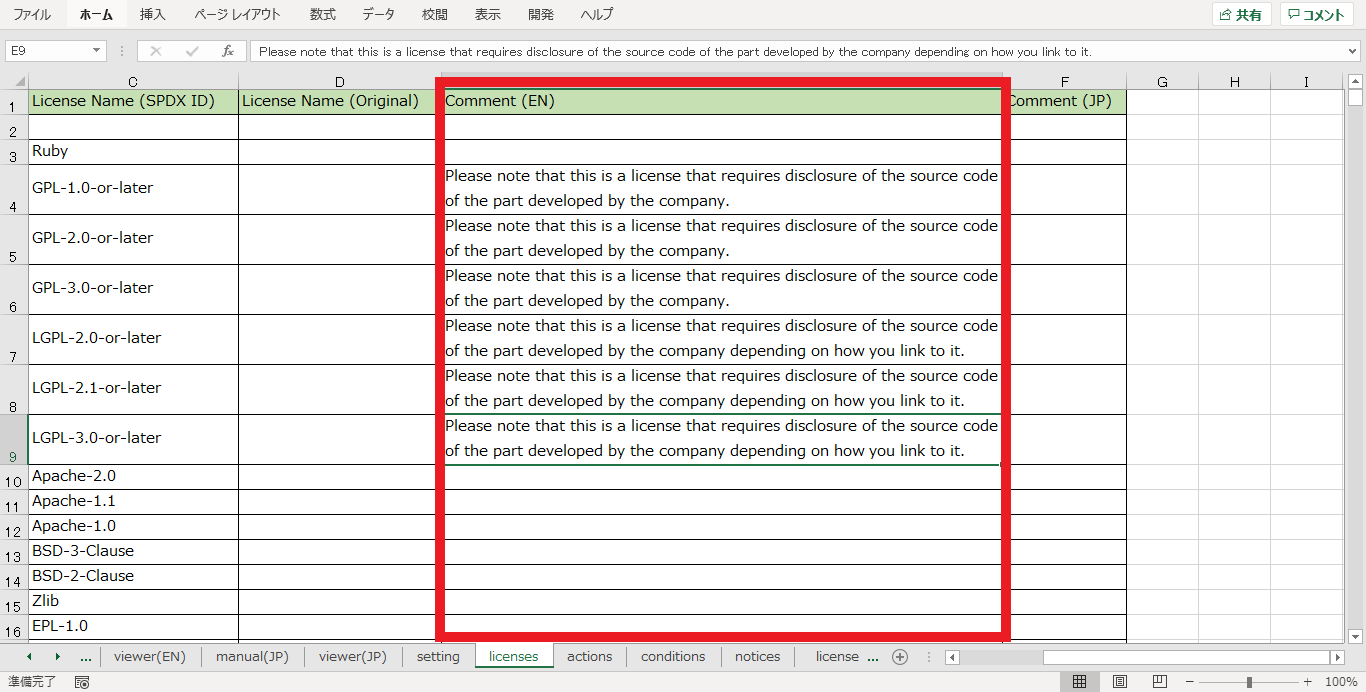
コメントの付与
ライセンスにコメントをつけておくことができます。企業が社内のエンジニアに本ツールを使ってもらう場合等に、本機能を使ってエンジニアに対して注意喚起のメッセージを付与することができます。
(1) licensesシートのComment(JP)の項目に、ライセンスに対するコメントを入力します。
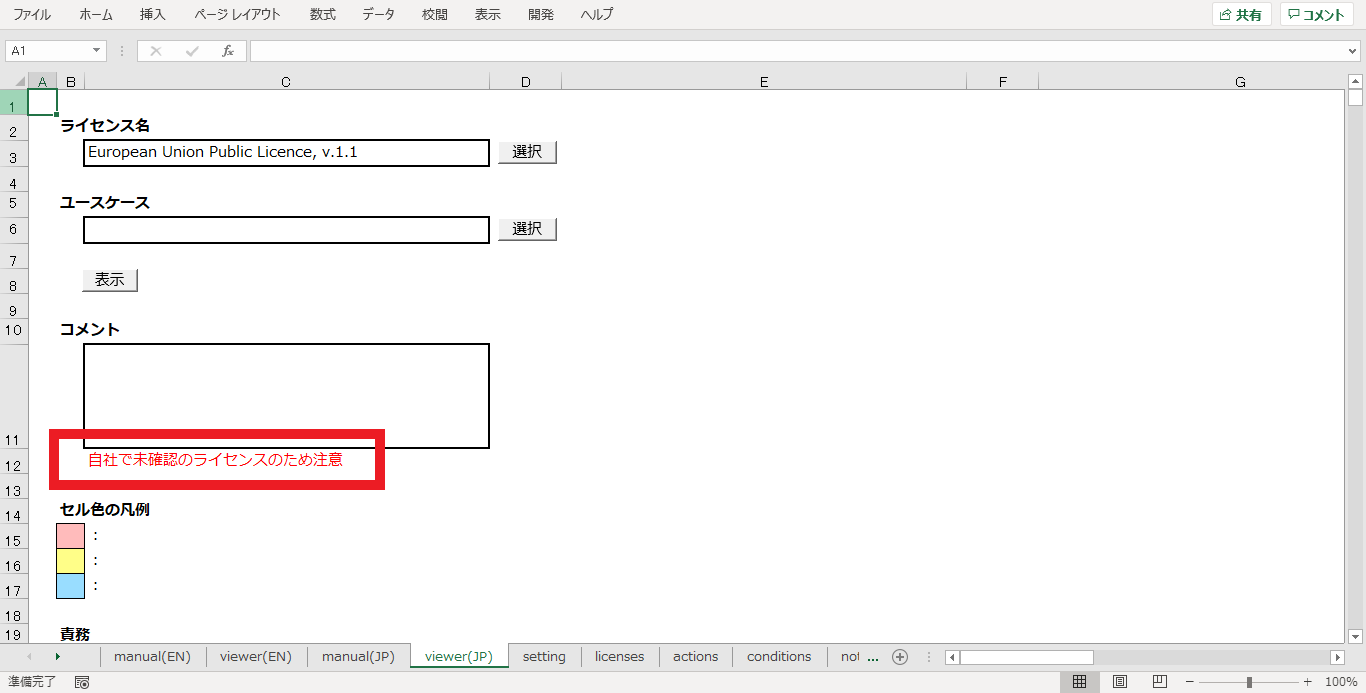
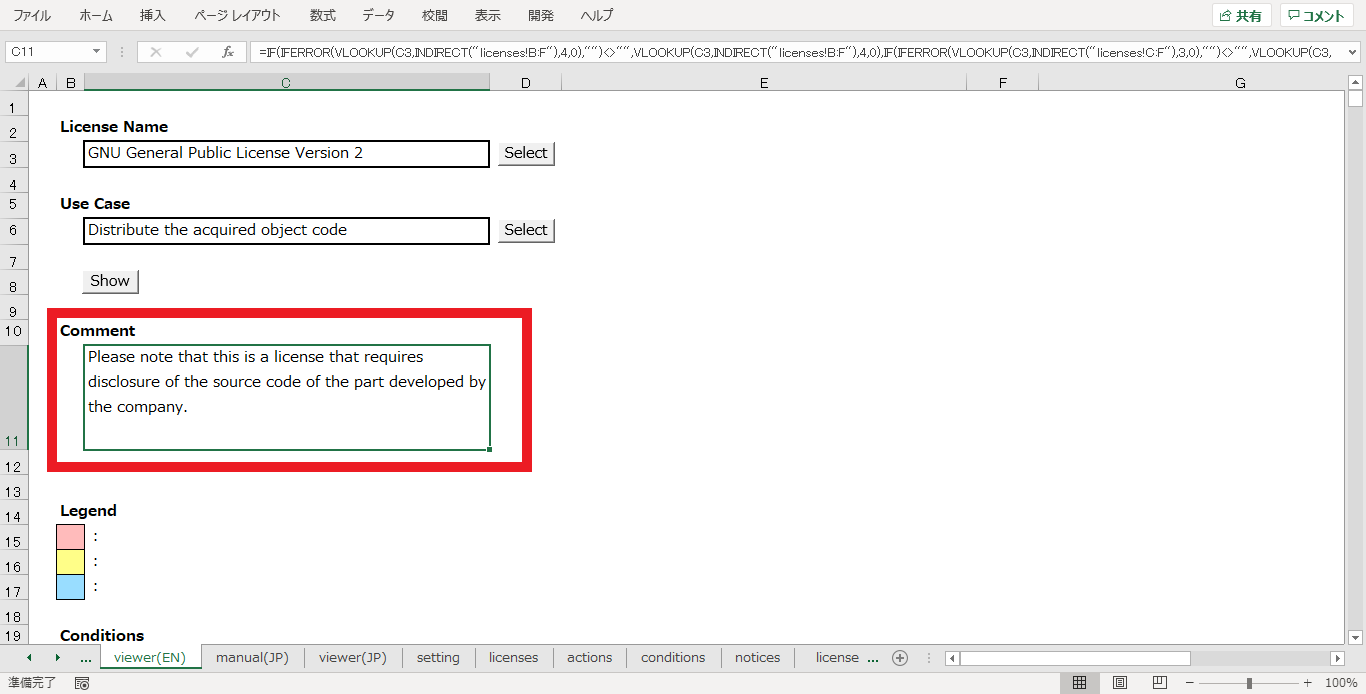
(2) viewer(JP)シートにおいて、ライセンス選択時にコメントが表示されるようになります。

ライセンスポリシーの適用
確認済みのライセンスを登録しておくことで、未確認のライセンスを選択した際に注意喚起のメッセージを付与することができます。
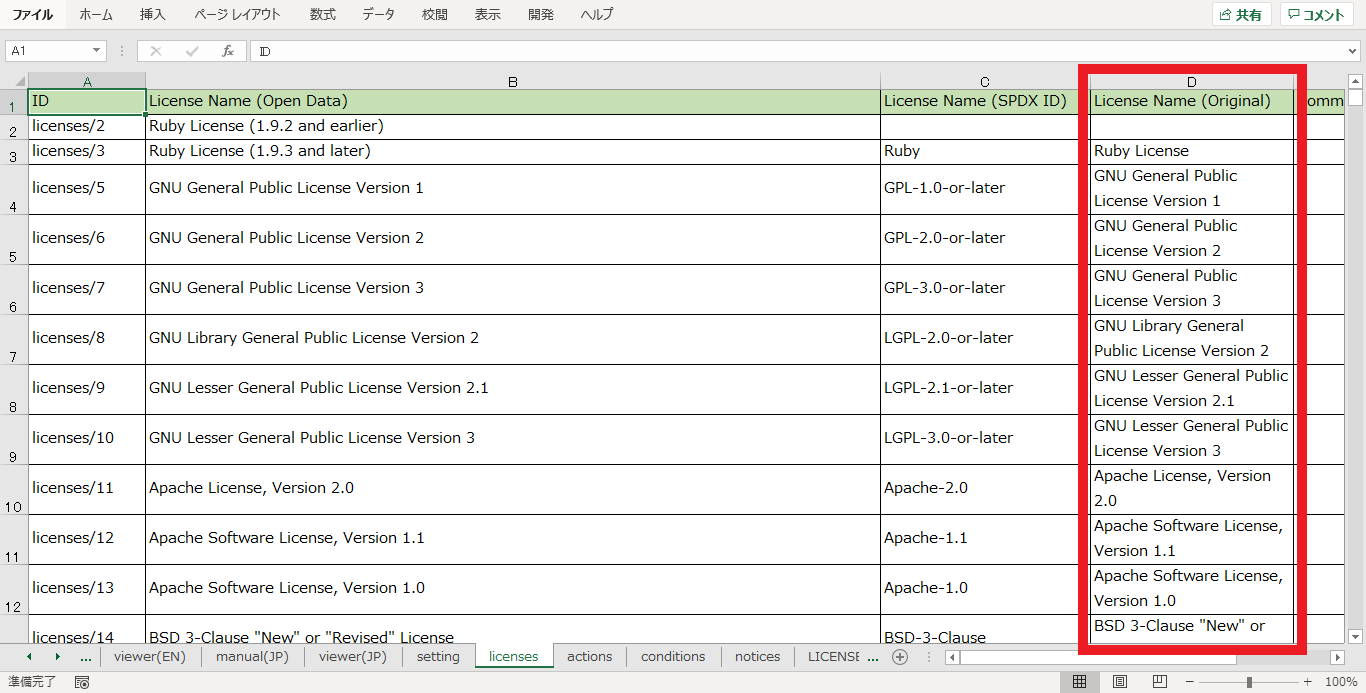
(1) licensesシートのLicense Name(Original)の項目に、確認済みのライセンスとして管理用のライセンス名を入力します。

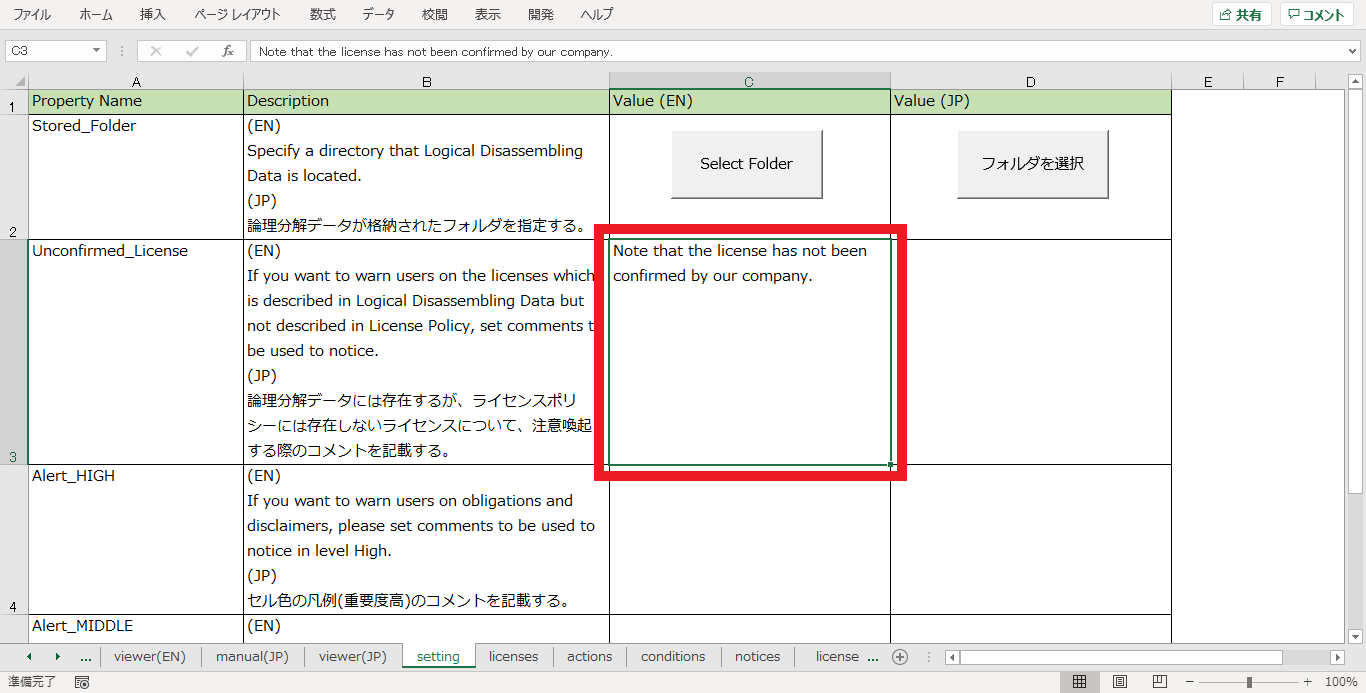
(2) settingシートのUnconfirmed_Licenseの項目に、未確認のライセンスを選択した際の注意喚起のコメントを入力します。

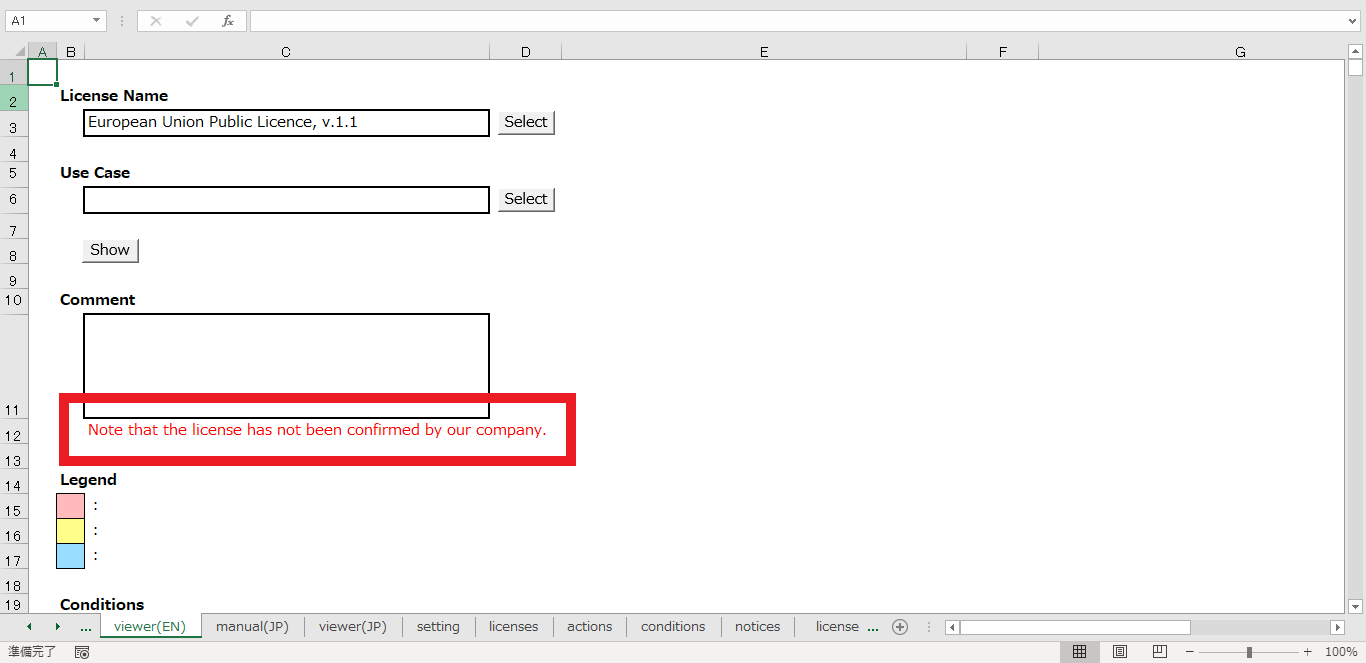
(3) viewer(JP)シートにおいて、未確認のライセンスが選択されるとコメントが表示されます。
注意喚起の色付け
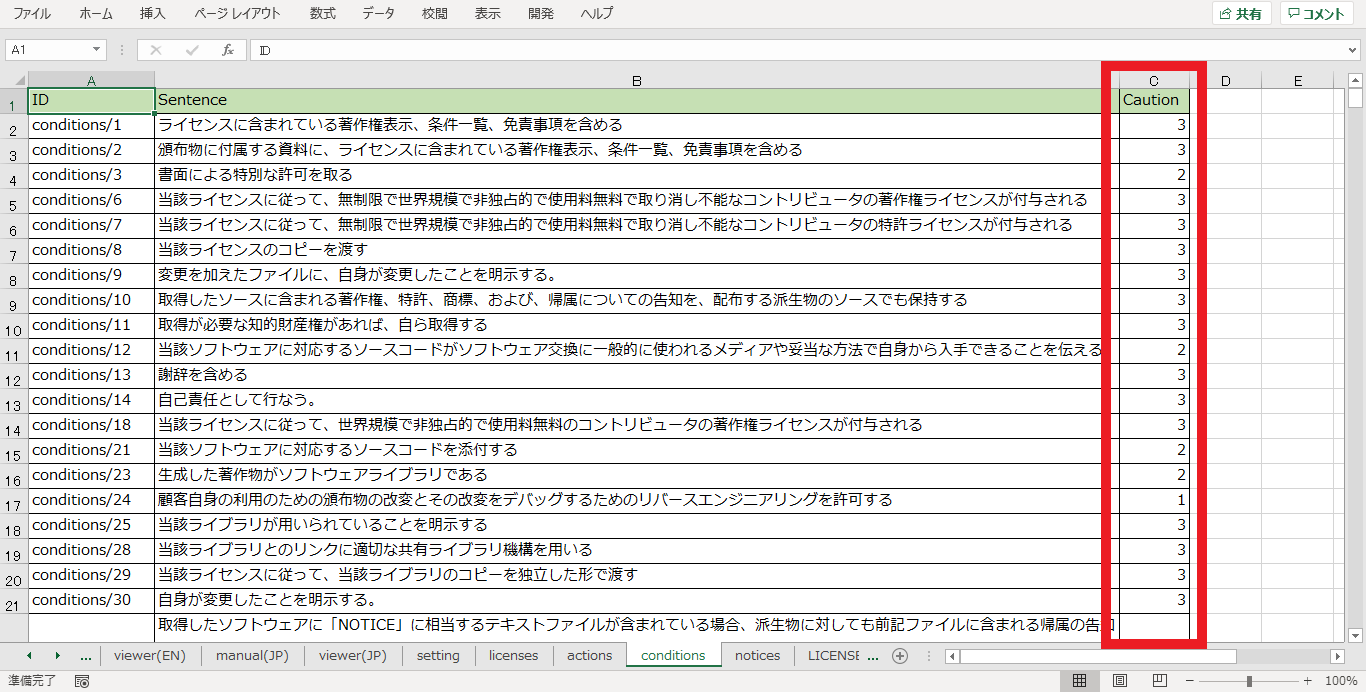
責務に対して、注意喚起のためのコメントや色付けを行うことができます。注意喚起のレベルは以下の3段階です。
- 1(重要度:高)
- 2(重要度:中)
- 3(重要度:低)
それぞれ、以下のように設定します。
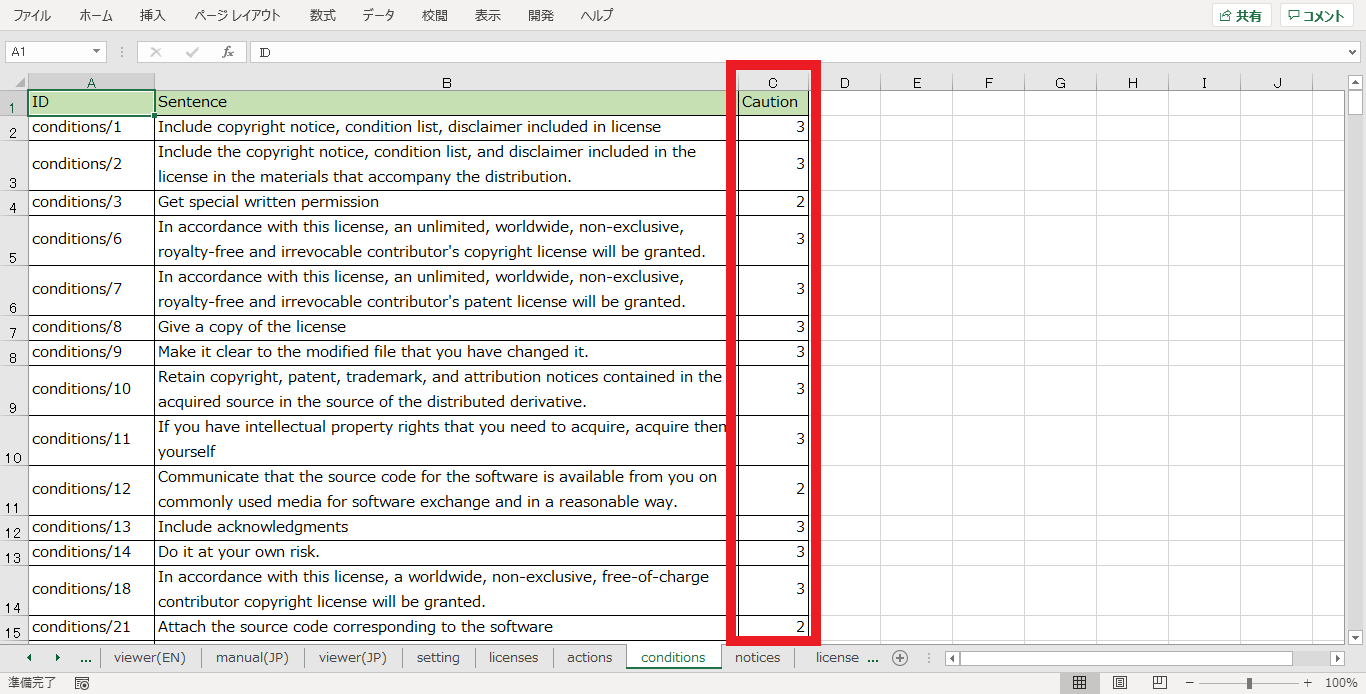
(1) conditionsシートに責務の重要度1~3を、noticesシートに免責事項の重要度1~3を、それぞれ設定します。
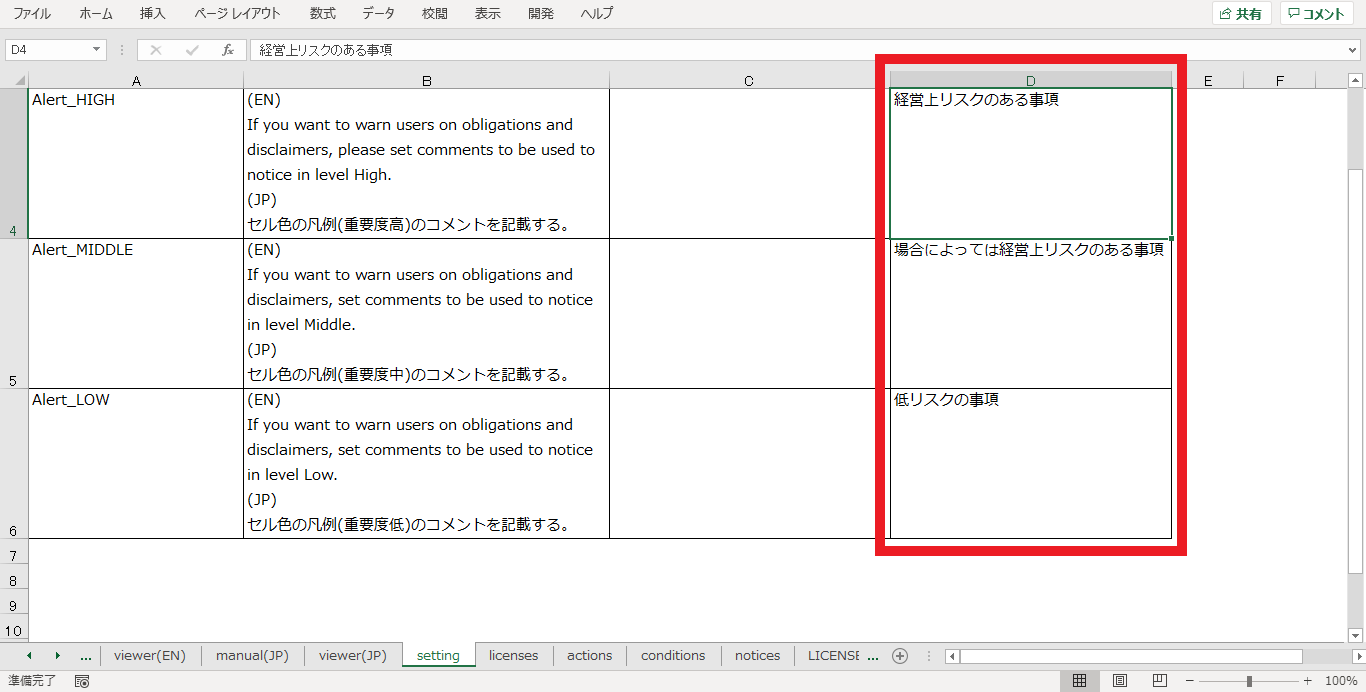
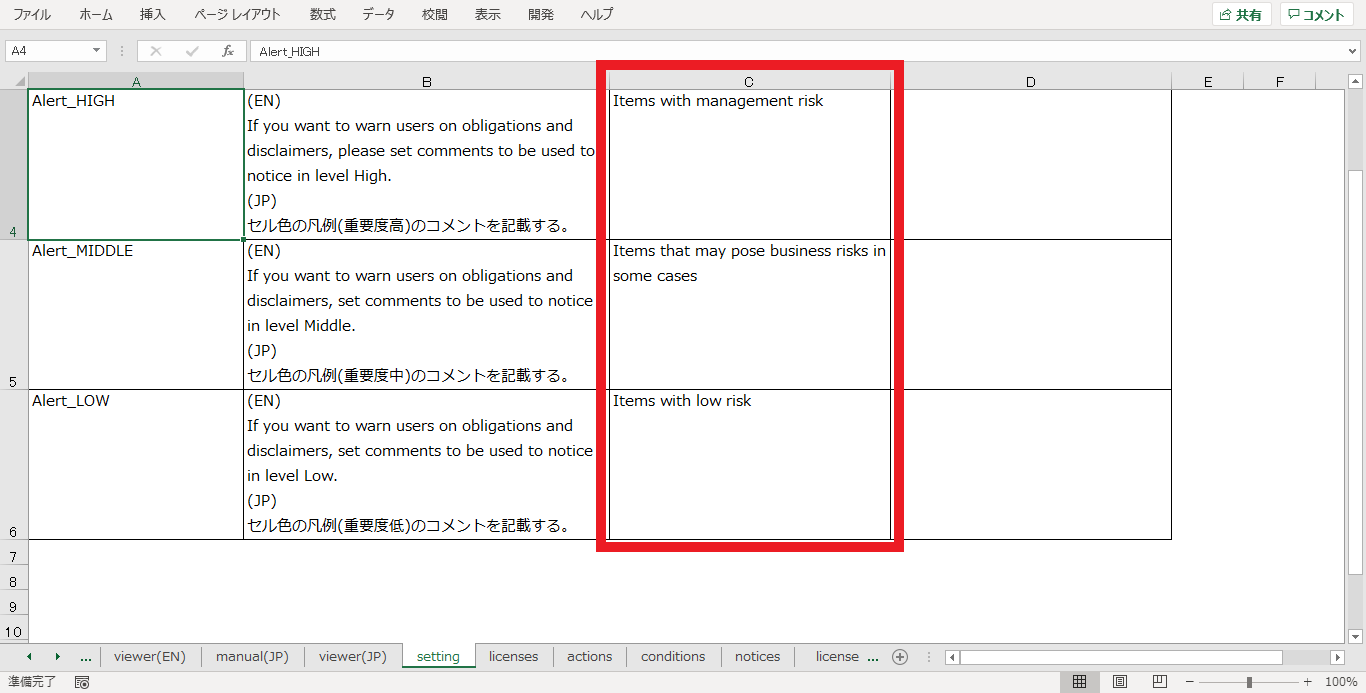
(2) settingsシートに「Alert_HIGH」「Alert_MIDDLE」「Alert_LOW」のそれぞれについてコメントを設定します。
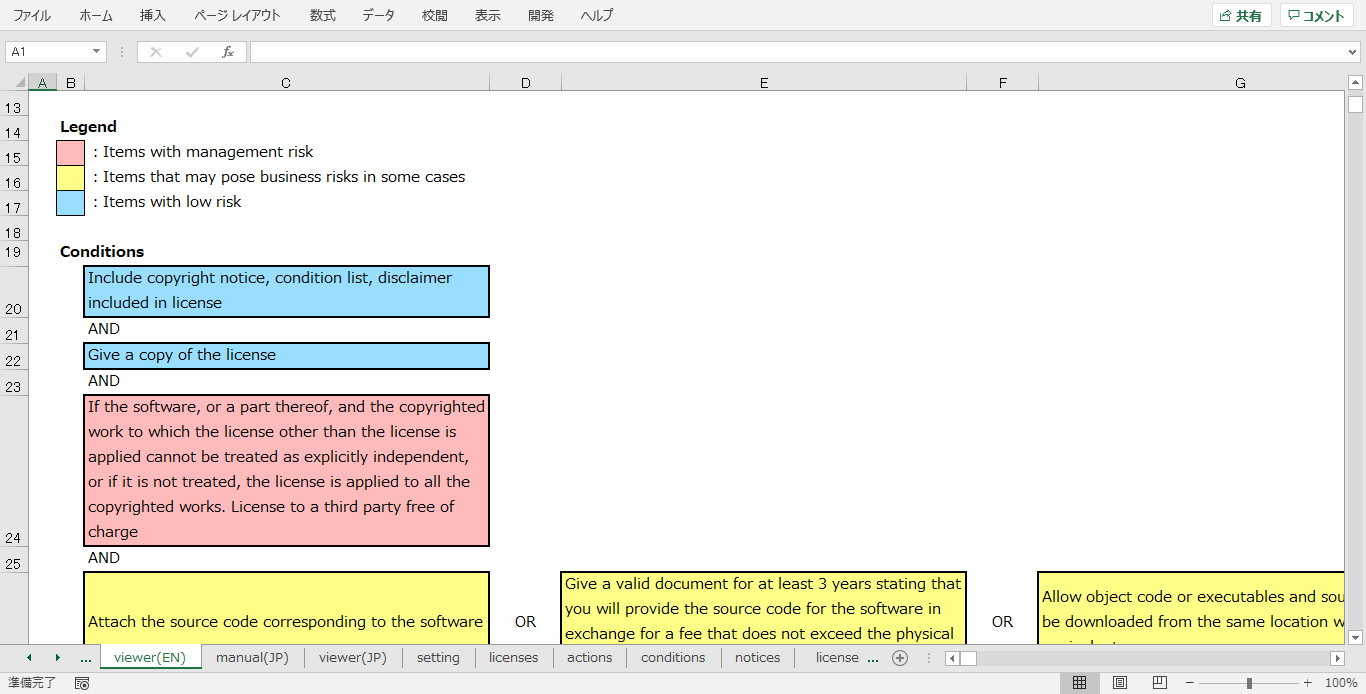
(3) viewer(JP)シートにおいて、「セル色の凡例」が表示されます。また注意喚起を設定済みの責務・免責事項が表示された場合は、セルの背景が変化します。
最後に
以上、OLSVの紹介でした。
明日はOpenChain Spec v2.1のvol.5. 3.4章の内容について小保田さんよりご紹介いただきます。明日以降もぜひOpenChain Japan Advent Calendar 2020をご覧ください!
Introduction
Hello, I am Morishita, a member of the OpenChain Japan WG Tooling subgroup.
Suddenly, have you ever felt "I don't understand the open source license..."?
I have. Too often. Open source licenses confuses developers.
In this article, I will introduce OLSV (OSS License Simple Viewer), a tool that helps developers to interpret the meaning of open source licenses.
What is OSS License Simple Viewer?
OLSV(OSS License Simple Viewer) is made by collaboration of Toyota, Hitachi, and Hitachi Solutions.
This is a simple Excel-based tool created as an open source license reference for developers. It helps users understand license contents by visualizing license logical decomposition data (see below for details).
It can show the license obligations (conditions) imposed for the "license" and "use case" selected by the user.
How to use
For details on how to use OLSV, please refer to the "manual(EN)" sheet of the Excel file, which is the main part of the tool, as described below.
Preparation
The first step is to do some preliminary preparation for viewing the license interpretation.
Prepare the logical decomposition data, which is the data for license interpretation. Here, we will download the OSS License Open Data published by Hitachi, Ltd.
https://codeload.github.com/Hitachi/open-license/zip/master
When you access the above URL, a zip file will be downloaded. Extract this zip file to a folder of your choice and confirm the existence of the following four json files.
- data/licenses.json -> List of licenses including the core data of the logical decomposition data
- data/conditions.json -> List of conditions
- data/actions.json -> List of use cases
- data/notices.json -> List of disclaimers
Then, download the OLSV main unit.
https://github.com/OLSV-oss/OSSLicenseSimpleViewer/blob/main/OSSLicenseSimpleViewer.xlsm
This Excel file will be used by importing the four json files mentioned above.
Unfortunately, as of December 2020, the Hitachi's json data does not support English.
Currently, we need to prepare the data in English on our own.
In this section, we will tentatively proceed with the following steps:
- import as Japanese once
- import as English.
- convert the Japanese data to English and configure it
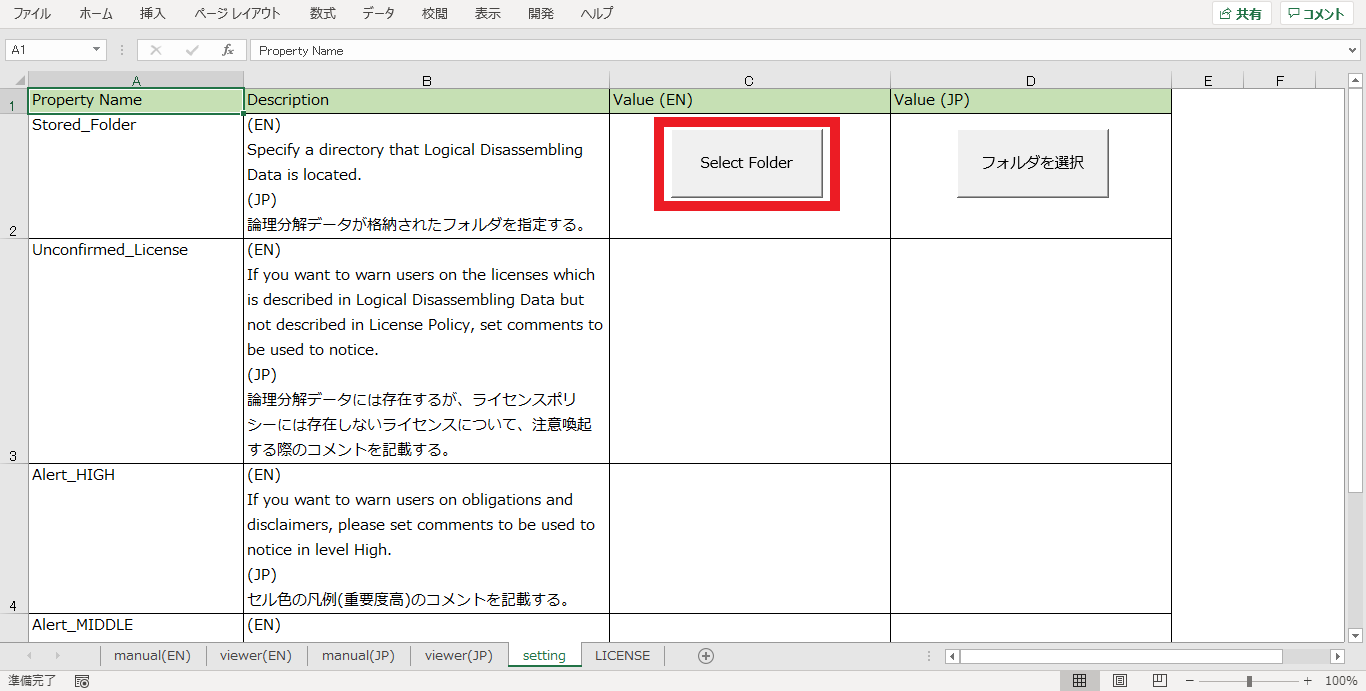
The 1st step, import the json file as Japanese once. Open the downloaded Excel file and click the button in the "Value(JP)" column of the "setting" sheet.
If you see a security warning for the macro, enable it.
When the folder selection dialog box appears, select the folder containing the four downloaded json files, and select "OK". Importing will start.

Wait for a while and the import will be completed. Four new sheets (licenses, actions, conditions, notices) will be created in Excel.

The 2nd step, import the json file as English. Click the button in the "Value(EN)" column of the "setting" sheet. Import the json file in the same way as above.
When the import is complete, a new sheet will be created and the existing sheet will be renamed.
The 3rd step, convert Japanese data to English and sets it.
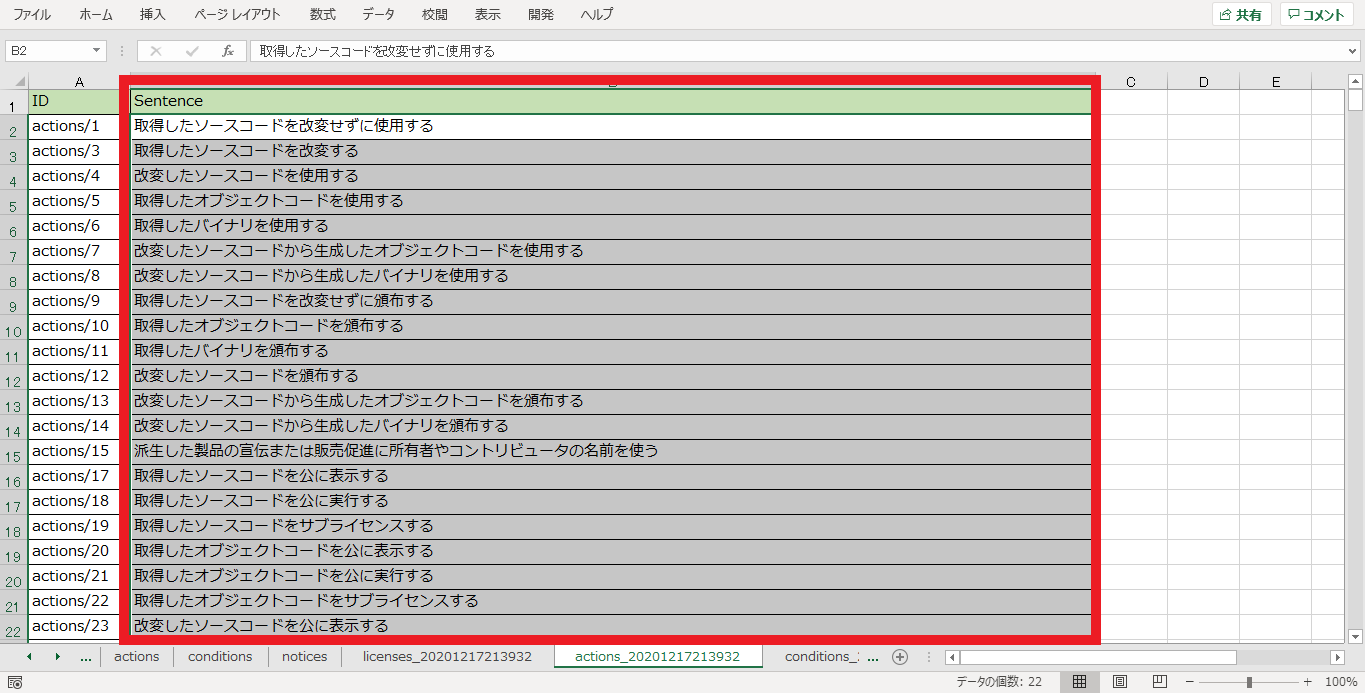
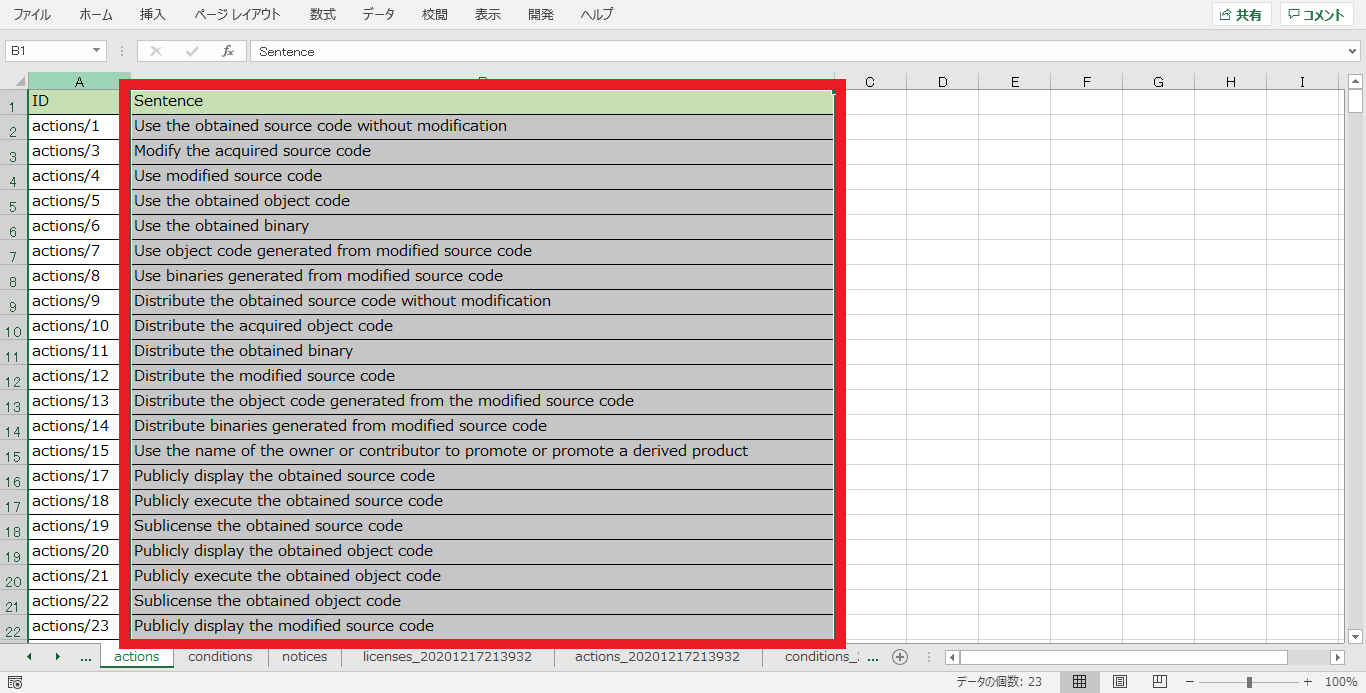
For example, convert the Japanese content in the "actions_<datetime>" sheet into English using a translation tool and set it in the "actions" sheet.
Do this same conversion in the "conditions" and "notices" sheets. This completes the minimum prep work.
Viewing Open Source License Interpretations
Open the "viewer(EN)" sheet of the Excel file. Select the License Name and Use Case you want to check in detail, and click "Show".
As an example, here we select the following option.
- License Name: GNU General Public License 2.0 (GPL-2.0)
- Use Case: Distribute the acquired object code
Note: .NET Framework 3.5 is required if an "Automation Error" is displayed at this time, so please install it appropriately according to your environment.
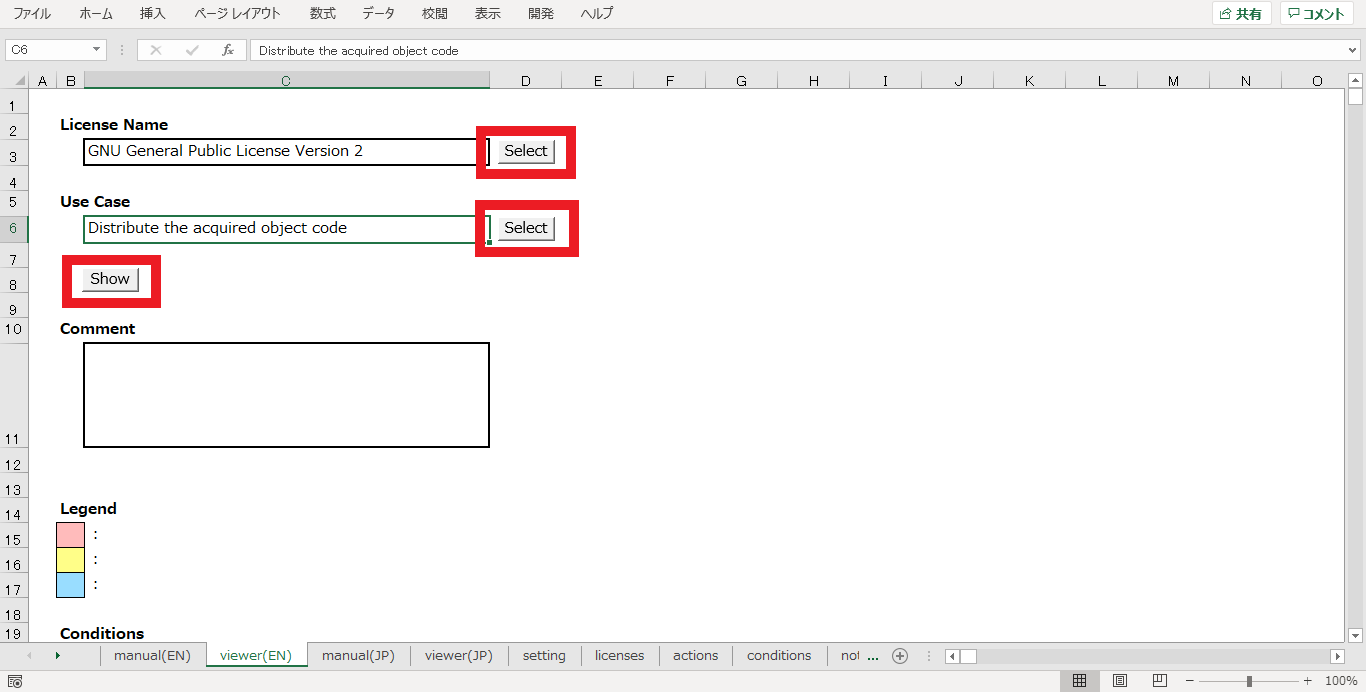
After clicking the "Show" button, the Conditions and Disclaimers for the selected license and use case will be displayed as shown below.

Conditions are items that developers must do with when using open source.
In the OLSV, these Conditions are displayed in AND/OR format, so that developers can easily understand what is mandatory and what is optional.
What is Logical Decomposition Data of Open Source License?
OLSV uses logical decomposition data for showing information of license interpretation. This section describes about this data.
Summary
Logical decomposition data is information that structurally organizes and summarizes the contents of open source license. As indicated in the previous sections, it consists of data such as open source license name, use cases, conditions, disclaimers, and so on.
Hitachi publishes the interpretation of hundreds of open source licenses as logical decomposition data on GitHub.
OSS License Open Data
https://github.com/Hitachi/open-license
Detail
An open source license contains a number of Clauses, and a clause consists of Actions (permitted uses) and Obligations. This is the basic structure of the logical decomposition.

The structure of the data model is as follows. Obligation has an AND/OR relationship.
For example, in the case of GPL-2.0, which I just gave as an example above, the logical decomposition data consists of the following.

OLSV is a viewer that makes it easy to view such data. By using it, the burden of open source license interpretation by developers can be reduced, and the understanding of open source licenses among companies can be standardized to eliminate discrepancies in recognition across the supply chain.
Other Features
In the above, I have introduced the basic usage of OLSV. This tool also has other functions as follows.
Using the SPDX Identifier
You can add SPDX identifier as a license option.
(1) Enter the SPDX identifier corresponding to your license in the License Name (SPDX ID) field of the license sheet.

(2) In the viewer(EN) sheet, the SPDX identifier can now be selected when selecting a license.
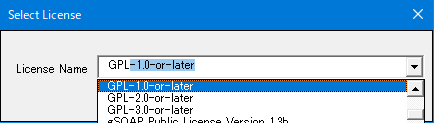
When selected, the logical decomposition data will be displayed.
Adding a comment
It is possible to add comments to the license. This function can be used to give a warning message to the developers when the company wants them to use this tool.
(1) Enter a comment for the license in the Comment(EN) field of the licenses sheet.
(2) In the viewer(EN) sheet, comments are now displayed when selecting a license.
License Policy
By registering a confirmed license, a warning message can be given when an unconfirmed license is selected.
(1) Enter the license name for management as a confirmed license in the License Name (Original) field of the licenses sheet.
(2) In the "Unconfirmed_License" field of the setting sheet, enter a comment to remind developers when he selects an unconfirmed license.
(3) In the viewer(EN) sheet, if an unconfirmed license is selected, a comment will be displayed.
Alert coloring
You can add comments and colors to alert for obligation. The three levels of alert are as follows:
- 1 (High importance)
- 2 (Medium importance)
- 3 (Low importance)
The configuration procedure is as follows.
(1) Set the importance level of the condition on the conditions sheet and the importance level of the disclaimers on the notices sheet.
(2) Set a comment for each of "Alert_HIGH", "Alert_MIDDLE", and "Alert_LOW" on the setting sheet.
(3) On the viewer(EN) sheet, the "Legend" will be displayed. The background of the cell will also change when the conditions and disclaimers that have been set as alerts are displayed.
Finally
Tomorrow, Mr. Kobota will introduce the contents of chapter 3.4 in OpenChain. Be sure to check out the OpenChain Japan Advent Calendar 2020 tomorrow and beyond!