KerasからTensorflow Backendで作ったCNNをTensorflowから使う
KerasはTensorflowやTheano、CNTKをバックエンドにしてニューラルネットワークを使うハイレベル・ライブラリです。
Kerasを使えばTensorflowやTheanoで冗長になるプログラムを簡易に書くことができます。
どのくらい簡易になるかというと、これくらいに簡易で短くなります。
他方で、TensorflowをバックエンドにしたKerasでトレーニングしたモデルをTensorflowの計算グラフとして出力することも可能です。
今回はCifar10のCNNをKerasでトレーニングして作ったモデルをTensorflow計算グラフにして使ってみたいと思います。
コード全文は以下にあります。
https://github.com/shibuiwilliam/Keras2TF
Tensorflow → Keras
まずはTensorflowバックエンドでKerasを使い、CNNをトレーニングします。
import os
os.environ["KERAS_BACKEND"] = "tensorflow"
kerasBKED = os.environ["KERAS_BACKEND"]
print(kerasBKED)

import keras
from keras.models import load_model
from keras.datasets import cifar10
from keras.models import Sequential
from keras.layers import Dense, Dropout, Activation, Flatten
from keras.layers import Conv2D, MaxPooling2D, InputLayer
from keras.callbacks import EarlyStopping, ModelCheckpoint
import os
import pickle
import numpy as np

# set parameters

batch_size = 32
num_classes = 10
epochs = 100
saveDir = "./cifar10/"
if not os.path.isdir(saveDir):
    os.makedirs(saveDir)

# get dataset

(x_train, y_train), (x_test, y_test) = cifar10.load_data()
print('x_train shape:', x_train.shape)
print(x_train.shape[0], 'train samples')
print(x_test.shape[0], 'test samples')
y_train = keras.utils.to_categorical(y_train, num_classes)
y_test = keras.utils.to_categorical(y_test, num_classes)

x_train = x_train.astype('float32')
x_test = x_test.astype('float32')
x_train /= 255
x_test /= 255

# define Keras model

model = Sequential()
model.add(Conv2D(32, (3, 3), padding='same', input_shape=x_train.shape[1:]))
model.add(Activation('relu'))
model.add(Conv2D(32, (3, 3)))
model.add(Activation('relu'))
model.add(MaxPooling2D(pool_size=(2, 2)))
model.add(Dropout(0.25))

model.add(Conv2D(64, (3, 3), padding='same'))
model.add(Activation('relu'))
model.add(Conv2D(64, (3, 3)))
model.add(Activation('relu'))
model.add(MaxPooling2D(pool_size=(2, 2)))
model.add(Dropout(0.25))
model.add(Flatten())

model.add(Dense(512))
model.add(Activation('relu'))
model.add(Dropout(0.5))
model.add(Dense(num_classes))
model.add(Activation('softmax'))

# optimization and compile

opt = keras.optimizers.adam()

model.compile(loss='categorical_crossentropy',
              optimizer=opt,
              metrics=['accuracy'])

# load pre-trained model

model.load_weights(os.path.join(saveDir, "Cifar10_convert.08-0.58-0.64.hdf5"))

# callbacks

es_cb = EarlyStopping(monitor='val_loss', patience=2, verbose=1, mode='auto')
chkpt = os.path.join(saveDir, 'Cifar10_convert.{epoch:02d}-{loss:.2f}-{val_loss:.2f}.hdf5')
cp_cb = ModelCheckpoint(filepath = chkpt, monitor='val_loss', verbose=1, save_best_only=True, mode='auto')

# train

history = model.fit(x_train, y_train,
                    batch_size=batch_size,
                    epochs=epochs,
                    verbose=1,
                    validation_data=(x_test, y_test),
                    callbacks=[es_cb, cp_cb],
                    shuffle=True)


# evaluate test data

score = model.evaluate(x_test, y_test, verbose=0)
print('Test loss:', score[0])
print('Test accuracy:', score[1])
この辺はなんら工夫もなく、Kerasの普通の使い方です。
あまり精度の良いモデルではないですが、今回はモデルを改良することが目的ではないので、このまま進みましょう。
次は、トレーニングで作られたKerasモデルを使ってTensorflowモデルを生成します。
Keras → Tensorflow
KerasはTensorflow同様、セッションで操作が管理されます。
Tensorflowのように明示的にセッションを利用することはありませんが、Keras.backendのget_session()やset_session()でセッションを呼び出すことが可能です。
そしてget_session()で呼び出してみると、あら不思議。実はKerasのセッションはTensorflowのセッションであることがわかります。
というわけで、Keras.backendで取得したセッションをTensorflowセッションとして扱い、Tensorflowのライブラリを使っていくことができるようになっています。
KerasのTensorflow Backendのコードを読むと、Tensorflowセッション含めてTensorflowのライブラリをラッピングしていることがわかります。
https://github.com/fchollet/keras/blob/master/keras/backend/tensorflow_backend.py
それではKerasのCNNモデルをTensorflowから呼び出せるようにしましょう。
まずはKerasセッションを取得し、Tensorflowの計算グラフに変換します。
# load tensorflow and keras backend
import tensorflow as tf
from tensorflow.python.framework import graph_util
from tensorflow.python.framework import graph_io
from keras import backend as K
ksess = K.get_session()
print(ksess)

# transform keras model to tensorflow graph
# the output will be json-like format
K.set_learning_phase(0)
graph = ksess.graph
kgraph = graph.as_graph_def()
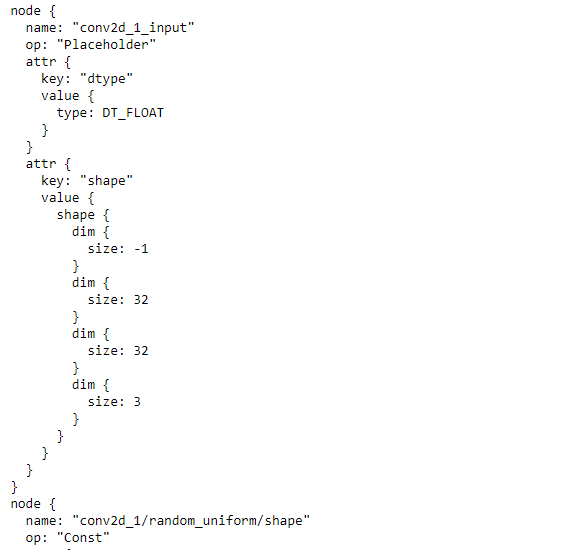
print(kgraph)
json形式で計算グラフを出力できました。
これをTensorflowで実行できるようにします。
変数を定数に変換し、使いまわせるようにモデルを保存します。
# define output node
num_output = 1
prefix = "output"
pred = [None]*num_output
outputName = [None]*num_output
for i in range(num_output):
    outputName[i] = prefix + str(i)
    pred[i] = tf.identity(model.get_output_at(i), name=outputName[i])
print('output name: ', outputName)

# convert variables in the model graph to constants
constant_graph = graph_util.convert_variables_to_constants(ksess, ksess.graph.as_graph_def(), pred_node_names)

# save the model in .pb and .txt
output_dir = "./"
output_graph_name = "keras2tf.pb"
output_text_name = "keras2tf.txt"
graph_io.write_graph(constant_graph, output_dir, output_graph_name, as_text=False)
graph_io.write_graph(constant_graph, output_dir, output_text_name, as_text=True)
print('saved graph .pb at: {0}\nsaved graph .txt at: {1}'.format(
        os.path.join(output_dir, output_graph_name),
        os.path.join(output_dir, output_text_name)))
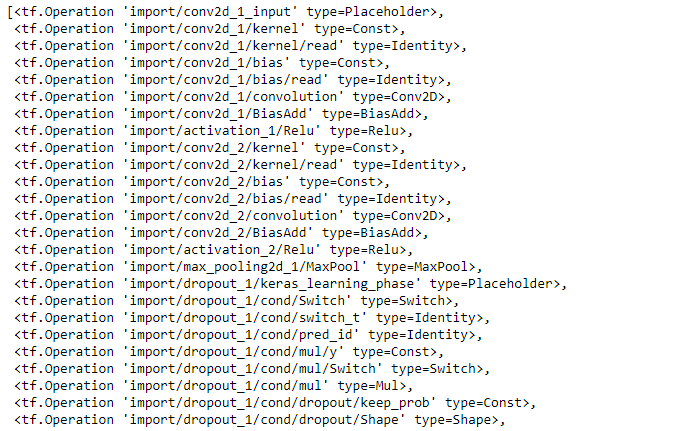
保存したpbファイルをロードし、TF.operationを表示します。
# load the previously saved graph

def load_graph(model_file):
    graph = tf.Graph()
    graph_def = tf.GraphDef()

    with open(model_file, "rb") as f:
        graph_def.ParseFromString(f.read())
    with graph.as_default():
        tf.import_graph_def(graph_def)
    return graph
tfmodel = load_graph(os.path.join(output_dir, output_graph_name))

# print operations in the model, in tf.Operation format

opers = tfmodel.get_operations()
opers
以下に出力されたように、OperationsにCNNモデルが定義されていることがわかります。
最後にこのモデルを使ってみましょう。
入力層と出力層を定義し、学習/テストフェーズをテストフェーズ(0)に設定して、TF.Session()で実行します。
# define the input layer, learning phase and output layer

inLayer = tfmodel.get_operation_by_name('import/conv2d_1_input')
learnPhase = tfmodel.get_operation_by_name('import/dropout_1/keras_learning_phase')
outLayer = tfmodel.get_operation_by_name('import/output0')

# use the model with test data to predict the label

with tf.Session(graph=tfmodel) as sess:
    results = sess.run(outLayer.outputs[0],
                       {inLayer.outputs[0]: x_test,
                        learnPhase.outputs[0]: 0})
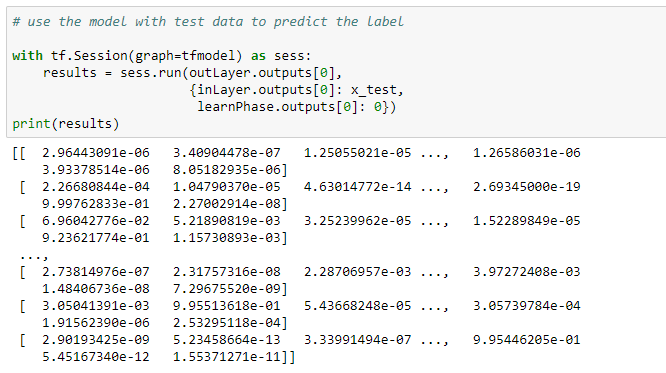
print(results)
判定結果はSoftmaxの確率値が出力となって表示されます。


