# はじめに
今回は、GraphQLとApolloServer v4を用いてSubscriptionの実装を行いました。
(v4になると記事がないので大変でした・・・)
備忘録として残しておこうと思います。
Subscriptionとは
まず、簡単にですが、Subscriptionとはサーバーに登録や更新処理などのイベントが発生するたびに、データを即時に更新(反映)できるというものです。
(結果整合性がとれるApollo Serverの機能のことです)
現実のサブスクの定期購入に近く、サーバーにサブスク登録されているクライアントにプッシュすることでデータを即時に更新することができるというものです。
(実際のコードを見るとしっくりくるはずです)
ライブラリの導入
以下のコマンドで必要なライブラリをインストールします。
yarn add graphql-ws ws @types/ws @graphql-tools/schema graphql-subscriptions cors @types/cors express
Subscriptionの有効化
まずは、Subscriptionを扱うために、HTTPサーバー・WebSocketサーバー・ApolloServerを作成していきます。
(この辺りは定形的なので、公式ドキュメントのまま進める方が確実です)
まずは、完成系のコードです。
import 'dotenv/config'

import { ApolloServer } from '@apollo/server'
import { expressMiddleware } from '@apollo/server/express4'
import { ApolloServerPluginDrainHttpServer } from '@apollo/server/plugin/drainHttpServer'
import { GraphQLFileLoader } from '@graphql-tools/graphql-file-loader'
import { loadSchemaSync } from '@graphql-tools/load'
import { addResolversToSchema } from '@graphql-tools/schema'
import { PrismaClient } from '@prisma/client'
import bodyParser from 'body-parser'
import cors from 'cors'
import express from 'express'
import { PubSub } from 'graphql-subscriptions'
import { useServer } from 'graphql-ws/lib/use/ws'
import { createServer } from 'http'
import { join } from 'path'
import { WebSocketServer } from 'ws'

import { user } from './resolvers/Link'
import { login, post, singUp } from './resolvers/Mutation'
import { feed } from './resolvers/Query'
import { links } from './resolvers/User'
import type { Context } from './types/Context'
import { getUserId } from './utils'

const PORT = 4000
const pubsub = new PubSub()

const prisma = new PrismaClient()

const app = express()

const schema = loadSchemaSync(join(__dirname, './schema.graphql'), {
  loaders: [new GraphQLFileLoader()],
})

// リゾルバー関数
const resolvers = {
  Query: {
    feed: feed,
  },

  Mutation: {
    signUp: singUp,
    login: login,
    post: post,
  },

  Subscription: {
    newLink: {
      subscribe: () => pubsub.asyncIterator('NEW_LINK'),
    },
  },

  Link: {
    user: user,
  },

  User: {
    links: links,
  },
}

const schemaWithResolvers = addResolversToSchema({ schema, resolvers })

const httpServer = createServer(app)

const wsServer = new WebSocketServer({
  server: httpServer,
  path: '/graphql',
})

const serverCleanup = useServer({ schema: schemaWithResolvers }, wsServer)

const server = new ApolloServer<Context>({
  schema: schemaWithResolvers,
  plugins: [
    ApolloServerPluginDrainHttpServer({ httpServer }),

    {
      async serverWillStart() {
        return {
          async drainServer() {
            await serverCleanup.dispose()
          },
        }
      },
    },
  ],
})

;(async () => {
  try {
    await server.start()

    app.use(
      '/graphql',
      cors<cors.CorsRequest>(),
      bodyParser.json(),
      expressMiddleware(server, {
        context: async ({ req }) => ({
          ...req,
          prisma,
          pubsub,
          userId: req && req.headers.authorization ? getUserId(req) : undefined,
        }),
      })
    )

    httpServer.listen(PORT, () => {
      console.log(`🚀 Query endpoint ready at http://localhost:${PORT}/graphql`)
      console.log(
        `🚀 Subscription endpoint ready at ws://localhost:${PORT}/graphql`
      )
    })
  } catch (error) {
    console.error('Error starting server: ', error)
  }
})()
順に解説します。
GraphQLスキーマ・リゾルバーの定義
const PORT = 4000
const pubsub = new PubSub()

const prisma = new PrismaClient()

const app = express()

const schema = loadSchemaSync(join(__dirname, './schema.graphql'), {
  loaders: [new GraphQLFileLoader()],
})

// リゾルバー関数
const resolvers = {
  Query: {
    feed: feed,
  },

  Mutation: {
    signUp: singUp,
    login: login,
    post: post,
  },

  Subscription: {
    newLink: {
      subscribe: () => pubsub.asyncIterator('NEW_LINK'),
    },
  },

  Link: {
    user: user,
  },

  User: {
    links: links,
  },
}
PubSubインスタンスは後で解説するので、ここでは割愛します。
この辺はexpressの格納とスキーマ・リゾルバーの定義をしているという一般的な処理です。
ちなみに、スキーマは以下となります。
type Query {
  feed: [Link]!
}

type Mutation {
  post(url: String!, description: String!): Link!
  signUp(email: String!, password: String!, name: String!): AuthPayload
  login(email: String!, password: String!): AuthPayload
}

type Subscription {
  newLink: Link
}

type Link {
  id: ID!
  description: String!
  url: String!
  user: User
}

type User {
  id: ID!
  name: String!
  email: String!
  links: [Link!]!
}

type AuthPayload {
  token: String
  user: User
}
スキーマではSubscriptionのnewLinkがLink型で返されるように定義しています。
Subscriptionの処理の詳細についての解説は後ほどします。
HTTPサーバー作WebSocketサーバーの作成
以下がそのコードです。
const schemaWithResolvers = addResolversToSchema({ schema, resolvers })

const httpServer = createServer(app)

const wsServer = new WebSocketServer({
  server: httpServer,
  path: '/graphql',
})

const serverCleanup = useServer({ schema: schemaWithResolvers }, wsServer)
まず、公式と違う点が1つあります。それが以下です。
公式だとschemaWithResolversの部分が以下のようになっています。
const schema = makeExecutableSchema({ typeDefs, resolvers });
私の場合、外部ファイルのスキーマを使用しているため、addResolversToSchemaを使用しています。
ここでは、スキーマとリゾルバーを一緒にして提供できるという認識で良いです。
次にcreateServerでHTTPサーバーを作成します。
ここでappを渡し、ExpressがHTTPサーバーで起動するようにします。
次にWebSocketサーバーですが、WebSocketサーバーはSubscriptionサーバーとして使用します。また、serverにhttpServerを指定することで、HTTPサーバーと同じネットワークポートでWebSocketサーバーを起動させることができます。
つまり、HTTPサーバーとの共存が可能になるということです。
さらに、HTTPサーバーと同じエンドポイントにするため、pathに/graphql`を渡し、作成します。
useServerでWebSocketを介したGraphQLのSubscription扱うことができるようになります。
Apollo Server作成
次にApollo Serverの立ち上げを行います。
const server = new ApolloServer<Context>({
  schema: schemaWithResolvers,
  plugins: [
    ApolloServerPluginDrainHttpServer({ httpServer }),

    {
      async serverWillStart() {
        return {
          async drainServer() {
            await serverCleanup.dispose()
          },
        }
      },
    },
  ],
})
ここでもGraphQLスキーマとリゾルバーを渡します。
重要なのがpluginsです。
pluginsでApollo Serverの動作をカスタマイズできます。ここでは、Apollo Serverを立ち上げるために、HTTPサーバーとWebSocketサーバーをシャットダウンしています。
ApolloServerPluginDrainHttpServerでは、HTTPサーバーがシャットダウンする際に、進行中のリクエストが完了するのを待つためのプラグインです。
serverWillStartでは、サーバーが起動する直前に実行されるロジックを定義できます。またdrainServerでは、serverClenaup.dispose()を呼び出し、サーバーが終了する際にクリーンアップ処理が行われるようにしています。
HTTPサーバー起動
;(async () => {
  try {
    await server.start()

    app.use(
      '/graphql',
      cors<cors.CorsRequest>(),
      bodyParser.json(),
      expressMiddleware(server, {
        context: async ({ req }) => ({
          ...req,
          prisma,
          pubsub,
          userId: req && req.headers.authorization ? getUserId(req) : undefined,
        }),
      })
    )

    httpServer.listen(PORT, () => {
      console.log(`🚀 Query endpoint ready at http://localhost:${PORT}/graphql`)
      console.log(
        `🚀 Subscription endpoint ready at ws://localhost:${PORT}/graphql`
      )
    })
  } catch (error) {
    console.error('Error starting server: ', error)
  }
})()
まず、Apollo Serverを起動します。
その際に、HTTPサーバーとWebSocketサーバーは起動しないようにするため、先ほどのpluginで定義した処理を行います。
続いて、HTTPサーバーのエンドポイントはCORSの定義、JSON使用の宣言・contextの定義をしています。
Contextはリクエスト全体で使用できる値を定義できるものです。例えば、Mutation等で引数にContextをとり、context.prismaを取得することで、context.prisma.createなどのDB操作を行えたりします。
Contextについては、別の記事で解説しているので、そちらを参照してください。
Subscription処理の実装
最初の方にでてきましたが、以下の部分で行なっています。
Subscription: {
    newLink: {
      subscribe: () => pubsub.asyncIterator('NEW_LINK'),
    },
  },
PubSubインスタンスのasyncIteratorにトリガーとなる文字列を渡すことで、subscriptionの定義ができます。
ここでは、購読者を定義しています。
つまり、データの登録や更新などのイベントがあった際に、実際にリアルタイムでLink型のデータを取得するようにしています。
実際にSubscriptionが実行されるイベント処理ですが、以下のpost関数になります。
export const post = async (
  _: unknown,
  args: { description: string; url: string },
  context: Context
) => {
  const { userId } = context

  const newLink = await context.prisma.link.create({
    data: {
      url: args.url,
      description: args.description,
      user: { connect: { id: userId as number } },
    },
  })

  // サブスクリプション送信(第一引数:トリガー名 / 第二引数:渡したい値)
  context.pubsub.publish('NEW_LINK', { newLink })

  return newLink
}
以下の記述のようにトリガー名をNEW_LINKとしてpublishすることで、NEW_LINKを持つSubscriptionにnewLinkオブジェクトが渡り、newLinkが登録された瞬間にリアルタイムでデータを取得することができます。
(購読者にサービスを渡すという一般的なサブスクに当てはめるとわかりやすいかもです)
context.pubsub.publish('NEW_LINK', { newLink })
挙動確認
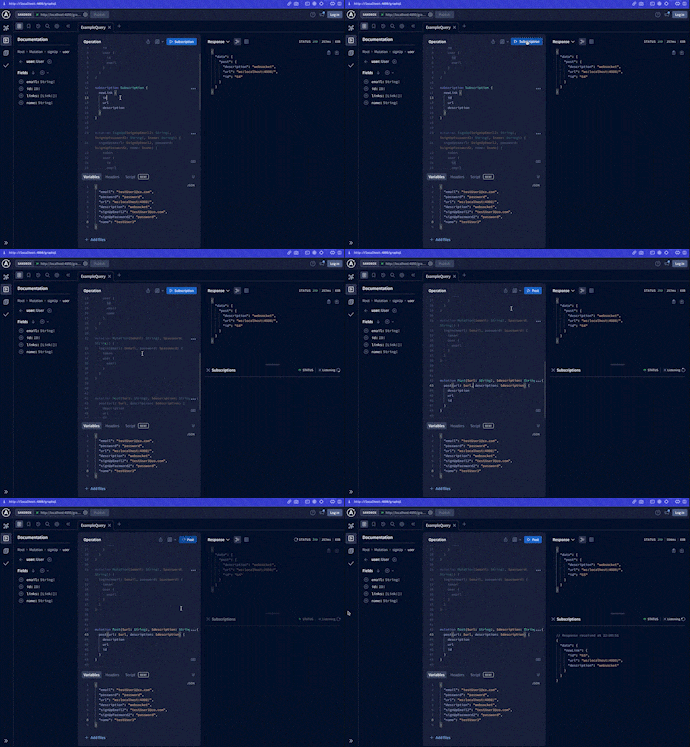
実際の挙動は以下のようになります。
見づらいのですが、最初にSubscriptionを実行する(右画面の下の部分)と「Listnening」状態になり、postを実行したら、データをリアルタイムで取得していることがわかると思います。

以上でSubscriptionの実装は完了です。