ネットを探しても、なかなか見つからないDrop Zoneからの画像アップロード方法。
最近Shopifiyアプリが、Next.jsで作成できるようになった。
jsだけで、フロントもバックエンドも作成できる。
Shopify App CLI (Github)
https://github.com/Shopify/shopify-app-cli
Shopify App CLIでコマンドから簡単にデプロイできるのは、herokuだけ。
heroku
https://jp.heroku.com/
Next.jsで、Shopify Polaris Drop Zone コンポーネントを使用して、AWS S3への画像のアップロードのサンプルを作成した。
このサンプルは、S3へブラウザからダイレクトにアップロードされる。
サーバー側は、 S3へのアップロード用の署名付きURLを発行して、返すだけ。
画像は、サーバーを通さないので、負荷がない。
ライブラリ
Shopify App CLIで作成した、node.jsのアプリケーションに、画像アップロード機能を追加。
Shopify App CLI (Github)
https://github.com/Shopify/shopify-app-cli
Shopify Polaris Drop Zone
https://polaris.shopify.com/components/actions/drop-zone
サンプル(Github)
設定
ダウンロード
yarn
環境設定
.env.exampleをコピーして.envファイルを作成
項目を埋める
SHOPIFY_API_KEY=YOUR_SHOPIFY_API_KEY
SHOPIFY_API_SECRET=YOUR_SHOPIFY_SECRET
HOST=YOUR_TUNNEL_URL
SHOP=my-shop-name.myshopify.com
SCOPES=read_products
AWS_ACCESS_KEY_ID=xxxxx
AWS_SECRET_ACCESS_KEY=yyyy
BUCKET=S3 BUCKET Name
S3のCORSの設定
ShopifyアプリからS3にアップロードできるように。
(本番環境では、AllowedOriginを設定する)
<?xml version="1.0" encoding="UTF-8"?>
<CORSConfiguration xmlns="http://s3.amazonaws.com/doc/2006-03-01/">
    <CORSRule>
        <AllowedOrigin>*</AllowedOrigin>
        <AllowedMethod>GET</AllowedMethod>
        <AllowedMethod>PUT</AllowedMethod>
        <MaxAgeSeconds>3000</MaxAgeSeconds>
        <AllowedHeader>*</AllowedHeader>
    </CORSRule>
</CORSConfiguration>
開発環境 スタート
shopify serve

画像のアップロード
画像を選択して、Drop Zoneへドラッグアンドドロップする。

アップロードされたファイルが、Drop Zoneへサムネイル画像付きで表示される
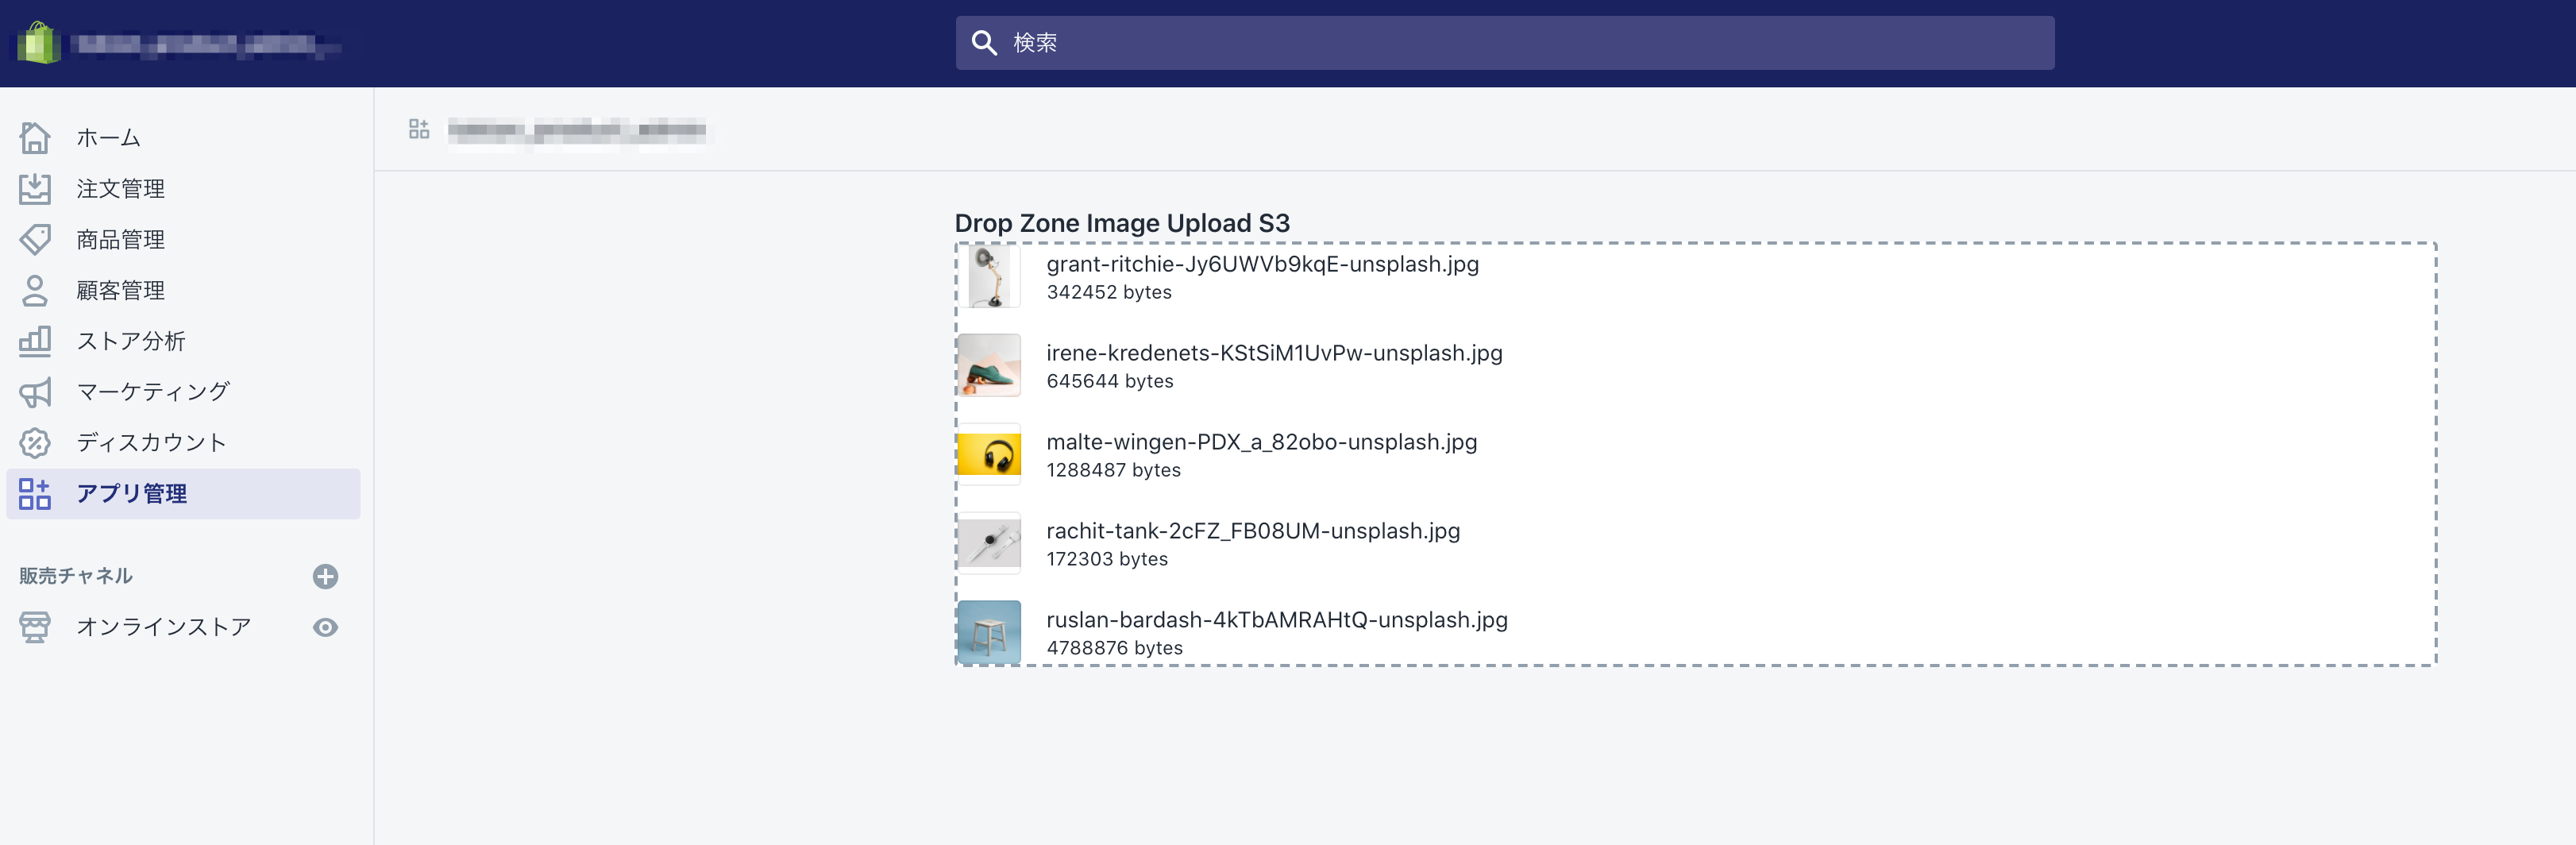
S3にファイルがアップロードされる。

バックエンド
server.js
S3へのアップロード用の署名付きURLを返す
  router.get("/api/upload-image", verifyRequest(), async (ctx) => {
    const url = await uploadImage(ctx.query)
    ctx.res.statusCode = 200
    ctx.res.setHeader("Content-Type", "application/json")
    ctx.res.end(JSON.stringify({ url: url }))
  })
upload-image.js
S3へのアップロード用の署名付きURLを作成
const aws = require("aws-sdk")
const AWS_ACCESS_KEY_ID = process.env.AWS_ACCESS_KEY_ID
const AWS_SECRET_ACCESS_KEY = process.env.AWS_SECRET_ACCESS_KEY
const BUCKET = process.env.BUCKET

aws.config.update({
  region: "ap-northeast-1",
  accessKeyId: AWS_ACCESS_KEY_ID,
  secretAccessKey: AWS_SECRET_ACCESS_KEY,
})

export default async (file) => {
  const s3 = new aws.S3()
  const params = {
    Bucket: BUCKET,
    Key: file.fileName,
    Expires: 60,
    ContentType: file.fileType,
  }

  return new Promise((resolve, reject) => {
    s3.getSignedUrl("putObject", params, (err, url) => {
      if (err) {
        reject(err)
      }
      resolve(url)
    })
  })
}
フロントエンド
index.js
Drop ZoneをラップしたImageFileUploderを表示
import { Heading, Page } from "@shopify/polaris"
import React from "react"
import ImageFileUploder from "../components/ImageFileUploder"

const Index = () => {
  return (
    <Page>
      <Heading>Drop Zone Image Upload S3</Heading>

      <ImageFileUploder />

    </Page>
  )
}

export default Index
ImageFileUploder.js
Drop ZoneをラップしたImageFileUploder
import { Caption, DropZone, Stack, Thumbnail } from "@shopify/polaris"
import React, { useCallback, useState } from "react"
import axios from "axios"
const BUCKET = process.env.BUCKET

const ImageFileUploader = () => {
  const [files, setFiles] = useState([])

  const uploadImage = async (file) => {
    return axios
      .get("/api/upload-image", {
        params: {
          fileName: file.name,
          fileType: file.type,
        },
      })
      .then((res) => {
        const options = {
          headers: {
            "Content-Type": file.type,
          },
        }
        return axios.put(res.data.url, file, options)
      })
      .then((res) => {
        const { name } = res.config.data
        return {
          name,
          isUploading: true,
          url: `https://${BUCKET}.s3.amazonaws.com/${file.name}`,
        }
      })
  }
  const handleDropZoneDrop = useCallback(
    async (_dropFiles, acceptedFiles, _rejectedFiles) => {
      for (let i = 0; i < acceptedFiles.length; i++) {
        await uploadImage(acceptedFiles[i])
      }
      setFiles((files) => [...files, ...acceptedFiles])
    },
    []
  )

  const validImageTypes = ["image/gif", "image/jpeg", "image/png"]

  const fileUpload = !files.length && <DropZone.FileUpload />
  const uploadedFiles = files.length > 0 && (
    <Stack vertical>
      {files.map((file, index) => (
        <Stack alignment="center" key={index}>
          <Thumbnail
            size="small"
            alt={file.name}
            source={
              validImageTypes.indexOf(file.type) > 0
                ? window.URL.createObjectURL(file)
                : "https://cdn.shopify.com/s/files/1/0757/9955/files/New_Post.png?12678548500147524304"
            }
          />
          <div>
            {file.name} <Caption>{file.size} bytes</Caption>
          </div>
        </Stack>
      ))}
    </Stack>
  )

  return (
    <DropZone type="image" onDrop={handleDropZoneDrop}>
      {uploadedFiles}
      {fileUpload}
    </DropZone>
  )
}

export default ImageFileUploader
ImageFileUploder.js
画像のアップロード部分
サーバーへ、/api/upload-imageファイル名とファイルタイプを送信。
サーバーから、S3アップロード用の署名付きURLが返される
署名付きURLへ、画像をPUT。
  const uploadImage = async (file) => {
    return axios
      .get("/api/upload-image", {
        params: {
          fileName: file.name,
          fileType: file.type,
        },
      })
      .then((res) => {
        const options = {
          headers: {
            "Content-Type": file.type,
          },
        }
        return axios.put(res.data.url, file, options)
      })
      .then((res) => {
        const { name } = res.config.data
        return {
          name,
          isUploading: true,
          url: `https://${BUCKET}.s3.amazonaws.com/${file.name}`,
        }
      })
  }
サンプル(Github)
S3へブラウザからのダイレクトアップロードは、便利だ。