デバッグモードを追加する
- これまで動作確認のためにクランク角度センサ信号を生成したり、いろいろ面倒でした。

- 今回は、外部から電気信号を入力しなくても動作確認ができるよう、Speeduinoにデバッグ用コードを追加します。

- これにより、TunerStudioのユーザーインタフェースから、回転数やスロットルポジションセンサの値を変更できるようになります。

用意するもの
- Arduino Mega 2560マイコンボード(互換ボード)
ソースコードの修正
デバッグ用ヘッダーファイルの作成
- 回転数、センサ値をTunerStudioから入力するため、元のコードの関数を置換するdebug.hを新規作成します。
- 使用していないダミーパラメータを用いて、回転数やセンサ値を設定します。
- センサ電圧はArduinoのanalogRead()関数を置換して値を書き換えます。
- 回転数はクランク角センサの割込み処理ではなく、RPMを算出する関数getRPM()を置換します。
debug.h
//Debug code

# ifndef DEBUG_H
# define DEBUG_H

extern uint16_t (*getRPM)();

static uint16_t getRPM2(void)
{
	uint16_t val;
	if(configPage9.unused10_180 > 0){ // Debug
		val = configPage9.unused10_181*25;//Set RPM
		currentStatus.hasSync=1;
		toothLastToothTime=currentLoopTime+10;
		revolutionTime = 600000000L / (unsigned long)val;
	}else{
		val = getRPM();
	}
	return val;
}

static uint16_t analogRead2(int pin) //Debug
{
	int val = 0;
	if(configPage9.unused10_180 > 0){
		if(pin==pinTPS){
      		val = configPage9.unused10_182 * 4;
		}else if(pin==pinCLT){
      		val = configPage9.unused10_183 * 4;
		}else if(pin==pinIAT){
      		val = configPage9.unused10_184 * 4;
		}else if(pin==pinO2){
      		val = configPage9.unused10_185 * 4;
		}else if(pin==pinBat){
      		val = configPage9.unused10_186 * 4;
		}else if(pin==pinMAP){
      		val = configPage9.unused10_187 * 4;
		}else if(pin==pinBaro){
 			val = configPage9.unused10_188 * 4;
		}else{
 			val = analogRead(pin);
		}
	}else{
		val = analogRead(pin);
	}
    return val;
}

# define analogRead(pin) analogRead2(pin) //Debug
# define getRPM() getRPM2() //Debug
# endif // DEBUG_H
デバッグ用ヘッダーファイルの追加
speeduino.inoとsensors.inoに、debug.hをインクルードする文を追加します。![]()
speeduino.ino
/*
Speeduino - Simple engine management for the Arduino Mega 2560 platform
Copyright (C) Josh Stewart

This program is free software; you can redistribute it and/or
modify it under the terms of the GNU General Public License
as published by the Free Software Foundation; either version 2
of the License, or (at your option) any later version.

This program is distributed in the hope that it will be useful,la
but WITHOUT ANY WARRANTY; without even the implied warranty of
MERCHANTABILITY or FITNESS FOR A PARTICULAR PURPOSE.  See the
GNU General Public License for more details.

You should have received a copy of the GNU General Public License
along with this program; if not, write to the Free Software
Foundation, Inc., 51 Franklin Street, Fifth Floor, Boston, MA  02110-1301, USA.
*/

# ifndef UNIT_TEST  // Scope guard for unit testing

# include <stdint.h> //https://developer.mbed.org/handbook/C-Data-Types
//************************************************
# include "globals.h"
# include "speeduino.h"
# include "utils.h"
# include "table.h"
# include "scheduler.h"
# include "comms.h"
# include "cancomms.h"
# include "maths.h"
# include "corrections.h"
# include "timers.h"
//#include "display.h"
# include "decoders.h"
# include "idle.h"
# include "auxiliaries.h"
# include "sensors.h"
//#include "src/DigitalWriteFast/digitalWriteFast.h"
# include "errors.h"
# include "storage.h"
# include "scheduledIO.h"
# include "crankMaths.h"
# include "updates.h"
# include <EEPROM.h>
# if defined (CORE_TEENSY)
# include <FlexCAN.h>
# endif

//Add debug header!
# include "debug.h" //Debug
sensors.ino
/*
Speeduino - Simple engine management for the Arduino Mega 2560 platform
Copyright (C) Josh Stewart
A full copy of the license may be found in the projects root directory
*/
# include "sensors.h"
# include "crankMaths.h"
# include "globals.h"
# include "maths.h"
# include "storage.h"

//Add debug header!
# include "debug.h" //Debug
Tunerstudio設定ファイル(Speeduino.ini)の変更
メニューの追加
menu = "Tools"に、subMenu = Debug, "Debug" を追加します。
Speeduino.ini
  menuDialog = main
   menu = "Tools"
      subMenu = mapCal,           "Calibrate Pressure Sensors"
      subMenu = std_ms2gentherm,  "Calibrate Temperature Sensors", 0
      subMenu = std_ms2geno2,     "Calibrate AFR Sensor", 0
      subMenu = sensorFilters,    "Set analog sensor filters"
      subMenu = Debug,    "Debug"
ダイアログの追加
dialog = Debug, "Debug"以下の文を追加します。
Speeduino.ini
         field =    "kPa At 0.0 Volts",   EMAPMin,  { useEMAP }
         field =    "kPa At 5.0 Volts",   EMAPMax,  { useEMAP }

    dialog = Debug, "Debug"
	field = "Debug Switch(0:Off,>=1:On)",  unused10_181
	field = "Caution! Do not connect the real engine."
        slider = "RPM",                   unused10_182,  horizontal, { unused10_181 > 0 }
        slider = "Throttle Position",     unused10_183,  horizontal, { unused10_181 > 0 }
        slider = "Coolant Sensor",        unused10_184,  horizontal, { unused10_181 > 0 }
        slider = "Inlet Air Temp Sensor", unused10_185,  horizontal, { unused10_181 > 0 }
        slider = "O2 Sensor",             unused10_186,  horizontal, { unused10_181 > 0 }
        slider = "Battery Voltage",       unused10_187,  horizontal, { unused10_181 > 0 }
        slider = "MAP Sensor",            unused10_188,  horizontal, { unused10_181 > 0 }
        slider = "Baro Sensor",           unused10_189,  horizontal, { unused10_181 > 0 }

    dialog = sensorFilters, "Analog sensor filters"
        field = "The values here set the amount of filtering to apply to each analog input"
        field = "Higher values result in stronger filtering, but slower response times for readings"
        field = "#Most setups will NOT require changes to the default filter values"
ビルドとTunerStudioの起動
ビルド
Arduino IDEからソースコードをビルドし、TunerStudioを起動し、プロジェクトを開きます。
参考 (2)まずは動かしてみる
Speeduino.iniの読み込み
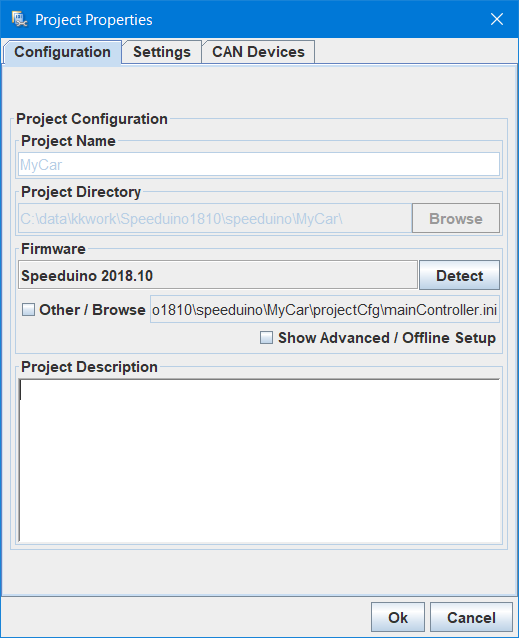
File>Vehicle Project>Project Propertiesより、Other/Browseをクリックし、上記で修正したspeeduino.iniを読み込みます。
動作確認
- Tools>Debugより、Debugダイアログを開き、Debug Switchを1に設定し、デバッグモードに切り替えます。
- 回転数を認識させるため、Arduino Megaを一度リセットします。
 デバックモードでは実エンジンを接続しないでください!
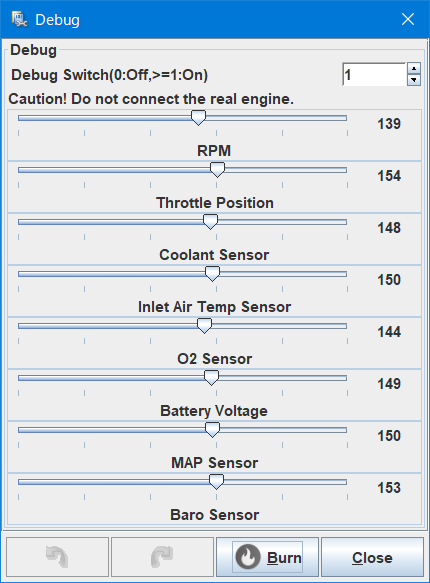
- スライダーで回転数、スロットルを変化させます。

最後に
- クランク角センサパルスやセンサ電圧を模擬するシミュレータを用いることも可能ですが、TunerStudioのユーザーインターフェースを利用することで、ソフトウエア上で回転数やセンサ値を変更できるようになりました。
- 次回は、デバッグモードを用いて、いろいろと制御を動かしてみる予定です。