はじめに
YesodはフルスタックのWeb Application Frameworkであるため、ログイン・ログアウトの機構を作成することのできる拡張可能なモジュールが提供されています。
Yesodでは基本的に Yesod.Auth モジュールとその拡張に乗っかった形で認証の機能を実装します。
ひな形
まずは、ひな形として以下のファイルを用意します。
stack.yaml:
resolver: lts-6.27

packages:
  - '.'

extra-deps:
  - load-env-0.1.1

flags: {}

extra-package-dbs: []
yesod-auth-sample.cabal:
name:              yesod-auth-sample
version:           0.1.0.0
cabal-version:     >= 1.8
build-type:        Simple

Flag dev
    Description:   Turn on development settings, like auto-reload templates.
    Default:       False

executable         yesod-auth-sample
    main-is:           yesod-auth-sample.hs
    hs-source-dirs:    .
    build-depends:     base
                     , yesod                         >= 1.4        && < 1.5
                     , yesod-core                    >= 1.4        && < 1.5
                     , yesod-auth                    >= 1.4        && < 1.5
                     , yesod-form                    >= 1.3        && < 1.5
                     , template-haskell
                     , text                          >= 0.11       && < 2.0
                     , shakespeare                   >= 2.0        && < 2.1
                     , http-conduit                  >= 2.1        && < 2.2
                     , data-default
                     , conduit                       >= 1.0        && < 2.0
                     , load-env

    ghc-options:       -threaded -O2
yesod-auth-sample.hs:
{-# LANGUAGE MultiParamTypeClasses #-}
{-# LANGUAGE OverloadedStrings     #-}
{-# LANGUAGE QuasiQuotes           #-}
{-# LANGUAGE TemplateHaskell       #-}
{-# LANGUAGE TypeFamilies          #-}
import           Data.Default                (def)
import           Data.Text                   (Text)
import           Network.HTTP.Client.Conduit (Manager, newManager)
import           Yesod
import           Yesod.Auth
import           Yesod.Auth.OpenId           (authOpenId, IdentifierType (Claimed))

data App = App
    { httpManager :: Manager
    }

mkYesod "App" [parseRoutes|
/ HomeR GET
/auth AuthR Auth getAuth
|]

instance Yesod App where
    -- Note: In order to log in with BrowserID, you must correctly
    -- set your hostname here.
    approot = ApprootStatic "http://localhost:3000"

instance YesodAuth App where
    type AuthId App = Text
    getAuthId = return . Just . credsIdent

    loginDest _ = HomeR
    logoutDest _ = HomeR

    authPlugins m =
        [ authOpenId Claimed []
        ]

    authHttpManager = httpManager

    -- The default maybeAuthId assumes a Persistent database. We're going for a
    -- simpler AuthId, so we'll just do a direct lookup in the session.
    maybeAuthId = lookupSession "_ID"

instance RenderMessage App FormMessage where
    renderMessage _ _ = defaultFormMessage

getHomeR :: Handler Html
getHomeR = do
    maid <- maybeAuthId
    defaultLayout
        [whamlet|
            <p>Your current auth ID: #{show maid}
            $maybe _ <- maid
                <p>
                    <a href=@{AuthR LogoutR}>Logout
            $nothing
                <p>
                    <a href=@{AuthR LoginR}>Go to the login page
        |]

main :: IO ()
main = do
    man <- newManager
    warp 3000 $ App man
上記ファイルを同じディレクトリに保存します。
% ls
yesod-auth-sample.cabal    stack.yaml
yesod-auth-sample.hs
stackを用いてビルドします。
% stack build
yesod-auth-sample-0.1.0.0: configure (exe)
Configuring yesod-auth-sample-0.1.0.0...
yesod-auth-sample-0.1.0.0: build (exe)
Preprocessing executable 'yesod-auth-sample' for yesod-auth-sample-0.1.0.0...
[1 of 1] Compiling Main             ( yesod-auth-sample.hs, .stack-work/dist/x86_64-linux/Cabal-1.22.4.0/build/yesod-auth-sample/yesod-auth-sample-tmp/Main.o )
Linking .stack-work/dist/x86_64-linux/Cabal-1.22.4.0/build/yesod-auth-sample/yesod-auth-sample ...
yesod-auth-sample-0.1.0.0: copy/register
Installing executable(s) in
/media/Data2/Gitrepo/yesod-authentication-example/.stack-work/install/x86_64-linux/lts-3.11/7.10.2/bin
起動してみます。
% stack exec yesod-auth-sample
20/Dec/2016:23:10:59 +0900 [Info#yesod-core] Application launched @(yesod_83PxojfItaB8w9Rj9nFdZm:Yesod.Core.Dispatch ./Yesod/Core/Dispatch.hs:157:11)
アクセスすると"Go to the login page"の文字が見えます。
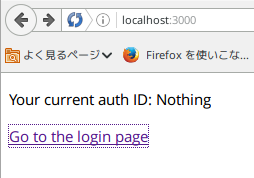
クリックすると、
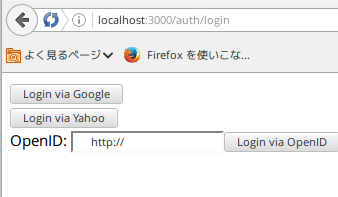
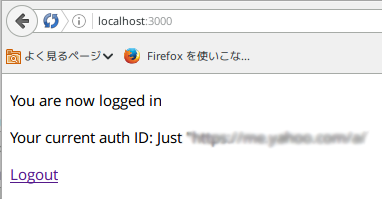
yahoo.comでOpenID認証を試みると、Top pageにリダイレクトされ、Justのあとの文字列にmaidが入ってきます。ここではぼかしを入れています。
Yesodの認証はOpenID以外にもGoogleEmail2等があります。なお、Yesod 1.2時代からYesodに慣れ親しんでいる方々にはおなじみの Yesod.Auth.BrowserID (Mozilla Persona) や Yesod.Auth.GoogleEmail は非推奨となり、既に認証に用いることができなくなっている事に注意してください。
GoogleEmail2
OpenIDでの認証ではユーザーのmaidに認証トークンが入ってくるため、メールアドレスによって管理者かそうでないかを分ける処理には不向きでしょう。GoogleEmail2ではmaidの情報としてメールアドレスが返ってきます。
それでは、GoogleEmail2を使って型だけを合わせてみます。この時点ではGoogleの認証基盤のクライアントIDとクライアントシークレットの情報が不足しているため、認証することはできません。
以下のように改変します。
diff --git a/yesod-auth-sample.hs b/yesod-auth-sample.hs
index 0a2a96c..3c5d0cd 100644
--- a/yesod-auth-sample.hs
+++ b/yesod-auth-sample.hs
@@ -8,8 +8,17 @@ import           Data.Text                   (Text)
 import           Network.HTTP.Client.Conduit (Manager, newManager)
 import           Yesod
 import           Yesod.Auth
+import           Yesod.Auth.GoogleEmail2
 import           Yesod.Auth.OpenId           (authOpenId, IdentifierType (Claimed))

+-- Replace with Google client ID.
+clientId :: Text
+clientId = ""
+
+-- Replace with Google secret ID.
+clientSecret :: Text
+clientSecret = ""
+
 data App = App
     { httpManager :: Manager
     }
@@ -33,6 +42,7 @@ instance YesodAuth App where

     authPlugins m =
         [ authOpenId Claimed []
+        , authGoogleEmail clientId clientSecret
         ]

     authHttpManager = httpManager
すると、ログインページにLogin via Googleのリンクが出現します。
Yesodの認証インターフェース
Yesodの認証周りはHackageのドキュメントによると、YesodAuth型クラスの authPlugins :: master -> [AuthPlugin master]メソッドの [AuthPlugin master] 部分に入り込む形で与えてやると良いことが分かります。
ここで、Yesod.Auth.OpenId と Yesod.Auth.GoogleEmail2 のドキュメントによると、authGoogleEmail 関数と authOpenId 関数はそれぞれ以下のシグネチャを持っています。
authGoogleEmail :: YesodAuth m
                => Text -- ^ client ID
                -> Text -- ^ client secret
                -> AuthPlugin m
authOpenId :: YesodAuth master
           => IdentifierType
           -> [(Text, Text)] -- ^ extension fields
           -> AuthPlugin master
どちらも AuthPlugin master を返す関数として実装されています。authPlugins関数にこれらのYesodの認証プラグインの情報を配列として渡すことで型が合うということが分かります。
発展編
ここまではYesodでの認証の仕組みのあらましを辿りました。実際のアプリケーションで認証に必要な情報をハードコートしてしまうのは望ましくありません。ここではdotenvと同等の機能を持ったload-envパッケージを用いて認証に必要な情報を実行時に取得することにします。
diff --git a/yesod-auth-sample.hs b/yesod-auth-sample.hs
index 3c5d0cd..ce3f086 100644
--- a/yesod-auth-sample.hs
+++ b/yesod-auth-sample.hs

@@ -10,17 +10,18 @@ import           Yesod
 import           Yesod.Auth
 import           Yesod.Auth.GoogleEmail2
 import           Yesod.Auth.OpenId           (authOpenId, IdentifierType (Claimed))
+import           LoadEnv
+import           System.Environment          (getEnv)
+import qualified Data.Text as T

--- Replace with Google client ID.
-clientId :: Text
-clientId = ""
-
--- Replace with Google secret ID.
-clientSecret :: Text
-clientSecret = ""
+data GoogleLoginKeys = GoogleLoginKeys
+    { googleLoginClientId :: Text
+    , googleLoginClientSecret :: Text
+    }

 data App = App
     { httpManager :: Manager
+    , googleLoginKeys :: GoogleLoginKeys
     }

 mkYesod "App" [parseRoutes|
@@ -42,7 +43,7 @@ instance YesodAuth App where

     authPlugins m =
         [ authOpenId Claimed []
-        , authGoogleEmail clientId clientSecret
+        , authGoogleEmail (googleLoginClientId $ googleLoginKeys m) (googleLoginClientSecret $ googleLoginKeys m)
         ]

     authHttpManager = httpManager
@@ -70,5 +71,15 @@ getHomeR = do

 main :: IO ()
 main = do
+    loadEnv -- load from .env
+    googleLoginKeys <- getGoogleLoginKeys
+
     man <- newManager
-    warp 3000 $ App man
+    warp 3000 $ App man googleLoginKeys
+      where
+        getGoogleLoginKeys :: IO GoogleLoginKeys
+        getGoogleLoginKeys = GoogleLoginKeys
+          <$> getEnvT "GOOGLE_LOGIN_CLIENT_ID"
+          <*> getEnvT "GOOGLE_LOGIN_CLIENT_SECRET"
+          where
+            getEnvT = fmap T.pack . getEnv
また、.envを以下のような形式で用意します。1
GOOGLE_LOGIN_CLIENT_ID=YOUR_CLIENT_ID
GOOGLE_LOGIN_CLIENT_SECRET=YOUR_CLIENT_SECRET
ここまでの変更を適用し、もう一度stackでビルドをしてみます。
% stack build
yesod-auth-sample-0.1.0.0: configure (exe)
Configuring yesod-auth-sample-0.1.0.0...
yesod-auth-sample-0.1.0.0: build (exe)
Preprocessing executable 'yesod-auth-sample' for yesod-auth-sample-0.1.0.0...
[1 of 1] Compiling Main             ( yesod-auth-sample.hs, .stack-work/dist/x86_64-linux/Cabal-1.22.4.0/build/yesod-auth-sample/yesod-auth-sample-tmp/Main.o )
Linking .stack-work/dist/x86_64-linux/Cabal-1.22.4.0/build/yesod-auth-sample/yesod-auth-sample ...
yesod-auth-sample-0.1.0.0: copy/register
Installing executable(s) in
/media/Data2/Gitrepo/yesod-authentication-example/.stack-work/install/x86_64-linux/lts-3.11/7.10.2/bin
GoogleEmail2経由でログインができればJustの中に入っているmaidの文字列がメールアドレスになっているはずです。
まとめ
Yesodの認証周りの解説を試みました。YesodのScaffoldによる解説とファイル一枚のスケルトンアプリケーションによる解説とどちらの方針で行うかを悩みましたが、説明を簡単にするためにファイル一枚のスケルトンアプリケーションでの解説としました。
実際のYesodアプリケーションに組み込んでみた実際の例はこちら2などがあります。
また、この解説に用いたコードのリポジトリはこちら3です。
-
YOUR_CLIENT_IDとYOUR_CLIENT_SECRETはGoogleのディベロッパーコンソールから取得した値に置き換えてください。 ↩
-
https://github.com/cosmo0920/Ahblog/compare/13c2691421...1b11b4d ↩