こちらの記事は古くなっています
NimBLEを使った方が安定していますのでこちらもご覧ください
NimBLEでESP32(M5StickC)にBLE HIDデバイスを接続する(複数デバイス対応) - Qiita
https://qiita.com/coppercele/items/4ce0e8858a92410c81e3
ESP32にBLE HIDデバイスを接続します。
Arduino BLEでのダイソーシャッター複数接続の動画上げました#ESP32 pic.twitter.com/RrSGO093vE
— もけ@ムギ㌠ (@coppercele) August 14, 2020
写真は恐らく日本で一番手軽に入手できるBLE HIDデバイスである
ダイソーで売られているスマートフォン用シャッターです(300円)
BLE HIDコントローラでBeetleC with M5StickC(ESP32)を操作してみました
やっと #BeetleC が届いたのでBLEのHIDコントローラと接続して操作してみました!
— もけ@ムギ㌠ (@coppercele) October 6, 2019
やはりこういう機敏な動作が求められる物は物理コントローラが最適ですね😀
BLEHIDデバイスとのつなぎ方はこちらですhttps://t.co/JrLvlGbC6R#M5Stack #M5StickC pic.twitter.com/CgUwL442Dz
Arduino-ESP32バージョン1.0.4を使用します
ArduinoIDEはインストールしてあるとします
ArduinoIDEのボードマネージャを開いてESP32ライブラリを1.0.4(最新)に更新します
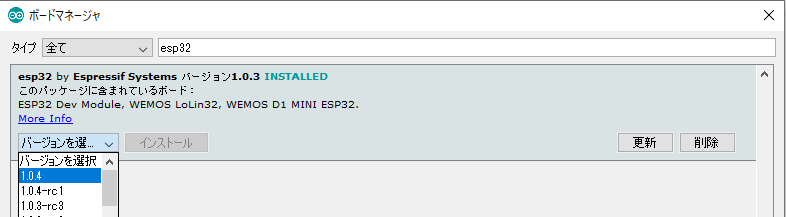
ボードの種類をESP32 Dev Moduleにします
※ESP32を使用しているならM5Stackなどでも動くはずです
追記
Arduino-ESP32 1.0.4で修正されました
※Arduino-ESP32 1.0.3BLEにはバグがあるので修正が必要です※
「void BLERemoteService::getCharacteristics(std::map* pCharacteristicMap)に構文ミスがある」
「BLEデバイスから取得したUUIDの先頭の0000が無くなる」
HIDのserviceUUIDは本来00001812-0000-1000-8000-00805f9b34fbですが、
ESP32が取得したUUIDには先頭の0000がありません。
現状のサンプルの実装(BLE_client.ino)ではServiceUUIDが複数のCharacteristicを持つことを意図していません
ダイソーシャッターやHIDコントローラーなどはHID(1812)にReportCharacteristic(2a4d)が複数存在するので
対応した処理を記述します
ライブラリ内部で使われてる変数のm_characteristicMapByHandleを
取得するためBLERemoteService::getCharacteristicsByHandle()を使用し、
pCharacteristicMapからCharactristicを検索して処理をします
static BLERemoteCharacteristic* pRemoteCharacteristic;
pRemoteCharacteristic = pRemoteService->getCharacteristic(charUUID);
以下略
↓
std::map<uint16_t, BLERemoteCharacteristic *> *pCharacteristicMap;
pCharacteristicMap = pRemoteService->getCharacteristicsByHandle();

for (auto itr = pCharacteristicMap->begin();
			itr != pCharacteristicMap->end(); ++itr) {

		if (itr->second->getUUID().equals(charUUID)) {
			Serial.print("CharUUID matched: ");
			Serial.println(itr->second->getUUID().toString().c_str());
			if (itr->second->canNotify()) {
				// ReportCharacteristicsはNotifyCallbackでデータを通信するため
				// Notify属性を持っているCharacteristicを登録する

				Serial.print("Notify registerd: ");
				Serial.println(itr->second->getUUID().toString().c_str());
				itr->second->registerForNotify(notifyCallback);
			}
		}
	}
複数デバイスに対応する
サンプルでは1つのデバイスにしか接続しないようになっていますので
複数のデバイスに接続できるように変更します
スキャンが終了すると
BLEAdvertisedDeviceCallbacks.onResult()
が見つかったデバイスの数だけ実行されます
HID UUID(0x1812)かチェックして該当すれば変数に格納するのですが、
複数あっても上書きされて最後のデバイスしか保持できていません
class MyAdvertisedDeviceCallbacks: public BLEAdvertisedDeviceCallbacks {
void onResult(BLEAdvertisedDevice advertisedDevice) {

  if (advertisedDevice.haveServiceUUID() && advertisedDevice.isAdvertisingService(serviceUUID)) {

    BLEDevice::getScan()->stop();
    myDevice = new BLEAdvertisedDevice(advertisedDevice);
   ↑ダイソーシャッターが複数存在すると上書きされる
そこでstd:vectorで複数デバイスを保持できるようにします
static BLEAdvertisedDevice *myDevice;
std::vector<BLEAdvertisedDevice*> myDevices;

class MyAdvertisedDeviceCallbacks: public BLEAdvertisedDeviceCallbacks {
  void onResult(BLEAdvertisedDevice advertisedDevice) {
    if (advertisedDevice.haveServiceUUID() && advertisedDevice.isAdvertisingService(serviceUUID)) {

//      BLEDevice::getScan()->stop();
      // stop()を実行するとその時点でonResult()が止まってしまい複数デバイスが取得できない
      myDevice = new BLEAdvertisedDevice(advertisedDevice);
      // 複数デバイスを保持する
      myDevices.push_back(myDevice);
      doConnect = true;
      doScan = true;

    } // Found our server
  } // onResult
};
複数デバイスを保持できるようになったところで
connectToServer()にて複数デバイスをNotifyCallbackに登録します
myDeviceをvectorに変えただけで基本的には同じです
bool connectToServer() {

  // 見つかったHIDデバイスの数を表示
  Serial.printf("myDevices=%d\n", myDevices.size());
  // デバイスの数だけループして登録する
  for (int i = 0; i < myDevices.size(); i++) {
    Serial.print("Forming a connection to ");
    Serial.println(myDevices.at(i)->getAddress().toString().c_str());

    BLEClient *pClient = BLEDevice::createClient();
    Serial.println(" - Created client");

    pClient->setClientCallbacks(new MyClientCallback());

    // Connect to the remove BLE Server.
    pClient->connect(myDevices.at(i));  // if you pass BLEAdvertisedDevice instead of address, it will be recognized type of peer device address (public or private)
    Serial.println(" - Connected to server");

    // Obtain a reference to the service we are after in the remote BLE server.
    BLERemoteService *pRemoteService = pClient->getService(serviceUUID);
    if (pRemoteService == nullptr) {
      Serial.print("Failed to find our service UUID: ");
      Serial.println(serviceUUID.toString().c_str());
      pClient->disconnect();
      return false;
    }
    Serial.println(" - Found our service");

    // 複数のCharacteristicを持つHIDの事は考慮されていないので
    // 複数のCharacteristicに対応した処理をする
    std::map<uint16_t, BLERemoteCharacteristic*> *pCharacteristicMap;
    pCharacteristicMap = pRemoteService->getCharacteristicsByHandle();
    // 引数なしのgetCharacteristics()は複数のCharacteristicを返してこないのでこちらを利用する
    if (pCharacteristicMap == nullptr) {
      Serial.println("pCharacteristicMap=null");
      return false;
    }

    for (auto itr = pCharacteristicMap->begin(); itr != pCharacteristicMap->end(); ++itr) {
      Serial.print("UUID: ");
      Serial.println(itr->second->getUUID().toString().c_str());
      if (itr->second->getUUID().equals(charUUID)) {
        Serial.print("CharUUID matched: ");
        Serial.println(itr->second->getUUID().toString().c_str());
        if (itr->second->canNotify()) {
          // ReportCharacteristicsはNotifyCallbackでデータを通信するため
          // Notify属性を持っているCharacteristicをすべて登録する
          Serial.print("Notify registerd: ");
          Serial.println(itr->second->getUUID().toString().c_str());
          itr->second->registerForNotify(notifyCallback);
        }
      }
    }


  }

  connected = true;
  return true;
}
BLE_client.inoを編集する
ArduinoIDEのスケッチ例からBLE_client.inoを開きます
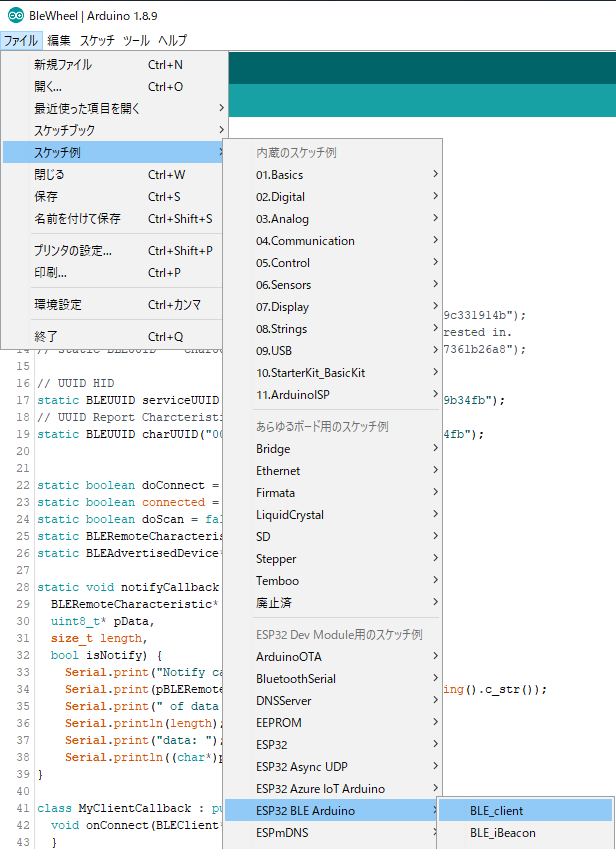
※別にBLE_client.inoじゃなくていいけど分かりやすくするため
~~
エディタ部分に以下のソースを上書きします
BLE_client.ino
# include "BLEDevice.h"

// UUID HID
static BLEUUID serviceUUID("00001812-0000-1000-8000-00805f9b34fb");
// UUID Report Charcteristic
static BLEUUID charUUID("00002a4d-0000-1000-8000-00805f9b34fb");

static boolean doConnect = false;
static boolean connected = false;
static boolean doScan = false;

static BLEAdvertisedDevice *myDevice;

std::vector<BLEAdvertisedDevice*> myDevices;

static void notifyCallback(BLERemoteCharacteristic *pBLERemoteCharacteristic, uint8_t *pData, size_t length, bool isNotify) {
  // ボタンを押すなどしてNotifyが実行されると呼び出される
  Serial.print("Notify callback for characteristic ");
  Serial.print(pBLERemoteCharacteristic->getUUID().toString().c_str());
  Serial.print(" of data length ");
  Serial.print(length);
  Serial.print(" Handle ");
  Serial.printf("%d\n",pBLERemoteCharacteristic->getHandle());

  Serial.print("data: ");
  for (int i = 0; i < length; i++) {
    // uint8_tを頭0のstringで表示する
    Serial.printf("%02X ", pData[i]);
  }
  Serial.println("");
}

class MyClientCallback: public BLEClientCallbacks {
  void onConnect(BLEClient *pclient) {
  }

  void onDisconnect(BLEClient *pclient) {
    connected = false;
    Serial.println("onDisconnect");
    ESP.restart();
  }
};

bool connectToServer() {

  Serial.printf("myDevices=%d\n", myDevices.size());
  for (int i = 0; i < myDevices.size(); i++) {
    Serial.print("Forming a connection to ");
    Serial.println(myDevices.at(i)->getAddress().toString().c_str());

    BLEClient *pClient = BLEDevice::createClient();
    Serial.println(" - Created client");

    pClient->setClientCallbacks(new MyClientCallback());

    // Connect to the remove BLE Server.
    pClient->connect(myDevices.at(i));  // if you pass BLEAdvertisedDevice instead of address, it will be recognized type of peer device address (public or private)
    Serial.println(" - Connected to server");

    // Obtain a reference to the service we are after in the remote BLE server.
    BLERemoteService *pRemoteService = pClient->getService(serviceUUID);
    if (pRemoteService == nullptr) {
      Serial.print("Failed to find our service UUID: ");
      Serial.println(serviceUUID.toString().c_str());
      pClient->disconnect();
      return false;
    }
    Serial.println(" - Found our service");

    // 複数のCharacteristicを持つHIDの事は考慮されていないので
    // 複数のCharacteristicに対応した処理をする
    std::map<uint16_t, BLERemoteCharacteristic*> *pCharacteristicMap;
    pCharacteristicMap = pRemoteService->getCharacteristicsByHandle();
    // 引数なしのgetCharacteristics()は複数のCharacteristicを返してこないのでこちらを利用する
    if (pCharacteristicMap == nullptr) {
      Serial.println("pCharacteristicMap=null");
      return false;
    }

    for (auto itr = pCharacteristicMap->begin(); itr != pCharacteristicMap->end(); ++itr) {
      Serial.print("UUID: ");
      Serial.println(itr->second->getUUID().toString().c_str());
      if (itr->second->getUUID().equals(charUUID)) {
        Serial.print("CharUUID matched: ");
        Serial.println(itr->second->getUUID().toString().c_str());
        if (itr->second->canNotify()) {
          // ReportCharacteristicsはNotifyCallbackでデータを通信するため
          // Notify属性を持っているCharacteristicをすべて登録する
          Serial.print("Notify registerd: ");
          Serial.println(itr->second->getUUID().toString().c_str());
          itr->second->registerForNotify(notifyCallback);
        }
      }
    }


  }
  connected = true;
  return true;
}
/**
 * Scan for BLE servers and find the first one that advertises the service we are looking for.
 */
class MyAdvertisedDeviceCallbacks: public BLEAdvertisedDeviceCallbacks {
  /**
   * Called for each advertising BLE server.
   */
  void onResult(BLEAdvertisedDevice advertisedDevice) {
    Serial.print("BLE Advertised Device found: ");
    Serial.println(advertisedDevice.toString().c_str());

    // We have found a device, let us now see if it contains the service we are looking for.
    if (advertisedDevice.haveServiceUUID() && advertisedDevice.isAdvertisingService(serviceUUID)) {

//      BLEDevice::getScan()->stop();
      myDevice = new BLEAdvertisedDevice(advertisedDevice);
      myDevices.push_back(myDevice);
      doConnect = true;
      doScan = true;

    } // Found our server
  } // onResult
};
// MyAdvertisedDeviceCallbacks

void setup() {
  Serial.begin(115200);
  Serial.println("Starting Arduino BLE Client application...");
  BLEDevice::init("");

  // Retrieve a Scanner and set the callback we want to use to be informed when we
  // have detected a new device.  Specify that we want active scanning and start the
  // scan to run for 5 seconds.
  BLEScan *pBLEScan = BLEDevice::getScan();
  pBLEScan->setAdvertisedDeviceCallbacks(new MyAdvertisedDeviceCallbacks());
  pBLEScan->setInterval(1349);
  pBLEScan->setWindow(449);
  pBLEScan->setActiveScan(true);
  pBLEScan->start(5, false);
} // End of setup.

// This is the Arduino main loop function.
void loop() {
  // If the flag "doConnect" is true then we have scanned for and found the desired
  // BLE Server with which we wish to connect.  Now we connect to it.  Once we are
  // connected we set the connected flag to be true.
  if (doConnect == true) {
    if (connectToServer()) {
      Serial.println("We are now connected to the BLE Server.");
    }
    else {
      Serial.println("We have failed to connect to the server; there is nothin more we will do.");
    }
    doConnect = false;
  }

  // If we are connected to a peer BLE Server, update the characteristic each time we are reached
  // with the current time since boot.
  if (connected) {
    // String newValue = "Time since boot: " + String(millis()/1000);
    // Serial.println("Setting new characteristic value to \"" + newValue + "\"");

    // // Set the characteristic's value to be the array of bytes that is actually a string.
    // pRemoteCharacteristic->writeValue(newValue.c_str(), newValue.length());
  }
  else if (doScan) {
    BLEDevice::getScan()->start(0);  // this is just eample to start scan after disconnect, most likely there is better way to do it in arduino
  }

  delay(1); // Delay a second between loops.
} // End of loop
コンパイルしてESP32に転送します。
HIDデバイスを接続待機状態にしてESP32を実行すると接続できます。
BLE Advertised Device found: Name: RKGAME
Forming a connection to 18:7a:93:48:d3:48
 - Created client
 - Connected to server
 - Found our service
(略)
Notify registerd: 00002a4d-0000-1000-8000-00805f9b34fb
We are now connected to the BLE Server.
- Connected to server
から進まないことがありますが何度かESP32をリセットすると接続できます。
また、ESP32のボード設定のCore Debug LevelをDebugにすると接続できることがあります(理由は不明)
自分はonDisconnect()内にesp_restart()を書いて接続できるまで自動で再起動するようにしています![]()
接続出来たらボタンを押すとnotifyCallback()が実行されてデータがシリアルコンソールに表示されます。

BLE HIDのServiceUUIDを出してるデバイスなら無差別でつなぐようになっているので
コントローラなど何でも繋がります。
複数接続にも対応したのでダイソーシャッターを複数用意しても接続できます
ちょっと見づらかったのでArduino BLEでのダイソーシャッター複数接続の動画上げ直しました#ESP32 pic.twitter.com/RrSGO093vE
— もけ@ムギ㌠ (@coppercele) August 14, 2020
ただこれ問題があってHandleが3個とも同じになるので個体の識別ができないんですよね・・・
NimBLEだとこんな感じでBLEアドレスが取れるんですけど
pRemoteCharacteristic->getRemoteService()->getClient()->getPeerAddress().toString()
Arduino BLEだとなぜかprivateだという・・・
class BLERemoteCharacteristic {
public:
(略)
private:

// Private member functions
BLERemoteService* getRemoteService();
↑こいつがprivateなのでアドレスが取れない
ライブラリを書き換えればいいんですけどそこまで要求するのも・・・
だれかプルリク出しておいてください(無責任)
実際に使う場合はnameかaddressで認識するとよいと思います。
デバイスがBluetoothいくつに対応してるかはこちらのサイトで調べられます
Launch Studio - Listing Search
https://launchstudio.bluetooth.com/Listings/Search
ただBluetooth4.0以上だからと言ってBLEで繋がらないデバイスもあるので油断しないようにしましょう🥺
あとはボタンごとのコードを調べて動作を書きましょう。
一例
const uint8_t BUTTON_TOP = 0x08;
const uint8_t BUTTON_BOTTOM = 0x01;
const uint8_t BUTTON_RIGHT = 0x02;
const uint8_t BUTTON_LEFT = 0x04;

const int INDEX_BUTTON = 2;
static void notifyCallback(
    BLERemoteCharacteristic *pBLERemoteCharacteristic,
    uint8_t *pData,
    size_t length,
    bool isNotify) {

    if (pData[INDEX_BUTTON] & BUTTON_TOP) {
        Serial.println("BUTTON TOP");
    }
    if (pData[INDEX_BUTTON] & BUTTON_BOTTOM) {
        Serial.println("BUTTON BOTTOM");
    }

    if (pData[INDEX_BUTTON] & BUTTON_RIGHT) {
        Serial.println("BUTTON RIGHT");
    }
    if (pData[INDEX_BUTTON] & BUTTON_LEFT) {
        Serial.println("BUTTON LEFT");
    }
}