【絶対にできる!】Googleログインボタンの実装【2/6】
本記事は、React × DjangoRESTFramework で Googleログインボタン を実装するチュートリアル
全6partのうちのpart2です
part1から読む場合はこちら
part0(導入偏)はこちら
Part2. バックエンド作成
0. 流れの理解
このパートの流れは以下の通りです。
- 仮想環境作成
- ライブラリインストール
- Djangoプロジェクト作成
- プロジェクトの設定変更
- 変数設定ファイル作成
- url作衛
- 初回migrate,superuser作成
- django-social-oauth Application作成
- DRF確認
1. 仮想環境作成
$ python -m venv tutorial
$ source tutorial/bin/activate
$ pip install --upgrade pip
2. 必要ライブラリインストール
- requirements.txtに記入
$ vi requirements.txt
django
djangorestframework
drf_social_oauth2
python-decouple
django-cors-headers
drf_social_oauth2 : DRFでソーシャルログインの機能を利用するために必要
python_decouple : .envファイルからデータを取り出すときに必要
django-cors-headers : reactとDjangoでのCORS連携に必要
- install実行
$ pip install -r requirements.txt

$ pip list
Package                Version
---------------------- --------
Django                 3.2.11
django-cors-headers    3.10.1
django-oauth-toolkit   1.7.0
djangorestframework    3.13.1
drf-social-oauth2      1.2.1
python-decouple        3.5
3. プロジェクト作成
$ django-admin startproject backend
$ cd backend
4. プロジェクト設定
- INSTALLED_APPS に ライブラリを追加
# Application definition

INSTALLED_APPS = [
    'django.contrib.admin',
    'django.contrib.auth',
    'django.contrib.contenttypes',
    'django.contrib.sessions',
    'django.contrib.messages',
    'django.contrib.staticfiles',

    # 以下追加
    'rest_framework',
    'drf_social_oauth2',
    'social_django',
    'oauth2_provider',
    'corsheaders',
]
- MIDDLEWARE にも追加
MIDDLEWARE = [
    'django.middleware.security.SecurityMiddleware',
    'django.contrib.sessions.middleware.SessionMiddleware',
    'django.middleware.common.CommonMiddleware',
    'django.middleware.csrf.CsrfViewMiddleware',
    'django.contrib.auth.middleware.AuthenticationMiddleware',
    'django.contrib.messages.middleware.MessageMiddleware',
    'django.middleware.clickjacking.XFrameOptionsMiddleware',

    # 以下追加
    'corsheaders.middleware.CorsMiddleware',
]
- CORS 設定追記
# React との CORS の設定

CORS_ALLOWED_ORIGINS = [
    "http://localhost:3000" # Reactはport:3000を利用
]
- TEMPLATES を以下の通り追加
TEMPLATES = [
    {
        'BACKEND': 'django.template.backends.django.DjangoTemplates',
        'DIRS': [],
        'APP_DIRS': True,
        'OPTIONS': {
            'context_processors': [
                'django.template.context_processors.debug',
                'django.template.context_processors.request',
                'django.contrib.auth.context_processors.auth',
                'django.contrib.messages.context_processors.messages',

                # 以下追加
                'social_django.context_processors.backends',
                'social_django.context_processors.login_redirect',
            ],
        },
    },
]
- REST framework 設定を追加
# REST framework 設定

REST_FRAMEWORK = {
    'DEFAULT_AUTHENTICATION_CLASSES': (
        'oauth2_provider.contrib.rest_framework.OAuth2Authentication',
        'drf_social_oauth2.authentication.SocialAuthentication',
    ),
}

AUTHENTICATION_BACKENDS = (
    # Google OAuth2 の認証バックエンド
    'social_core.backends.google.GoogleOAuth2',

    # Django REST framework の認証バックエンド
    'drf_social_oauth2.backends.DjangoOAuth2',

    # Django の認証バックエンド
    'django.contrib.auth.backends.ModelBackend',
)
- さらに、Google OAuth 関連設定追加
# decouple から config をインポート
from decouple import config

# Google から取得した鍵情報

SOCIAL_AUTH_GOOGLE_OAUTH2_KEY = config("SOCIAL_AUTH_GOOGLE_OAUTH2_KEY")
SOCIAL_AUTH_GOOGLE_OAUTH2_SECRET = config("SOCIAL_AUTH_GOOGLE_OAUTH2_SECRET")

# アクセススコープの設定

SOCIAL_AUTH_GOOGLE_OAUTH2_SCOPE = [
    'https://www.googleapis.com/auth/userinfo.email',
    'https://www.googleapis.com/auth/userinfo.profile',
]
- (オプション)言語設定
なにかと見やすいので日本語化しておく
# Internationalization
# https://docs.djangoproject.com/en/3.2/topics/i18n/

LANGUAGE_CODE = 'ja'

TIME_ZONE = 'Asia/Tokyo'
5. 変数設定ファイル作成
GoogleCloudで取得した認証情報のID,シークレットを変数として保存します
.envファイルを作成しましょう
※プロジェクトのルート(manage.py と同じ階層)に作成します
$ vi .env
SOCIAL_AUTH_GOOGLE_OAUTH2_KEY="499058585498-xxxxxxxxxxxx.apps.googleusercontent.com"
SOCIAL_AUTH_GOOGLE_OAUTH2_SECRET="GOCSxxxxxxxxxxxxnn3rV"
6. urlの設定
from django.contrib import admin
from django.urls import path, include # include追加

urlpatterns = [
    path('admin/', admin.site.urls),
    path('auth/', include('drf_social_oauth2.urls', namespace='drf')), # 追加
]
7. migrate, superuser作成
$ python manage.py migrate
$ python manage.py createsuperuser --email=your.email@gmail.com --username=admin
8. 管理ページ 設定
- サーバ起動
$ python manage.py runserver
http://127.0.0.1:8000/admin にアクセスし、作成した管理ユーザでログイン
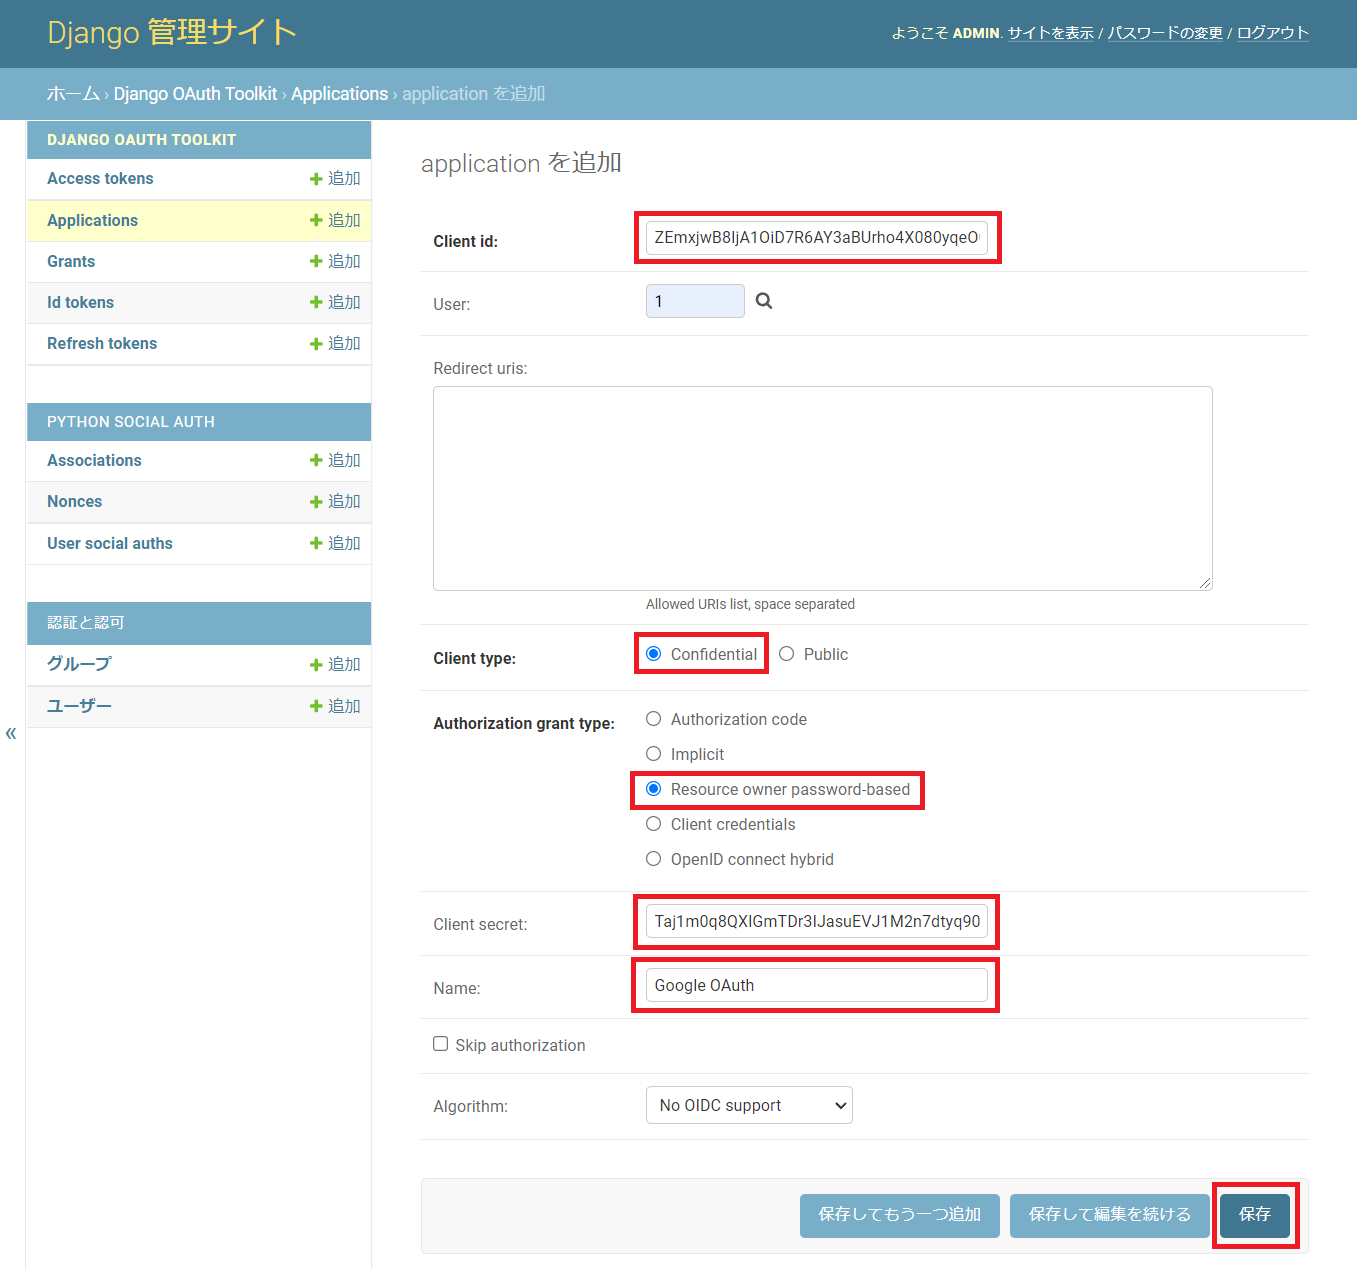
- Application を作成
Django OAuth Toolkit の Application を追加する
- 設定
-
Client id,Client secretの値は自動で作成されています 後ほど利用するのでどこかメモ帳に控えておきましょう(※値を変更しないよう注意してください) - その他以下の通り設定し、保存
- User : 1
- Client type : Confidental
- Authorization grant type : Resource owner password-based
- Name : 適当に入力(自分はGoogle OAuthにしました)
9. DRF確認
http://127.0.0.1:8000/auth/convert-token にアクセスしてみて、↓の画面が表示されればいったんOK!
Part2 終了
お疲れ様です
次のPartでフロントエンドの設定を行います


