はじめに
本記事で紹介するのは、「共通部分のみ特定のViewで切り出しておいて、中身のコンテンツは任意のものを表示するようにしたい」というケースに使えるテクニックです。
よくあるドロワー画面の作成を通じて上記の要求を実装していきます。
実現すること
- 特定のアクションを起点として画面の左側からスライドして表示・非表示が切り替わるViewを作成する
- 上記のViewの表示・非表示処理部分のみを共通化し、中身に何を表示するかは利用者側が任意に決めることができるようにする
成果物

// 利用サンプル
struct ContentView: View {
    @State private var isPresented: Bool = false

    var body: some View {
        ZStack {
            Button(action: { self.isPresented.toggle() }) {
                Text("Button")
            }

            DrawerView(isPresented: $isPresented) {
                SomeView()
            }
        }
    }
}
サンプルコード
DrawerViewの作成
まずは固定のコンテンツしか表示できないDrawerViewを作成します。
本記事は「View生成処理の一部を移譲する」という点の解説がメインなので、ここでの実装の詳細は解説しません。
ドロワー内に表示する画面を作る
struct ContentView: View {
    var body: some View {
        MenuView()
    }
}

struct MenuView: View {
    var body: some View {
        List {
            ForEach(0..<100) { number in
                Text("\(number)")
            }
        }
    }
}

ドロワーが開いている時に表示するマスクを追加する
struct ContentView: View {
    var body: some View {
        DrawerView()
    }
}

struct DrawerView: View {
    private struct MaskView: View {
        var body: some View {
            Rectangle()
                .background(Color.black)
                .opacity(0.2)
        }
    }

    var body: some View {
        GeometryReader { (geometry: GeometryProxy) in
            ZStack(alignment: .leading) {
                MaskView()

                MenuView()
                    .frame(width: 200)
                    .padding(geometry.safeAreaInsets) // コンテンツはSafeArea内に表示する
            }.edgesIgnoringSafeArea([.top, .bottom]) // マスクはSafeAreaを無視して表示する
        }
    }
}

ボタンで画面の出し入れができるようにする
struct ContentView: View {
    @State private var isPresentedDrawerView: Bool = false

    var body: some View {
        ZStack {
            Button(action: {
                // ボタンをタップするとドロワーを開く
                self.isPresentedDrawerView.toggle()
            }) {
                Text("Button")
            }

            DrawerView(isPresented: $isPresentedDrawerView)
        }
    }
}

struct DrawerView: View {
    // ...

    // 画面の表示状態をBindingで受け取り、表示元/DrawerView内どちらからでも開閉できるようにする
    @Binding var isPresented: Bool

    var body: some View {
        GeometryReader { (geometry: GeometryProxy) in
            ZStack(alignment: .leading) {
                // isPresentedがtrueの時のみ画面を表示する
                if self.isPresented {
                    MaskView()
                        .onTapGesture {
                            // マスクをタップするとドロワーを閉じる
                            self.isPresented = false
                        }

                    MenuView()
                        .frame(width: 200)
                        .padding(geometry.safeAreaInsets)
                        .background(Color.primary.colorInvert())
                }
            }
            .edgesIgnoringSafeArea([.top, .bottom])        }
    }
}

アニメーションをつける
struct DrawerView: View {
    // ...

    var body: some View {
        GeometryReader { (geometry: GeometryProxy) in
            ZStack(alignment: .leading) {
                if self.isPresented {
                    MaskView()
                        // 透明度を変化させるトランジションを指定
                        .transition(.opacity)
                        .onTapGesture {
                            self.isPresented = false
                        }

                    MenuView()
                        .frame(width: 200)
                        .padding(geometry.safeAreaInsets)
                        .background(Color.primary.colorInvert())
                        // 画面左側に移動するトランジションを指定
                        .transition(.move(edge: .leading))
                }
            }
            // レンダリング時にアニメーションが効くように指定
            .animation(.spring())
            .edgesIgnoringSafeArea([.top, .bottom])        }
    }
}

ここまでで最低限のDrawerViewの実装が完了しました![]()
コンテンツ生成部の切り出し
DrawerViewの実装が完了しましたが、ここで「MenuViewを直接DrawerViewの中で生成している」という点に気がつくと思います。
もしここでMenuViewの生成を外から指定することができれば、それ以外の実装は共通で使えるのではないか?という疑問が湧いてくるでしょう。
こういったケースでは ViewBuilder を利用することで コンテンツ生成部分だけ柔軟に変更 することが可能になります。
ViewBuilder
ViewBuilderは、公式ドキュメント にも記載されている通り、「クロージャーからビューを構築する」ためのパラメータAttributeです。
まとまったView生成処理を関数やイニシャライザに受け渡したい時に利用できます。
これは、Swift5.1で導入された @_functionBuilder の機能の上で作られたもので、以下のように定義されています。
@_functionBuilder public struct ViewBuilder {

    /// Builds an empty view from an block containing no statements, `{ }`.
    public static func buildBlock() -> EmptyView

    /// Passes a single view written as a child view (e..g, `{ Text("Hello") }`) through
    /// unmodified.
    public static func buildBlock<Content>(_ content: Content) -> Content where Content : View
}
FunctionBuilder
ではFunctionBuilderとは何なのでしょうか。
めちゃくちゃにざっくり表現すると↓のような感じです。
// こういう感じに書いていたのを
Function(引数1, 引数2, 引数3)

// こんな感じで書けるようになるもの
Function {
    引数1
    引数2
    引数3
}
例えば、「Stringの可変長引数を受け取り、全て半角スペースを付与した上でつなぎ合わせる」機能を持つ下記のような関数があるとします。
struct StringBuilder {
    static func buildBlock(_ strings: String...) -> String {
        strings.joined(separator: " ")
    }
}

StringBuilder.buildBlock("Hello", ",", "SwiftUI") // Hello , SwiftUI
これは、FunctionBuilderの機能を利用することで、下記のように記述することができるようになります。
JoinedString {
    "Hello"
    ","
    "SwiftUI"
}
// Hello , SwiftUI
実装の変更点は以下の通りです。
// 対象の関数を持つstructに `@_functionBuilder` 属性を付与する
- struct StringBuilder {
+ @_functionBuilder struct StringBuilder {
    static func buildBlock(_ strings: String...) -> String {
        strings.joined(separator: " ")
    }
}

// 引数としてstruct名に`@`をつけたアノテーション(@StringBuilder)を付与したクロージャを受け取る関数を定義する
// この時、クロージャの返り値の型を対象の関数の返り値の型と同じにしておく
+ struct JoinedString {
+     let buildResult: String
+
+     init(@StringBuilder builder: () -> String) {
+         buildResult = builder()
+     }
+ }
このように、FunctionBuilderを用いることで、
「クロージャ内に記述された改行ごとの値」を「@_functionBuilder内で定義された関数の引数」として受け渡すことができました。
実際にはコンパイラにより、単にbuildBlock関数を実行しているだけと解釈されます。
※ 現時点ではFunctionBuilderは非公式なものとして提供されているため、あまり積極的には使わない方が良いかもしれません。
ViewBuilderとの比較
ここで、これらのコードがSwiftUIでViewを宣言する時のコードと同じ構造をしていることに気がつくと思います。
@ViewBuilder は、今回作成した @StringBuilder と同様に、
「クロージャ内に記述された改行ごとのView」を「 @_functionBuilder 内で定義された関数の引数」として受け渡していただけということになります。
実際に両者を比較すると、Genericsを使っているなどの違いはあれど、その他はほぼ同じであることがわかるでしょう。
// ※ 比較しやすいように一部実際の定義から修正しています

// FunctionBuilderの定義
@_functionBuilder struct ViewBuilder {
    static func buildBlock<C0, C1>(_ c0: C0, _ c1: C1) -> TupleView<(C0, C1)> where C0 : View, C1 : View
}

// 定義したFunctionBuilderの利用
struct VStack<Content> : View where Content : View {
    init(alignment: HorizontalAlignment = .center, spacing: CGFloat? = nil, @ViewBuilder content: () -> Content)
}
// FunctionBuilderの定義
@_functionBuilder struct StringBuilder {
    static func buildBlock(_ strings: String...) -> String
}

// 定義したFunctionBuilderの利用
struct JoinedString {
    init(@StringBuilder builder: () -> String)
}
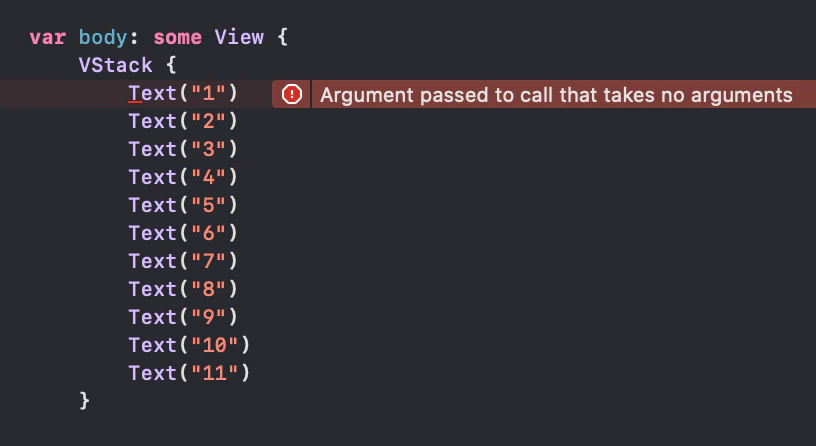
※ ちなみに、ViewBuilderのbuildBlockは現状10個までのViewを受け取れるように実装されているので、
それより多いViewを1つのブロックに渡すとコンパイルエラーが起きます。public static func buildBlock<C0, C1>(_ c0: C0, _ c1: C1) -> TupleView<(C0, C1)> where C0 : View, C1 : View // ... public static func buildBlock<C0, C1, C2, C3, C4, C5, C6, C7, C8, C9>(_ c0: C0, _ c1: C1, _ c2: C2, _ c3: C3, _ c4: C4, _ c5: C5, _ c6: C6, _ c7: C7, _ c8: C8, _ c9: C9) -> TupleView<(C0, C1, C2, C3, C4, C5, C6, C7, C8, C9)> where C0 : View, C1 : View, C2 : View, C3 : View, C4 : View, C5 : View, C6 : View, C7 : View, C8 : View, C9 : View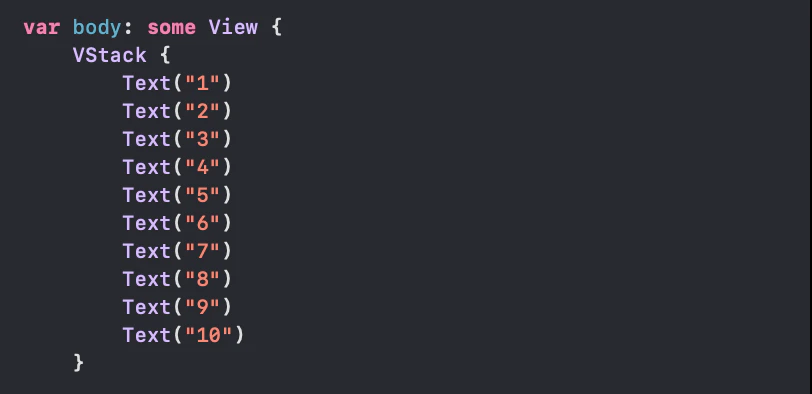
ViewBuilderの適用
それでは、ここからは実際にViewBuilderを利用していきます。
DrawerViewの「View生成処理の一部を外側から注入」できるように変更してみましょう。
※ FunctionBuilderは非公式の機能ですが、ViewBuilderは公式の機能です。
上記での解説の通り、@ViewBuilder を付与したクロージャをパラメータに受け取るように定義することで、
View生成のためのまとまった処理を、別のクラスに移譲することができるようになります。
struct DrawerView<Content>: View where Content: View {
    // ...

    @Binding private var isPresented: Bool
    private let content: () -> Content

    // イニシャライザでコンテンツのViewを生成する処理を受け取っておく
    init(isPresented: Binding<Bool>, @ViewBuilder content: @escaping () -> Content) {
        self._isPresented = isPresented
        self.content = content
    }

    // ...
}
また受け取ったクロージャはプロパティに保持しておき、bodyが評価されるタイミングで実行します
struct DrawerView<Content>: View where Content: View {
    // ...

    var body: some View {
        GeometryReader { (geometry: GeometryProxy) in
            ZStack(alignment: .leading) {
                if self.isPresented {
                    MaskView()
                        .transition(.opacity)
                        .onTapGesture {
                            self.isPresented = false
                        }

                    // 直接MenuViewを初期化していた部分を、引数で受け取ったクロージャを実行するように変更する。
                    // これにより、ここのView生成処理だけを外側から変更できるようになり、その他の処理は共通化される。
                    // MenuView()
                    //    .frame(width: 200)
                    self.content()
                        .padding(geometry.safeAreaInsets)
                        .background(Color.primary.colorInvert())
                        .transition(.move(edge: .leading))
                } else {
                    // ※ ViewBuilder内で@Stateを参照している場合、
                    // 非表示時も実行だけはしておかないと初期レンダリングがうまくいかない。
                    self.content()
                        .hidden()
                }
            }
            .animation(.spring())
            .edgesIgnoringSafeArea([.top, .bottom])        }
    }

    // ...
}
最後に、DrawerViewを利用する側でViewBuilderを受け渡してあげれば完成です。
struct ContentView: View {
    @State private var isPresentedDrawerView: Bool = false

    var body: some View {
        ZStack {
            Button(action: {
                self.isPresentedDrawerView.toggle()
            }) {
                Text("Button")
            }

            // DrawerView(isPresented: $isPresentedDrawerView)
            DrawerView(isPresented: $isPresentedDrawerView) {
                // このクロージャはViewBuilderなので、任意のViewを構築することができる
                // もちろんVStackなどを使ってさらに階層構造を深くしていくことも可能
                MenuView()
                    .frame(width: 200)
            }
        }
    }
}
完成
Drawer内のコンテンツを任意のものに簡単に変えることができるようになったので、
以下のように動的に中身を変更することも可能になりました![]()
struct ContentView: View {
    @State private var selectedEmoji: String = ""
    @State private var isPresentedDrawerView: Bool = false

    var body: some View {
        ZStack {
            VStack(spacing: 16) {
                ForEach(["😄", "😩", "🥺"], id: \.self) { emoji in
                    Button(action: {
                        self.selectedEmoji = emoji
                        self.isPresentedDrawerView = true
                    }) {
                        Text(emoji)
                            .font(Font.title)
                    }
                }
            }

            DrawerView(isPresented: $isPresentedDrawerView) {
                MenuView(emoji: self.selectedEmoji)
                    .frame(width: 200)
            }
        }
    }
}
おわりに
このようにViewBuilderを駆使することで、Viewの共通化がとても行いやすくなります。
繰り返し記述されているような無駄なコードはViewBuilderを利用してどんどん淘汰していきましょう![]()
サンプルコード
https://github.com/chocoyama/DrawerView/blob/master/DrawerView/ContentView.swift
※ ちなみにソースコード中の .leading の部分を .trailing にしてあげるだけで、右側から表示されるドロワーにすることができます。(僅か2行の変更!)
