経緯
CloudFront+S3ではURLがディレクトリまでしかない場合は404エラーになります。つまり、
http://hogehoge.com
の場合には index.html が表示されますが、
http://hogehoge.com/subdir/
の場合には index.html が表示されずに 404エラーになる訳です。
その解決方法として既に多くの記事で Lambda@edge を使って http://hogehoge.com/subdir/ (末尾にスラッシュあり) の場合に index.html を表示させる方法が紹介されていますが、http://hogehoge.com/subdir (末尾にスラッシュなし)の場合CSSやJSのパス当たらないなど、うまく動かなかったので、備忘録も兼ねて記事を書くことにしました。
方法を先に言ってしますと、スラッシュ(/)無しの場合にはスラッシュ(/)ありに301リダイレクトさせるというものです。
まずはLambda@edgeを用意しましょう。
2021/12現在、Lambda@edgeはバージニア北部リージョンしか利用できないので、バージニア北部リージョンに変更します。そこでLambda関数を新規で作成して、以下のコードを記述します。
Lambdaのコード
見てのとおり、内部で301リダイレクトしています。
exports.handler = (event, context, callback) => {
  const request = event.Records[0].cf.request;

  // スラッシュで終わらず拡張子がない場合はディレクトリとみなして末尾にスラッシュを付けるてリダイレクト
  if (!request.uri.match(/\/$/)) {
    const names = request.uri.split('/');

    // ディレクトリ名に「.」が含まれるケースについては考慮外とする
    if (!names[names.length - 1].match(/.+\..+/)) {
      request.uri = request.uri.replace(/$/, '/');

      const response = {
        status: 301,
        statusDescription: "Permanenoly Add",
        headers: {
          location: [{
            key: 'Location',
            value: request.uri
          }]
        }
      };
      return callback(null, response);
    }
  }

  // 末尾がスラッシュで終わっている場合はindex.htmlを付加する
  request.uri = request.uri.replace(/\/$/, '/index.html');

  return callback(null, request);
};
トリガーに使っているリージョンにCloudFrontを指定
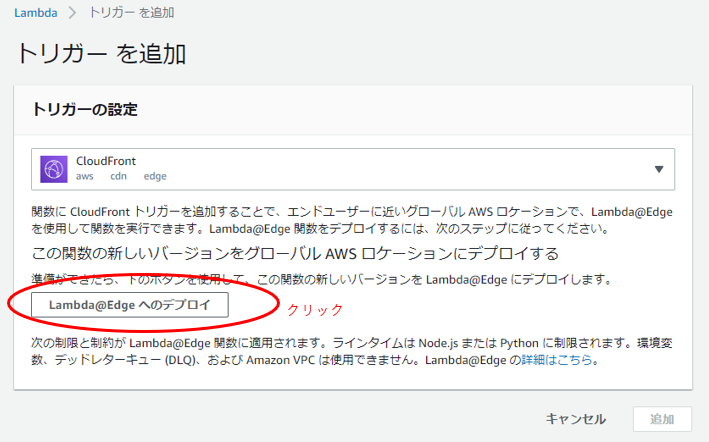
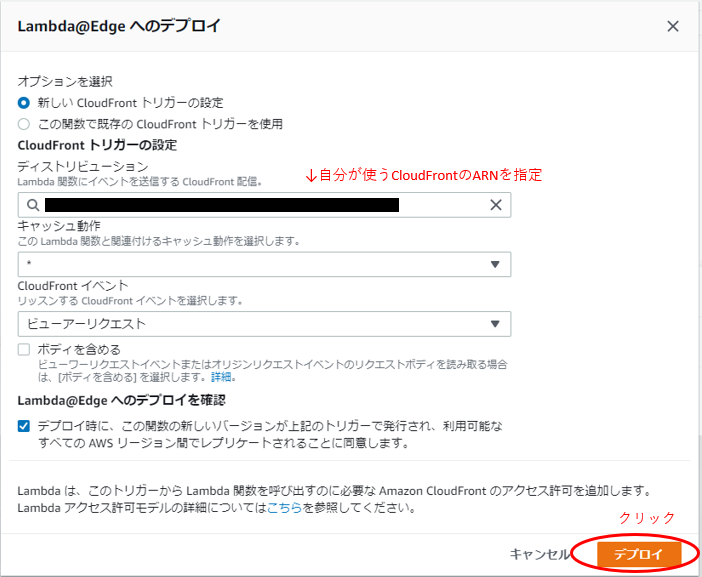
次にLambdaの「トリガーを追加」をクリックして、自分の使っているリージョン(バージニア北部でなくてもOK)のCloudFrontを指定します。
以下のようなエラーが出るときがあります。
InvalidLambdaFunctionAssociationException: The function execution role must be assumable with edgelambda.amazonaws.com as well as lambda.amazonaws.com principals. Update the IAM role and try again.
この場合には、Lambdaの設定>アクセス権限>該当の実行ロールをクリックしてロールの編集画面にいき、
ロール編集画面から「信頼関係」タブを選択し「信頼関係の編集」ボタンをクリックして、ポリシードキュメントを以下に変更してください。
{
  "Version": "2012-10-17",
  "Statement": [
    {
      "Effect": "Allow",
      "Principal": {
        "Service": [
          "edgelambda.amazonaws.com",
          "lambda.amazonaws.com"
        ]
      },
      "Action": "sts:AssumeRole"
    }
  ]
}
その後、CloudFrontのキャッシュを削除して完了です。
http://hogehoge.com/subdir にアクセスして、http://hogehoge.com/subdir/ にリダイレクトされ、
index.htmlの内容が表示されれば成功です。
Basic認証をかけたいとき
余談ですが、Basic認証をかけたいときにはLambda関数は以下のコードになります。
exports.handler = (event, context, callback) => {
  const request = event.Records[0].cf.request;

  // スラッシュで終わらず拡張子がない場合はディレクトリとみなして末尾にスラッシュを付けるてリダイレクト
  if (!request.uri.match(/\/$/)) {
    const names = request.uri.split('/');

    // ディレクトリ名に「.」が含まれるケースについては考慮外とする
    if (!names[names.length - 1].match(/.+\..+/)) {
      request.uri = request.uri.replace(/$/, '/');

      const response = {
        status: 301,
        statusDescription: "Permanenoly Add",
        headers: {
          location: [{
            key: 'Location',
            value: request.uri
          }]
        }
      };
      return callback(null, response);
    }
  }

  //末尾がスラッシュで終わっている場合はindex.htmlを付加する
  request.uri = request.uri.replace(/\/$/, '/index.html');

  //Basic認証処理
  const headers = request.headers

  // ユーザー名とパスワードを設定
  const authUser = 'username'
  const authPass = 'password'
  const authString = 'Basic ' + new Buffer(authUser + ':' + authPass).toString('base64')

  // 初アクセス or 認証NG
  if (typeof headers.authorization === 'undefined' || headers.authorization[0].value !== authString) {
    callback(null, {
      status: '401',
      statusDescription: 'Unauthorized',
      body: '<h1>401 Unauthorized</h1>',
      headers: {
        'www-authenticate': [{key:'WWW-Authenticate', value:'Basic'}]
      }
    })
  }
  // 認証OK
  else{
    callback(null, request)
  }
};
さらに複数のID/PWでBasic認証をかけたいときには以下のコードになります。
exports.handler = (event, context, callback) => {
  const request = event.Records[0].cf.request;

  // スラッシュで終わらず拡張子がない場合はディレクトリとみなして末尾にスラッシュを付けるてリダイレクト
  if (!request.uri.match(/\/$/)) {
    const names = request.uri.split('/');

    // ディレクトリ名に「.」が含まれるケースについては考慮外とする
    if (!names[names.length - 1].match(/.+\..+/)) {
      request.uri = request.uri.replace(/$/, '/');

      const response = {
        status: 301,
        statusDescription: "Permanenoly Add",
        headers: {
          location: [{
            key: 'Location',
            value: request.uri
          }]
        }
      };
      return callback(null, response);
    }
  }

  //末尾がスラッシュで終わっている場合はindex.htmlを付加する
  request.uri = request.uri.replace(/\/$/, '/index.html');

  //Basic認証処理(複数版)
  const headers = request.headers;

  // Configure authentication
  var authUsers = [
    {
      'user':'username1',
      'pass':'password1',
    },
    {
      'user':'username2',
      'pass':'password2',
    },
  ];

  var authString = '';

  // Require Basic authentication
  if (typeof headers.authorization != 'undefined') {
    authUsers.forEach(function(authUser){
      // Construct the Basic Auth string
      authString = 'Basic ' + new Buffer(authUser.user + ':' + authUser.pass).toString('base64');

      if (headers.authorization[0].value == authString) {
        // Continue request processing if authentication passed
        callback(null, request);
      }
    });
  }

  // Reject request
  const body = 'Unauthorized';
  const response = {
    status: '401',
    statusDescription: 'Unauthorized',
    body: '<h1>401 Unauthorized</h1>',
    headers: {
      'www-authenticate': [{key: 'WWW-Authenticate', value:'Basic'}]
    },
  };
  callback(null, response);

};
参考にしたサイト
https://qiita.com/nwsoyogi/items/6ccea086ddac98bb8af1
https://higelog.brassworks.jp/2955

