Caffeを使ってみた
- Caffe2があるのですが、WindowsではGPUで現状(2018.6)は使うことが出来ないので、Caffeにしました。
- WindowsのCaffeはビルドなどしても良いのですが、バイナリバージョンが公式で出ているので、動かすだけであれば簡単です。
- 以下の手順で動かしていきます。
- 学習画像、テスト画像、評価画像の3種類を用意する
- データベースを作る
- 平均値画像を作る
- 学習する
- 評価する
はじめに
-
はじめに,Windows版のCaffeを入手します。
-
かつては,ビルドなどをしなければならないのですが,とりあえずいろいろと改良しなければビルド版を入手したらOK
-
GPU,CPUなど好きなものをダウンロードしてください。
-
プログラムはここ
-
ダウンロード後は解凍して、フォルダの中に[tools]と[example]のフォルダを作成しておきましょう。
- [tools]には、後に作成したプログラム
- [example]には、画像を格納していきます
学習画像、テスト画像、評価画像の3種類を用意する
- 認識するために画像を集めてきます。
- 実際には大量の画像が必要ですが、今回は以下の構成で集めました。
-
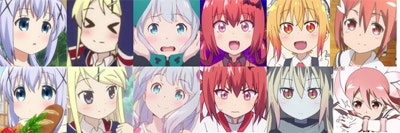
6クラス(チノ(ごちうさ)、カレン(きんモザ)、沙霧(エロマンガ先生)、サターニャ(ガヴリール)、トオル(メイドラゴン)、友奈(ゆゆゆ))
-
学習画像(Train):50枚
-
テスト画像(Test):30枚
-
評価画像(Valid):20枚
-
100 px ×100 px
-
- exampleフォルダに新しくフォルダを作成します。
- 例)animation
- このフォルダの中に先ほどの3つのフォルダを作って、画像を保存してください。
- プログラムは、exampleフォルダ上内に作成したフォルダ内(今回はAninmation)でコマンドプロンプトもしくはWindows PowerShellを起動して行います。
データベースの生成
- Caffeで扱うためのデータベースを作成する前に,訓練画像とテスト画像のデータベースを作成する必要があります.
- フォーマットは以下のようにします。
- フォーマットは以下の通りです。
- ファイル名, ラベル番号
AA.jpg, 0
BB.jpg, 0
............
ZZ.jpg, 9
- ファイル名, ラベル番号
- 上の例では,10クラスに分けています。
- 手作業で作成してもいいのですが、少し面倒なのでプログラムを作成しました。
import os
import sys
from pathlib import Path

def Create(path, strs):

	#file open
	file_list  = open("{0}/{1}/list.txt".format(path, strs), "w")
	file_label = open("{0}/{1}/label.txt".format(path, strs), "w")

	#The path object genetate
	p = Path("{0}/{1}".format(path, strs))

	class_no = []
	class_name = []
	for i in p.glob("**/*"):
		# A directory or file judges
		if os.path.isfile(i):

			# windows path convert to string
			file_name = str(i)
			c = 0
			for j in class_no:
				if(j in str(i)):
					temp = strs + "\\"
					file_list.write("{0} {1}\n".format(file_name.replace(str(temp), "").replace(str(path), ""), c))
					break
				c += 1

		else:
			class_no.append(str(i))
			class_name.append(str(i).replace("{0}{1}".format(path, strs),"").replace(strs,"").replace("\\", ""))

	c = 0
	for i in class_name:
		file_label.write("{0} {1}\n".format(c, i))
		c += 1

	print(class_name)

if __name__ == '__main__':
	args = sys.argv

	if len(args) < 2:
		print("  python build_database.py [data_folder]\n")
		exit(0)

	path = args[1]
	Create(path, "train")
	Create(path, "test")
-
プログラムの起動は次の通りです。
python build_database.py [folder] -
実際には、次の通りになります。
python ..\tools\build_database.py animation -
train.txtとtest.txtが出来れいればOK
-
ここから、Caffe用のデータベースを作成する。データベースを作成するプログラムは[bin]フォルダにあります。
-
convert_imageset.exeを使って、Caffe用のデータベースを作成します。次のように起動します。
convert_image.set.exe -backend=lmdb [root] [list] [output_folder] -
今回の場合は、次のようにします。
-
Train
convert_image.set.exe -backend=lmdb .\Animation .\Animation\train\list.txt .\Animation\train_lmdb\ -
Test
convert_image.set.exe -backend=lmdb .\Animation .\Animation\test\list.txt .\Animation\test_lmdb\
平均画像を作成する
- 次は、平均画像を作成します。平均画像には以下のプログラムを使用します。
compute_image_mean.exe [FLAGS] INPUT_DB [OUTPUT_FILE] - 今回の場合は、次の通りになります。
compute_image_mean.exe -backend=lmdb .\Animation\train_lmdb\ mean.bina
ryproto - 平均画像は、訓練データの画像からのみ生成します。
学習する
- ここまでで、下準備が終わりました。次に学習フェーズです。GPU使用の人は比較的に早く、CPU使用の人は時間がかかるかと思います。
- まずは、学習するために必要なこととして、ネットワークが必要となります。
- ネットワークは、元のGitHubからダウンロードすることができます。
- 今回は、AlexNetモデルを使用します。
- モデルを使用するときは次の部分を変更してください。
crop_size: (画像サイズ)
mean_file: "mean.binaryproto"

train側のsource
source: "train_lmdb"

test側のsource
source: "test_lmdb"

・・・

最後のレイヤーの中
num_output: [クラス数]
input_param { shape: { dim: 10 dim: 3 dim:画像サイズ dim: 画像サイズ } }
※AlexNetは227×227がデフォルトで最も良い認識になるようにチューニングされています。

・・・

最後のレイヤーの中
num_output: [クラス数]
net: "train_val.prototxt"
test_iter: 1000
test_interval: 1000
base_lr: 0.01
lr_policy: "step"
gamma: 0.1
stepsize: 1000
display: 20
max_iter: 10000
momentum: 0.9
weight_decay: 0.0005
snapshot: 10000
snapshot_prefix: "animations"(出力されるファイルの名前)
solver_mode: CPU    //GPU or CPU
-
学習を行うためには、以下のプログラムを実行します。
caffe.exe train --solver=solver.prototxt -
最終的に、このような感じになりました。
-
レートが0.949=94.9%なのでいい感じかと。
I0711 15:50:16.894043  8720 data_layer.cpp:73] Restarting data prefetching from start.
I0711 15:50:17.117455  8720 data_layer.cpp:73] Restarting data prefetching from start.
I0711 15:50:17.225157 17824 solver.cpp:397]     Test net output #0: accuracy = 0.949983
I0711 15:50:17.225157 17824 solver.cpp:397]     Test net output #1: loss = 0.210197 (* 1 = 0.210197 loss)
I0711 15:50:17.226155 17824 solver.cpp:315] Optimization Done.
テスト
-
学習ができていれば、「snapshot_prefix」の名前で、拡張子が「.caffemodel」「.solverstate」ができていれば学習が完了です。
-
10000万回エポックを回した今回の結果が次の通りになります。
- animations_iter_10000.caffemodel
- animations_iter_10000.solverstate
-
テストは、「bin\classifiation.exe」が認識するためのプログラムになっています。
-
次のようにプログラムを起動します。
classification.exe [prototxt] [caffemodel] [mean.binaryproto] [label] [image] -
今回の場合は、次のようになります。
classification.exe deploy.prototxt animations_iter_10000.caffemodel mean.binaryproto train\label.txt valid\XXX\XXX[ここにValid内の画像を入れてください]
> ..\..\bin\classification.exe .\deploy.prototxt .\animations_iter_1000
0.caffemodel .\mean.binaryproto .\train\label.txt .\valid\chino\chino_010.png
---------- Prediction for .\valid\chino\chino_010.png ----------
0.9999 - "0 chino"
0.0001 - "4 toru"
0.0000 - "2 sagiri"
0.0000 - "5 yuna"
0.0000 - "1 karen"

> ..\..\bin\classification.exe .\deploy.prototxt .\animations_iter_1000
0.caffemodel .\mean.binaryproto .\train\label.txt .\valid\sagiri\sagiri_007.png
---------- Prediction for .\valid\sagiri\sagiri_007.png ----------
0.9956 - "2 sagiri"
0.0044 - "0 chino"
0.0000 - "1 karen"
0.0000 - "5 yuna"
0.0000 - "4 toru"
- どちらも、きちんと認識されていることが分かりますね。
まとめ
- 最後に、今回作ったpythonをGitHubに挙げています。