はじめに
この記事は アイスタイル Advent Calendar 2022 15日目の記事です。
お久しぶりです。@shiratah(@chilitreat)です。
最近は、誰も詳細を知らないレガシーなコードを新しくTypeScriptで再実装したり、Nuxt.jsでフロントエンドを作り直したりしています。その中で得た知見を紹介します。
近年アイスタイルでは、Node.js(TypeScript)で作られたバックエンドAPIが増えています。
その中でも、Inversifyとinversify-express-utils を使ったアプリケーションが多いです。
Inversifyは、JavaScriptとNode.jsアプリケーションのための、強力で軽量な反転制御コンテナ(DIコンテナ)です。クラスの依存解決がDIコンテナ経由で行うことができます。
手癖的に使うスクリプトを紹介する前に、簡単なサンプルコードとともにInversifyの使い方をおさらいします。
Inversifyを使った開発
Inversifyを利用するため、クラスとコンテナを作成します。
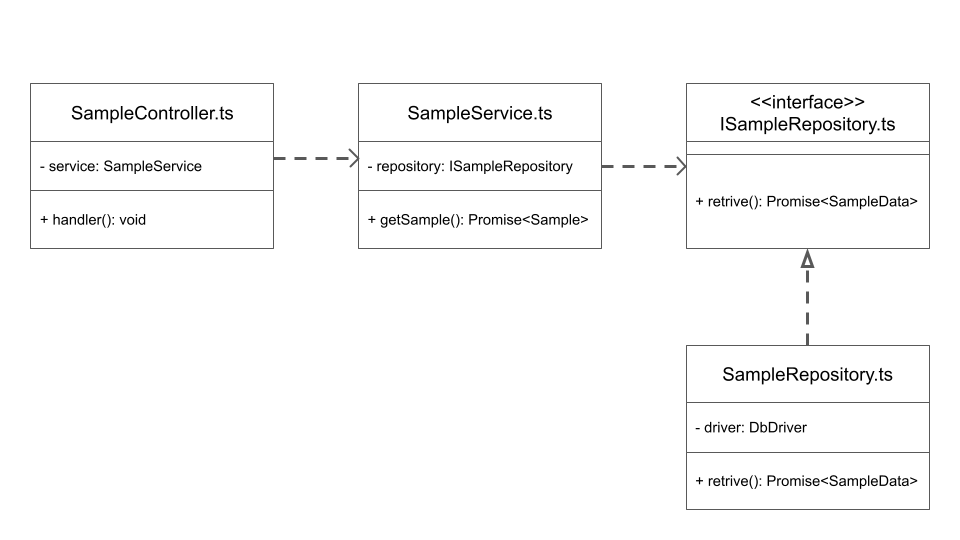
今回はこのような構成のアプリケーションをサンプルとして利用します。
SampleServiceが ISampleRepositoryを使ってSampleデータを取得してSampleControllerがクライアントにデータを返すようなシンプルなアプリケーションです。
サンプルクラス
いくつかデータを取得し、ビジネスロジックに沿ってデータを返すサービスクラスだと思ってください。
import { inject } from 'inversify';
import { provide } from 'inversify-binding-decorators';

interface Sample {
    id: number;
    text: string;
}

@provide(SampleService)
export class SampleService {
    public constructor(
        @inject(TYPES.SampleRepository)
          private readonly repository: ISampleRepository
    ) {}

    public async getSample(): Promise<Sample> {
        // 本当はもう少し複雑なビジネスロジックが含まれるが便宜上省略
        return this.repository.retrive();
    }
}
コンテナ
作成したクラスをコンテナに登録し、コンテナからインスタンスを取得します。
この時、取得したインスタンスが依存するクラスの依存関係も@injectデコレーターを元に解決されたインスタンスが取得されます。
import { Container } from 'inversify';
import { buildProviderModule } from 'inversify-binding-decorators';
import { ISampleRepository } from './interface/ISampleRepository';
import { SampleRepository } from './infrastructure/repository/SampleRepository';
import { TYPES } from './types';

const container = new Container();

container.load(buildProviderModule());

container.bind<ISampleRepository>(TYPES.SampleRepository).to(SampleRepository);

export container;
この開発で困ること
よくある設計パターンで、Controller,Service,Repository,DAOなど役割ごとにレイヤー構造とすることが多いと思います。
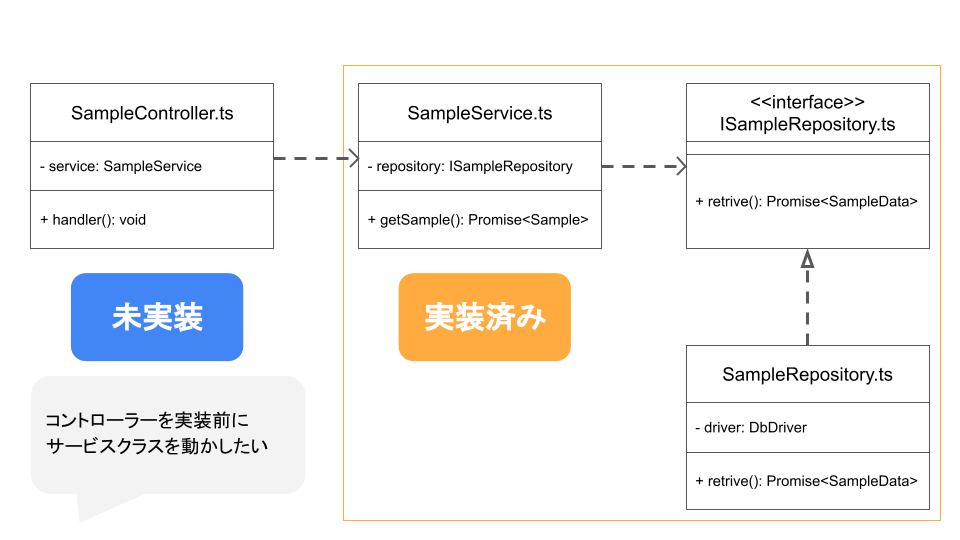
新たにServiceを実装した際、Serviceクラスを叩くエントリーポイントになるクラスが実装されてなく、Service単体で動作確認できないことがあります。
Serviceクラス単体でユニットテストを書くことで動作確認はできるのですが、依存クラスをモックするパターンが多いと思います。
実際にデータベースや外部APIを叩いてみて、初めて実装漏れやインターフェースの不一致に気づくこともよくあると思います。
そこで、なるべく早い段階で実際に依存するクラスを繋ぎ込んだ状態で、動作確認をするために、手癖スクリプトを使います。
困ったを解決する手癖スクリプト
// デコレーターを利用しているので必ず指定
require('reflect-metadata');
// この辺はお好みで
require('dotenv').config();
require('source-map-support').install();

import { container } from './container';

(async () => {
    // この関数の中に色々書く
    // container.get() で依存関係が解決されたインスタンスをコンテナから取得する
    const serivce = container.get<SampleService>(SampleService);
    console.log(await service.getSample());
})()
  .then(() => {
    process.exit(0);
  })
  .catch((e) => {
    console.error(e);
    process.exit(1);
  });
スクリプトの実行方法
$ npx ts-node -r tsconfig-paths/register -P ./tsconfig.json ./index.ts
ミニ解説
このスクリプトは、DIコンテナに登録されたクラスを、Inversifyのcontainer.getメソッドでインスタンスとして取得し、任意の処理を実行後に処理を終了します。(いわゆるドライバーです)
これによって、Controllerの代わりとして、Serviceクラスを呼び出し簡単に動作確認をすることができます。
container.getで取得するクラスを変更することで汎用的に利用することができます。
ts-nodeを使うのは、TypeScriptのコンパイルをスキップしてサクッと実行するためです。
またnpx経由で使うことでプロジェクトにts-nodeがインストールされていなくてもts-nodeを利用できます。
(npxはインストールしない代わりに実行のたびにts-nodeをダウンロードしてきてしまうため、実行の遅さが気になる場合はts-nodeをグローバルインストールすることで実行までの待ち時間が多少短くなります)
ts-nodeの -rオプションで tsconfig-paths/register を読み込むことで、エイリアスパスを利用している場合も正しくパスを解決できるようになります。(スクリプト内でrequire(tsconfig-paths/register)で読み込んでもOK)
(おまけ) NestJSでもコンテナからインスタンスを取得したい
await NestFactory.createApplicationContext(ApplicationModule)で、アプリケーションコンテキストを作成した後に、.get() でインスタンスを取得できました。
const app = await NestFactory.create(ApplicationModule);
const tasksService = app.get(TasksService);
NestJSの場合も非常にお手軽ですね。
最後に
今回のサンプルだと依存するクラスが1個、2個レベルなので手間的にはControllerを実装するのとあまり変わらないかもしれませんが、依存するクラスが増えるほど、依存の階層が深くなるほどこのドライバースクリプトの恩恵が大きくなってきます(自分でnewで依存を解決していくのは非常に面倒な作業)。
必要なクラスを全て実装し切ってから動作確認することより、細かく実装と動作確認を繰り返したいケースが多いのでこういったスクリプトがあると小さく動作確認できて便利ですね。
最後までお読みいただきありがとうございました。
明日の担当は @kuritah さんです!よろしくお願いします〜

