2025 年の業務で LINE 関連の設計・開発を担当する機会があり、
その中で LIFF(LINE Front-end Framework)を使った Web アプリが必要になりました。
今回求められていた要件は次の2つです。
- 公式アカウントからユーザーへのメッセージ送信ができること
- リッチメニューからアプリを起動できること
これらを満たすため、LINEミニアプリではなく LIFF を採用しました。
ここでは、Spring Boot を使って動作サンプルを作り、その構築手順をまとめたものになります。
実装は最小限ですが、これだけで リッチメニュー → LIFF → Spring Boot の画面表示まで動作します。
1. なぜ LIFF を採用したのか?(ミニアプリとの比較)
LINEミニアプリも候補だったのですが、次の理由で LIFF が最適と判断しました。
✔ 1.1 LINE ミニアプリは自由なメッセージ送信が難しい
LINEミニアプリは、 通常のLINEの友達登録→メッセージ送信という流れとは異なります
しかし、今回の要件は
- 通常のLINEのやり取りができること
- リッチメニューによる操作でアプリを開く
などが必要でした。
そのため、LIFFを利用することにしました
✔ 1.2 リッチメニューからの起動が簡単
リッチメニューのボタンに
https://liff.line.me/xxxxx
を貼るだけで起動できます。
今回の記事は、こういった背景から LIFF を選択した理由と、最小構成で動かす手順をまとめた備忘録です。
2. 使用技術
- Spring Boot 3.2+
- ngrok(ローカルサーバを外部公開)
- LIFF (LINE Front-end Framework)
3. Spring Boot プロジェクトの作成
以下の構成でプロジェクトを作成します。
src/
└ main/
├ java/com/example/liffdemo/
│ ├ LiffDemoApplication.java
│ └ controller/LiffController.java
└ resources/
├ templates/index.html
└ application.properties
4. Controller の実装
package com.example.liffdemo.controller;

import org.springframework.stereotype.Controller;
import org.springframework.ui.Model;
import org.springframework.web.bind.annotation.GetMapping;
import org.springframework.web.bind.annotation.RequestParam;

@Controller
public class LiffController {

	@GetMapping("/liff")
	public String liffEntryPoint(
	        @RequestParam(required = false) String liffId,
	        Model model) {

	    model.addAttribute("liffId", liffId);

	    return "index";
	}
}
}
5. index.html(Thymeleaf)
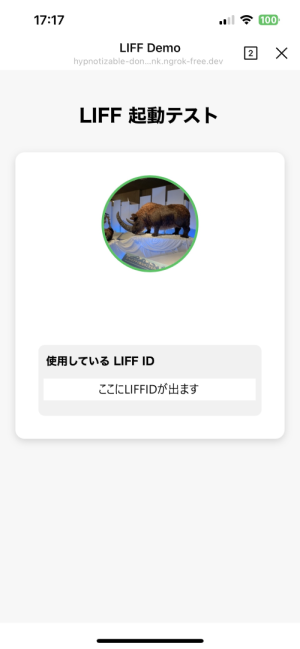
今回はLIFFの設定時にURLパラメータを埋め込めるのかの確認も兼ねたサンプルです
開くと、ユーザのプロフィール画像が表示されます
<!DOCTYPE html>
<html lang="ja" xmlns:th="http://www.thymeleaf.org">
<head>
    <meta charset="UTF-8" />
    <meta name="viewport" content="width=device-width, initial-scale=1.0" />
    <title>LIFF Demo</title>

    <!-- LIFF SDK -->
    <script src="https://static.line-scdn.net/liff/edge/2/sdk.js"></script>

    <style>
        body {
            font-family: "Segoe UI", Meiryo, sans-serif;
            margin: 0;
            background: #f7f7f7;
            padding: 20px;
            text-align: center;
        }

        .card {
            background: white;
            padding: 30px;
            border-radius: 12px;
            max-width: 400px;
            margin: 30px auto;
            box-shadow: 0 3px 10px rgba(0,0,0,0.15);
        }

        .profile-img {
            width: 120px;
            height: 120px;
            border-radius: 50%;
            margin-bottom: 20px;
            border: 3px solid #06c755; /* LINEカラー */
        }

        .param-box {
            margin-top: 20px;
            text-align: left;
            font-size: 14px;
            background: #f1f1f1;
            padding: 10px;
            border-radius: 8px;
            word-break: break-all;
        }

        .loader {
            margin-top: 30px;
            font-size: 14px;
            color: #555;
        }
    </style>
</head>
<body>

    <h2>LIFF 起動テスト</h2>
    <p class="loader">LIFF を初期化中...</p>

    <div class="card" id="profileCard" style="display:none;">
        <img id="profileImage" class="profile-img" src="" alt="profile" />
        <h3 id="profileName"></h3>

        <div class="param-box">
            <strong>使用している LIFF ID</strong>
            <p id="paramLiffId"></p>
        </div>
    </div>


    <script>
        document.addEventListener("DOMContentLoaded", async () => {
            const liffId = "[[${liffId}]]";

            try {
                await liff.init({ liffId });
                const profile = await liff.getProfile();

                // プロフィール表示
                document.getElementById("profileImage").src = profile.pictureUrl;
                document.getElementById("profileName").innerText = profile.displayName;

                // LIFF ID 表示
                document.getElementById("paramLiffId").innerText = liffId;

                // カード表示
                document.getElementById("profileCard").style.display = "block";
                document.querySelector(".loader").style.display = "none";

            } catch (error) {
                document.querySelector(".loader").innerText =
                    "LIFF の初期化に失敗しました: " + error;
            }
        });
    </script>

</body>
</html>
7. ngrok でローカルを公開
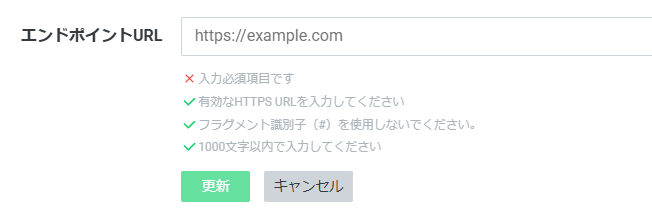
LIFFの設定時、LIFFエンドポイントURLを求められます。
LIFFエンドポイントURLにはhttps urlが必須なため、
今回はngrokを使って一時的な公開URLを生成します
ngrokをインストールして以下のコマンドを実行
ngrok config add-authtoken <あなたのトークン>
ngrok http 8080
表示された URL(例)
https://xxxxxx.ngrok-free.dev
これを LIFF のエンドポイント URLに設定します。
今回はLIFFのIDも付けます
https://xxxxxx.ngrok-free.dev/liff?liffId=222222222222
8. LIFFアプリの設定
LINE Developers → LIFF → 新規作成で以下を入力:
LIFF URL:https://xxxxxx.ngrok-free.dev/liff
サイズ:Full
利用範囲:プロフィール(必要に応じて)
発行された LIFF URL:
https://liff.line.me/1234567890-xxxxxxx
9. リッチメニューに登録
LINE Official Account Manager の
「リッチメニュー」 → ボタン設定 で以下を設定:
アクション種別:リンク
URL:LIFF URL(8で発行したもの)
10. 起動確認
LINE アプリからリッチメニューをタップすると
起動したユーザのアカウントが表示されます
おわりに
LIFFのサンプルを用意したいなというときに、手軽にhttpsのエンドポイントを用意したいということで、これまで経験のなかったngrokも触れたのはよかったのかなと思います
将来的にはLINEミニアプリと統合されるLIFFですが
ミニアプリとは異なる点もあり、LINEのリッチメニューからの動作確認用の手順を備忘録がてら記載しました。