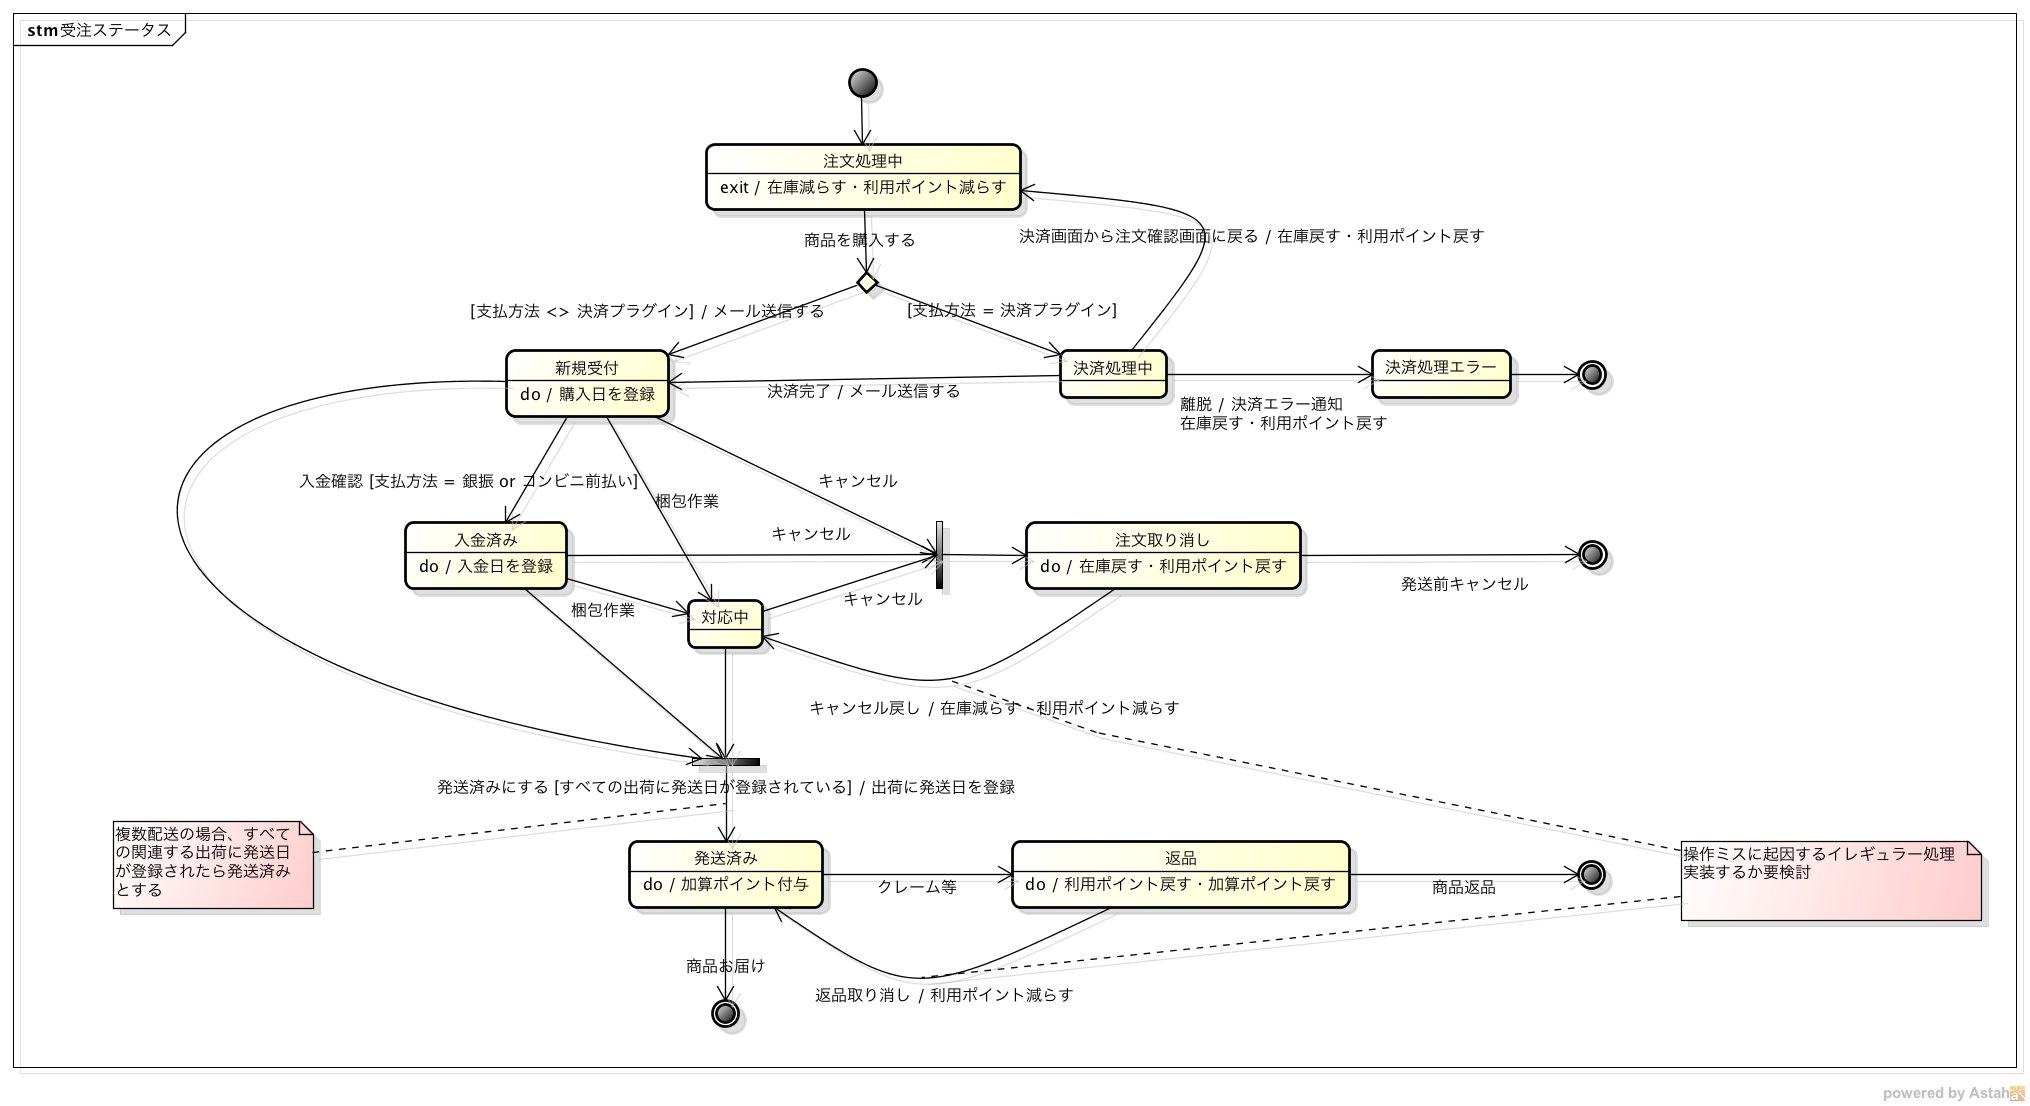
EC-CUBE4では、受注ステータスのステータス遷移を制御できるようになりました。
これにより、例えば新規受付→対応中には変更できるが、対応中→新規受付には変更できない、といった業務に沿った遷移を定義できるようになりました。
標準では以下のようなステータス遷移が定義されています。

参考:https://github.com/EC-CUBE/ec-cube/pull/3325
また、ステータス遷移時のタイミングでイベントを発火する仕組みも備えており、特定のステータスに変更されたタイミングでなにか処理を行う、といったカスタマイズも簡単に行うことができます。
今回は、新規受付→ラッピング中→発送済といったステータス遷移を追加する想定で、受注ステータスのカスタマイズ方法を解説したいと思います。
また、ラッピング中にステータスが変更されたタイミングでメール通知も行ってみます。
ステータスを追加する
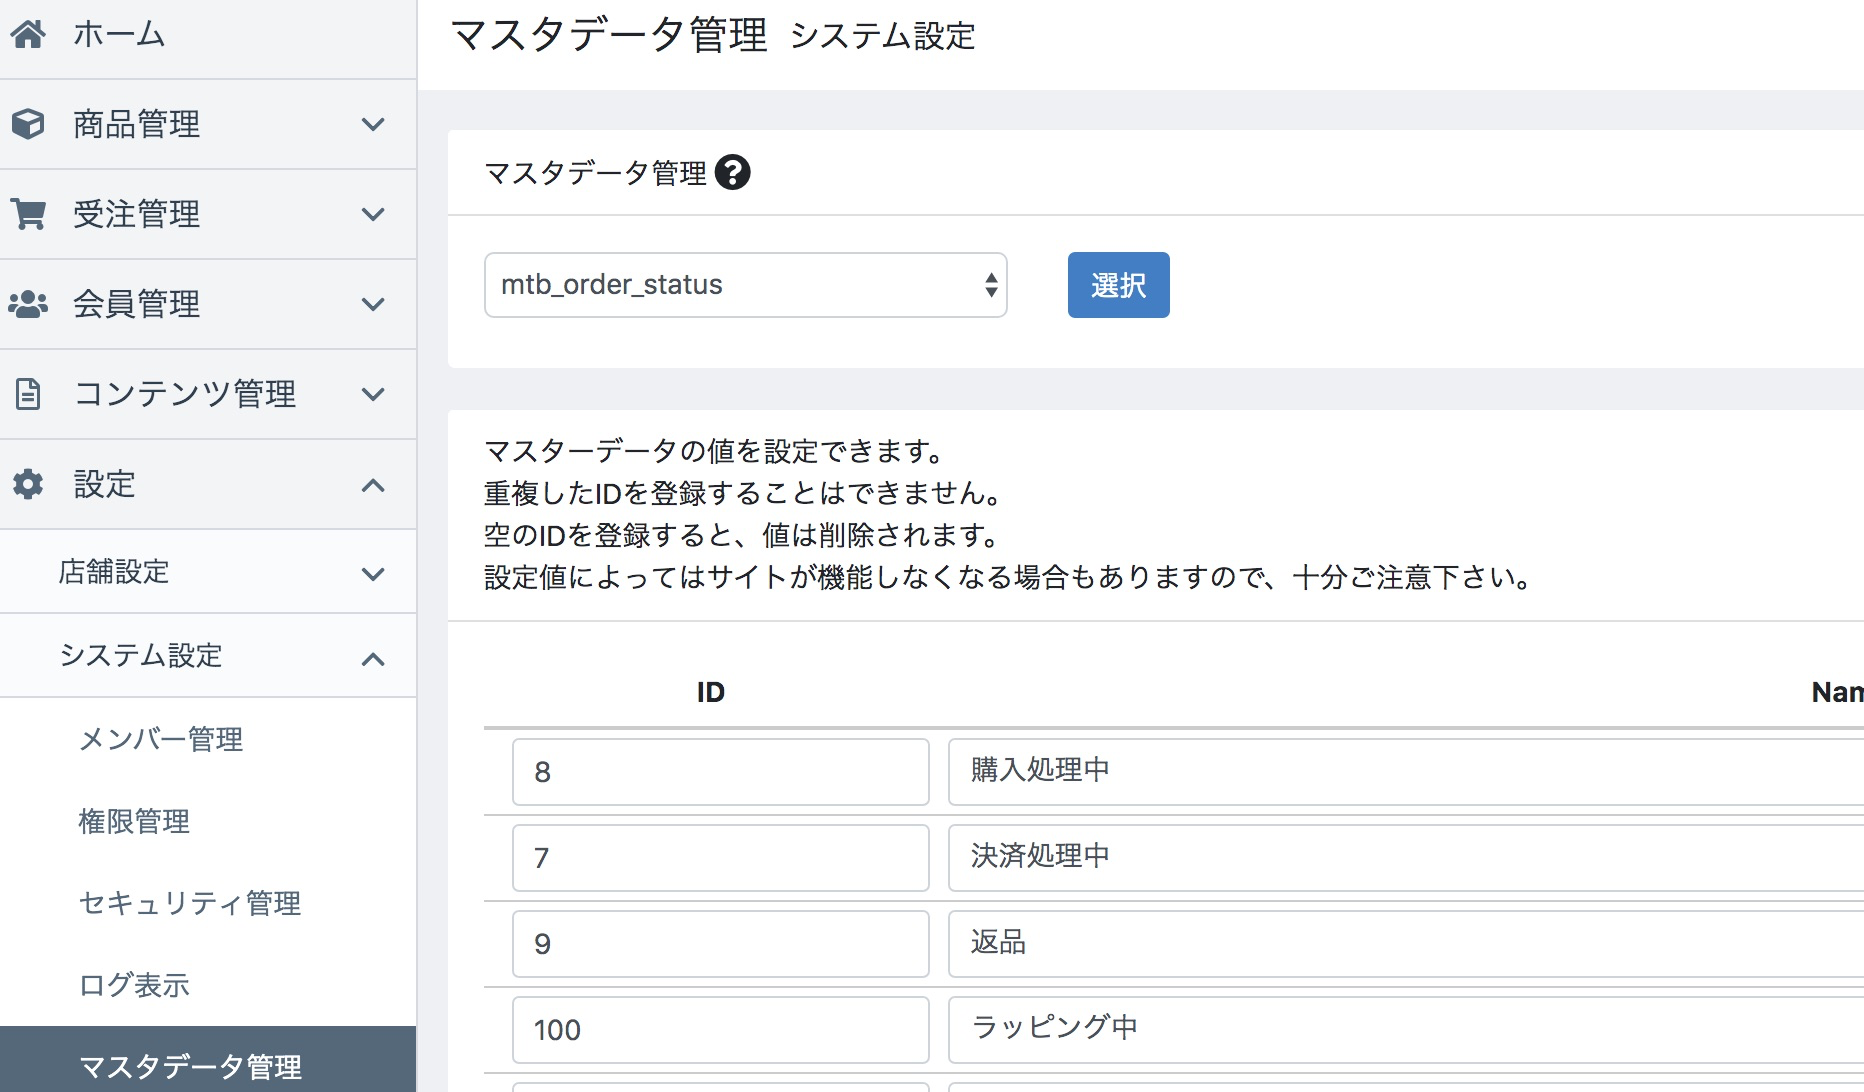
まず、マスターデータ管理からmtb_order_status、mtb_order_status_color、mtb_customer_order_statusにステータスを追加します。
1〜9までは標準のステータスがあるため、IDは100を使ってみます。
ステータス遷移を定義する
上記では、ステータスを追加しただけなので、まだ利用できる状態ではありません。
ステータス遷移も合わせて設定を行う必要があります。
設定は、app/config/eccube/packages/order_state_machine.phpに定義します。
まず、追加したステータスのIDをplacesに定義します。IDは文字列で記述する必要があります。
            'places' => [
                (string) Status::NEW,
                (string) Status::CANCEL,
                (string) Status::IN_PROGRESS,
                (string) Status::DELIVERED,
                (string) Status::PAID,
                (string) Status::PENDING,
                (string) Status::PROCESSING,
                (string) Status::RETURNED,
+                // 追加したステータスのIDを以下に定義
+                '100',
            ],
次に、ステータスの遷移を、transitionsに定義します。
まず、新規受付→ラッピング中のステータス遷移を定義します。
            'transitions' => [
                'pay' => [
                    'from' => (string) Status::NEW,
                    'to' => (string) Status::PAID,
                ],
                'packing' => [
                    'from' => [(string) Status::NEW, (string) Status::PAID],
                    'to' => (string) Status::IN_PROGRESS,
                ],

                ...

                'cancel_return' => [
                    'from' => (string) Status::RETURNED,
                    'to' => (string) Status::DELIVERED,
                ],
+                // ラッピング中への遷移を追加
+                'in_wrapping' => [
+                    'from' => (string) Status::NEW,
+                    'to' => '100',
+                ]
これで、新規受付→ラッピング中のステータス遷移ができるようになります。
同様に、ラッピング中→発送済への遷移を定義します。
            'transitions' => [
                'pay' => [
                    'from' => (string) Status::NEW,
                    'to' => (string) Status::PAID,
                ],
                'packing' => [
                    'from' => [(string) Status::NEW, (string) Status::PAID],
                    'to' => (string) Status::IN_PROGRESS,
                ],

                ...

                'ship' => [
-                    'from' => [(string) Status::NEW, (string) Status::PAID, (string) Status::IN_PROGRESS],
+                    'from' => [(string) Status::NEW, (string) Status::PAID, (string) Status::IN_PROGRESS, '100'],
                    'to' => [(string) Status::DELIVERED],
                ],
                'return' => [
                    'from' => (string) Status::DELIVERED,
                    'to' => (string) Status::RETURNED,
                ],
                'cancel_return' => [
                    'from' => (string) Status::RETURNED,
                    'to' => (string) Status::DELIVERED,
                ],
                // ラッピング中への遷移を追加
                'in_wrapping' => [
                    'from' => (string) Status::NEW,
                    'to' => '100',
                ]
これで、ラッピング中→発送済の遷移ができるようになります。
メール通知を実装する
最後に、新規受付→ラッピング中に変更されたタイミングで、メールを送信するカスタマイズを行ってみます。
app/Customize/Service/OrderStateMachine.phpを作成します。
<?php

namespace Customize\Service;

use Eccube\Repository\BaseInfoRepository;
use Symfony\Component\EventDispatcher\EventSubscriberInterface;
use Symfony\Component\Workflow\Event\Event;

class OrderStateMachine implements EventSubscriberInterface
{
    /**
     * @var \Swift_Mailer
     */
    private $mailer;

    /**
     * @var BaseInfoRepository
     */
    private $baseInfoRepository;

    public function __construct(\Swift_Mailer $mailer, BaseInfoRepository $baseInfoRepository)
    {
        $this->mailer = $mailer;
        $this->baseInfoRepository = $baseInfoRepository;
    }

    public static function getSubscribedEvents()
    {
        return [
            'workflow.order.transition.in_wrapping' => ['inWrapping'],
        ];
    }

    public function inWrapping(Event $event)
    {
        $BaseInfo = $this->baseInfoRepository->get();
        $Order = $event->getSubject()->getOrder();
        $subject = '['.$BaseInfo->getShopName().'] ラッピング中です。';
        $body = 'ラッピング中です。';

        $message = (new \Swift_Message())
            ->setSubject($subject)
            ->setFrom([$BaseInfo->getEmail01() => $BaseInfo->getShopName()])
            ->setTo([$Order->getEmail()])
            ->setBcc($BaseInfo->getEmail01())
            ->setReplyTo($BaseInfo->getEmail03())
            ->setReturnPath($BaseInfo->getEmail04());
        $message->setBody($body);
        $this->mailer->send($message);
    }
}
作り方は、EventSubscriberInterfaceを実装したクラスを作り、介入したいイベントをgetSubscribedEventsで定義するだけです。
イベント名は、workflow.order.transition.xxxのように、order_state_machine.phpで定義されているtransitionsのキー名を指定します。
これで、ラッピング中のステータスに変更されたタイミングで、メールを送信することができます。


