作る前に見てほしいこと
作る前に完成系を見たほうがイメージしやすいと思うのでやってみてね。
https://unityroom.com/games/yuruson_flappybird
この記事通りやったら大体こんな感じになる。
環境
- windows11
- version: unity 6000.3.10f1
この記事で使っているものは6なら何も変わらないはず。
6以下でもオブジェクトとかスクリプトを作成するときの表記が違うだけで作ることはできる。
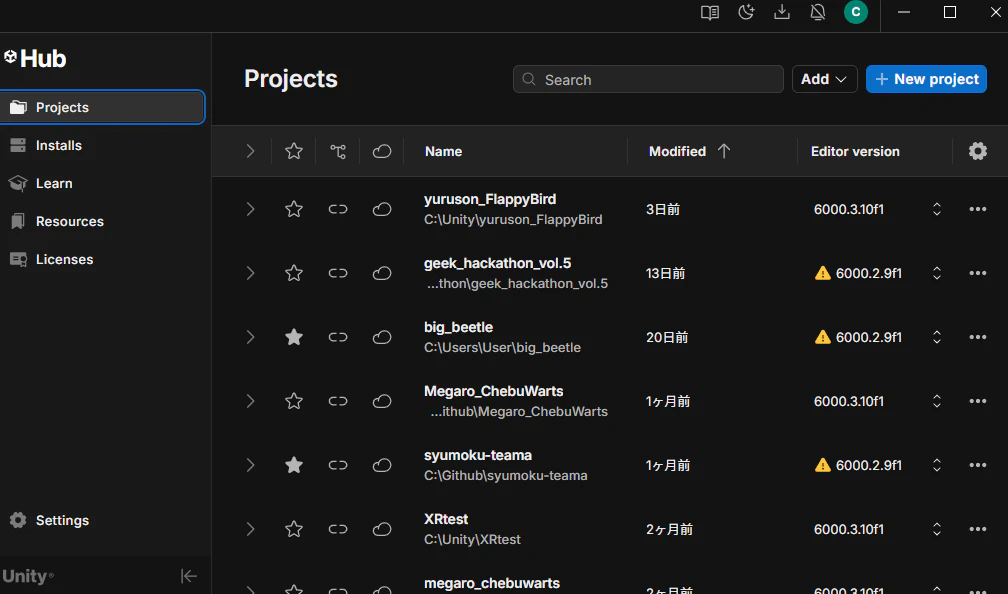
1. unityのprojectを作る
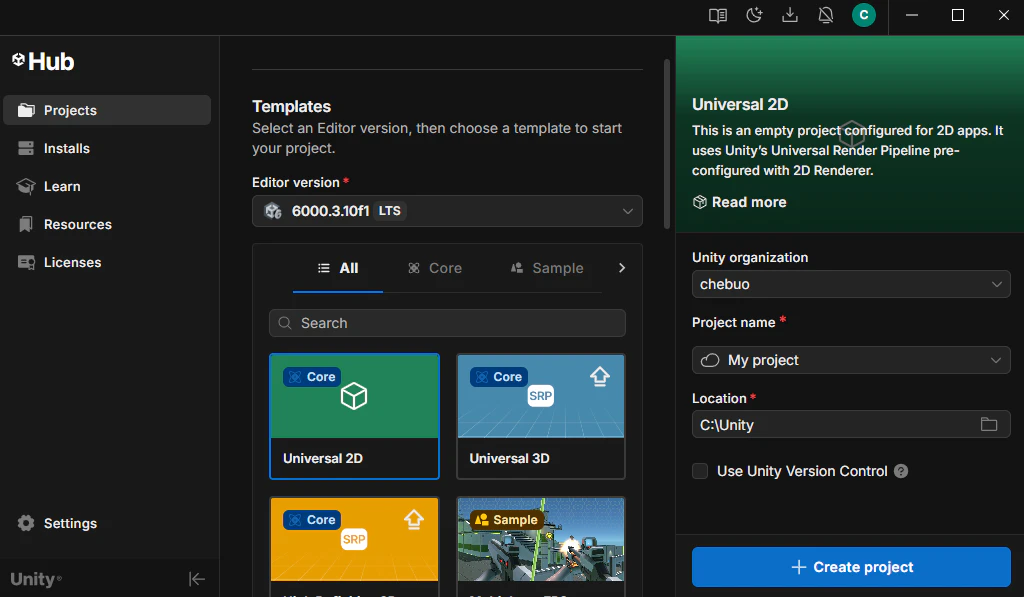
右上のボタンのNew projectをクリックする。
今回のゲームは2Dなので、Universal 2D を選択する。
Project nameは適当でよい。
Locationもどこでもいいが、専用のフォルダをwindowsだったら、C:\のすぐ下に作ることをお勧めする。(管理がしやすい)
設定が終わったら、Create projectで作成する。
2. playerの設定をする
playerは何でもいいが、今回はcircleを使う。
Hierarchyを右クリックして、
2D Object->Sprites->cicleを選択する。
当たり判定や物理演算を使うためにコンポーネントを追加する。
InspectorのAdd Componentから「RigidBody2D」と「circleCollider2D」を追加する。
3. ジャンプできるようにする
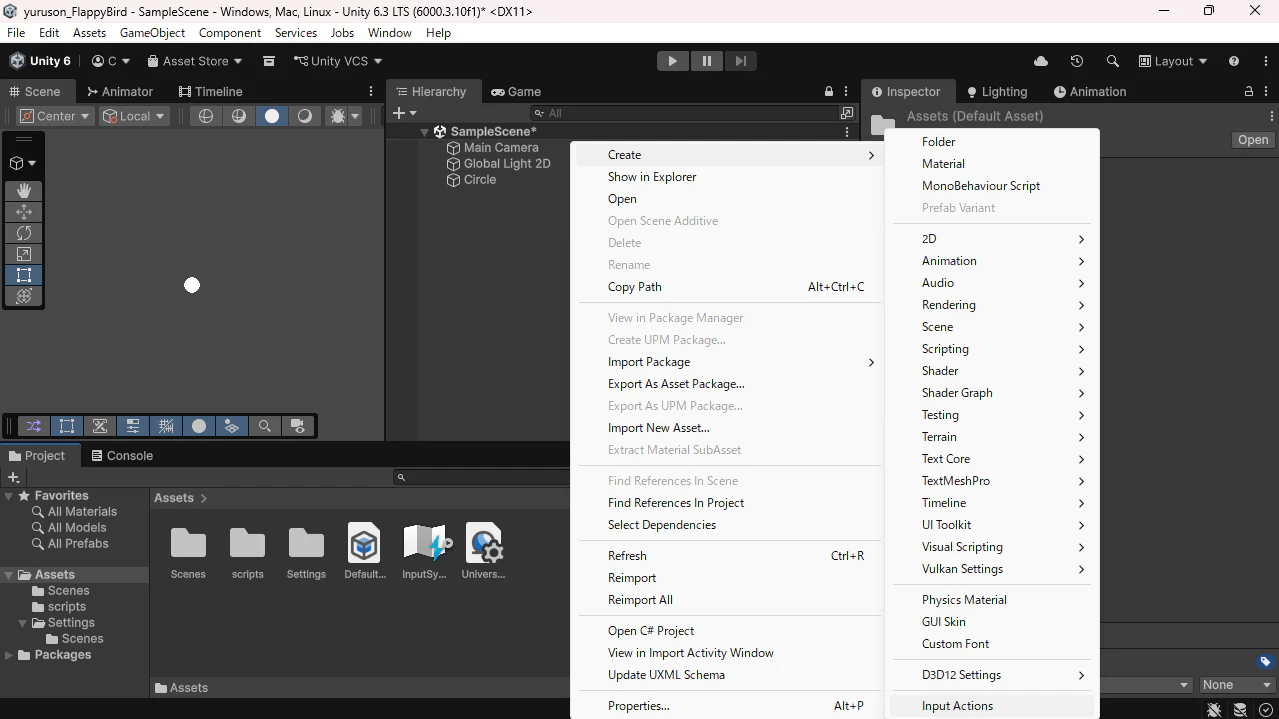
まず、InputSystemを使ってアクションを登録する。
Assetsで右クリックし、
Create->InputActions でInputActionsを作成する。
InputActionsをダブルクリックし設定画面を開く。
ActionMapsに+ボタンでPlayerを追加する。
Actionsに追加されたnew Actionの名前をJumpに変更する。
Jumpには何も設定されていないno Bindingの状態なので、PathをクリックしてKeyboard->By Location of Key->Spaceを選択する。
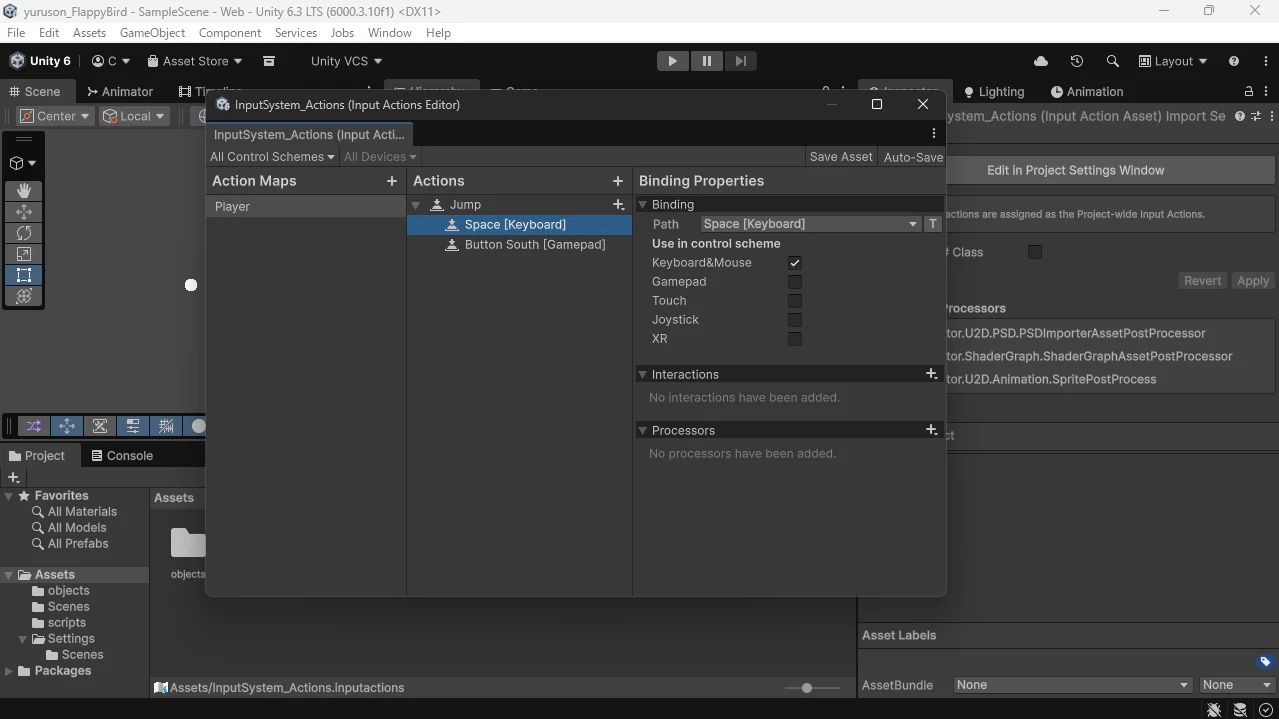
これによって、JumpというActionにSpaceキーが反応するようになった。
次に、PlayerControllerコンポーネントを作成する。
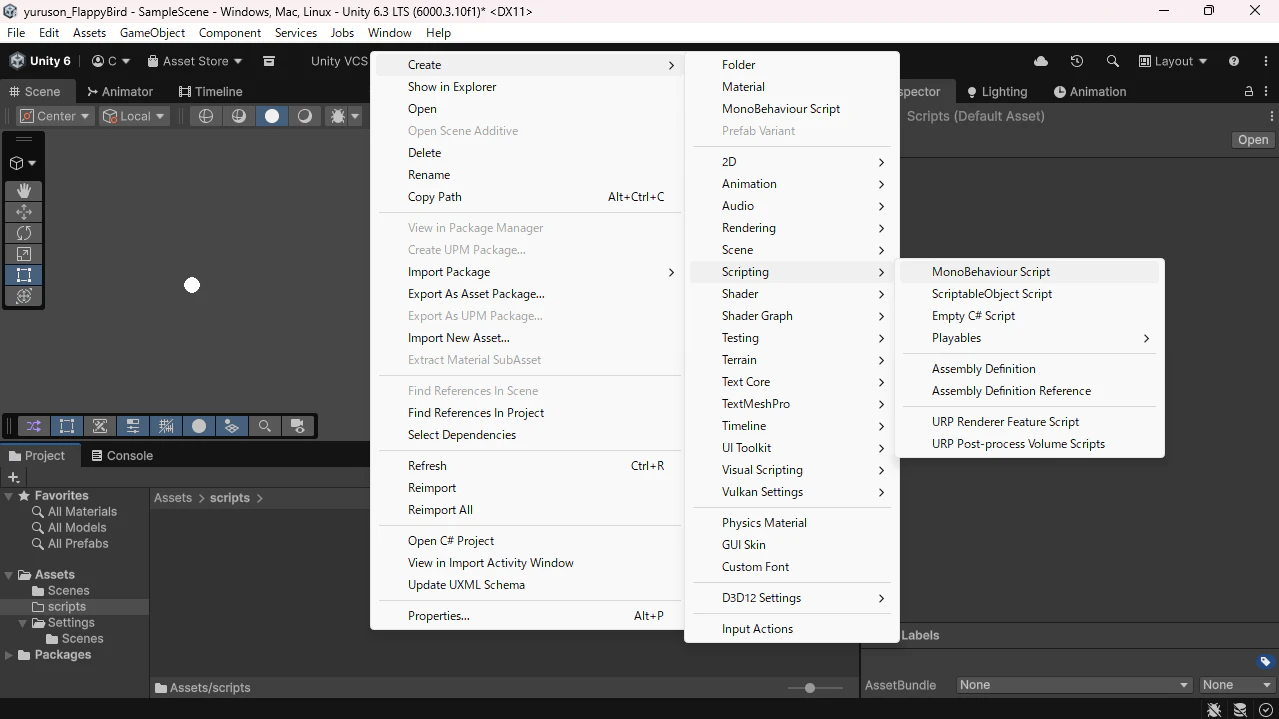
Assetsで右クリックをし、
Create->Scripting->MonoBehaviourScript でMonoBehaviour Scriptを作成する。
scriptの名前は何でもよいが、分かりやすくするために、PlayerControllerにする。
同時にcircleにPlayerControllerをAdd Componentから検索して追加する。
今回はInputSystemを使用してデバイスの入力を取得する。
以下のコードでJumpという名前のアクションが入力されたとき、ログにJump!と出る。
using UnityEngine;
using UnityEngine.InputSystem;

public class PlayerController : MonoBehaviour
{
    InputAction jumpAction;
    // Start is called once before the first execution of Update after the MonoBehaviour is created
    void Start()
    {
        jumpAction = InputSystem.actions.FindAction("Jump");
        jumpAction.Enable();
    }

    // Update is called once per frame
    void Update()
    {
        if(jumpAction.triggered)
        {
            Debug.Log("Jump!");
        }
    }
}
Jump!と出たら次は実際にジャンプするための処理を書く。
そこで使うのが、先ほど入れたRigidBody2Dコンポーネント。
RigidBody2Dは物理演算に関するあらゆることを操作することができる。
Rigidbody2D rb2d;  //Rigidbody2D型のrbという変数を宣言
void Start()
{                //rbにscriptがついてるRigidbody2Dを代入
  rb=this.GetComponent<Rigidbody2D>();
}
今回はAddForceを使ってオブジェクトを上方向に加速させる。
rb2d.AddForce(Vector3.up);
コード全体
using UnityEngine;
using UnityEngine.InputSystem;

public class PlayerController : MonoBehaviour
{
    InputAction jumpAction;
    Rigidbody2D rb2d;
    // Start is called once before the first execution of Update after the MonoBehaviour is created
    void Start()
    {
        jumpAction = InputSystem.actions.FindAction("Jump");
        rb2d = this.GetComponent<Rigidbody2D>();
    }

    // Update is called once per frame
    void Update()
    {
        if(jumpAction.triggered)
        {
            rb2d.AddForce(Vector3.up);
            Debug.Log("Jump!");
        }
    }
}
public float jumpForce=10;
float で実数を入れられる変数を宣言することができ、
public でいろいろなところから参照できるようになる。
unityのeditor上でも値を変更できるので、わざわざコードを書き替えなくてもよくなる。
rb2d.linearVelocityY = 0;
これでY軸の速度をゼロにすることができる。
これをジャンプする前にすることで慣性をなくすことができる。
このままでは長押すると飛んで行ってしまう。なので、ForceMode2Dのimpalseを使ってジャンプの上昇を一瞬だけにする。
rb2d.AddForce(Vector3.up * jumpForce, ForceMode2D.Impulse);
playerの動作はひとまず完成。
4. 障害物を作る
縦に長い長方形を障害物として使う。
Hierarchyで右クリックし、
2D Object->sprites->square
作成したsquareにRigidbody2DとboxCollider2Dを追加する。
初期設定では、自由落下、playerに押される、回転するなど障害物に必要ない物理演算が働いてしまう。
なので、Rigidbody2Dの設定をInspectorから変更していく。
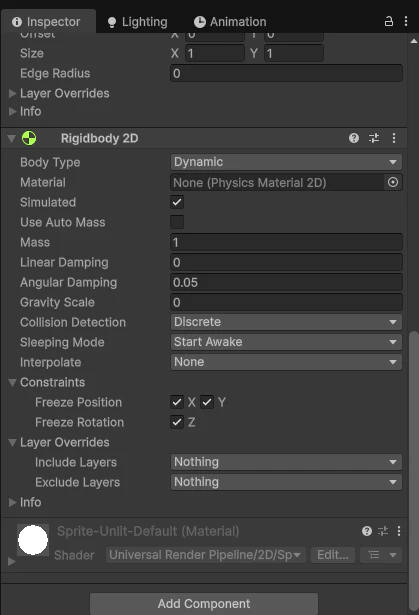
Gravity Scaleを0にして重力を消して、FreezePositionのX軸、Y軸とFreezeRotationのZ軸にチェックを入れることによって、高さを固定し、回転しないようにしている。
次に移動させる処理を書く。
このゲームはplayerを動かすより、周りの物体を動かしたほうが作りやすい(個人的な意見)ので、動いている障害物をplayerが避けるように作成する。
Assets内で右クリックをし、
Create->Scripting->MonoBehaviour Scriptを選択する。
名前は何でもよいが、私はObstacleControllerにする。
あとで外すのでどちらでもよいが、どのような動きか見たい方はSquareに追加することをお勧めする。
Update内にこのコードを追加する。
transform.Translate(Vector3.left*0.05f);
Translateというのは指定した座標に、相対移動させるときに使う。
今回はVector3.leftなので、左側へ進むようになっている。
0.05にfがついているのはfloat型の値と示すためにある。
補足説明
Vector3.leftの中身は以下のようになっている。Vector3(-1,0,0)
つまり、X軸方向に-1成分の座標が入っている。
そして、このままだとかなり早く移動してしまうので、0.05掛けて減速させている。
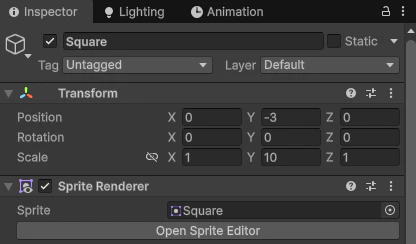
次に高さがランダムになるようにする。
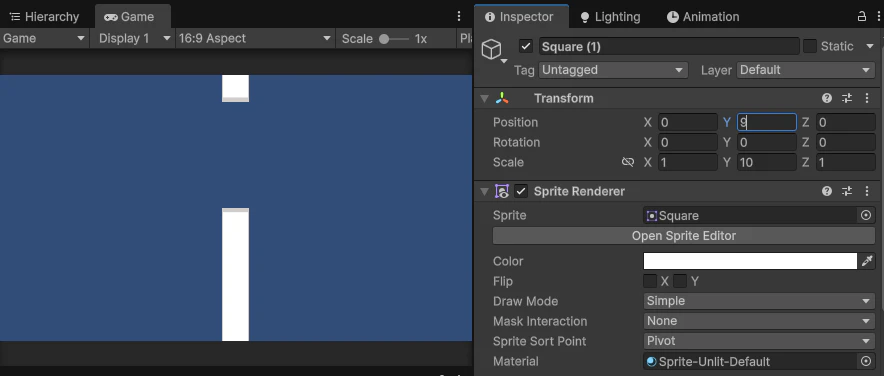
今回は上下が見えないので大きさを変えるのではなく、もともと大きい状態で配置して位置を変えることで障害物の大きさが変わっているように見えるようにする。
なので、大きさ変更するためにInspectorからScaleのY軸の値を10などに設定し、画面からはみ出す大きさにする。
下から生えている障害物は作れたので、次は上から生えている障害物を作成する。基本的な部分は変わらないので、HierarchyでSquareをクリックし、ctrl+Dで複製する。
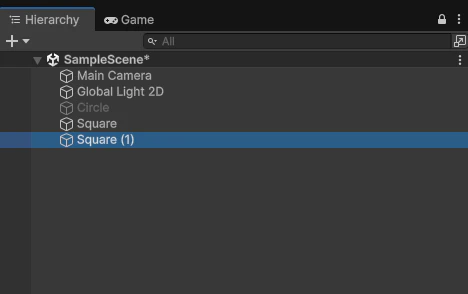
このように、(1)がついた全く同じオブジェクトが作られる。
いい感じの隙間ができるように位置調整をする。
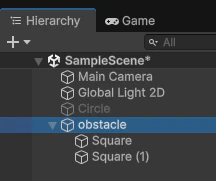
次はこの二つのオブジェクトを一つのオブジェクトとして扱いたいので、中身のない親オブジェクトを作成し、二つの障害物を子オブジェクトとして設定する。
Hierarchyで右クリックし、
Create Empty で空のオブジェクトを作成して名前をobstacleに設定する。
このオブジェクトにObstacleController(障害物用のSxript)を追加する。
ここでSquareにObstacleControllerを追加した人は、InspectorのScriptのアイコンを右クリックして、Remove Componentをクリックすることで削除することができる。
Squareをobstacleにドラッグアンドドロップで移動させると下の画像のようになる。
配置する高さをランダムにする必要があるので、ObstacleCotroller(障害物用のScript)に追記する。ついでに、右側から移動させるので、初期位置を右に設定する。
float posY=Random.Range(-5, 0);
transform.position=new Vector3(5,posY,0);
これをvoid Start()内に配置する。
void Start()内は最初に一回だけ実行するという処理がされるので、X座標5、Y座標-5から0の中のランダムな場所に配置される。
これで障害物自体の設定は終わり。
全体のコード
using UnityEngine;

public class ObstacleController : MonoBehaviour
{
    // Start is called once before the first execution of Update after the MonoBehaviour is created
    void Start()
    {
        float posY=Random.Range(-5, 0);
        transform.position=new Vector3(15,posY,0);
    }

    // Update is called once per frame
    void Update()
    {
        transform.Translate(Vector3.left*0.05f);
    }
}
5. 障害物を自動生成させる
今の状態だと障害物を一回避けるだけで終わってしまう。なので、自動生成させるコードを書く。
Assets内で右クリックし、
Create->Scripting->MonoBehaviour Scriptを選択して、ObstacleManagerという名前のScriptを作成する。
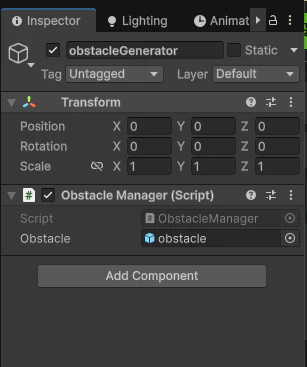
さらに、ObstacleManagerを入れるからのオブジェクトも作成する。
Hierarchyで右クリックして、
Create Emptyを選択し、ObstacleGeneratorという名前にする。
そして、AssetsにあるObstacleManagerをドラッグアンドドロップしてObstacleGeneratorにObstacleManagerを追加する。
(Add Componentから追加していない理由はない)
Componentの追加方法について
-
Add Componentから追加する。
-
Assets内からドラッグ&ドロップして追加する。
-
ScriptからAddComponentする。
例)RigidBody2Dを追加する場合
Rigidbody2D rb=this.gameObject.AddComponent<Rigidbody2D>();
このコードはRigidbody2D型のrbを宣言しながら、Rigidbody2Dを代入したかったので、変な形になっている。実際にはこのような形で使うことはほとんどない。
まず、障害物をこのscriptから取得したいので、宣言する。
public GameObject obstacle;
これによって、Inspectorに枠ができるので、ドラッグアンドドロップする。
このコードで、一定間隔で障害物を生成する関数を宣言している。
while(true)で無条件に繰り返すようにしており、yield returnで待機状態にしている。最後に、Instantiateで生成している。
IEnumerator SpawnObstacle()
{
    while (true)
    {
        yield return new WaitForSeconds(1.5f);
        Instantiate(obstacle);
    }
}
上のコードだけでは関数を宣言しただけで実行はしていない。実行するのに、StartCroutineを使う。
void Start()内に下のコードを書く。
StartCoroutine(SpawnObstacle());
これでObstacleManagerは完成!!
全体のコード
using System.Collections;
using UnityEngine;

public class ObstacleManager : MonoBehaviour
{
    public GameObject obstacle;
    // Start is called once before the first execution of Update after the MonoBehaviour is created
    void Start()
    {
        StartCoroutine(SpawnObstacle());
    }

    // Update is called once per frame
    void Update()
    {

    }

    IEnumerator SpawnObstacle()
    {
        while (true)
        {
            yield return new WaitForSeconds(1.5f);
            Instantiate(obstacle);
        }
    }
}

最後に、Squareにobstacleタグをつける。
タグをつけるオブジェクトのInspectorから、
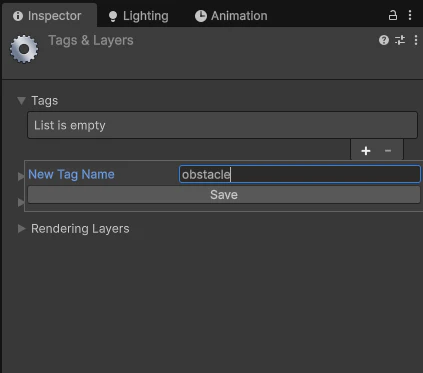
Untagged->Add Tag…を選択する。
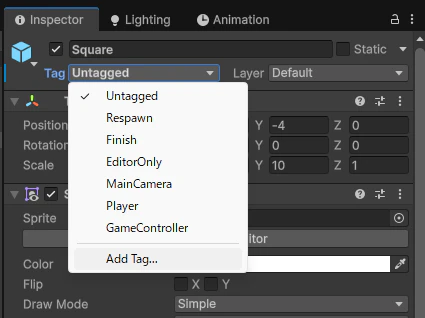
+ボタンを押してobstacleを追加して保存する。
もう一度、Untaggedをクリックすると、obstacleが追加されているので、オブジェクトにobstaleタグを追加する。
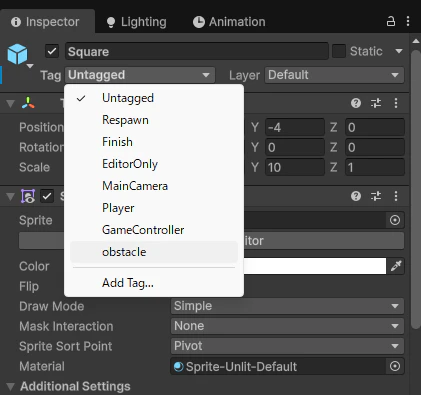
これをHierarchyにあるobstacleの中にある、二つのSquareにobstacleタグをつける。
6. 当たったときの処理を作る
PlayerCotrollerに障害物と当たったか感知するコードを書く。
OnCollisionEnter2Dで何かと当たった時を感知する。
そして、中のif文で、当たったオブジェクトがobstacleというタグが付いているときに、実行するようにしている。
void OnCollisionEnter2D(Collision2D collision)
{
    if (collision.gameObject.CompareTag("obstacle"))
    {
        this.gameObject.SetActive(false);
        Debug.Log("Game Over!");
    }
}
これで当たったときの処理は終わり。
全体のコード
using UnityEngine;
using UnityEngine.InputSystem;
using UnityEngine.SceneManagement;

public class PlayerController : MonoBehaviour
{
    public float jumpForce=5;
    public static int score=0;
    public bool isGame=true;
    InputAction jumpAction;
    Rigidbody2D rb2d;
    // Start is called once before the first execution of Update after the MonoBehaviour is created
    void Start()
    {
        jumpAction = InputSystem.actions.FindAction("Jump");
        jumpAction.Enable();
        rb2d = this.GetComponent<Rigidbody2D>();
    }

    // Update is called once per frame
    void Update()
    {
        if(jumpAction.triggered)
        {
            rb2d.linearVelocityY = 0;
            rb2d.AddForce(Vector3.up * jumpForce, ForceMode2D.Impulse);
            Debug.Log("Jump!");
        }
        if(transform.position.y<-7)
        {
            Debug.Log("Game Over!");
            isGame=false;
        }
        if(transform.position.y>7)
        {
            Debug.Log("Game Over!");
            isGame=false;
        }
        if (!isGame)
        {
            SceneManager.LoadScene("ResultScene");
        }
    }
    void OnCollisionEnter2D(Collision2D collision)
    {
        if (collision.gameObject.CompareTag("obstacle"))
        {
            Debug.Log("Game Over!");
            isGame=false;
        }
    }
}
7.画面外に行った時の処理
今のままでは画面外に行っても終了しない。
なので、PlayerControllerにY座標が一定より大きかった時、または小さかった時に、ゲームオーバーにする処理を書く。
if(transform.position.y<-7)
{
    Debug.Log("Game Over!");
    isGame=false;
}
if(transform.position.y>7)
{
    Debug.Log("Game Over!");
    isGame=false;
}
8. ゲームが終了した時の処理
ゲームを終了したことを感知するためにboolをPlayerControllerに追加する。
最初からゲームが開始している状態なので、初期値をtrueにする。
public bool isGame=true;
if文の条件式に「!isGame」と書くことで、isGameがfalseだった時実行するようにできる。
if (!isGame)
{
    SceneManager.LoadScene("ResultScene");
}
最後に、Debug.Log("Game Over!");の下に
isGame=false;
と書けば、PlayerControllerは終わり。
全体のコード
using UnityEngine;
using UnityEngine.InputSystem;
using UnityEngine.SceneManagement;

public class PlayerController : MonoBehaviour
{
    public float jumpForce=10;
    public bool isGame=true;
    InputAction jumpAction;
    Rigidbody2D rb2d;
    // Start is called once before the first execution of Update after the MonoBehaviour is created
    void Start()
    {
        jumpAction = InputSystem.actions.FindAction("Jump");
        jumpAction.Enable();
        rb2d = this.GetComponent<Rigidbody2D>();
    }

    // Update is called once per frame
    void Update()
    {
        if(jumpAction.triggered)
        {
            rb2d.linearVelocityY = 0;
            rb2d.AddForce(Vector3.up * jumpForce, ForceMode2D.Impulse);
            Debug.Log("Jump!");
        }
        if (!isGame)
        {
            SceneManager.LoadScene("ResultScene");
        }
    }
    void OnCollisionEnter2D(Collision2D collision)
    {
        if (collision.gameObject.CompareTag("obstacle"))
        {
            this.gameObject.SetActive(false);
            Debug.Log("Game Over!");
            isGame=false;
        }
    }
}
スコアなどリザルトを写す画面を作る。
Assets内を右クリックして、
Create->Scene->Sceneでシーンを追加する。
名前はわかりやすくResultSceneにする。
オブジェクトを追加する前に、
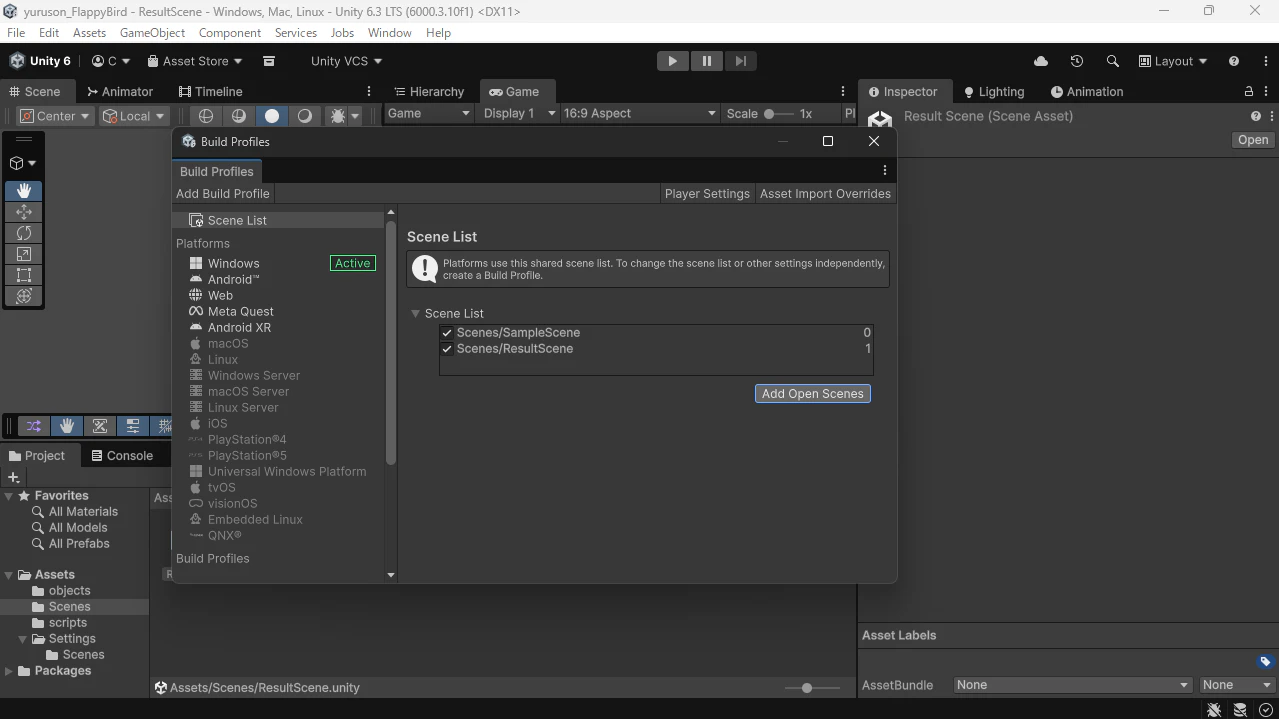
File->BuildProfile からScene Listを開き、Add Open Scenesをクリックする。
これによって、シーン遷移をすることができるようになる。
UIを作成する。
ResultSceneのHierarchyで右クリックして、
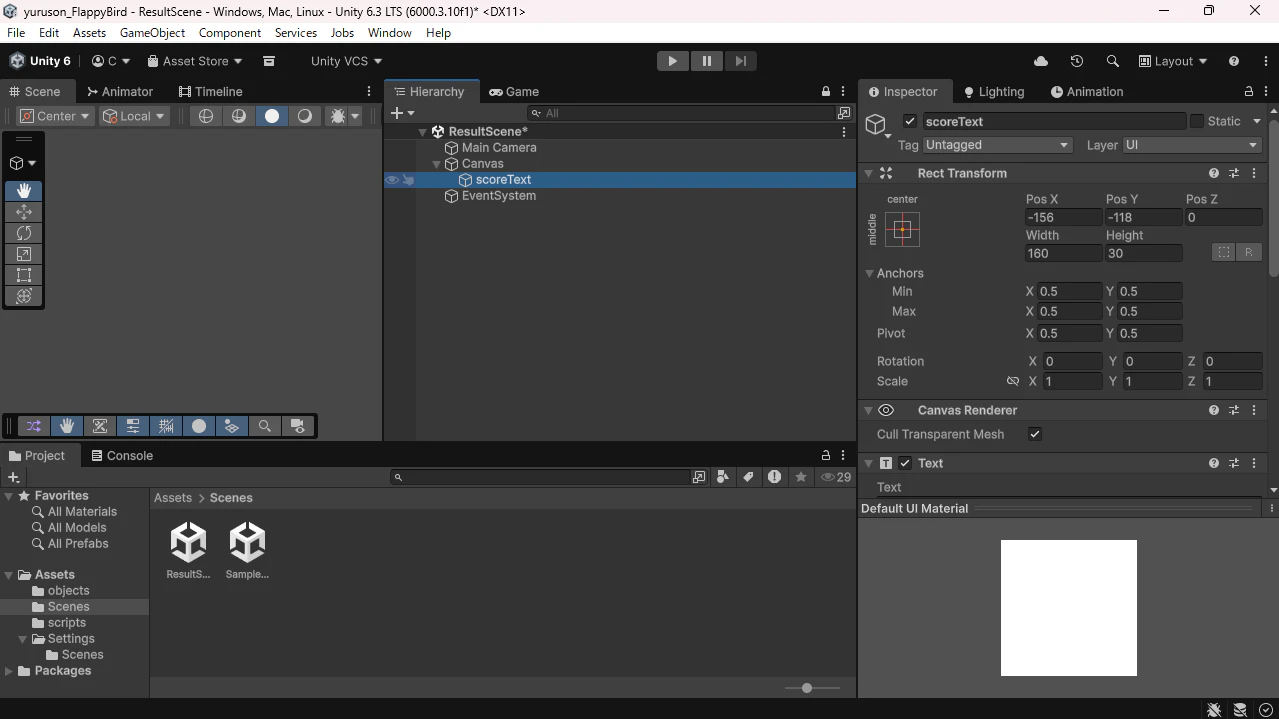
Create->UI(Canvas)->Legacy->textを選択する。
名前はscoreTextにする。
スコアを表示する場所は作ったが、スコア自体がないので作成する。
Sample Sceneに戻る。
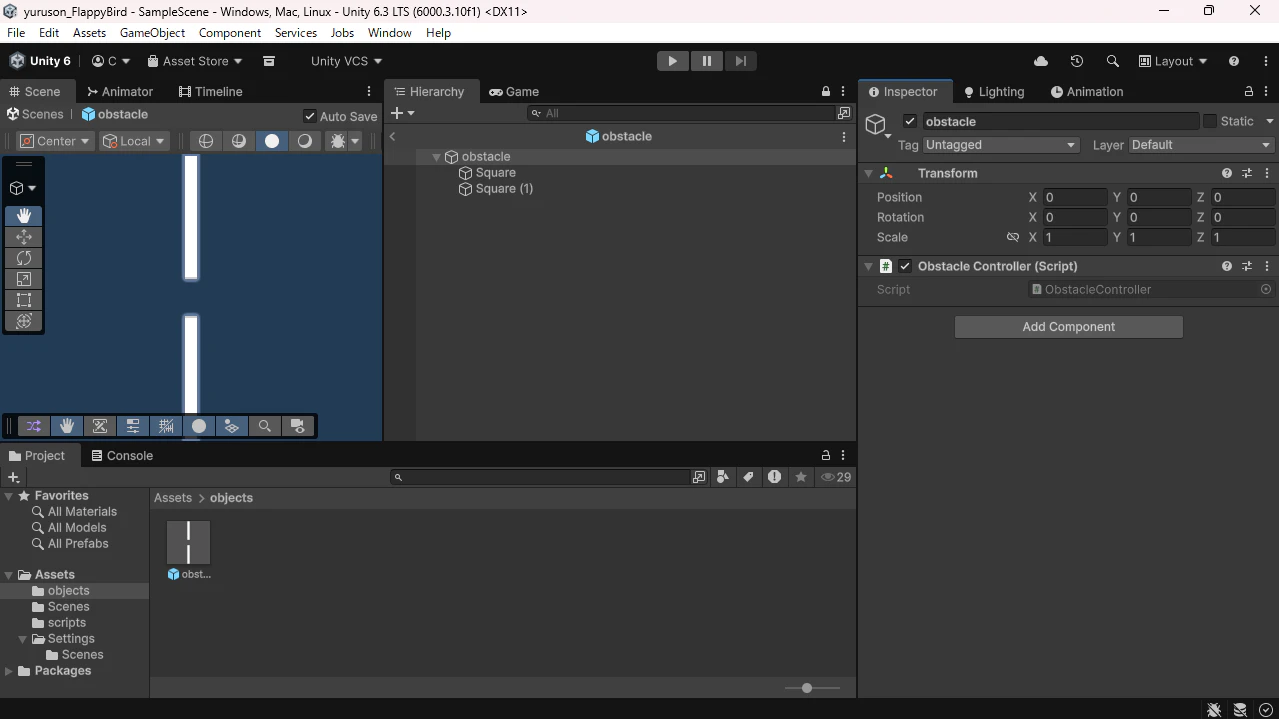
先ほど作ったobstacleのprefabからInspectorを開き、右上のopenをクリックする。

すると、このようにprefabの中身を見ることができる。
ここに通り抜けたか判定を取るための当たり判定を追加する。
今回は可視化することができるようにSquareを使う。
Hierarchyを右クリックして、
2D Object->Sprites->Squareで追加する。
追加したら、Square (2)という名前のオブジェクトが出てくる。
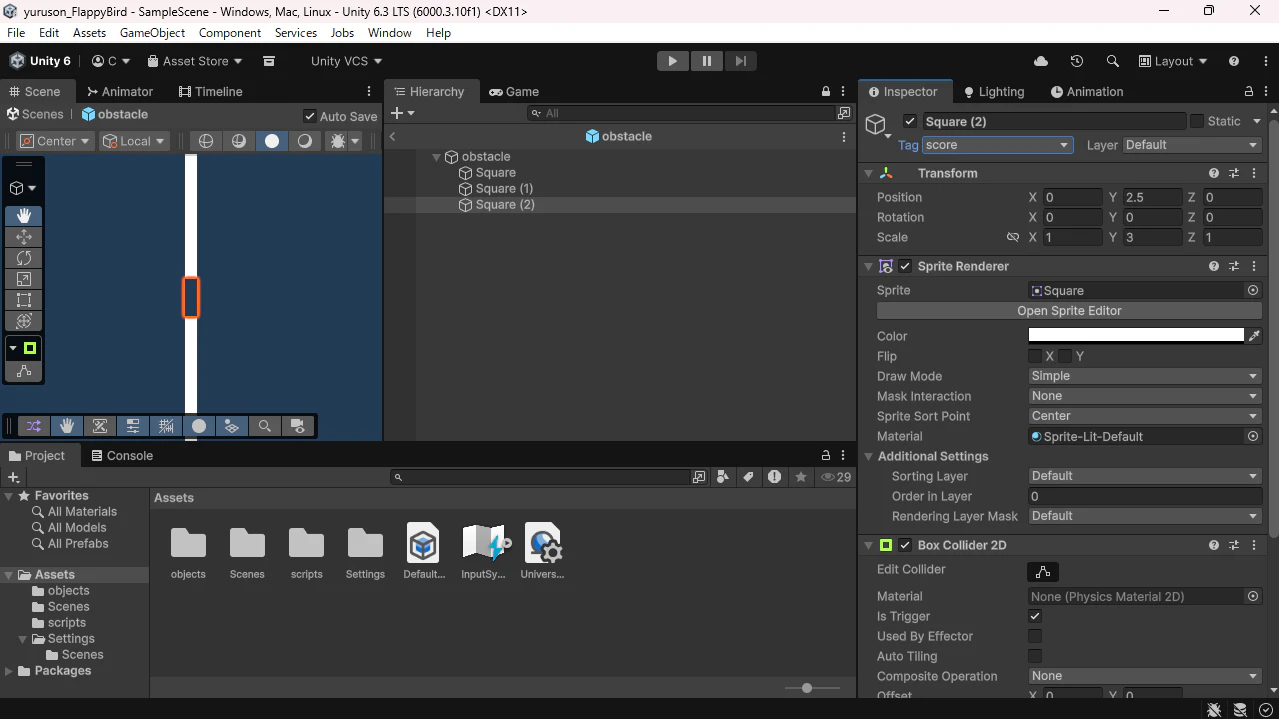
Square (2)のY軸のScaleを調整して、障害物の間に入れる。
このSqareは見えてはいけないのでInspectorにあるColorタブをクリックして、alfa値を0にする。これによって、透明になる。
さらに、物理的に当たってほしくないので、InspectorのBox Collider2DのisTriggerにチェックを入れる。
最後に、Inspector上部にあるTagのUntaggedをクリックして、
Add Tag…を選び、+ボタンを押してscoreという名前のタグを追加する。
下の画像のようになっていればおk。
そして、scoreという整数型の変数を宣言する。
public static int score=0;
この変数をResultSceneでも使いたいので、publicにしてstaticで静的な変数にすることで、外部からでも簡単に参照することができるようにする。
static変数は全体に共有されるので扱いに注意!!
そして、OnTriggerEnter2Dという関数を追加する。
OnTriggerEnter2DはTriggerのチェックがついたオブジェクトと触れたときに実行される。
その中に、if文で触れたオブジェクトがscoreタグだったら、という条件を付ける。
if文の中にはscoreに1を足す処理と実行されているか確認するためのDebug.Logを追加する。
void OnTriggerEnter2D(Collider2D collider)
    {
        if (collider.gameObject.CompareTag("score"))
        {
            Debug.Log("Score!");
            score++;
        }
    }
これでPlayerControllerは完成!!
全体のコード
using UnityEngine;
using UnityEngine.InputSystem;
using UnityEngine.SceneManagement;

public class PlayerController : MonoBehaviour
{
    public float jumpForce=10;
    public int score=0;
    public bool isGame=true;
    InputAction jumpAction;
    Rigidbody2D rb2d;
    // Start is called once before the first execution of Update after the MonoBehaviour is created
    void Start()
    {
        jumpAction = InputSystem.actions.FindAction("Jump");
        jumpAction.Enable();
        rb2d = this.GetComponent<Rigidbody2D>();
    }

    // Update is called once per frame
    void Update()
    {
        if(jumpAction.triggered)
        {
            rb2d.linearVelocityY = 0;
            rb2d.AddForce(Vector3.up * jumpForce, ForceMode2D.Impulse);
            Debug.Log("Jump!");
        }
        if (!isGame)
        {
            SceneManager.LoadScene("ResultScene");
        }
    }
    void OnCollisionEnter2D(Collision2D collision)
    {
        if (collision.gameObject.CompareTag("obstacle"))
        {
            this.gameObject.SetActive(false);
            Debug.Log("Game Over!");
            isGame=false;
        }
    }

    void OnTriggerEnter2D(Collider2D collider)
    {
        if (collider.gameObject.CompareTag("score"))
        {
            Debug.Log("Score!");
            score++;
        }
    }
}
リザルト画面を作成する。
ResultSceneに移動して、Assets内を右クリックして、
Create->Scripting->MonoBehaviour Scriptをクリックする。
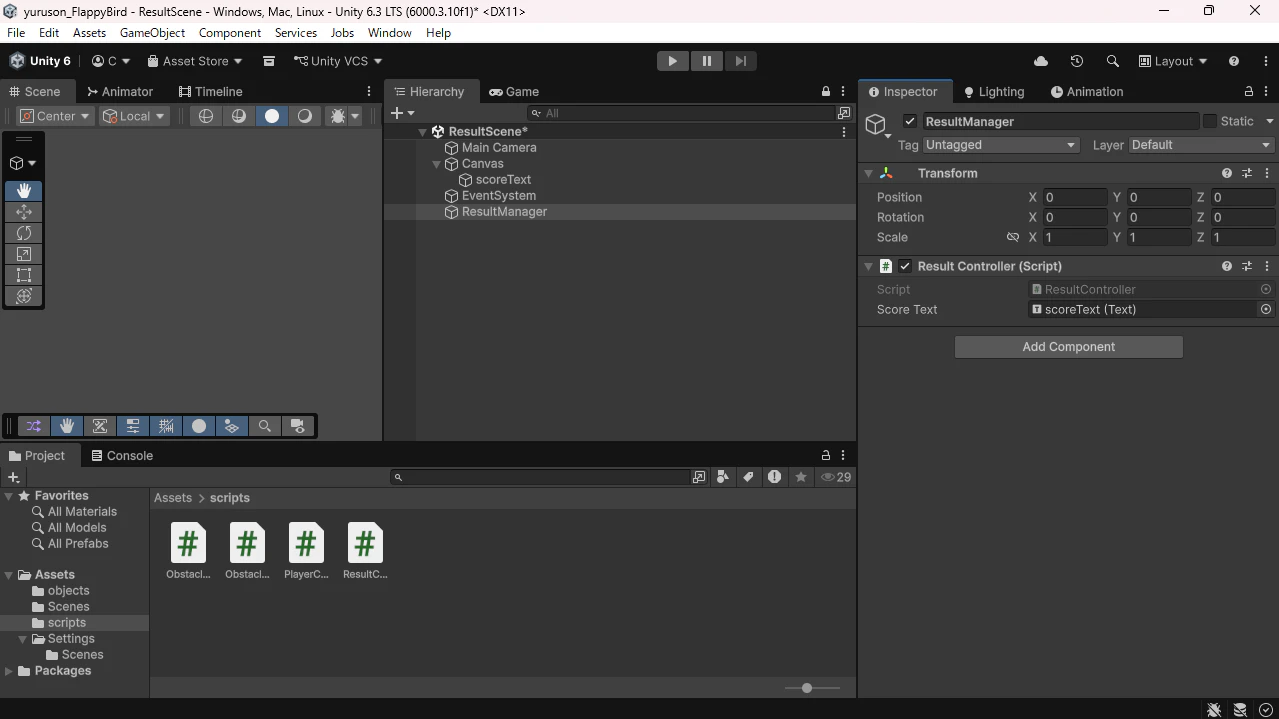
名前をResultControllerにする。
Scriptを入れるためのオブジェクトも作成する。
Hierarchyを右クリックして、
Create Emptyをクリックして、名前をResultManagerにしておく。
先ほど作成したscoreTextのtextコンポーネントを取得したいので、
SerializeFieldでInspectorからドラッグアンドドロップできるようにする。
[SerializeField] Text scoreText;
これでtextコンポーネントを追加できる枠が表示される。
scoreText.text = "Score: " + PlayerController.score.ToString();
表示されている値が壁を乗り越えた回数になっているか確認するためにプレイする。
ボタンを作成する。
タイトルに戻るボタンとリプレイボタンを作成する。
Hierarchyを右クリックして、
UI(Canvas)->Legacy->Buttonをクリックする。
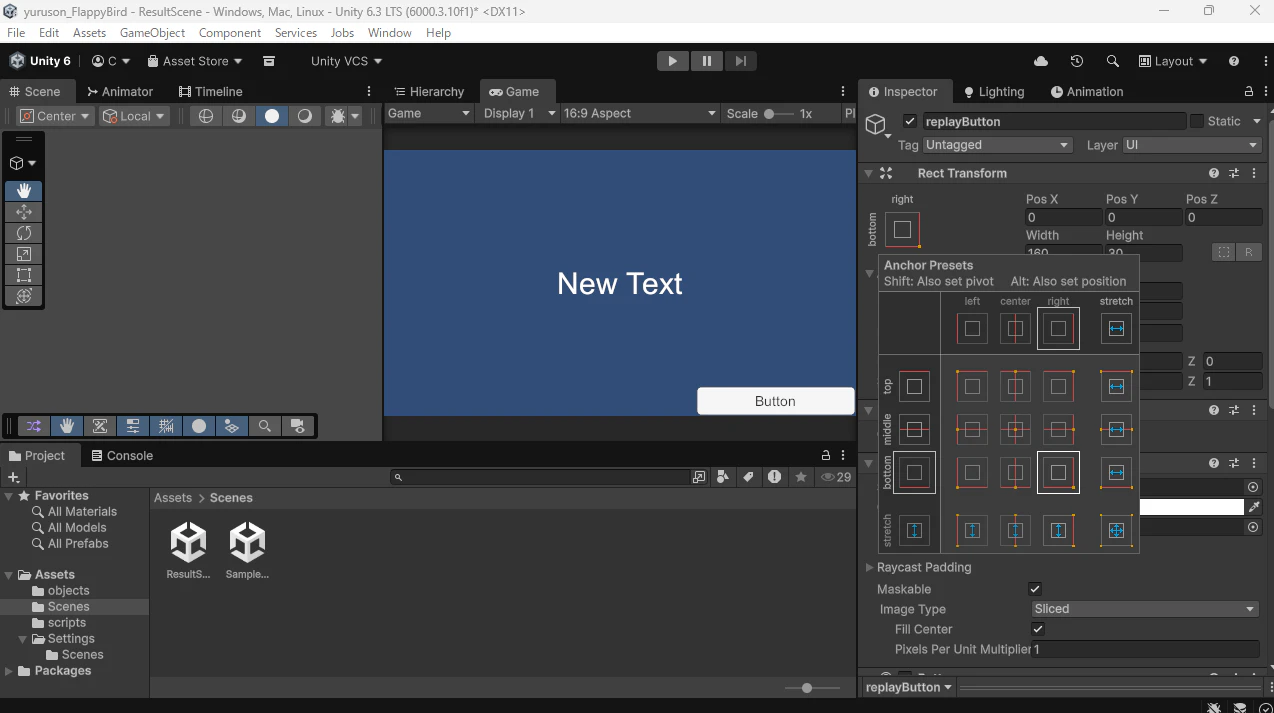
名前はreplayButtonにする。
まず配置を変更する。
Inspectorの左にある四角に十字模様のある図をクリックする。
すると、このような表が表示される。
画像の場所をalt+Sifhtを押して、クリックするとボタンが右下に移動する。
同じ手順でタイトル遷移ボタンを作成する。
replayボタンと中身は同じなので、ctrl+DでreplayButtonを複製する。
この時、名前を変えることを忘れないようにする。
名前はtitleButtonにする。
先ほどと同じようにInspectorの図をクリックして、今度は左下の一個上の図をalt+Sifhtを押しながらクリックする。すると、ボタンが左下に表示される。
ボタンに表示される文字は、ボタンの子オブジェクトのtextを変更すると変えられるので、好きな言葉に変更する。
ボタンに画面遷移機能を追加する。
ボタンのInscpectorの下の部分にあるonClickに関数を追加することで、押したときに好きな関数を実行させることができる。
まず、関数を宣言する。
このコードでは二つの関数を宣言している。
ReStart関数ではscoreを初期化してSampleSceneに遷移している。
ToTitle関数ではscoreを初期化してTitleSceneに遷移している。
public void ReStart()
{
    PlayerController.score = 0;
    SceneManager.LoadScene("SampleScene");
}

public void ToTitle()
{
    PlayerController.score = 0;
    SceneManager.LoadScene("TitleScene");
}
これでResultControllerも完成!!
全体のコード
using UnityEngine;
using UnityEngine.UI;
using UnityEngine.SceneManagement;

public class ResultController : MonoBehaviour
{
    [SerializeField] Text scoreText;
    // Start is called once before the first execution of Update after the MonoBehaviour is created
    void Start()
    {

    }

    // Update is called once per frame
    void Update()
    {
        scoreText.text = "Score: " + PlayerController.score.ToString();
    }

    public void ReStart()
    {
        PlayerController.score = 0;
        SceneManager.LoadScene("SampleScene");
    }

    public void ToTitle()
    {
        PlayerController.score = 0;
        SceneManager.LoadScene("TitleScene");
    }
}
ボタンに関数を追加する。
ボタンのInspectorのOnClick()のNone ObjectにResultManagerをドラッグアンドドロップする。
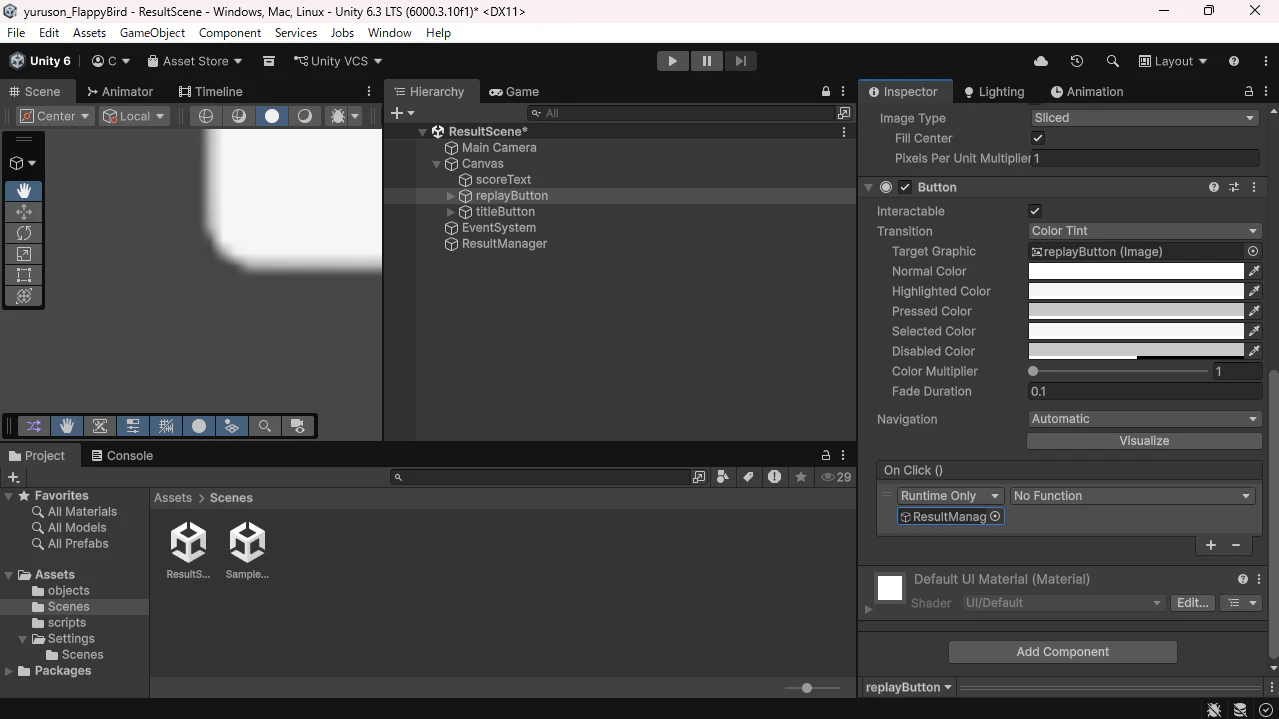
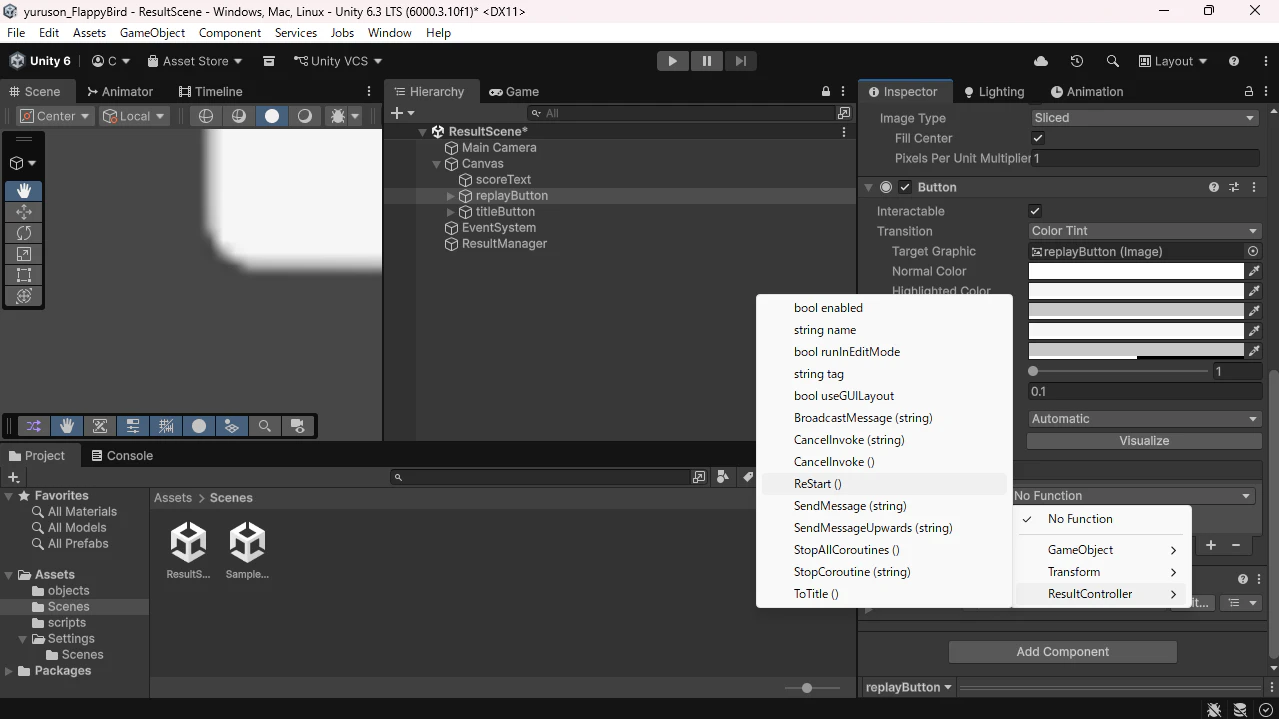
no functionをクリックして、
ResultController->ReStart() を選ぶ。
これでボタンを押したときReStartが実行され、もう一度遊ぶことができるようになった。
これと同じ手順でtitleButtonを押したときに、ToTitle関数が実行されるようにする。
8.タイトルシーンの作成
Assets内で右クリックして、
Create->Scene->Sceneを選択する。
Sceneの名前はTitleSceneにする。
TitleSceneにUIを追加する。
タイトルシーンなので、スタートボタンとタイトルを配置する。
Hierarchyを右クリックして、
UI(Canvas)->Legacy->Buttonと
UI(Canvas)->Legacy->Textでボタンとテキストを追加する。
textは好きなタイトルにする。
OnClickに追加するための関数を宣言する。
Assets内で右クリックして、
Create->Scripting->MonoBehaviour Scriptを選択する。
名前はTitleControllerにする。
この中で関数を宣言する。
public void GameStart()
{
    SceneManager.LoadScene("SampleScene");
}
そして、TitleControllerを使うために空のオブジェクトを作成する。
Hierarchyで右クリックして、
Create Emptyを選択する。
名前をTitleManagerにする。
TitleManagerにTitleCotrollerをドラッグアンドドロップする。
ボタンのInspectorの下のほうにあるOnClickの+ボタンをクリックしてNone ObjectにTitleManagerをドラッグアンドドロップする。
no function->TitleController->GameStart()でボタンを押したときに関数が実行されるようにする。
TitleControllerも完成!!
全体のコード
using UnityEngine;
using UnityEngine.SceneManagement;

public class TItleController : MonoBehaviour
{
    // Start is called once before the first execution of Update after the MonoBehaviour is created
    void Start()
    {

    }

    // Update is called once per frame
    void Update()
    {

    }

    public void GameStart()
    {
        SceneManager.LoadScene("SampleScene");
    }
}
これでゲーム完成!!!
かなり最低限の部分しか教えていないので、追加したいものや難易度調整は自分でやってみよう。
PlayerCotroller
using UnityEngine;
using UnityEngine.InputSystem;
using UnityEngine.SceneManagement;

public class PlayerController : MonoBehaviour
{
    public float jumpForce=5;
    public static int score=0;
    public bool isGame=true;
    InputAction jumpAction;
    Rigidbody2D rb2d;
    // Start is called once before the first execution of Update after the MonoBehaviour is created
    void Start()
    {
        jumpAction = InputSystem.actions.FindAction("Jump");
        jumpAction.Enable();
        rb2d = this.GetComponent<Rigidbody2D>();
    }

    // Update is called once per frame
    void Update()
    {
        if(jumpAction.triggered)
        {
            rb2d.linearVelocityY = 0;
            rb2d.AddForce(Vector3.up * jumpForce, ForceMode2D.Impulse);
            Debug.Log("Jump!");
        }
        if(transform.position.y<-7)
        {
            Debug.Log("Game Over!");
            isGame=false;
        }
        if(transform.position.y>7)
        {
            Debug.Log("Game Over!");
            isGame=false;
        }
        if (!isGame)
        {
            SceneManager.LoadScene("ResultScene");
        }
    }
    void OnCollisionEnter2D(Collision2D collision)
    {
        if (collision.gameObject.CompareTag("obstacle"))
        {
            Debug.Log("Game Over!");
            isGame=false;
        }
    }

    void OnTriggerEnter2D(Collider2D collider)
    {
        if (collider.gameObject.CompareTag("score"))
        {
            Debug.Log("Score!");
            score++;
        }
    }
}
ObstacleCotroller
using UnityEngine;

public class ObstacleController : MonoBehaviour
{
    // Start is called once before the first execution of Update after the MonoBehaviour is created
    void Start()
    {
        float posY=Random.Range(-5, 0);
        transform.position=new Vector3(15,posY,0);
    }

    // Update is called once per frame
    void Update()
    {
        transform.Translate(Vector3.left*0.05f);
    }
}
ObstacleManager
using System.Collections;
using UnityEngine;

public class ObstacleManager : MonoBehaviour
{
    public GameObject obstacle;
    // Start is called once before the first execution of Update after the MonoBehaviour is created
    void Start()
    {
        StartCoroutine(SpawnObstacle());
    }

    // Update is called once per frame
    void Update()
    {

    }

    IEnumerator SpawnObstacle()
    {
        while (true)
        {
            yield return new WaitForSeconds(1.5f);
            Instantiate(obstacle);
        }
    }
}
ResultController
using UnityEngine;
using UnityEngine.UI;
using UnityEngine.SceneManagement;

public class ResultController : MonoBehaviour
{
    [SerializeField] Text scoreText;
    // Start is called once before the first execution of Update after the MonoBehaviour is created
    void Start()
    {

    }

    // Update is called once per frame
    void Update()
    {
        scoreText.text = "Score: " + PlayerController.score.ToString();
    }

    public void ReStart()
    {
        PlayerController.score = 0;
        SceneManager.LoadScene("SampleScene");
    }

    public void ToTitle()
    {
        PlayerController.score = 0;
        SceneManager.LoadScene("TitleScene");
    }
}
TitleCotroller
using UnityEngine;
using UnityEngine.SceneManagement;

public class TItleController : MonoBehaviour
{
    // Start is called once before the first execution of Update after the MonoBehaviour is created
    void Start()
    {

    }

    // Update is called once per frame
    void Update()
    {

    }

    public void GameStart()
    {
        SceneManager.LoadScene("SampleScene");
    }
}