はじめに
アドベントカレンダーの季節になりましたね。この時期になると有用な秘蔵の知見も大放流されるので
読んだり選んだりするのは大変だったりしますがとても学びがあります。
特にKubernetes系のアドカレ記事を読んで直前までネタを考えてなかったのでパク、インスピレーションをもらえたので前々から試そうと思っていたタイトルの内容を試してみました。
ちなみにローカル環境でIstioを入れる意味は...特にないです!ただ単に
「kindは前に試してたけどアドカレで日本語情報も増えたし久々に触ってみっか」と
「Istioを触る機会はなかったけど使い勝手とかどうなんだろう?」
というのが同時に湧いてきたので合わせてみただけだったりです。
なお今回試したコンフィグ類をGithubに置いておきました。
実行環境
- ハードウェア
- MacOS: Mojave
- Device: Macbook Pro
- Memory: 16 GB
- CPU: 2.5 GHz Intel Core i7
- 機種名: MacBook Pro
- ソフトウェア
- docker: 19.03.4 (Server/Client)
- kind: v0.6.1
kind
クラスタ作成
まずkubernetesの実行環境としてkindを使用します。
インストール方法はこちらから。ちなみに私はgoの環境が既にあったのでgo getでインストールしています。
https://kind.sigs.k8s.io/docs/user/quick-start/
kind create clusterするだけでもシングルノードのクラスタはできますが、
諸々設定がないデフォルト状態なので以下のコンフィグを作成してます。
kind: Cluster
apiVersion: kind.sigs.k8s.io/v1alpha3
nodes:
- role: control-plane
- role: worker
  extraPortMappings:
  - containerPort: 30080
    hostPort: 30080
ノード毎にextraPortMappingsを指定でき、これがk8sのNodePortとして利用できるので30080ポートを開けています。
クラスタを構築してみると初回はイメージ取得などもあるので数分、2回目以降なら10秒程度で完成します。
ちなみにkindのコンフィグを変更しても適用する方法はなさそうなので、変更を反映するにはクラスタを作り直すしかないようですが、それもサクッとできますね。
$ kind create cluster --config kind-config.yaml
Creating cluster "kind" ...
 ✓ Ensuring node image (kindest/node:v1.16.3) 🖼
 ✓ Preparing nodes 📦
 ✓ Writing configuration 📜
 ✓ Starting control-plane 🕹️
 ✓ Installing CNI 🔌
 ✓ Installing StorageClass 💾
 ✓ Joining worker nodes 🚜
Set kubectl context to "kind-kind"
You can now use your cluster with:

kubectl cluster-info --context kind-kind

Thanks for using kind! 😊
kind-kindというコンテキストに切り替えるとkindで構築したクラスタをkubectlで操作できるようになります。
$ kubectl cluster-info --context kind-kind
Kubernetes master is running at https://127.0.0.1:58426
KubeDNS is running at https://127.0.0.1:58426/api/v1/namespaces/kube-system/services/kube-dns:dns/proxy

To further debug and diagnose cluster problems, use 'kubectl cluster-info dump'.
$ kubectl config use-context kind-kind
Switched to context "kind-kind".
$ kubectl get node
NAME                 STATUS   ROLES    AGE    VERSION
kind-control-plane   Ready    master   2m8s   v1.16.3
kind-worker          Ready    <none>   95s    v1.16.3
ちなみにDocker的にはマッピングしたポートが以下のように見えます。
$ docker ps
CONTAINER ID        IMAGE                  COMMAND                  CREATED             STATUS              PORTS                                                                  NAMES
26739125161e        kindest/node:v1.16.3   "/usr/local/bin/entr…"   7 hours ago         Up 7 hours          127.0.0.1:58426->6443/tcp  kind-control-plane
0d46c43a644d        kindest/node:v1.16.3   "/usr/local/bin/entr…"   7 hours ago         Up 7 hours          0.0.0.0:30080->30080/tcp   kind-worker
クラスタを削除したい場合は以下のコマンドで削除できます。
kind delete cluster
自作のDockerイメージを配布する
kindにはimageのloadという機能があり、最初どんな機能かイマイチピンと来なくて使ってなかったのですが、
ホストマシンが持っているDockerイメージをkindクラスタのノードに配布?転送?するという開発環境としては嬉しい機能がありました。
わざわざdockerhubなどのレジストリにpushしなくていいので手間が減って良いですね。
https://kind.sigs.k8s.io/docs/user/quick-start/#loading-an-image-into-your-cluster
せっかくなので環境変数MSGを表示するだけの簡単なWebアプリのイメージを作ってkind loadしてみましょう。
コードはこんな感じです。
package main

import (
  "fmt"
  "net/http"
  "os"
)

func main(){
  http.HandleFunc("/", handler)
  http.ListenAndServe(":8080", nil)
}

func handler(w http.ResponseWriter, r *http.Request){
  msg := os.Getenv("MSG")
  fmt.Fprintf(w, msg)
}
FROM golang:alpine AS builder

WORKDIR /work
COPY main.go .
RUN go build -o envweb .

FROM alpine

WORKDIR /exec
COPY --from=builder /work/envweb .
CMD ["./envweb"]
まずはホスト側でDockerビルドします。
$ docker build -t envweb:v1 .
Sending build context to Docker daemon  3.072kB
Step 1/8 : FROM golang:alpine AS builder
 ---> 69cf534c966a
Step 2/8 : WORKDIR /work
 ---> Using cache
 ---> ac2f9cedbec1
Step 3/8 : COPY main.go .
 ---> Using cache
 ---> 1c8da2825756
Step 4/8 : RUN go build -o envweb .
 ---> Using cache
 ---> 6dcb50b4c927
Step 5/8 : FROM alpine
 ---> 965ea09ff2eb
Step 6/8 : WORKDIR /exec
 ---> Using cache
 ---> 59303d271366
Step 7/8 : COPY --from=builder /work/envweb .
 ---> Using cache
 ---> 6aae52df31e3
Step 8/8 : CMD ["./envweb"]
 ---> Using cache
 ---> 7b34cbc36c39
Successfully built 7b34cbc36c39
Successfully tagged envweb:v1

$ docker images
REPOSITORY                              TAG                 IMAGE ID            CREATED             SIZE
envweb                                  v1                  7b34cbc36c39        14 minutes ago      13MB
golang                                  alpine              69cf534c966a        5 days ago          359MB
kindest/node                            v1.16.3             14809a9a48fc        6 days ago          1.26GB
alpine                                  latest              965ea09ff2eb        7 weeks ago         5.55MB
envwebというイメージがビルドできました。これをkindでクラスタにロードしてみます。
$ kind load docker-image envweb:v1
Image: "envweb:v1" with ID "sha256:7b34cbc36c3902eb8093668638c4259b4ebd56e5bf8e81a3f0ea08b3c40fab7f" not present on node "kind-worker"
Image: "envweb:v1" with ID "sha256:7b34cbc36c3902eb8093668638c4259b4ebd56e5bf8e81a3f0ea08b3c40fab7f" not present on node "kind-control-plane"
kind-workerとkind-control-planeにロードされたようです。(--nodesでロード対象ノードを任意に指定できるようです)
kind-worker側でどう認識されているか見てみると、
docker clientではなくcrictlを使うせいかdocker.io/library/envweb:v1とprefixが付いていますが、ハッシュ値が一致するイメージがありました。
$ docker exec -it kind-worker crictl images
IMAGE                                TAG                 IMAGE ID            SIZE
docker.io/kindest/kindnetd           0.5.3               aa67fec7d7ef7       80.3MB
docker.io/library/envweb             v1                  7b34cbc36c390       13.3MB
docker.io/library/nginx              latest              231d40e811cd9       50.8MB
k8s.gcr.io/coredns                   1.6.2               bf261d1579144       44.2MB
k8s.gcr.io/etcd                      3.3.15-0            b2756210eeabf       248MB
k8s.gcr.io/kube-apiserver            v1.16.3             392249bd86967       185MB
k8s.gcr.io/kube-controller-manager   v1.16.3             808025b3748ef       128MB
k8s.gcr.io/kube-proxy                v1.16.3             f4fd1d7052b4e       103MB
k8s.gcr.io/kube-scheduler            v1.16.3             1974a03197540       105MB
k8s.gcr.io/pause                     3.1                 da86e6ba6ca19       746kB
ちなみにイメージに付けるタグは何でもいいのですが
The Kubernetes default pull policy is
IfNotPresentunless the image tag is:latestin which case the default policy isAlways.
IfNotPresentcauses the Kubelet to skip pulling an image if it already exists.
とあるようにタグ指定せずに:latestにしてしまうとkubernetesのpull policyはAlwaysがデフォルトになってしまうので、
ロードしたイメージが使われずImagePullBackOffになったりと想定外の動きをしてしまうので、何かしらタグをつけましょう。
Istio
公式のドキュメントを読みつつ進めました。
https://istio.io/docs/
インストール
Istioのインストール方法は3種類あるのですが、
| インストール方法 | 公式での扱い |
|---|---|
Customizable Install with Istioctl
|
Quick Installはistioctlベース |
Customizable Install with Helm
|
will be deprecated |
| Standalone Operator Install | Experimental |
なので現時点ではIstioctlを使うのがベストだと思われます。
istioctlの実行ファイルはドキュメントにあるようにコマンド1つで取ってこれるのであとはパスを通すだけで使えます。
curl -L https://istio.io/downloadIstio | sh -
istioctlでクラスタにistioをデプロイするのも以下の1コマンドでできました。
$ istioctl manifest apply --set profile=demo
Preparing manifests for these components:
- Tracing
- Injector
- Kiali
- Cni
- Telemetry
- Pilot
- Base
- PrometheusOperator
- IngressGateway
- EgressGateway
- Policy
- Grafana
- Citadel
- CertManager
- NodeAgent
- Prometheus
- CoreDNS
- Galley

Applying manifest for component Base
Finished applying manifest for component Base
Applying manifest for component Tracing
Applying manifest for component Galley
Applying manifest for component IngressGateway
Applying manifest for component Kiali
Applying manifest for component Policy
Applying manifest for component Citadel
Applying manifest for component Prometheus
Applying manifest for component EgressGateway
Applying manifest for component Pilot
Applying manifest for component Injector
Applying manifest for component Telemetry
Applying manifest for component Grafana
Finished applying manifest for component Tracing
Finished applying manifest for component Prometheus
Finished applying manifest for component Citadel
Finished applying manifest for component Galley
Finished applying manifest for component Kiali
Finished applying manifest for component Injector
Finished applying manifest for component EgressGateway
Finished applying manifest for component Policy
Finished applying manifest for component IngressGateway
Finished applying manifest for component Pilot
Finished applying manifest for component Grafana
Finished applying manifest for component Telemetry
ちなみにオプションの--set profile=demoって何だろう?というところですが、以下のページに解説と一覧がありました。
https://istio.io/docs/setup/additional-setup/config-profiles/
demoはistioのサイトで例として使われているBookinfoアプリに必要なコンポーネントをデプロイするようです。
コンポーネントとしてはistio-nodeagentを除くほぼ全部盛りのようです。
各コンポーネントの役割などはまだあまり理解できてませんが、今回の内容ではdefaultで十分だったかもしれませんね。。
ローカル環境向けのカスタマイズ
環境によっては上記のコマンドでインストールが完了しますが、
istio-ingressgatewayがtype: LoadBalancerなServiceとしてデプロイされるのに対して、
今回の環境にはロードバランサがありません。
ドキュメントにも
If your cluster is running in an environment that does not support an external load balancer (e.g., minikube), the EXTERNAL-IP of istio-ingressgateway will say . To access the gateway, use the service’s NodePort, or use port-forwarding instead.
と書かれているように、今回はistio-ingressgatewayをNodePortに変更しました。
またistio-ingressgatewayは複数のポートを持っていて、
今回使用したいhttp2のnodePortをkindのextraPortMappingsで露出させたcontainerPortの30080に変更しました。
もっとスマートな方法があるかもしれないですが、一応今回のポイントですね★
$ kubectl -n istio-system edit svc istio-ingressgateway
# Please edit the object below. Lines beginning with a '#' will be ignored,
# and an empty file will abort the edit. If an error occurs while saving this file will be
# reopened with the relevant failures.
#
apiVersion: v1
kind: Service
metadata:
  labels:
    app: istio-ingressgateway
    istio: ingressgateway
  name: istio-ingressgateway
  namespace: istio-system
spec:
  type: NodePort # <- LoadBalancerから変更
  selector:
    app: istio-ingressgateway
  ports:
  - name: http2
    nodePort: 30080 # <- kindの設定と合わせる
    port: 80
    protocol: TCP
    targetPort: 80
  - name: https
...
$ kubectl -n istio-system get svc
NAME                     TYPE        CLUSTER-IP       EXTERNAL-IP   PORT(S)                                                                                                                      AGE
grafana                  ClusterIP   10.96.74.124     <none>        3000/TCP                                                                                                                     25h
istio-citadel            ClusterIP   10.97.100.43     <none>        8060/TCP,15014/TCP                                                                                                           25h
istio-egressgateway      ClusterIP   10.102.103.38    <none>        80/TCP,443/TCP,15443/TCP                                                                                                     25h
istio-galley             ClusterIP   10.105.177.225   <none>        443/TCP,15014/TCP,9901/TCP,15019/TCP                                                                                         25h
istio-ingressgateway     NodePort    10.108.210.154   <none>        15020:30693/TCP,80:30080/TCP,443:31800/TCP,15029:32323/TCP,15030:30564/TCP,15031:32108/TCP,15032:31978/TCP,15443:30129/TCP   25h
istio-pilot              ClusterIP   10.107.90.39     <none>        15010/TCP,15011/TCP,8080/TCP,15014/TCP                                                                                       25h
istio-policy             ClusterIP   10.97.222.97     <none>        9091/TCP,15004/TCP,15014/TCP                                                                                                 25h
istio-sidecar-injector   ClusterIP   10.101.148.158   <none>        443/TCP                                                                                                                      25h
istio-telemetry          ClusterIP   10.96.219.241    <none>        9091/TCP,15004/TCP,15014/TCP,42422/TCP                                                                                       25h
jaeger-agent             ClusterIP   None             <none>        5775/UDP,6831/UDP,6832/UDP                                                                                                   25h
jaeger-collector         ClusterIP   10.111.95.238    <none>        14267/TCP,14268/TCP,14250/TCP                                                                                                25h
jaeger-query             ClusterIP   10.107.163.49    <none>        16686/TCP                                                                                                                    25h
kiali                    ClusterIP   10.100.80.83     <none>        20001/TCP                                                                                                                    25h
prometheus               ClusterIP   10.100.148.98    <none>        9090/TCP                                                                                                                     25h
tracing                  ClusterIP   10.108.193.129   <none>        80/TCP                                                                                                                       25h
zipkin                   ClusterIP   10.109.29.40     <none>        9411/TCP                                                                                                                     25h
Webアプリコンテナのデプロイ
前半で作成したWebアプリコンテナをデプロイします。
istioでバランシング等の制御の様子を見るため、webというServiceの裏に別々のメッセージを返す2種類のアプリをデプロイしようと思います。
apiVersion: v1
kind: Service
metadata:
  name: web
spec:
  ports:
  - port: 8080
    protocol: TCP
    targetPort: 8080
    name: http
  selector:
    app: web
---
apiVersion: apps/v1
kind: Deployment
metadata:
  name: web-v1
spec:
  replicas: 1
  selector:
    matchLabels:
      app: web
      version: v1
  template:
    metadata:
      labels:
        app: web
        version: v1
    spec:
      containers:
      - image: envweb:v1
        imagePullPolicy: IfNotPresent
        name: envweb
        env:
        - name: MSG
          value: This app is version 1
        ports:
        - containerPort: 8080
---
apiVersion: apps/v1
kind: Deployment
metadata:
  name: web-v2
spec:
  replicas: 1
  selector:
    matchLabels:
      app: web
      version: v2
  template:
    metadata:
      labels:
        app: web
        version: v2
    spec:
      containers:
      - image: envweb:v1
        imagePullPolicy: IfNotPresent
        name: envweb
        env:
        - name: MSG
          value: New app is version 2
        ports:
        - containerPort: 8080
デプロイ方法ですが、通常のmanifestのapplyが可能ですが、その場合は1つだけ下準備として、
デプロイするnamespaceにラベルを付ける必要があります。
$ kubectl label namespace default istio-injection=enabled
namespace/default labeled
$ kubectl get ns --show-labels
NAME              STATUS   AGE   LABELS
default           Active   41m   istio-injection=enabled
istio-system      Active   36m   istio-injection=disabled,istio-operator-managed=Reconcile,operator.istio.io/component=Base,operator.istio.io/managed=Reconcile,operator.istio.io/version=1.4.0
kube-node-lease   Active   41m   <none>
kube-public       Active   41m   <none>
kube-system       Active   41m   <none>
$ kubectl apply -f manifests/web.yml
service/web created
deployment.apps/web-v1 created
deployment.apps/web-v2 created
namespaceにラベルを付与しない場合は、istioctlでインジェクションさせたマニフェストをapplyさせる方法もあります(今回は上の方法で実施しました)
$ istioctl kube-inject -f manifests/web.yml | kubectl apply -f -
そうすると、本来であればコンテナ数(READYの項目)は1/1ですが、今回は2/2となっておりsidecarとしてdocker.io/istio/proxyv2というコンテナが追加されています。(argsなどにenvoyの文字がありました)
$ k get po
NAME                      READY   STATUS    RESTARTS   AGE
web-v1-6f4f6c8c7f-nh2cl   2/2     Running   0          9s
web-v2-66bfbb9dd7-dkp7x   2/2     Running   0          9s
続いてistioのAPIリソースである
DestinationRuleVirtualService-
Gateway
をデプロイします。
こちらもそれぞれの意味をしっかりと理解していないので解説はしませんが、
VirtualService.spec.http.route.weightを設定して、v1とv2へのトラフィックを9:1に割り振るようにしてみました。
apiVersion: networking.istio.io/v1alpha3
kind: DestinationRule
metadata:
  name: app
spec:
  host: "*"
  subsets:
  - name: v1
    labels:
      version: v1
  - name: v2
    labels:
      version: v2
  trafficPolicy:
    tls:
      mode: ISTIO_MUTUAL
---
apiVersion: networking.istio.io/v1alpha3
kind: VirtualService
metadata:
  name: app
spec:
  hosts:
  - "*"
  gateways:
  - web-gateway
  http:
  - route:
    - destination:
        host: web
        subset: v1
        port:
          number: 8080
      weight: 90
    - destination:
        host: web
        subset: v2
        port:
          number: 8080
      weight: 10
---
apiVersion: networking.istio.io/v1alpha3
kind: Gateway
metadata:
  name: web-gateway
spec:
  selector:
    istio: ingressgateway
  servers:
  - port:
      number: 80
      name: http
      protocol: HTTP
    hosts:
    - "*"
こちらもapply
$ kubectl apply -f manifests/istio.yml
destinationrule.networking.istio.io/app created
virtualservice.networking.istio.io/app created
gateway.networking.istio.io/web-gateway created
早速端末でcurlしてみます。
特に集計はしてませんが、均等でもなくいい感じにv1とv2にアクセスが振り分けられているようです!
 $ for i in `seq 100`; do curl localhost:30080; echo; done
This app is version 1
This app is version 1
This app is version 1
New app is version 2
This app is version 1
This app is version 1
This app is version 1
This app is version 1
This app is version 1
This app is version 1
This app is version 1
This app is version 1
This app is version 1
This app is version 1
New app is version 2
This app is version 1
This app is version 1
...
その他のコンポーネント
前述のようにistioは複数のコンポーネントを含んでいます。
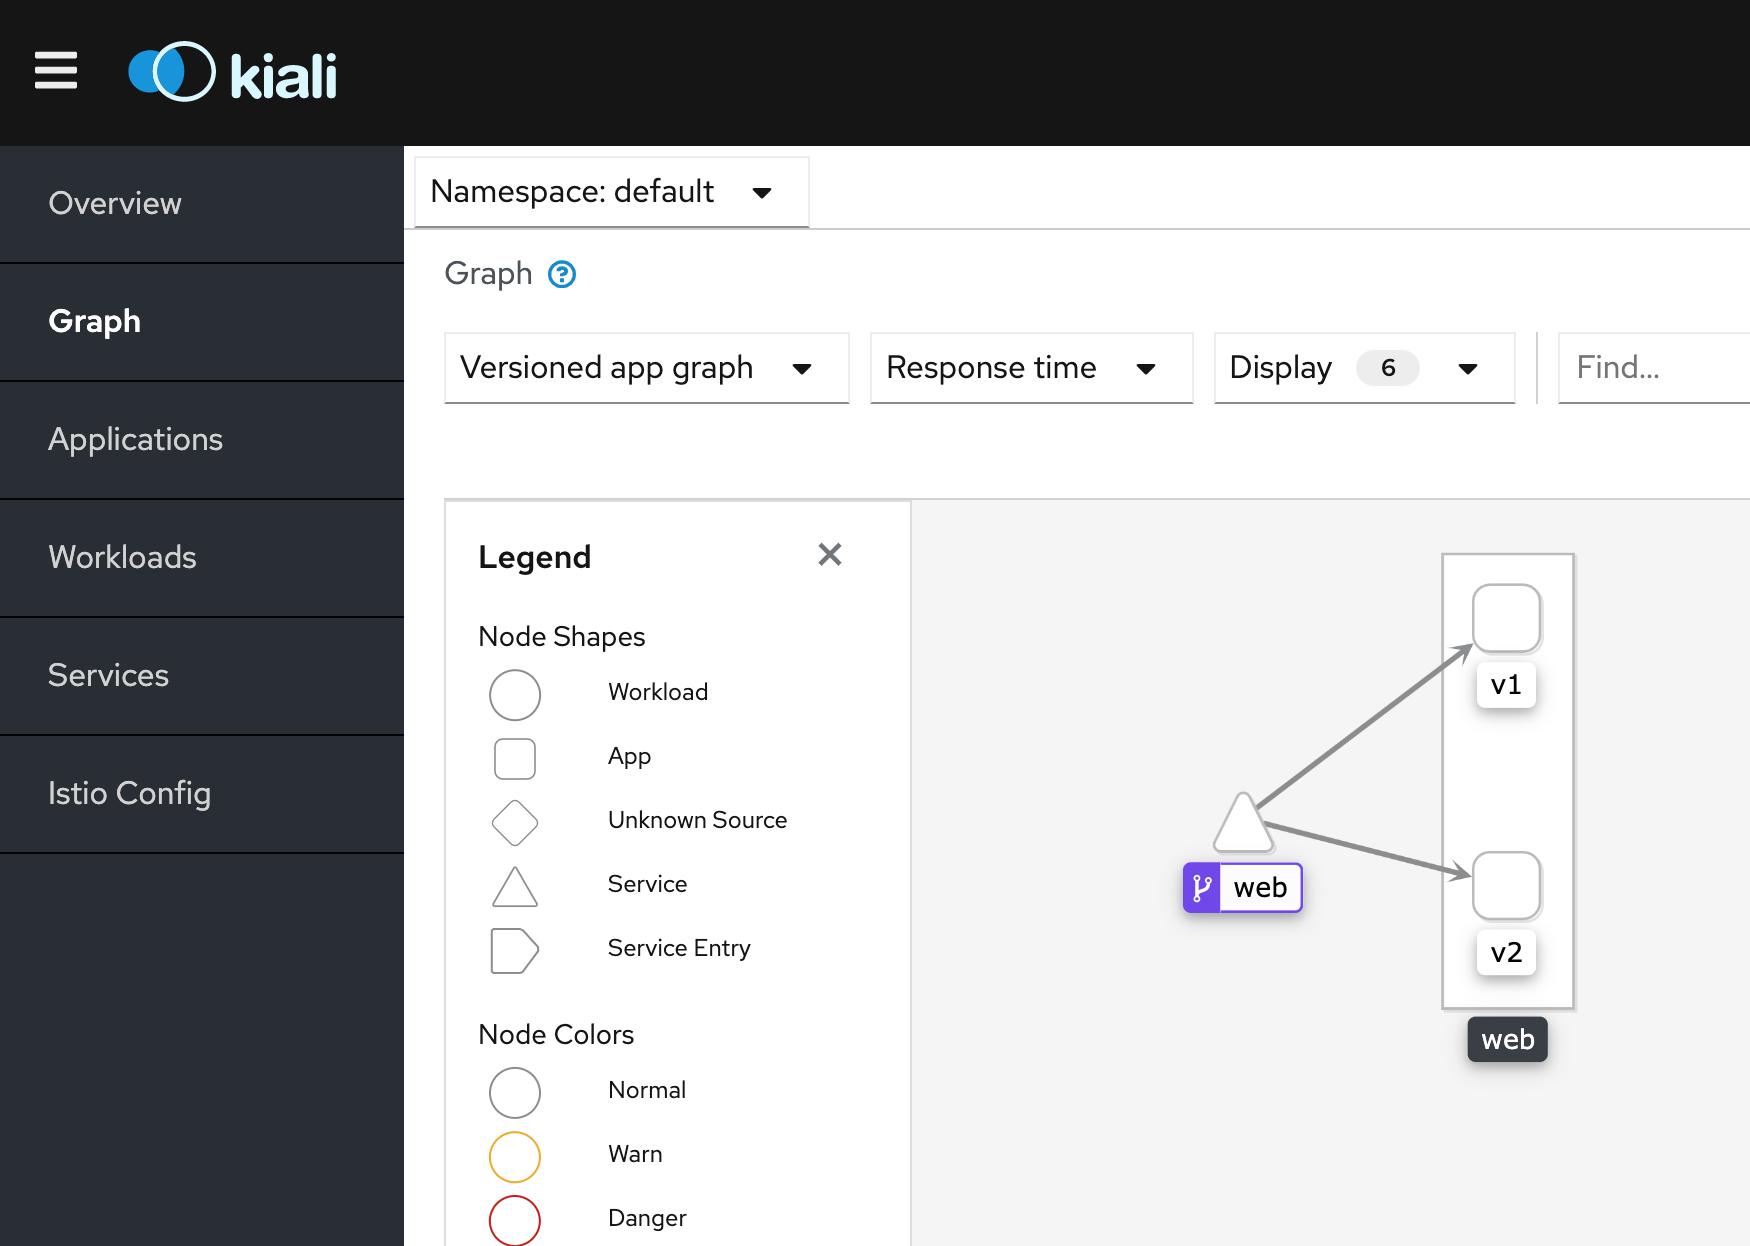
例えばistioのサービスメッシュの状況を可視化するKialiであれば、
以下のコマンドを実行すればport-forwardでkialiのダッシュボードにアクセスすることができます。
(user/passwordはadmin/adminでログインできました)
$ istioctl dashboard kiali
http://localhost:53305/kiali
最後に
kindでもIstio入門ができる環境は気軽に作れてしまうことが分かりました。
kubernetesの簡単なハンズオンぐらいであればkindでも十分かもしれません。
Istioについてはまだ「よくわからないけど動いた」レベルの理解なので、この環境を使って理解を深めていこうと思います。