Swift, XCode6.1でのメモ。分かってない部分あるので間違いあれば訂正くださると有難いです。
概要
タイムスタンプを持つテーブルを使用している時、月毎や日毎でセクションにまとめたいことがある。
(e.g.)ニュース一覧や、ブラウザの履歴など。
そのような場合、CoreDataのNSFetchedResultsControllerを使うことで簡単にセクション分け出来る。
参考画像(中身は適当)
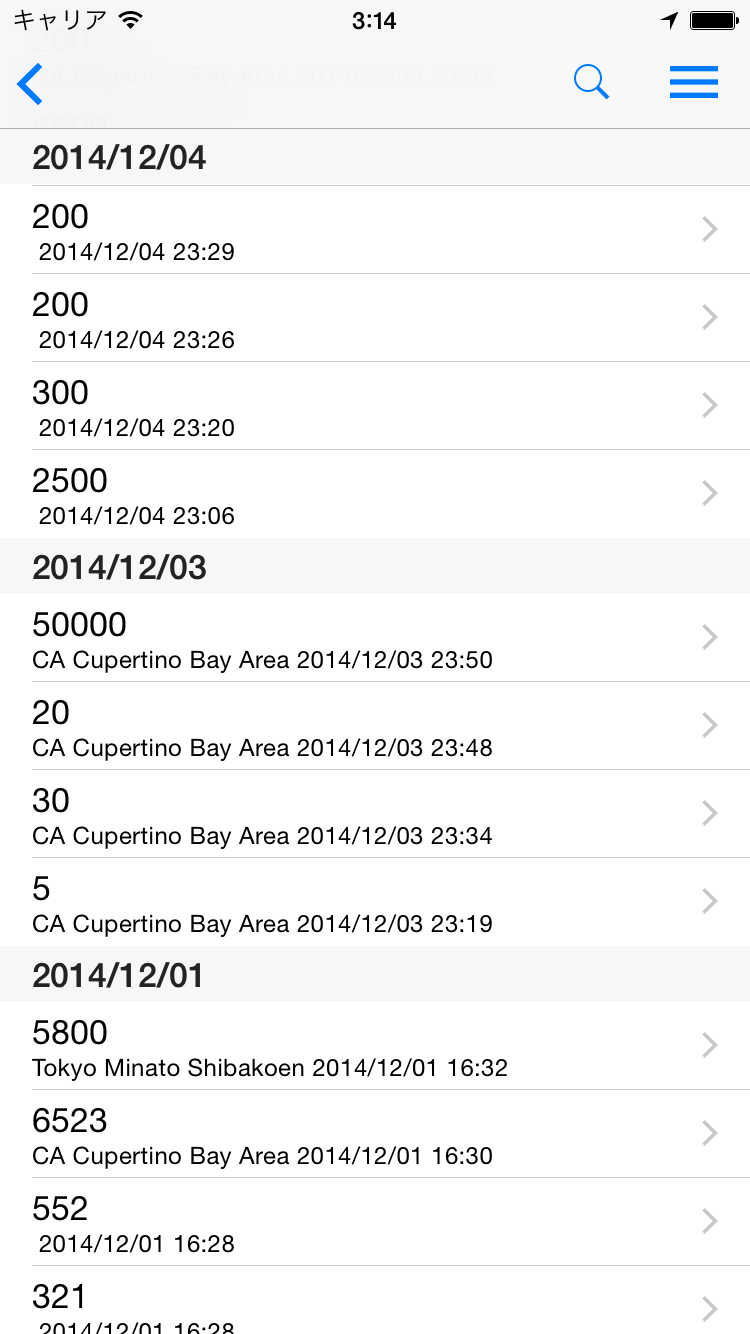
要は、下記をSwiftでやってみた感じ。
NSFetchedResultsControllerで日付毎にセクションをまとめる方法
Swiftでのやり方、ということで、
- モデルの対応
- コントローラの対応
の順で書きました。
前提
・CoreData等をimportできている
・使用するEntityを作成している
・EntityのためのNSManagedObjectを継承したクラスを作成している
CoreDataのモデル
下記の3点を行う。順に説明します。
- sectionIdentifierという名前のAttributeを追加する。
- sectionIdentifierのPropertyにTransientを追加する。
- モデルクラスにsectionIdentifierのgetterを書く。
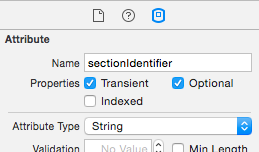
1, sectionIdentifierという名前のAttributeを追加する。
Xcodeでxcdatamodeldを開き、管理したいEntityのAttributesにsectionIdentifierという名前のフィールドを追加する。

2, sectionIdentifierのPropertyにTransientを追加する。
先ほど追加したAttributeのsectionIdentifierを選択し、Xcode右側のAttributeメニューにPropertyという項目があるので、Transientにチェックを入れる。
Transientは、データをSQLiteなどの永続ストアに保存せず、動的に生成し一時的にだけメモリで管理するための設定。
そのため、この設定をしたsectionIdentifierはデータとしては保存されず、呼び出された時のみ動的に生成される。
今回のような、オブジェクトの持つタイムスタンプを元にセクション分けをしたい場合には、このやり方の方がディスク容量も食わないので良さそうに思える。
3, モデルクラスにsectionIdentifierのgetterを書く。
NSManagedObjectクラスを継承した、Entityのモデルクラスを作っていると思う。
そこに先ほど追加したsectionIdentifierと宣言と、次のような感じでgetterを書く。
    var sectionIdentifier:String{
        get{
            self.willAccessValueForKey("sectionIdentifier")
            var tmp:String? = self.primitiveValueForKey("sectionIdentifier") as? String
            self.didAccessValueForKey("sectionIdentifier")

            if tmp == nil{
                let calendar:NSCalendar = NSCalendar.currentCalendar()
                let components:NSDateComponents = calendar.components(NSCalendarUnit.CalendarUnitYear | NSCalendarUnit.CalendarUnitMonth | NSCalendarUnit.CalendarUnitDay, fromDate: self.recordTime )

                tmp = String(format: "%ld", components.year * 10000 + components.month * 100 + components.day)
                self.setPrimitiveValue(tmp, forKey: "sectionIdentifier")
            }

            return tmp!
        }
    }
簡単に説明する。
getter最初の3行は、sectionIdentifierの今の値を単純に取り出している。
self.willAccessValueForKey("sectionIdentifier")
var tmp:String? = self.primitiveValueForKey("sectionIdentifier") as? String
self.didAccessValueForKey("sectionIdentifier")
NSManagedObjectを継承しているクラスは、プロパティにアクセスする時には上記のようにwillAccessValueForKeyとdidAccessValueForKeyで挟んで、primitiveValueForKeyを使って取り出さなければいけない。
実際の内部ストレージへのアクセスの前後でaccess notificationを発生させているようだ。
(何で必要なのかイマイチ分かっていない。最後のsetPrimitiveValueは普通にやっているし…。)
残りのif文では、sectionIdentifierがnilだった場合に値を作成して代入している。
今回は日付でセクション分けしたいので、年と月と日で作った8桁の数字をStringにして代入している。
また、途中に出てくる self.recordTime はこのオブジェクトの記録日時が入っているNSDate型の変数。
こんな感じでモデル側は準備完了。
TableViewController で NSFetchedResultsController を使う
- NSFetchedResultsControllerの準備を行う。
- テーブルでの日付ごとセクション分けを行う。
- その他
1, NSFetchedResultsController等の準備を行う。
結構ややこしくなってしまったが、ここでは現在の月のデータのみを新しい順に取り出している。
そのため、最初の方は現在の月の初日と末日を取り出すためのコードなので本筋とは関係ない。
まず、テーブルビューでNSFetchedResultsController用の変数を用意し、getterを書く。
    var _fetchedResultsController: NSFetchedResultsController? = nil
    var fetchedResultsController: NSFetchedResultsController {
        if _fetchedResultsController != nil {
            return _fetchedResultsController!
        }

        // get start day and last day for request predicate

        let today:NSDate = NSDate()
        let formatter: NSDateFormatter = NSDateFormatter()
        formatter.dateFormat = "yyyy/MM/dd HH:mm"

        // calendar and get this month startday and lastday

        let calendar = NSCalendar.currentCalendar()
        var components = calendar.components(NSCalendarUnit.YearCalendarUnit|NSCalendarUnit.MonthCalendarUnit|NSCalendarUnit.DayCalendarUnit|NSCalendarUnit.HourCalendarUnit|NSCalendarUnit.MinuteCalendarUnit|NSCalendarUnit.SecondCalendarUnit, fromDate: today)
        components.day = 1
        components.hour = 0
        components.minute = 0
        components.second = 0
        let startDate:NSDate? = calendar.dateFromComponents(components)
        let range = calendar.rangeOfUnit(NSCalendarUnit.CalendarUnitDay, inUnit: NSCalendarUnit.CalendarUnitMonth, forDate: today)
        components.day = range.length
        components.hour = 23
        components.minute = 59
        components.second = 59
        let lastDate:NSDate? = calendar.dateFromComponents(components)

        // get coredata instances

        let appDel:AppDelegate = UIApplication.sharedApplication().delegate as AppDelegate
        let context: NSManagedObjectContext? = appDel.managedObjectContext
        let sort:NSSortDescriptor = NSSortDescriptor(key: "recordTime", ascending: false)
        let predicate:NSPredicate? = NSPredicate(format: "%@ <= recordTime && recordTime <= %@", startDate!, lastDate!)

        let request = NSFetchRequest(entityName: "Record")
        request.predicate = predicate
        request.sortDescriptors = [sort]
        request.returnsObjectsAsFaults = false

        // get an instance of NSFetchedResultsController
        let aFetchedResultsController = NSFetchedResultsController(fetchRequest: request, managedObjectContext: context!, sectionNameKeyPath: "sectionIdentifier", cacheName: nil)
        _fetchedResultsController = aFetchedResultsController

        var error: NSError? = nil
        if !_fetchedResultsController!.performFetch(&error) {
            abort()
        }
        return _fetchedResultsController!
    }
最初の _fetchedResultsController Objective-Cのように、はインスタンス変数を扱うような気持ちで宣言、使用している。
また、NSFetchedResultsControllerを使う時はNSSortDescriptorを使ってタイムスタンプでソート設定をしておかなければいけないらしい。日付などでセクション分けするつもりなので当然っちゃ当然。
ソートはsectionIdentifierでは出来ないので永続ストアに保存されているAttributeを使用する。
細かいCoreDataの使い方に関してはここでは触れないので他を参照お願いします。
これで準備は終わりなので、あとはNSFetchedResultsControllerを使って取り出したデータを表示するだけ!
2, テーブルでの日付ごとセクション分け
セクションごとに分けられたデータに次でアクセスできる。
self.fetchedResultsController.sections
なので、基本的にこれを使ってデータを振り分ければOK。
日付でセクション分けを行うには、tableView(tableView: UITableView, viewForHeaderInSection section: Int) -> UIView? や tableView(tableView: UITableView, titleForHeaderInSection section: Int) -> String? を使い、次のようにすると良い(例)。
(tableView(tableView: UITableView, titleForHeaderInSection section: Int) -> String?の例)
    override func tableView(tableView: UITableView, titleForHeaderInSection section: Int) -> String? {
        var dateString = ""
        if let sec = self.fetchedResultsController.sections as? [NSFetchedResultsSectionInfo] {
            dateString = sec[section].name!
        }
        return dateString
    }
sec[section].name!で、section番目のセクションの名前(sectionIdentifier)を取得している。
長くなるので他は簡単に。sec = self.fetchedResultsController.sections as? [NSFetchedResultsSectionInfo]とした上で、
・numberOfSectionsInTableView(tableView: UITableView) -> Int
sec.countを返せばOK。
・tableView(tableView: UITableView, numberOfRowsInSection section: Int) -> Int
sec[section].numberOfObjects を返せばOK。
・tableView(tableView: UITableView, cellForRowAtIndexPath indexPath: NSIndexPath) -> UITableViewCell
単純に self.fetchedResultsController.objectAtIndexPath(indexPath) を使ってデータを順に取り出して処理すれば良い。
3, その他
NSFetchedResultsControllerでデータ処理があった場合のDelegateも設定出来る。
ここでは割愛するので下記を参考にどうぞ。
NSFetchedResultsControllerDelegate
参考
Custom Section Titles with NSFetchedResultsController
NSFetchedResultsControllerで日付毎にセクションをまとめる方法
NSFetchedResultsControllerDelegate
もし何か間違い・指摘・助言あればお願いします。