仮想化方式を変更することにしたきっかけ
- インスタンスの稼働枠に空きがない (キャパシティ不足) ために、インスタンスを起動できないことがたびたび発生した
- 後継のインスタンスタイプの方が、費用が安いうえにスペックが高い
- リザーブドインスタンスの期限が近づいてきていた
から。
運用を継続するにあたって、1. のキャパシティ不足でインスタンスをたびたび起動できないことがあり、古いインスタンスタイプを運用し続けることに危機感があった。
仮想化方式を paravirtual から hvm に変更する
AWS の FAQ に「Amazon Linux 準仮想化 AMI からハードウェア仮想マシン AMI にデータとアプリケーションを移行する方法を教えてください」があるので、わざわざ Qiita に残すことはないと思ったが、実際に自分が実行してみて、わかりにくいところやはまったところを備忘録として残しておこうと考えた。
PV インスタンスを HVM インスタンスに変換する
上記の FAQ では、「PV (paravirtual) インスタンスから新しい HVM インスタンスにデータをコピーし、アプリケーションを移動する」を推奨しているが、古い構成環境で運用を続ける必要がある場合、インスタンスのボリュームまるまるを変換せざるをえないと思う。
今回は「PV (paravirtual) インスタンスを HVM インスタンスに変換する」の作業記録を残しておく。
変換作業の準備をする
ここでは、
- 変換元 (paravirtual) のボリュームの準備
- 変換先 (hvm) のボリュームの準備
- 変換処理を実行するインスタンスの準備
を進める。
前出の FAQ にある
- PV インスタンスを停止します。
- PV インスタンスのルートボリュームのスナップショットを作成します。
は、バックアップとして日次でスナップショットを作成していて、データの差分が大きくないのであれば、それらを利用してもよいと思う。
変換元のボリュームを作成する
作成手順としては、
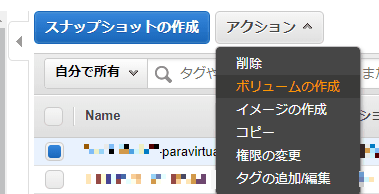
- PV インスタンスのボリュームのスナップショットを作成する
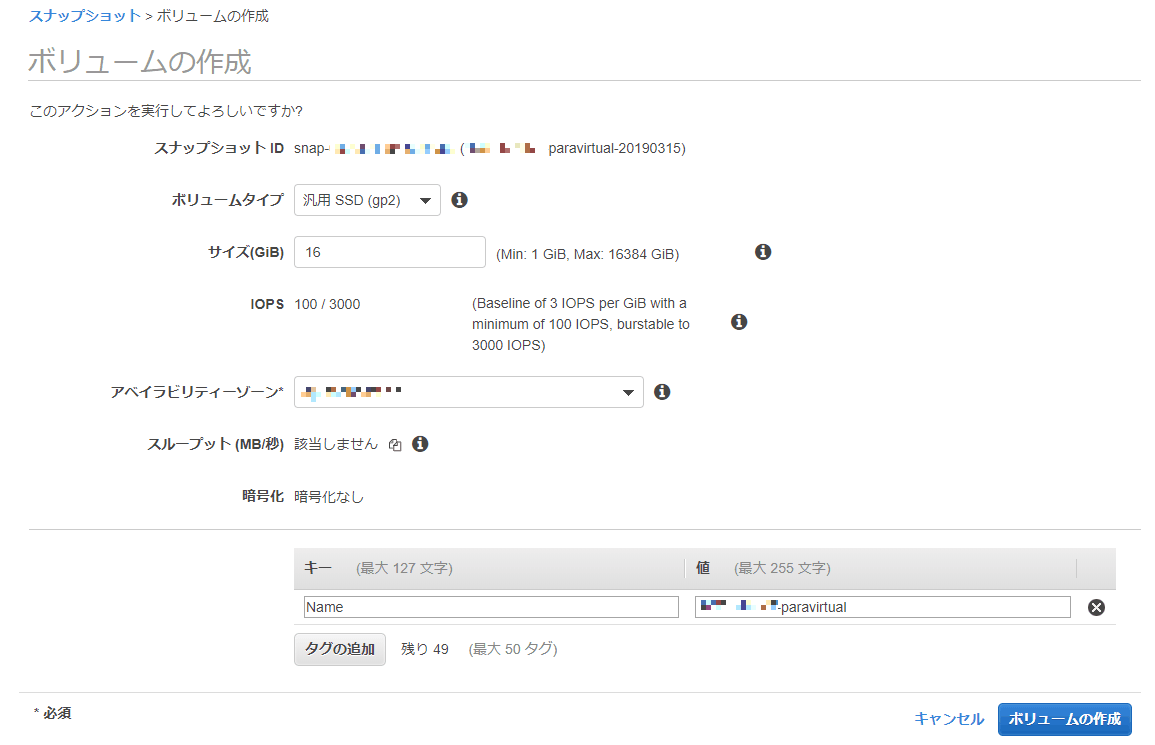
- 作成したスナップショットを、 PV インスタンスと同じアベイラビリティーゾーン に、新しい EBS ボリュームとして復元する
手順となる。スナップショットの説明やキーの値は、他のスナップショット区別がつけやすい名称にすることをお勧めする。
スナップショットの作成にかかる時間は、ボリュームの容量に比例するので、じっと待つ。
そして、作成したスナップショットを、EBS ボリュームに復元する。
この時に注意することは、
- ボリューム作成先のアベイラビリティーゾーンが正しいか
- キーの値は、他のボリュームと区別がつきやすい名称にする
ことになる。誤ったアベイラビリティーゾーンにボリュームを作成した場合は、再作成になり、時間をロスすることになる。
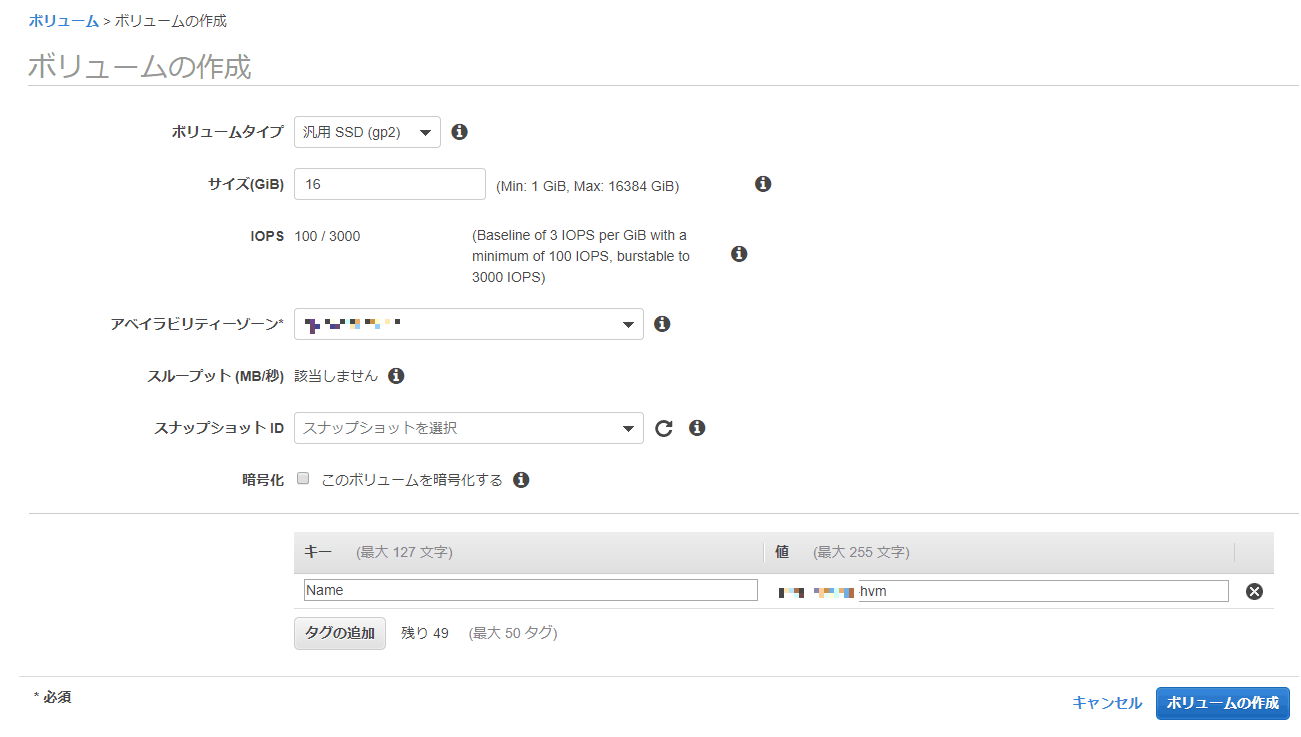
変換先 (hvm) のボリュームを作成する
変換先 (hvm) のボリュームを、 変換元のボリュームと同じアベイラビリティゾーンに新規に作成 する。ボリュームサイズは、変換元のボリュームと同じサイズでよい。
変換処理を実行するためのインスタンスを作成する
さきほど作成したボリュームと同じアベイラビリティーゾーンに、新規にインスタンスを作成する。このインスタンスのボリュームサイズは最低限の 8GB で大丈夫。
作成したインスタンスに変換するボリュームをアタッチする
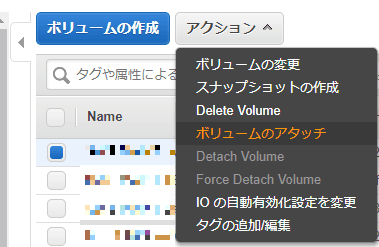
新規に作成したインスタンスを起動し、変換元 (paravirtual) と変換先 (hvm) の両ボリュームをアタッチ (マウント) する。
前出の FAQ 通りに、変換元 (paravirtual) のボリュームは /dev/xvdf としてマウントする。
そして、変換先 (hvm) のボリュームは /dev/xvdg としてマウントする。
この時点で、新しく作成したボリュームは、
- 変換元 (paravirtual) のボリューム (/dev/xvdf)
- 変換先 (hvm) のボリューム (/dev/xvdg)
- 新規に作成したインスタンスのボリューム
の 3 つになる。
paravirtual のボリュームを hvm ボリュームに変換する
新規に作成したインスタンスに SSH でログインをして、root ユーザーになる。
$ sudo su
#
root ユーザーになるときは「sudo su -」ではなく、「sudo su」を実行する。理由は後述する。
ボリュームのマウント状況を確認する
まずは FAQ 通りに、実行をしてみる。
# lsblk
NAME          MAJ:MIN RM SIZE RO TYPE MOUNTPOINT
nvme0n1       259:0    0   8G  0 disk
├─nvme0n1p1   259:1    0   8G  0 part /
└─nvme0n1p128 259:2    0   1M  0 part
nvme1n1       259:3    0  16G  0 disk
nvme2n1       259:4    0  16G  0 disk
さきほどアタッチしたはずのボリューム /dev/xvdf や /dev/xvdg がない。確認をしてみると、
# ls -l /dev | grep xvd
lrwxrwxrwx 1 root root           7 Mar 15 03:06 xvda -> nvme0n1
lrwxrwxrwx 1 root root           9 Mar 15 03:06 xvda1 -> nvme0n1p1
lrwxrwxrwx 1 root root          11 Mar 15 03:06 xvda128 -> nvme0n1p128
lrwxrwxrwx 1 root root           7 Mar 15 03:38 xvdf -> nvme1n1
lrwxrwxrwx 1 root root           7 Mar 15 03:34 xvdg -> nvme2n1
となっていて、/dev/xvdf や /dev/xvdg はシンボリックリンクとして存在している。
(FAQ が若干古い?)
変換先 (hvm) のボリュームにパーティションを作成
変換先 (hvm) のボリューム (/dev/xvdg) にパーティションを作成する。
# parted /dev/xvdg --script 'mklabel msdos mkpart primary 1M -1s print quit'
Model: NVMe Device (nvme)
Disk /dev/nvme2n1: 17.2GB
Sector size (logical/physical): 512B/512B
Partition Table: msdos
Disk Flags:

Number  Start   End     Size    Type     File system  Flags
 1      1049kB  17.2GB  17.2GB  primary

# ls -l /dev/ | grep xvd
lrwxrwxrwx 1 root root           7 Mar 18 03:13 xvda -> nvme0n1
lrwxrwxrwx 1 root root           9 Mar 18 03:13 xvda1 -> nvme0n1p1
lrwxrwxrwx 1 root root          11 Mar 18 03:13 xvda128 -> nvme0n1p128
lrwxrwxrwx 1 root root           7 Mar 18 03:20 xvdf -> nvme1n1
lrwxrwxrwx 1 root root           7 Mar 18 03:26 xvdg -> nvme2n1
lrwxrwxrwx 1 root root           9 Mar 18 03:26 xvdg1 -> nvme2n1p1

# partprobe /dev/xvdg
# udevadm settle
-
partedコマンドで、パーティーションを作成 (parted コマンドについて - Qiita) -
partprobeコマンドでパーティーションの変更を、カーネルに再認識させる -
udevadm settle接続されているデバイスのイベントキューが終了するのを待つ
これで、/dev/xvdg に xvdg1 というパーティションも作成されている。
変換元 (paravirtual) ボリュームから変換先 (hvm) ボリュームにデータをコピーする
変換元 (paravirtual) ボリュームのファイルシステムをチェックしてから、データサイズを最小化する。
# e2fsck -f /dev/xvdf ; resize2fs -M /dev/xvdf
e2fsck 1.42.9 (28-Dec-2013)
Pass 1: Checking inodes, blocks, and sizes
Pass 2: Checking directory structure
Pass 3: Checking directory connectivity
Pass 4: Checking reference counts
Pass 5: Checking group summary information
/: 175618/1048576 files (1.1% non-contiguous), 2955983/4194304 blocks
resize2fs 1.42.9 (28-Dec-2013)
Resizing the filesystem on /dev/xvdf to 2947141 (4k) blocks.
The filesystem on /dev/xvdf is now 2947141 blocks long.
完了したら、変換元 (paravirtual) ボリューム (/dev/xvdf) のデータを、変換先 (hvm) ボリューム (/dev/xvdg1) にコピーする。
# dd if=/dev/xvdf of=/dev/xvdg1 bs=$(blockdev --getbsz /dev/xvdf) conv=sparse count=$(dumpe2fs /dev/xvdf | grep "Block count:" | cut -d : -f2 | tr -d "\\ ")
dumpe2fs 1.42.9 (28-Dec-2013)
2947141+0 records in
2947141+0 records out
12071489536 bytes (12 GB) copied, 124.197 s, 97.2 MB/s
完了したら、/dev/xvdg1 のファイルシステムをチェックして、データサイズを最小化する。
# e2fsck -f /dev/xvdg1 && resize2fs /dev/xvdg1
e2fsck 1.42.9 (28-Dec-2013)
Pass 1: Checking inodes, blocks, and sizes
Pass 2: Checking directory structure
Pass 3: Checking directory connectivity
Pass 4: Checking reference counts
Pass 5: Checking group summary information
/: 175618/737280 files (1.2% non-contiguous), 2936005/2947141 blocks
resize2fs 1.42.9 (28-Dec-2013)
Resizing the filesystem on /dev/xvdg1 to 4194048 (4k) blocks.
The filesystem on /dev/xvdg1 is now 4194048 blocks long.
ここの作業を忘れると、あとで grub を再インストールするときに空き容量が不足しているとエラーが出る場合があるかもしれない。
変換先 (hvm) ボリュームを起動ディスクにする
/dev/xvdg1 を /mnt にマウントさせる。
# mount /dev/xvdg1 /mnt/ && mount -o bind /dev/ /mnt/dev && mount -o bind /sys /mnt/sys && mount -o bind /proc /mnt/proc
chroot して、/mnt をルートディレクトリにして、grub の設定をする。
# chroot /mnt/
もし、chroot して次のようなエラーが出た場合、root ユーザーの PATH が変わってしまっているためである。
# chroot /mnt/
/usr/libexec/grepconf.sh: line 5: grep: command not found
その場合は、
# exit         <= chroot を解除
# exit         <= root ユーザーから元のユーザーに戻る
$ sudo su      <= 自環境に設定されている環境変数を引き継いで root になる
# chroot /mnt/ <= もう一度 chroot する
と実行してみる。
原因としては、root ユーザーになるときに、sudo su - と実行して root の環境変数を利用したものの、環境変数が適切に設定されていないために grep コマンドが保存されている PATH がみつけられないことが考えられる。
そして、念のため、grub へパスが通っていることを確認する。
# which grub
/sbin/grub
grub を(chroot 環境下で) 再インストールする。
# yum reinstall grub -y
で次のようなエラーが発生した場合は、もともと grub がインストールされていない可能性がある。
# yum reinstall grub -y
Loaded plugins: fastestmirror, priorities, update-motd, upgrade-helper
No Match for argument: grub
Loading mirror speeds from cached hostfile
 * amzn-main: packages.ap-northeast-1.amazonaws.com
 * amzn-updates: packages.ap-northeast-1.amazonaws.com
amzn-main                                                                                                                                                                                                             | 2.1 kB  00:00:00
amzn-updates                                                                                                                                                                                                          | 2.5 kB  00:00:00
(1/2): amzn-main/latest/group_gz                                                                                                                                                                                      | 4.4 kB  00:00:00
(2/2): amzn-main/latest/primary_db                                                                                                                                                                                    | 4.0 MB  00:00:01
Package(s) grub available, but not installed.
Error: Nothing to do

# rpm -qa | grep grub
grubby-7.0.15-7.8.amzn1.x86_64
# yum install grub -y
grub が未インストールの場合は、(chroot 環境下で) grub をインストールする。そして、
# ls -l /etc/grub.conf
lrwxrwxrwx 1 root root 22 Jun 26  2012 /etc/grub.conf -> ../boot/grub/grub.conf
# ls -l /boot/grub/
total 72
-rw-r--r-- 1 root root   727 Mar 15 11:39 grub.conf
lrwxrwxrwx 1 root root    11 Jun 26  2012 menu.lst -> ./grub.conf
-rw-r--r-- 1 root root 67229 May  3  2012 splash.xpm.gz

# rm -f /boot/grub/*stage* /boot/grub/device.map
# grub-install /dev/xvdg
Probing devices to guess BIOS drives. This may take a long time.
No suitable drive was found in the generated device map.
FAQ によると grub-install 実行時のエラーは想定内とのこと。
次に、grub の設定を更新する。
# cat <<EOF | grub --batch
device (hd0) /dev/xvdg
root (hd0,0)
setup (hd0)
EOF
実行後に、次のメッセージが表示される。
Probing devices to guess BIOS drives. This may take a long time.


    GNU GRUB  version 0.97  (640K lower / 3072K upper memory)

 [ Minimal BASH-like line editing is supported.  For the first word, TAB
   lists possible command completions.  Anywhere else TAB lists the possible
   completions of a device/filename.]
grub> device (hd0) /dev/xvdg
grub> root (hd0,0)
 Filesystem type is ext2fs, partition type 0x83
grub> setup (hd0)
 Checking if "/boot/grub/stage1" exists... yes
 Checking if "/boot/grub/stage2" exists... yes
 Checking if "/boot/grub/e2fs_stage1_5" exists... yes
 Running "embed /boot/grub/e2fs_stage1_5 (hd0)"...  29 sectors are embedded.
succeeded
 Running "install /boot/grub/stage1 (hd0) (hd0)1+29 p (hd0,0)/boot/grub/stage2 /boot/grub/grub.conf"... succeeded
Done.
/etc/grub.conf の設定を変更する。
# cat /etc/grub.conf
# created by imagebuilder
default=0
timeout=3
hiddenmenu

title Amazon Linux 2017.09 (4.14.104-78.84.amzn1.x86_64)
root (hd0)
kernel /boot/vmlinuz-4.14.104-78.84.amzn1.x86_64 root=LABEL=/ console=hvc0 LANG=en_US.UTF-8 KEYTABLE=us
initrd /boot/initramfs-4.14.104-78.84.amzn1.x86_64.img
title Amazon Linux 2017.09 (4.9.75-25.55.amzn1.x86_64)
root (hd0)
kernel /boot/vmlinuz-4.9.75-25.55.amzn1.x86_64 root=LABEL=/ console=hvc0 LANG=en_US.UTF-8 KEYTABLE=us
initrd /boot/initramfs-4.9.75-25.55.amzn1.x86_64.img
title Amazon Linux 2017.09 (4.9.70-22.55.amzn1.x86_64)
root (hd0)
kernel /boot/vmlinuz-4.9.70-22.55.amzn1.x86_64 root=LABEL=/ console=hvc0 LANG=en_US.UTF-8 KEYTABLE=us
initrd /boot/initramfs-4.9.70-22.55.amzn1.x86_64.img

# sed -i 's/root\ (hd0)/root (hd0,0)/g' /etc/grub.conf
# sed -i 's/console=hvc0/console=ttyS0/g' /etc/grub.conf
次に /boot/grub/menu.lst の設定を変更する。
# cat /boot/grub/menu.lst
# created by imagebuilder
default=0
timeout=3
hiddenmenu

title Amazon Linux 2017.09 (4.14.104-78.84.amzn1.x86_64)
root (hd0)
kernel /boot/vmlinuz-4.14.104-78.84.amzn1.x86_64 root=LABEL=/ console=hvc0 LANG=en_US.UTF-8 KEYTABLE=us
initrd /boot/initramfs-4.14.104-78.84.amzn1.x86_64.img
title Amazon Linux 2017.09 (4.9.75-25.55.amzn1.x86_64)
root (hd0)
kernel /boot/vmlinuz-4.9.75-25.55.amzn1.x86_64 root=LABEL=/ console=hvc0 LANG=en_US.UTF-8 KEYTABLE=us
initrd /boot/initramfs-4.9.75-25.55.amzn1.x86_64.img
title Amazon Linux 2017.09 (4.9.70-22.55.amzn1.x86_64)
root (hd0)
kernel /boot/vmlinuz-4.9.70-22.55.amzn1.x86_64 root=LABEL=/ console=hvc0 LANG=en_US.UTF-8 KEYTABLE=us
initrd /boot/initramfs-4.9.70-22.55.amzn1.x86_64.img

# sed -i 's/root\ (hd0)/root (hd0,0)/g' /boot/grub/menu.lst
# sed -i 's/console=hvc0/console=ttyS0/g' /boot/grub/menu.lst
/boot/grub/grub.conf も変更する
私の場合、FAQ の通りに実行しても hvm に変換したボリュームからインスタンスから起動できなかったので、調べた結果、/boot/grub/grub.conf も変更する必要があることがやっとわかった。
# ls -l /boot/grub/ | grep grub.conf
-rw-r--r-- 1 root root    727 Mar 15 11:39 grub.conf

# cat /boot/grub/grub.conf
# created by imagebuilder
default=0
timeout=3
hiddenmenu

title Amazon Linux 2017.09 (4.14.104-78.84.amzn1.x86_64)
root (hd0)
kernel /boot/vmlinuz-4.14.104-78.84.amzn1.x86_64 root=LABEL=/ console=hvc0 LANG=en_US.UTF-8 KEYTABLE=us
initrd /boot/initramfs-4.14.104-78.84.amzn1.x86_64.img
title Amazon Linux 2017.09 (4.9.75-25.55.amzn1.x86_64)
root (hd0)
kernel /boot/vmlinuz-4.9.75-25.55.amzn1.x86_64 root=LABEL=/ console=hvc0 LANG=en_US.UTF-8 KEYTABLE=us
initrd /boot/initramfs-4.9.75-25.55.amzn1.x86_64.img
title Amazon Linux 2017.09 (4.9.70-22.55.amzn1.x86_64)
root (hd0)
kernel /boot/vmlinuz-4.9.70-22.55.amzn1.x86_64 root=LABEL=/ console=hvc0 LANG=en_US.UTF-8 KEYTABLE=us
initrd /boot/initramfs-4.9.70-22.55.amzn1.x86_64.img
/boot/grub/grub.conf に記述されている「root (hd0)」を「root (hd0,0)」に変更し、「console=hvc0」を「console=ttyS0」に変更する必要がある。
わざわざファイルを直接編集する必要はなく、/boot/grub/menu.lsf のシンボリックリンクにして代用をする。
# mv /boot/grub/grub.conf /boot/grub/grub.conf.orig
# ln -s /boot/grub/menu.lst /boot/grub/grub.conf
# ls -l /boot/grub/ | grep grub.conf
lrwxrwxrwx 1 root root     19 Mar 18 17:31 grub.conf -> /boot/grub/menu.lst
-rw-r--r-- 1 root root    727 Mar 15 11:39 grub.conf.orig
完了したら、chroot を解除して、インスタンスを停止する。
# exit
# halt
この時、halt を実行したのに、いっこうに停止する様子がなかったので、コンソールからインスタンスを停止した。停止には、かなりの時間がかかった。
変換先 (hvm) ボリュームで起動してみる
まずは、アタッチされている 3 つのボリューム
- 変換元 (paravirtual) のボリューム (/dev/xvdf)
- 変換先 (hvm) のボリューム (/dev/xvdg)
新規に作成したインスタンスのボリューム
をデタッチする。
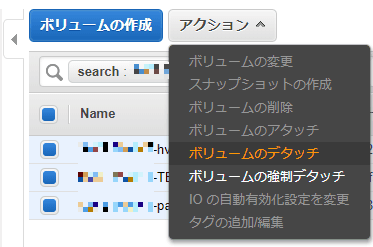
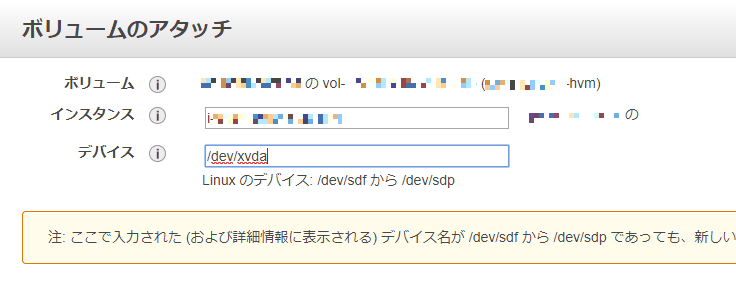
そして、変換先 (hvm) ボリューム (/dev/xvdg) を起動ボリューム (/dev/xvda) としてアタッチする。
無事起動して動作確認ができたら、完了。
起動しなかったり、これまで通り動作しない場合は、(上記の作業手順では、ほぼ変換元 (paravirtual) のボリュームに変更をくわえていないので) 変換先 (hvm) のボリュームの準備からやり直しとなる。

