この記事でやること

この記事では、Azure Cognitive Searchで抽出した画像のタグ情報やキャプションをAzure Purviewに登録していきます。
準備
ADLS gen2上にサンプルの画像ファイルを置いておきます。
Cognitive Searchの設定はこの辺が分かりやすいです。
Cognitive Searchの設定
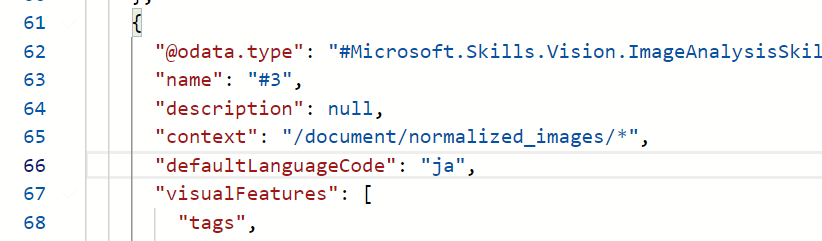
画像からタグとキャプションの生成が出来るようにしておきます。

imageTags、imageCaptionを取得できるようにします。

折角なのでdefaultLanguageCodeをjaにしてタグを日本語にしてみます。
Purviewの設定
サンプルファイルを予めスキャンしておきます。
今回のサンプル語彙を登録するRootとしてCognitiveSearchテスト用Rootを登録してGUIDを控えておきます。GUIDはPurview Studioで表示した時にURLからtermGuidで確認することも出来ます。もちろんAPIなどでも取得可能です。

実装
画像情報の読み込み
CognitiveSearchクライアント設定。
import json, base64
from azure.core.credentials import AzureKeyCredential
from azure.search.documents import SearchClient

index_name = 'インデックス名'
endpoint = 'エンドポイント'
key = 'キー情報'

credential = AzureKeyCredential(key)
search_client = SearchClient(endpoint=endpoint, index_name=index_name, credential=credential)
検索した結果から必要な情報を取得します。
search_results = search_client.search("*")

image_informations = []
for result in search_results:
    result["metadata_storage_path"] = result["metadata_storage_path"][:-1] # ファイルパスに何か1byte付いているのを消す。これはいったい。。
    result["metadata_storage_path"] = result["metadata_storage_path"] + '=' * ((4 - len(result["metadata_storage_path"]) & 3) & 3)
    image_info = dict(filePath=base64.urlsafe_b64decode(result["metadata_storage_path"]).decode('utf-8'), imageTags=result["imageTags"])

    caption = json.loads(result["imageCaption"][0])
    if caption["captions"] != []:
        image_info["imageCaption"] = caption["captions"][0]["text"]
    image_informations.append(image_info)
用語集に登録するためタグを抽出。
tags = []
for image_information in image_informations:
    tags.extend(image_information["imageTags"])
Purviewの利用設定
Purviewクライアントの設定をしてデフォルトの用語集を取得します。
from pyapacheatlas.core import PurviewClient
from pyapacheatlas.auth import ServicePrincipalAuthentication
from pyapacheatlas.core.glossary import PurviewGlossaryTerm

auth = ServicePrincipalAuthentication(
    tenant_id = "テナントID",
    client_id = "クライアントID",
    client_secret = "接続情報"
)

purview_client = PurviewClient(
    account_name = "アカウント名",
    authentication = auth
)

## デフォルトの用語集を取得
default_glossary = purview_client.glossary.get_glossary()
語彙の登録
画像タグを語彙として一括登録。
upload_termsがlist形式を受け取れるので複数の語彙を一括で登録できます。
add_hierarchyで親の語彙を指定して階層構造にします。(ここで控えていたGUIDを使います。)
terms = []
for tag in tags:
    term = PurviewGlossaryTerm(
        name=tag,
        qualifiedName = tag + "@Glossary",
        glossaryGuid = default_glossary["guid"],
        longDescription = "Cognitive Search test term.",
        status = "Approved" # Should be Draft, Approved, Alert, or Expired
    )
    term.add_hierarchy(parentFormalName="CognitiveSearchテスト用Root", parentGuid="xxxx-xxxx-xxxx") #控えておいたGUID
    terms.append(term)

term_results = purview_client.glossary.upload_terms(terms)
エンティティと語彙の紐付け
エンティティと語彙のリレーションシップを作成します。
語彙のqualifiedNameには @Glossary が最後につきます。見落としがちです。
relationships = []
for image_information in image_informations:
    for tag in image_information["imageTags"]:
        relationship = {
            "typeName": "AtlasGlossarySemanticAssignment",
            "attributes": {},
            "guid": -100,
            "end1": {
                "typeName": "AtlasGlossaryTerm",
                "uniqueAttributes": {
                    "qualifiedName": "CognitiveSearchテスト用Root_" + tag + "@Glossary"
                }
            },
            "end2": {
                "typeName": "azure_datalake_gen2_path",
                "uniqueAttributes": {
                    "qualifiedName": image_information["filePath"].replace(".blob.", ".dfs.") #なぜかパスがblobなのでadlsに
                }
            },
        }
        relationships.append(relationship)
登録
リレーションを登録します。
for relationship in relationships:
    entity = relationship["end2"]["uniqueAttributes"]["qualifiedName"]
    term = relationship["end1"]["uniqueAttributes"]["qualifiedName"]
    print(f"Working on {entity}:{term}")

    try:
        results = purview_client.upload_relationship(relationship)
        print("\tSuccess")
    except Exception as e:
        print(f"Exception for {entity} and was not uploaded: {e}")
こんな感じで登録が行われていきます。
Working on https://xxx.dfs.core.windows.net/xxx/dog.jpg:CognitiveSearchテスト用Root_犬@Glossary
	Success
Working on https://xxx.dfs.core.windows.net/xxx/dog.jpg:CognitiveSearchテスト用Root_屋内@Glossary
	Success
結果
こんな感じになります。
何も考えないで登録すると "いくつか" とか "異なる" みたいな変なタグも出来てしまうので工夫が必要かも知れません。

あとがき
今回、語彙でやりましたが分類でも近いことができると思います。どのように使い分けるべきか悩みます。