概要
- 新型コロナの影響でヘルスケア関連のデバイスの需要が高まっている。
- maxim integrated社から出ているMAX3010xシリーズの最新版を試してみた。
- まず開発キット(MAXREFDES117)を入手し、動作を確かめてみる。
- 前回はRaspberry Piで動作を確認した。今回は単体のデバイスとできないか試してみる。
- まず心拍数を取得しOLEDに表示をしてみる
用意するもの
- Arduino nano
- モバイルバッテリー
- MAX30102開発キット(MAXREFDES117)
https://www.maximintegrated.com/jp/design/reference-design-center/system-board/6300.html - OLEDディスプレイモジュール(I2C)
- ブレッドボード
- ジャンパーワイヤー各種
環境構築
(1)Arduino IDEをインストール
https://www.arduino.cc/en/main/software
(2)SparkFun MAX3010x libraryをインストール
https://github.com/sparkfun/SparkFun_MAX3010x_Sensor_Library
(3)Adafruit_SSD1306 ライブラリをインストール
https://github.com/adafruit/Adafruit_SSD1306
(4)Adafruit-GFX-Libraryをインストール
https://github.com/adafruit/Adafruit-GFX-Library
組み立て
arduino nanoと開発キット(MAXREFDES117)、OLEDディスプレイモジュールを以下のように接続する

プログラミング
まずArduino Project Hubに掲載のスケッチを試してみる
https://create.arduino.cc/projecthub/SurtrTech/measure-heart-rate-and-spo2-with-max30102-c2b4d8
/* This code works with MAX30102 + 128x32 OLED i2c + Buzzer and Arduino UNO
 * It's displays the Average BPM on the screen, with an animation and a buzzer sound
 * everytime a heart pulse is detected
 * It's a modified version of the HeartRate library example
 * Refer to www.surtrtech.com for more details or SurtrTech YouTube channel
 */

#include <Adafruit_GFX.h>        //OLED libraries
#include <Adafruit_SSD1306.h>
#include <Wire.h>
#include "MAX30105.h"           //MAX3010x library
#include "heartRate.h"          //Heart rate calculating algorithm

MAX30105 particleSensor;

const byte RATE_SIZE = 4; //Increase this for more averaging. 4 is good.
byte rates[RATE_SIZE]; //Array of heart rates
byte rateSpot = 0;
long lastBeat = 0; //Time at which the last beat occurred
float beatsPerMinute;
int beatAvg;

#define SCREEN_WIDTH 128 // OLED display width, in pixels
#define SCREEN_HEIGHT 32 // OLED display height, in pixels
#define OLED_RESET    -1 // Reset pin # (or -1 if sharing Arduino reset pin)

Adafruit_SSD1306 display(SCREEN_WIDTH, SCREEN_HEIGHT, &Wire, OLED_RESET); //Declaring the display name (display)

static const unsigned char PROGMEM logo2_bmp[] =
{ 0x03, 0xC0, 0xF0, 0x06, 0x71, 0x8C, 0x0C, 0x1B, 0x06, 0x18, 0x0E, 0x02, 0x10, 0x0C, 0x03, 0x10,              //Logo2 and Logo3 are two bmp pictures that display on the OLED if called
0x04, 0x01, 0x10, 0x04, 0x01, 0x10, 0x40, 0x01, 0x10, 0x40, 0x01, 0x10, 0xC0, 0x03, 0x08, 0x88,
0x02, 0x08, 0xB8, 0x04, 0xFF, 0x37, 0x08, 0x01, 0x30, 0x18, 0x01, 0x90, 0x30, 0x00, 0xC0, 0x60,
0x00, 0x60, 0xC0, 0x00, 0x31, 0x80, 0x00, 0x1B, 0x00, 0x00, 0x0E, 0x00, 0x00, 0x04, 0x00,  };

static const unsigned char PROGMEM logo3_bmp[] =
{ 0x01, 0xF0, 0x0F, 0x80, 0x06, 0x1C, 0x38, 0x60, 0x18, 0x06, 0x60, 0x18, 0x10, 0x01, 0x80, 0x08,
0x20, 0x01, 0x80, 0x04, 0x40, 0x00, 0x00, 0x02, 0x40, 0x00, 0x00, 0x02, 0xC0, 0x00, 0x08, 0x03,
0x80, 0x00, 0x08, 0x01, 0x80, 0x00, 0x18, 0x01, 0x80, 0x00, 0x1C, 0x01, 0x80, 0x00, 0x14, 0x00,
0x80, 0x00, 0x14, 0x00, 0x80, 0x00, 0x14, 0x00, 0x40, 0x10, 0x12, 0x00, 0x40, 0x10, 0x12, 0x00,
0x7E, 0x1F, 0x23, 0xFE, 0x03, 0x31, 0xA0, 0x04, 0x01, 0xA0, 0xA0, 0x0C, 0x00, 0xA0, 0xA0, 0x08,
0x00, 0x60, 0xE0, 0x10, 0x00, 0x20, 0x60, 0x20, 0x06, 0x00, 0x40, 0x60, 0x03, 0x00, 0x40, 0xC0,
0x01, 0x80, 0x01, 0x80, 0x00, 0xC0, 0x03, 0x00, 0x00, 0x60, 0x06, 0x00, 0x00, 0x30, 0x0C, 0x00,
0x00, 0x08, 0x10, 0x00, 0x00, 0x06, 0x60, 0x00, 0x00, 0x03, 0xC0, 0x00, 0x00, 0x01, 0x80, 0x00  };


void setup() {
  display.begin(SSD1306_SWITCHCAPVCC, 0x3C); //Start the OLED display
  display.display();
  delay(3000);
  // Initialize sensor
  particleSensor.begin(Wire, I2C_SPEED_FAST); //Use default I2C port, 400kHz speed
  particleSensor.setup(); //Configure sensor with default settings
  particleSensor.setPulseAmplitudeRed(0x0A); //Turn Red LED to low to indicate sensor is running

}

void loop() {
 long irValue = particleSensor.getIR();    //Reading the IR value it will permit us to know if there's a finger on the sensor or not
                                           //Also detecting a heartbeat
if(irValue > 7000){                                           //If a finger is detected
    display.clearDisplay();                                   //Clear the display
    display.drawBitmap(5, 5, logo2_bmp, 24, 21, WHITE);       //Draw the first bmp picture (little heart)
    display.setTextSize(2);                                   //Near it display the average BPM you can display the BPM if you want
    display.setTextColor(WHITE);
    display.setCursor(50,0);
    display.println("BPM");
    display.setCursor(50,18);
    display.println(beatAvg);
    display.display();

  if (checkForBeat(irValue) == true)                        //If a heart beat is detected
  {
    display.clearDisplay();                                //Clear the display
    display.drawBitmap(0, 0, logo3_bmp, 32, 32, WHITE);    //Draw the second picture (bigger heart)
    display.setTextSize(2);                                //And still displays the average BPM
    display.setTextColor(WHITE);
    display.setCursor(50,0);
    display.println("BPM");
    display.setCursor(50,18);
    display.println(beatAvg);
    display.display();
    tone(3,1000);                                        //And tone the buzzer for a 100ms you can reduce it it will be better
    delay(100);
    noTone(3);                                          //Deactivate the buzzer to have the effect of a "bip"
    //We sensed a beat!
    long delta = millis() - lastBeat;                   //Measure duration between two beats
    lastBeat = millis();

    beatsPerMinute = 60 / (delta / 1000.0);           //Calculating the BPM

    if (beatsPerMinute < 255 && beatsPerMinute > 20)               //To calculate the average we strore some values (4) then do some math to calculate the average
    {
      rates[rateSpot++] = (byte)beatsPerMinute; //Store this reading in the array
      rateSpot %= RATE_SIZE; //Wrap variable

      //Take average of readings
      beatAvg = 0;
      for (byte x = 0 ; x < RATE_SIZE ; x++)
        beatAvg += rates[x];
      beatAvg /= RATE_SIZE;
    }
  }

}
  if (irValue < 7000){       //If no finger is detected it inform the user and put the average BPM to 0 or it will be stored for the next measure
     beatAvg=0;
     display.clearDisplay();
     display.setTextSize(1);
     display.setTextColor(WHITE);
     display.setCursor(30,5);
     display.println("Please Place ");
     display.setCursor(30,15);
     display.println("your finger ");
     display.display();
     noTone(3);
     }

}
検証
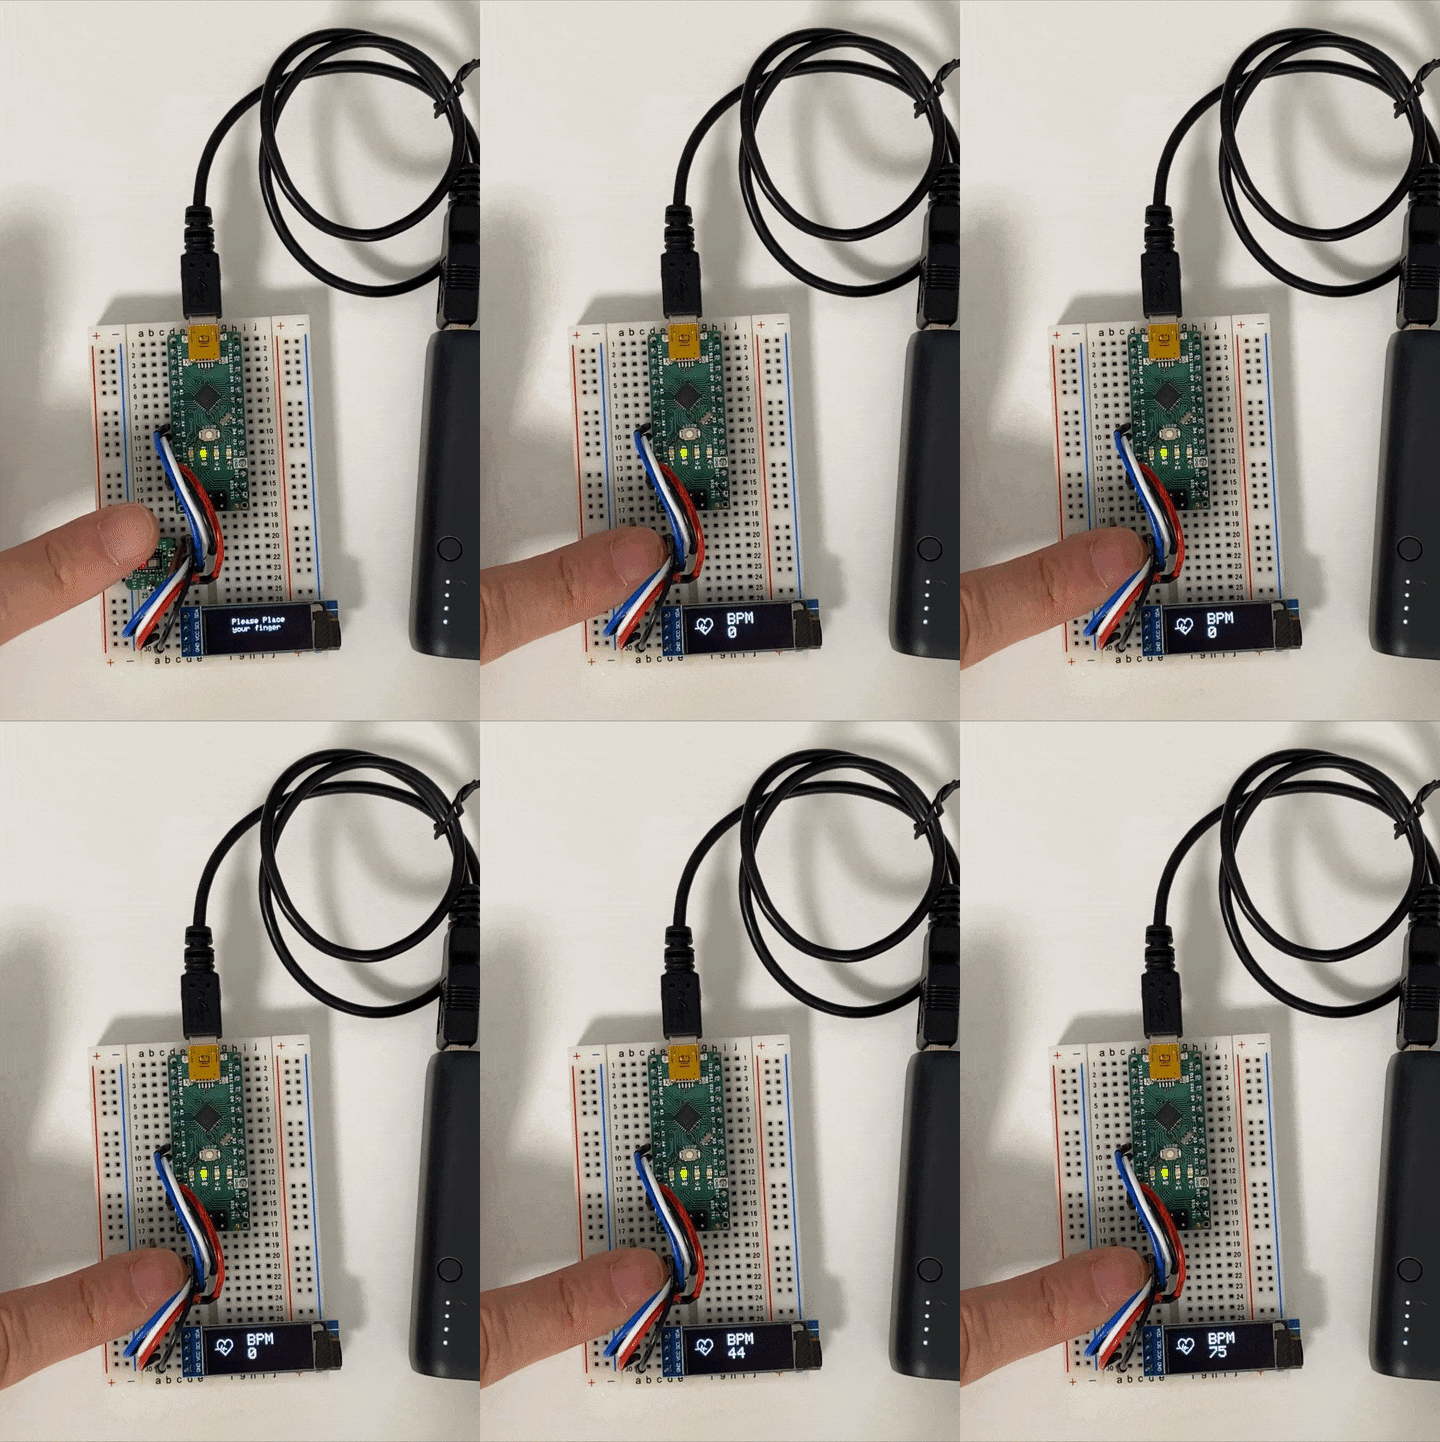
- 無事心拍数は取得できた。Arduino nanoのOLEDディスプレイにも表示できている
- モバイルバッテリーでも動作が確認できた
次回に向けて
- SpO2もOLEDディスプレイに表示できないかを試してみる


