概要
- 労働環境において、空気中の二酸化炭素濃度は1000ppm以下が推奨値となっている。
- オフィスビル等では考慮されているが、居住用の部屋では不明である。
- 在宅勤務環境の空気中の二酸化炭素濃度を測定し、換気タイミングの目安とする。
- 既製品を使わず、安価なマイコンとセンサーを使って作ってみる。
(参考)
厚生労働省 建築物における衛生的環境の確保に関する法律の空気環境に関する規制概要
https://www.mhlw.go.jp/stf/shingi/2r9852000001hhf7-att/2r9852000001hhnb.pdf
用意するもの
- M5Stack(ESP32系のマイコン)
- CCS811搭載 空気品質センサモジュール(スイッチサイエンス)
https://www.switch-science.com/catalog/3298/ - Arduino IDEが動くPC (Mac/Windows)
環境構築
(1)Arduino IDEをインストール
https://www.arduino.cc/en/main/software
(2)M5Stack関連のライブラリをインストール
https://mag.switch-science.com/2018/02/28/getting-started-with-m5stack/
(3)SparkFun公式ライブラリをインストール
https://github.com/sparkfun/SparkFun_BME280_Arduino_Library
https://github.com/sparkfun/SparkFun_CCS811_Arduino_Library
それぞれ、Arduino IDEのスケッチ→ライブラリをインクルード→ライブラリを管理
から、CCS811,BME280をそれぞれ検索してインストールする。
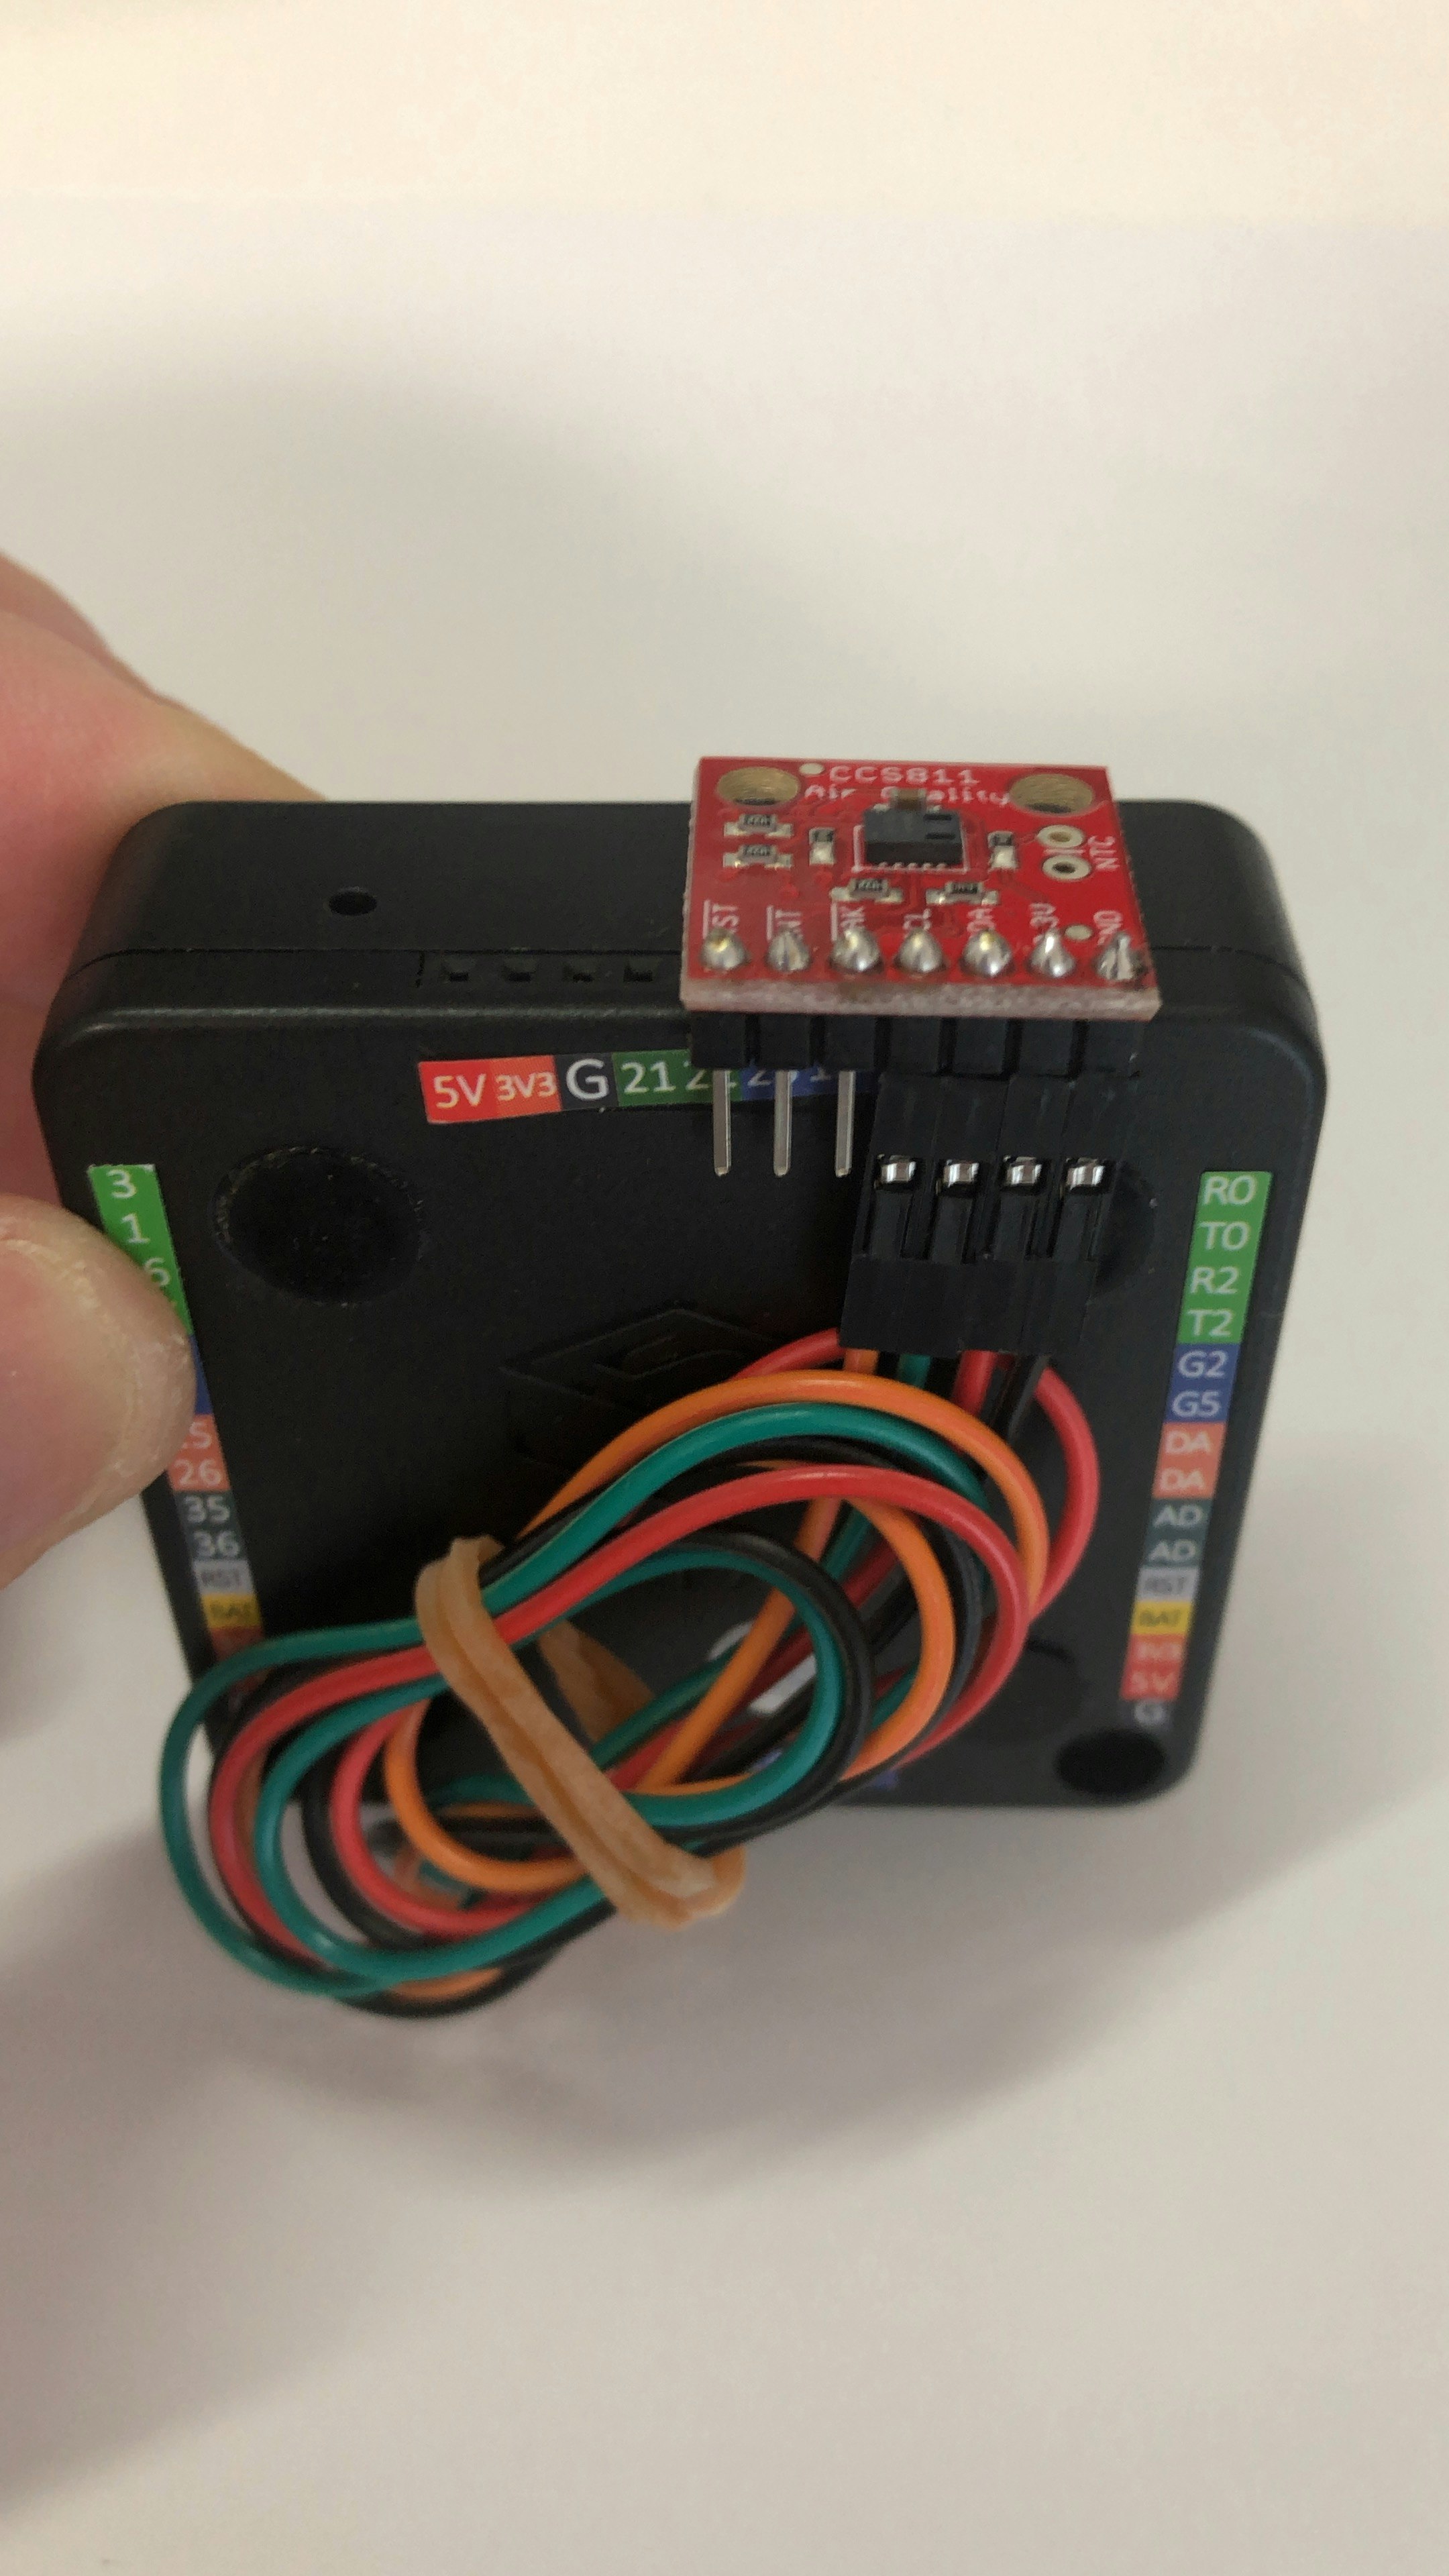
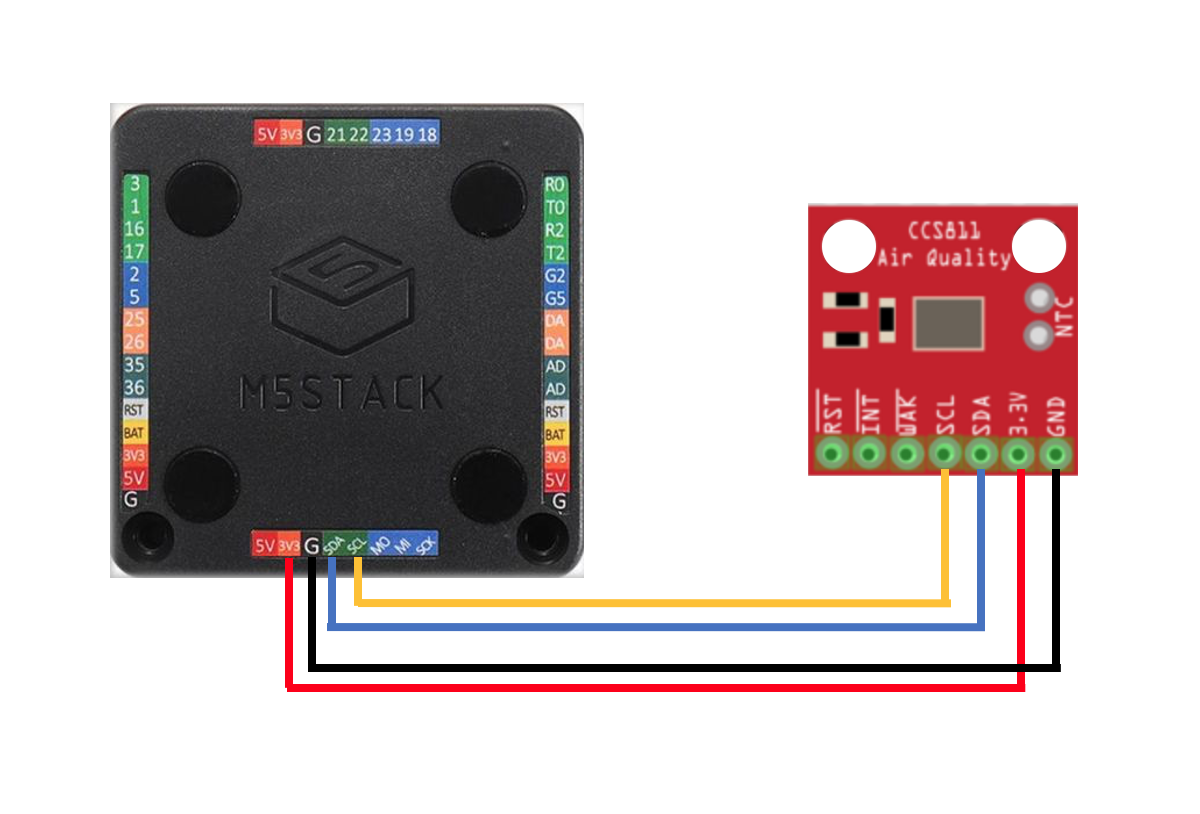
組み立て
M5Stackとセンサーを下図のように接続する。
プログラミング
SparkFun公式のコードに、M5Stackの画面に表示する処理を追加したものをArduino IEDでM5Stackに書き込む。
https://github.com/sparkfun/SparkFun_CCS811_Arduino_Library/blob/master/examples/Example2_BME280Compensation/Example2_BME280Compensation.ino
"for M5Stack"とコメントに記載している所が、追加変更部分。
BME280(温湿度・気圧センサー)の処理も入っているが、削らなくても動作する。
【追加処理】
(1)M5Stackの画面をクリアする。
(2)表示する文字の座標を(0.0)(左上)とする
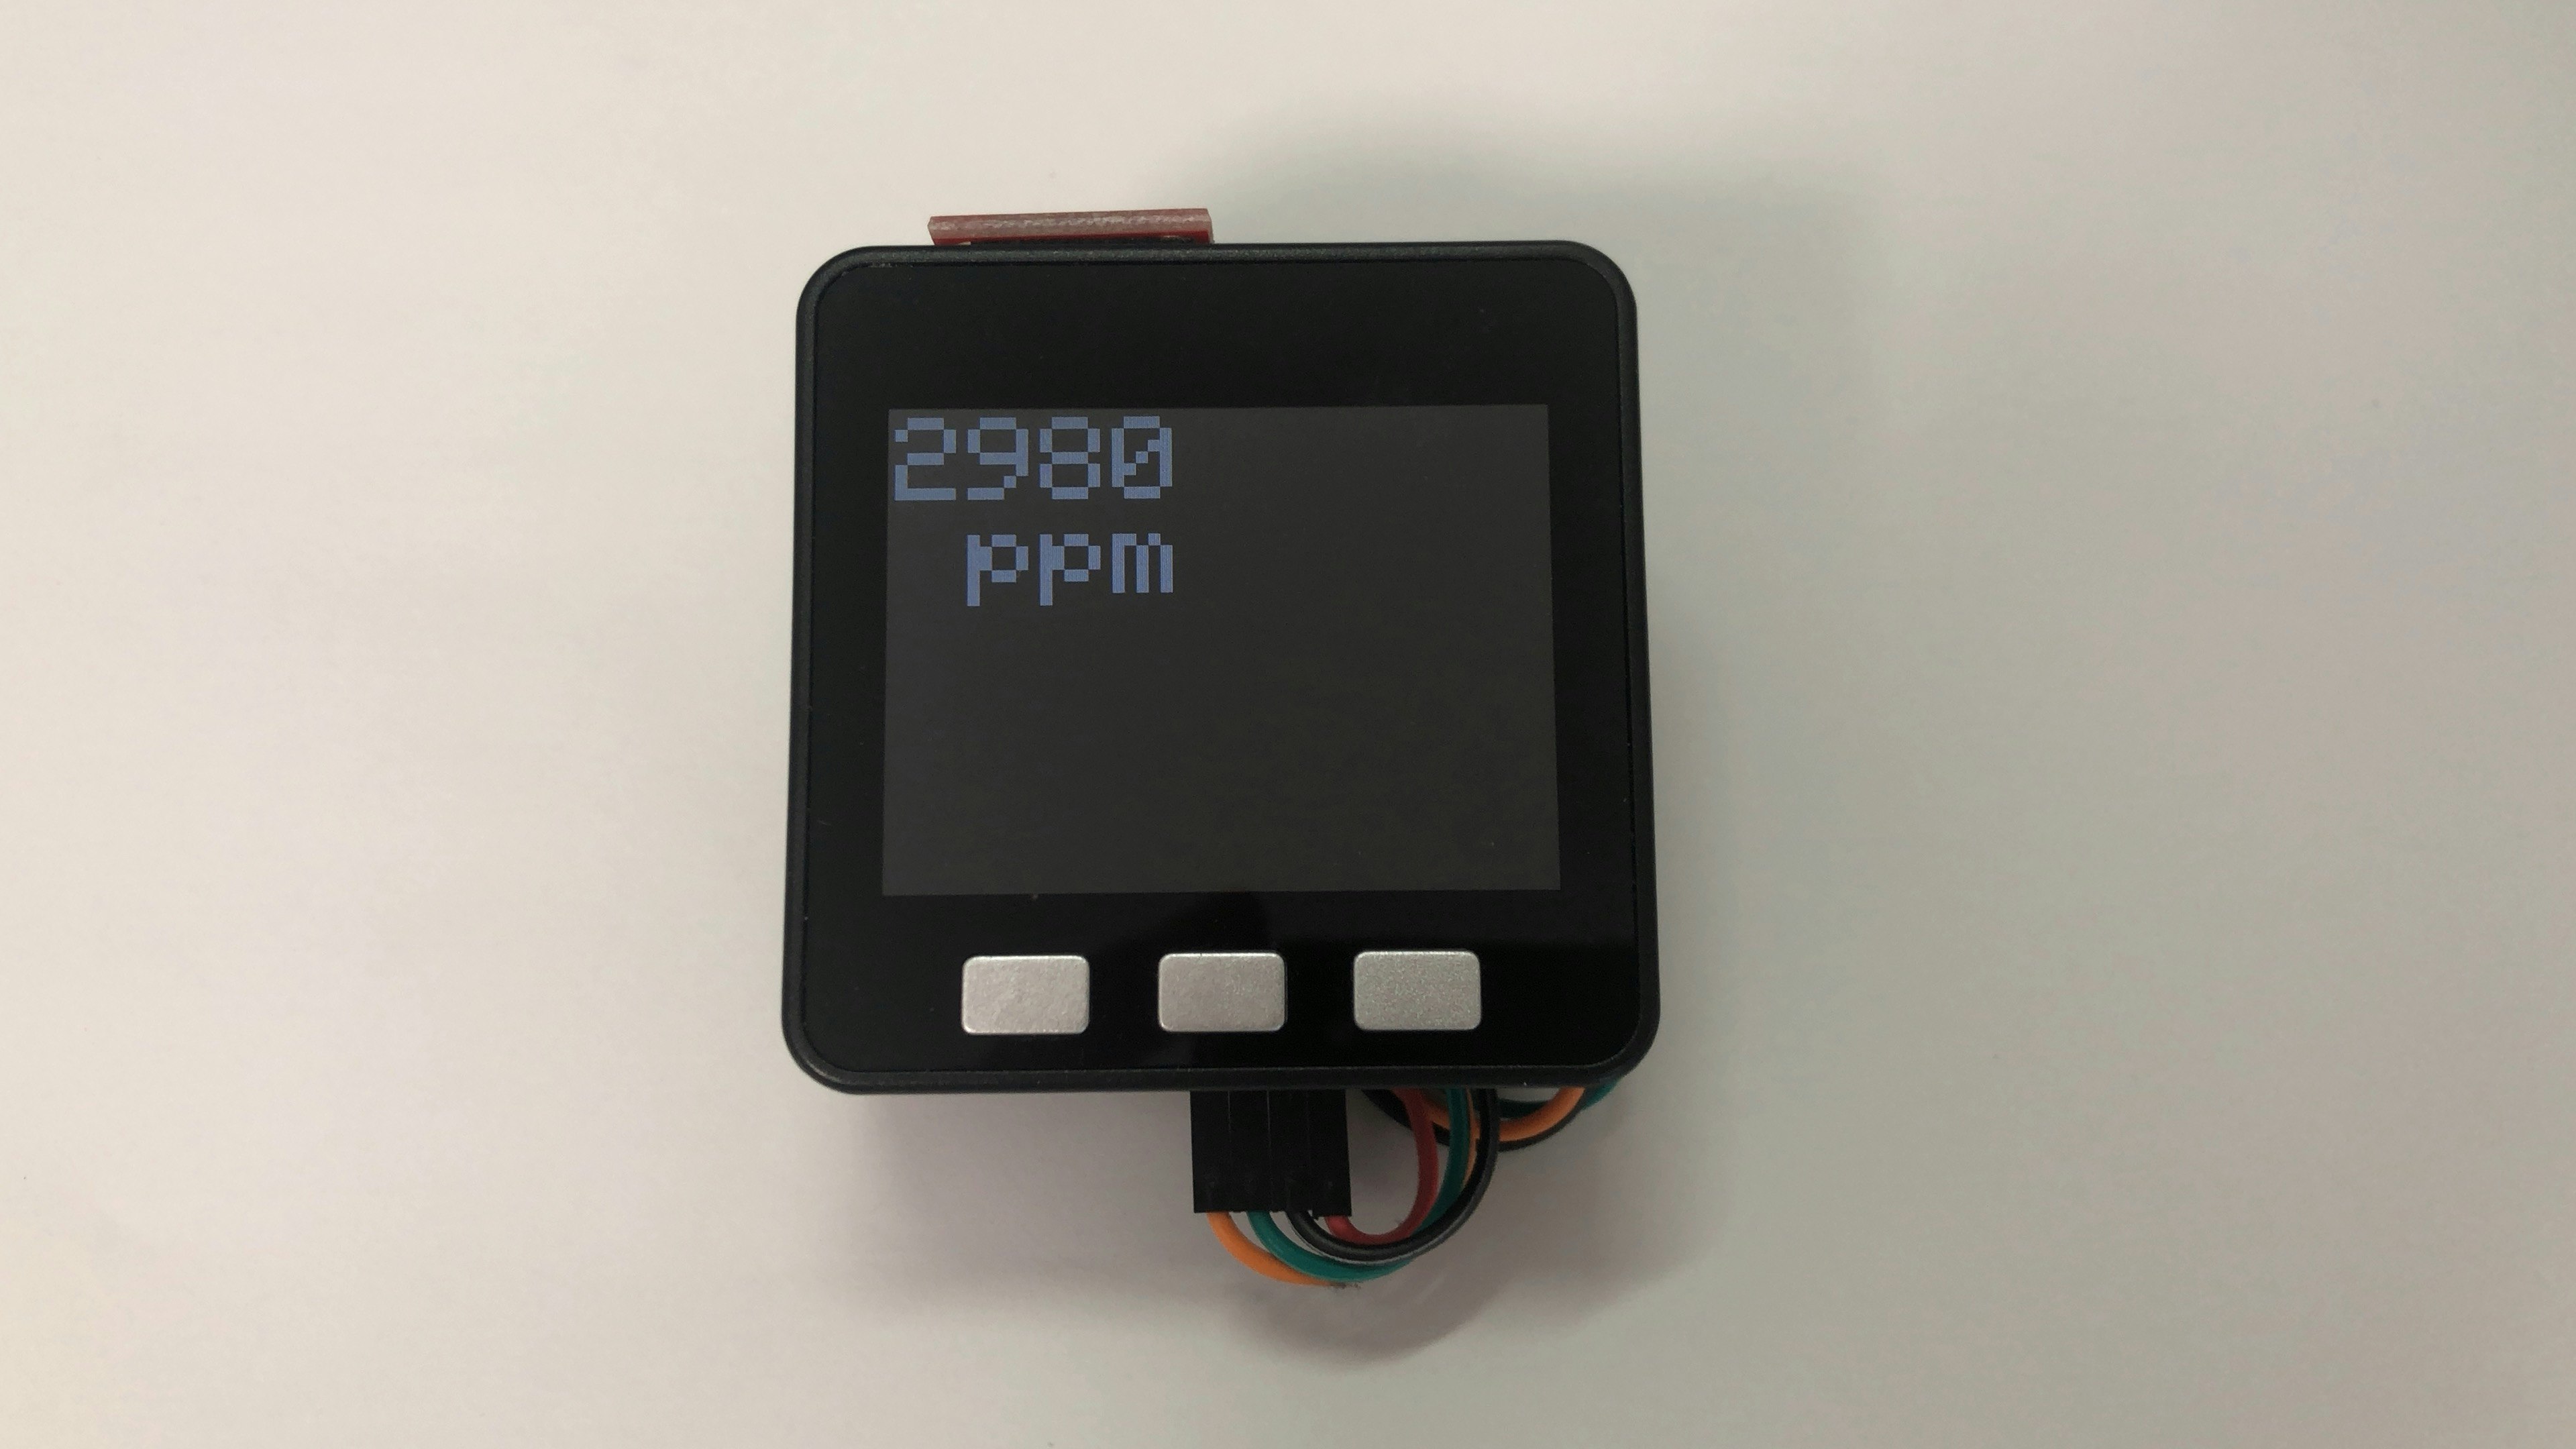
(3)画面に二酸化炭素濃度を数値+ppm形式で表示する
(4)10秒毎に更新する
/******************************************************************************
  Compensating the CCS811 with humidity readings from the BME280
  Marshall Taylor @ SparkFun Electronics
  April 4, 2017
  https://github.com/sparkfun/CCS811_Air_Quality_Breakout
  https://github.com/sparkfun/SparkFun_CCS811_Arduino_Library
  This example uses a BME280 to gather environmental data that is then used
  to compensate the CCS811.
  Hardware Connections (Breakoutboard to Arduino):
  3.3V to 3.3V pin
  GND to GND pin
  SDA to A4
  SCL to A5
  Resources:
  Uses Wire.h for i2c operation
  Development environment specifics:
  Arduino IDE 1.8.1
  This code is released under the [MIT License](http://opensource.org/licenses/MIT).
  Please review the LICENSE.md file included with this example. If you have any questions
  or concerns with licensing, please contact techsupport@sparkfun.com.
  Distributed as-is; no warranty is given.
******************************************************************************/
#include <Wire.h>
#include <SparkFunBME280.h> //Click here to get the library: http://librarymanager/All#SparkFun_BME280
#include <SparkFunCCS811.h> //Click here to get the library: http://librarymanager/All#SparkFun_CCS811

#define CCS811_ADDR 0x5B //Default I2C Address
//#define CCS811_ADDR 0x5A //Alternate I2C Address

#define PIN_NOT_WAKE 5

//Global sensor objects
CCS811 myCCS811(CCS811_ADDR);
BME280 myBME280;

void setup()
{
  Serial.begin(115200);
  Serial.println();
  Serial.println("Apply BME280 data to CCS811 for compensation.");

  Wire.begin();

  //This begins the CCS811 sensor and prints error status of .beginWithStatus()
  CCS811Core::CCS811_Status_e returnCode = myCCS811.beginWithStatus();
  Serial.print("CCS811 begin exited with: ");
  Serial.println(myCCS811.statusString(returnCode));

  //For I2C, enable the following and disable the SPI section
  myBME280.settings.commInterface = I2C_MODE;
  myBME280.settings.I2CAddress = 0x77;

  //Initialize BME280
  //For I2C, enable the following and disable the SPI section
  myBME280.settings.commInterface = I2C_MODE;
  myBME280.settings.I2CAddress = 0x77;
  myBME280.settings.runMode = 3; //Normal mode
  myBME280.settings.tStandby = 0;
  myBME280.settings.filter = 4;
  myBME280.settings.tempOverSample = 5;
  myBME280.settings.pressOverSample = 5;
  myBME280.settings.humidOverSample = 5;

  //Calling .begin() causes the settings to be loaded
  delay(10); //Make sure sensor had enough time to turn on. BME280 requires 2ms to start up.
  myBME280.begin();
}
//---------------------------------------------------------------
void loop()
{
  //Check to see if data is available
  if (myCCS811.dataAvailable())
  {
    //for M5Stack
    M5.Lcd.clear();
    M5.Lcd.setCursor(0.0);

    //Calling this function updates the global tVOC and eCO2 variables
    myCCS811.readAlgorithmResults();
    //printInfoSerial fetches the values of tVOC and eCO2
    printInfoSerial();

    float BMEtempC = myBME280.readTempC();
    float BMEhumid = myBME280.readFloatHumidity();

    Serial.print("Applying new values (deg C, %): ");
    Serial.print(BMEtempC);
    Serial.print(",");
    Serial.println(BMEhumid);
    Serial.println();

    //This sends the temperature data to the CCS811
    myCCS811.setEnvironmentalData(BMEhumid, BMEtempC);
  }
  else if (myCCS811.checkForStatusError())
  {
    //If the CCS811 found an internal error, print it.
    printSensorError();
  }
  //for M5Stack
  delay(10000); //Wait for next reading
}

//---------------------------------------------------------------
void printInfoSerial()
{
  //getCO2() gets the previously read data from the library
  Serial.println("CCS811 data:");
  Serial.print(" CO2 concentration : ");
  Serial.print(myCCS811.getCO2());
  Serial.println(" ppm");

  // for M5Stack
  M5.Lcd.setBrightness(10);
  M5.Lcd.setTextSize(6);
  M5.Lcd.plintln(co2);
  M5.Lcd.plintln(ppm);

  //getTVOC() gets the previously read data from the library
  Serial.print(" TVOC concentration : ");
  Serial.print(myCCS811.getTVOC());
  Serial.println(" ppb");

  Serial.println("BME280 data:");
  Serial.print(" Temperature: ");
  Serial.print(myBME280.readTempC(), 2);
  Serial.println(" degrees C");

  Serial.print(" Temperature: ");
  Serial.print(myBME280.readTempF(), 2);
  Serial.println(" degrees F");

  Serial.print(" Pressure: ");
  Serial.print(myBME280.readFloatPressure(), 2);
  Serial.println(" Pa");

  Serial.print(" Pressure: ");
  Serial.print((myBME280.readFloatPressure() * 0.0002953), 2);
  Serial.println(" InHg");

  Serial.print(" Altitude: ");
  Serial.print(myBME280.readFloatAltitudeMeters(), 2);
  Serial.println("m");

  Serial.print(" Altitude: ");
  Serial.print(myBME280.readFloatAltitudeFeet(), 2);
  Serial.println("ft");

  Serial.print(" %RH: ");
  Serial.print(myBME280.readFloatHumidity(), 2);
  Serial.println(" %");

  Serial.println();
}

//printSensorError gets, clears, then prints the errors
//saved within the error register.
void printSensorError()
{
  uint8_t error = myCCS811.getErrorRegister();

  if (error == 0xFF) //comm error
  {
    Serial.println("Failed to get ERROR_ID register.");
  }
  else
  {
    Serial.print("Error: ");
    if (error & 1 << 5)
      Serial.print("HeaterSupply");
    if (error & 1 << 4)
      Serial.print("HeaterFault");
    if (error & 1 << 3)
      Serial.print("MaxResistance");
    if (error & 1 << 2)
      Serial.print("MeasModeInvalid");
    if (error & 1 << 1)
      Serial.print("ReadRegInvalid");
    if (error & 1 << 0)
      Serial.print("MsgInvalid");
    Serial.println();
  }
}
注意点
スイッチサイエンスのWebに記載がある通り、正常な値が出力されるまで丸二日程度かかった。エージングが終わるまでは、400ppm辺りの表示がずっとされたままであった。
https://www.switch-science.com/catalog/3298/
CCS811のデータシートでは、実使用前に48時間のエージングと、20分のコンディショニングの時間が推奨されています(センサがウォームアップして、有効なデータを出力するまでに20分かかります)。
使ってみて
- 作業していると2000〜3000ppmまで上がる。
- 換気を10分程度すると、400〜500ppmまで下がる。(自然界の数値)
- およそ3時間毎のに10分程度の換気が必要であることが分かった。
その他
- 動植物が多い環境、火を使う環境では更に数値が上がると予想される。
- TVOC(総揮発性有機化合物)も同時に測定できるため、有機化学物質が多い環境でも有用である。