はじめに
Ansible Automation Platform (AAP)インストール後ジョブが実行できるまでの設定を確認しました。
次の順で実施しています。
- 組織
- プロジェクト
- インベントリー
- ホスト
- 実行対象サーバーとAAP管理ノードとのssh鍵交換
- ジョブテンプレートの作成
- ジョブの実行
Ansible Automation Platform インストール・ログは下記をご参考ください。
環境
・HW: IBM Power10 S1014
・仮想環境
VIOS: 3.1.4
仮想マシン:
OS: RHEL 9.4 ppc64le (PU Desired 0.2, VP Max 4, Memory 16GB で設定)
・Ansible Automation Platform 2.5.9 (コンテナは同一ノード構成)
1. 組織の作成
・マニュアル:組織の作成
組織名 "test" を作成します。


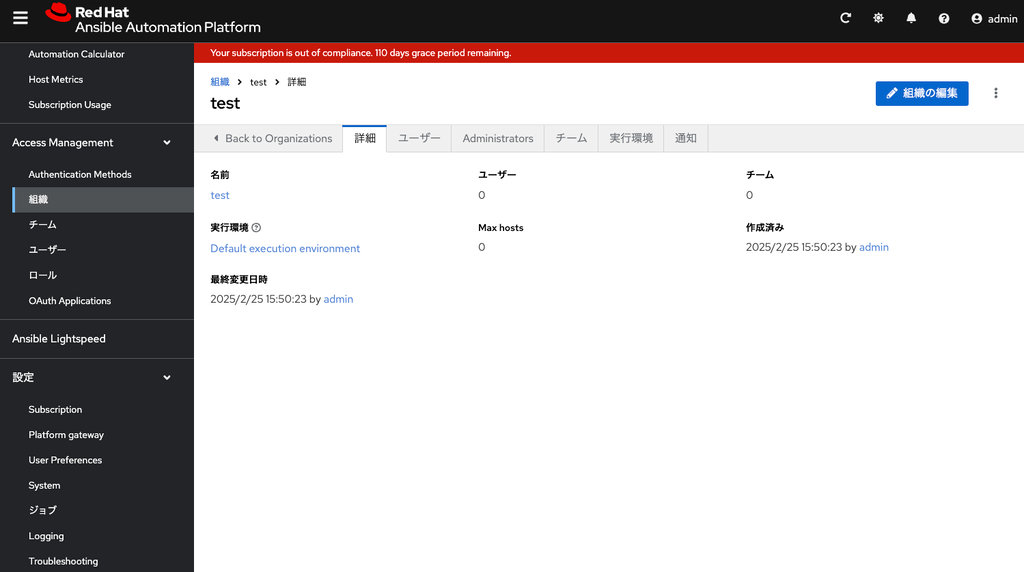
チーム、ユーザー、認証情報設定はデフォルトのままひとまず省略します。
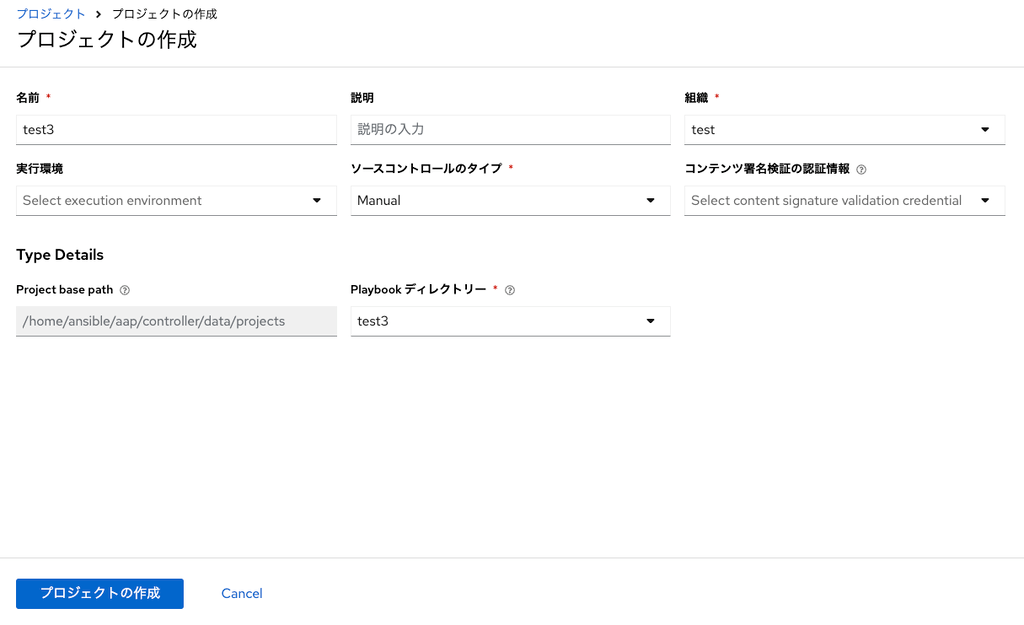
2.プロジェクトの作成
マニュアル: プロジェクトの作成
プロジェクトに移動し、"プロジェクトの作成" を押します。

"test3" という名前を指定しています。
組織は 1. で作成した "test" を選択します。
ソースコントロールのタイプは、設定を行っていればGitなど、他から取り組むことができるようですが、今回は何も設定していないので "Manual" を選択します。

ソースコントロールのタイプを指定すると、"Type Details" が表示されました。
project base path が "/home/ansible/aap/controller/data/projects" で指定されています。
Playbook ディレクトリーに何も表示されません。少し試して、ディレクトリを作成すると選択肢に表示されることに気づきました。

プロジェクトフォルダの下に、test3 ディレクトリを作成し、test.ymlを配置します。
$ cd /home/ansible/aap/controller/data/projects
$ mkdir test3
$ ls -l test3
合計 0
$ cd test3
touch test.yml
$ ls -l
合計 0
-rw-r--r-- 1 ansible ansible 0  2月 21 05:07 test.yml
test.yml は Hello World を表示されるだけの playbook を作成しました。
- name: Hello World Sample
  hosts: all
  gather_facts: no
  tasks:
    - name: Hello Message
      debug:
        msg: "Hello World!"
GUI上で"プロジェクト" に移動し、以下を指定します。
名前 : test3
ソースコントロールのタイプ : Manual
Project base path : /home/ansible/aap/controller/data/projects
Project ディレクトリー : test3 #<= 作成したディレクトリが反映
"プロジェクトの作成" を押します。
test3 プロジェクトが作成されました。

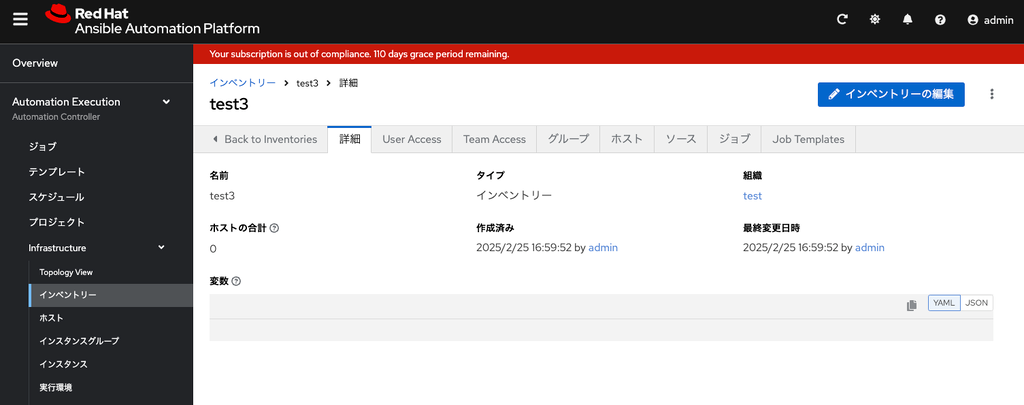
3. インベントリーの設定
続いてインベントリーを設定します。
インベントリーは Ansible が操作する管理対象サーバーをリスト化した定義ファイルです。
AAP で設定するのに少し戸惑いましたが、色々行っているうちに稼働した設定結果を記載します。
インベントリーの画面に移動し、"インベントリーの作成" から3つある選択肢のうち一番上の"インベントリーの作成" を押します。

名前(test3)と組織(test)のみを指定します。

↑でインベントリーの作成を押し、無事作成されました↓
マニュアル: 新規インベントリーの追加
インベントリー自体に以下の設定が可能のようです。
・インベントリーへのパーミッションの追加
・インベントリーへのグループの追加
・ホストの追加
・ソースの追加
ホストについては次のホストの作成でインベントリーを指定すると、自動的にインベントリー側のホスト設定に反映されていました。
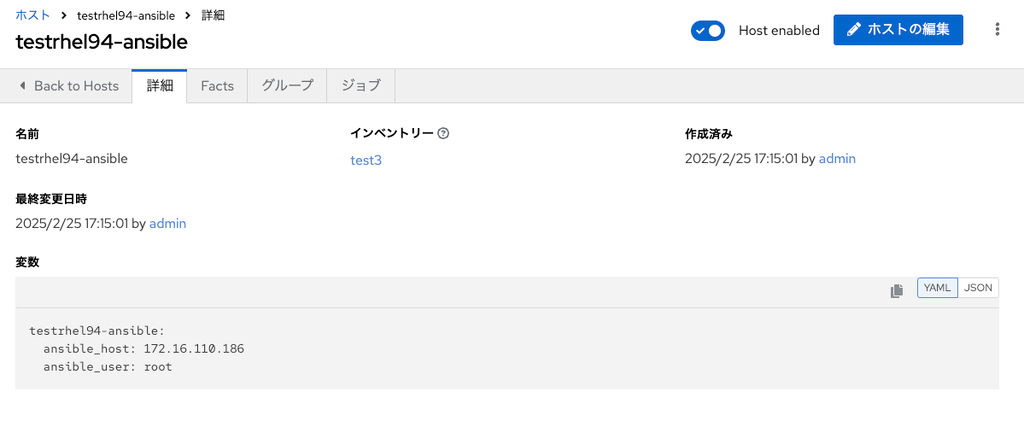
4. ホスト
ホスト画面に移動し、"ホストの作成" を押します。

名前 "testrhel94-ansible"、インベントリー "test3" を指定します。
変数に以下を設定します。
testrhel94-ansible:
  ansible_host: 172.16.110.186
  ansible_user: root

"testrhel94-ansible" が作成されました。
同様 に"testrhel95-ansible" を作成しました。

なお、上記の操作で 3 で作成したインベントリー test3 のホスト項目に追加されていました。

(追記) ホストに指定した変数は、名前解決できている場合には設定せずに実行可能でした。
5. 実行対象サーバーとAAP管理ノードとのssh鍵交換
事前に作成した id_rsa.pub を使用してサーバー "testrhel94-ansible" と "testrhel95-ansible" に対して鍵交換を実施します。
$ ssh-copy-id -i id_rsa.pub root@172.16.110.186
/usr/bin/ssh-copy-id: INFO: Source of key(s) to be installed: "id_rsa.pub"
The authenticity of host '172.16.110.186 (172.16.110.186)' can't be established.
ED25519 key fingerprint is SHA256:BbDQHElUVLgLOwHxh6cIbfgR8Giwev4BPkWe3BnRxKE.
This key is not known by any other names
Are you sure you want to continue connecting (yes/no/[fingerprint])? yes
/usr/bin/ssh-copy-id: INFO: attempting to log in with the new key(s), to filter out any that are already installed
/usr/bin/ssh-copy-id: INFO: 1 key(s) remain to be installed -- if you are prompted now it is to install the new keys
root@172.16.110.186's password:

Number of key(s) added: 1

Now try logging into the machine, with:   "ssh 'root@172.16.110.186'"
and check to make sure that only the key(s) you wanted were added.
パスワードなしで入れるかどうかを確認
[ansible@rhel94aap0215 test3]$ ssh -i id_rsa root@172.16.110.186
Activate the web console with: systemctl enable --now cockpit.socket

Register this system with Red Hat Insights: insights-client --register
Create an account or view all your systems at https://red.ht/insights-dashboard
Last login: Tue Feb 25 01:33:20 2025
[root@testrhel94-ansible ~]#
ssh鍵交換できました。"testrhel95-ansible" も同様に行っています。
6. ジョブテンプレートの作成
マニュアル: ジョブテンプレートの作成
"テンプレート" -> "ジョブテンプレートの作成" を選択し、"ジョブテンプレートの作成" を押します。

上のジョブテンプレートの作成を押します。

名前 "test3"、プロジェクト "test3"、ジョブタイプ "実行"、Playbook "test.yml" を設定します。
プロジェクト・ディレクトリに有効な yml ファイルがない場合は Playbookの選択肢に yml ファイルが出力されませんでした。

ジョブテンプレート "test3" の作成が完了しました。

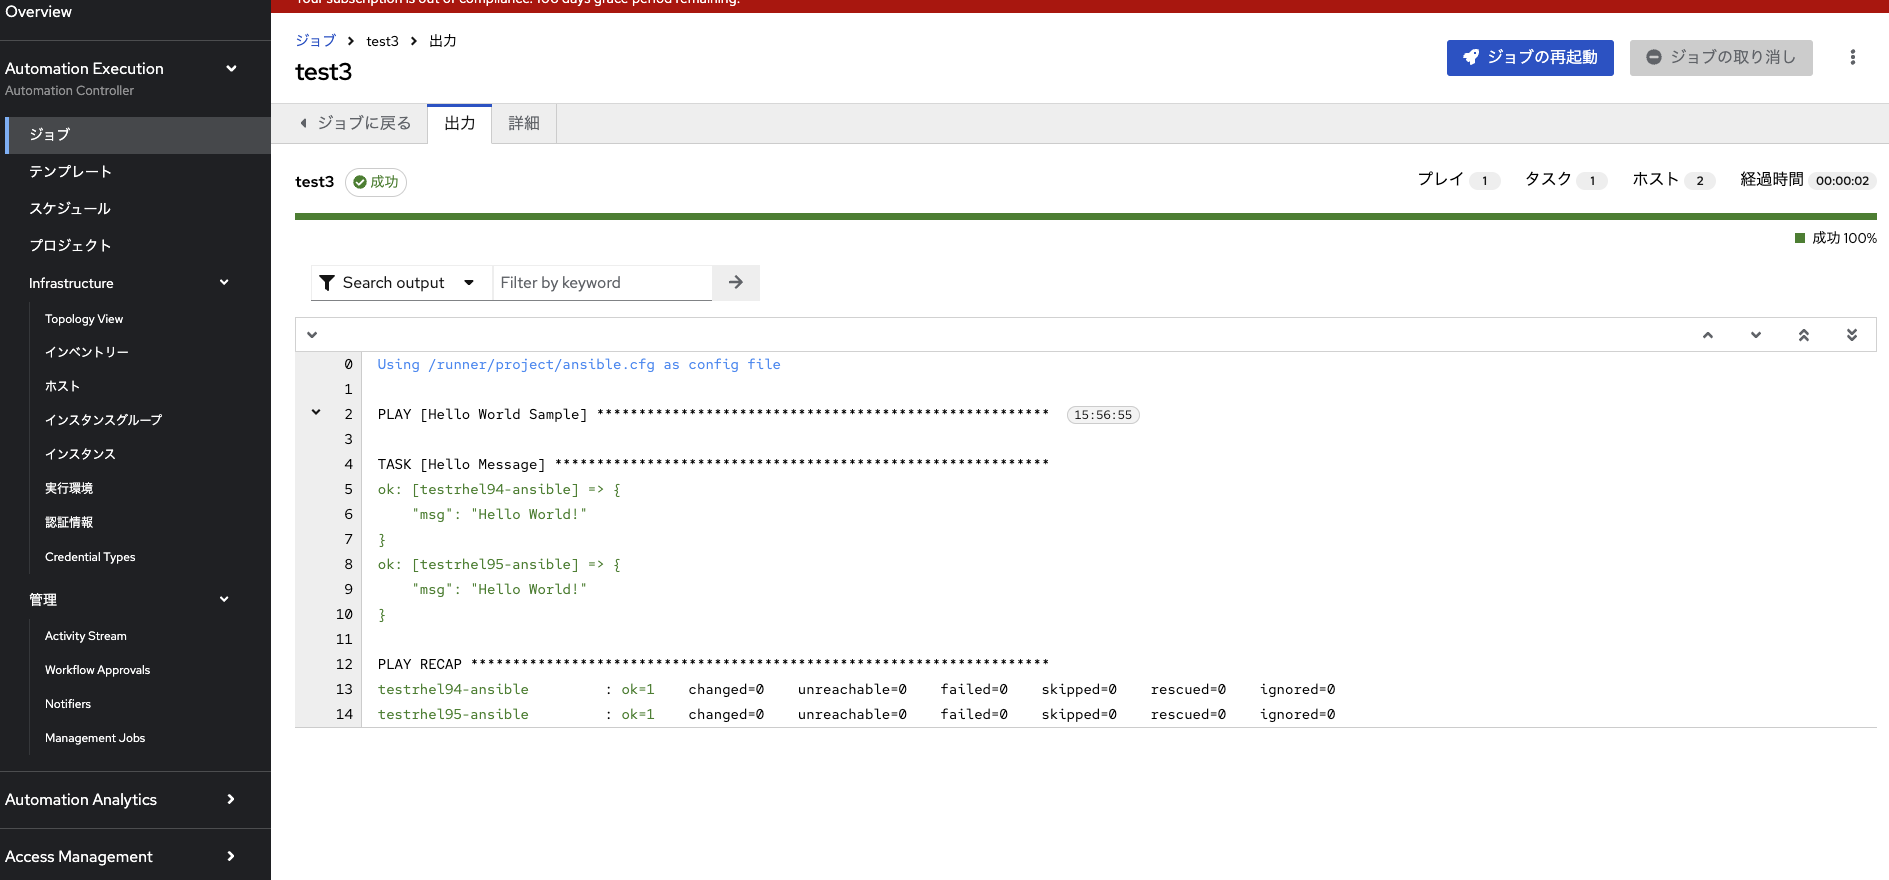
7. ジョブの実行
ジョブテンプレート作成の画面から、"テンプレートの起動" を押します。
マニュアル: ジョブテンプレートの起動

"test3" が実行され、インベントリーで指定した対象ホスト2つで "Hello World" の出力が実行されました。
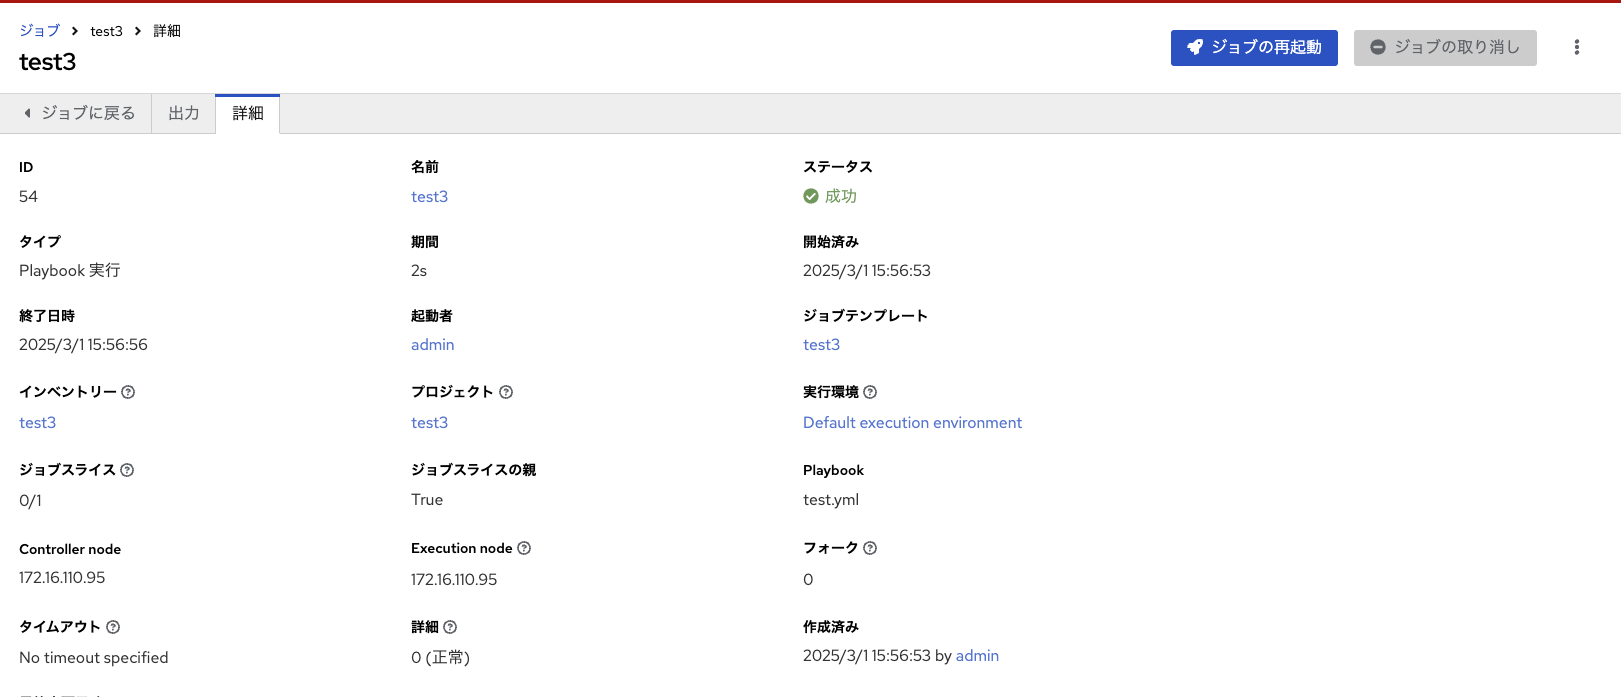
ジョブの詳細
おわりに
設定可能な項目が多くて惑いましたが最小限の実行が確認できました。
ワークフローやユーザー制御周りなどを確認していこうと思います。
参考:
以上です。