Rustとは
RustはFirefoxで有名なMozilla社によって開発されていたオープンソースのプログラミング言語です。2021年からはRust Foundationが立ち上がり開発を主導しているようです。
Rustの大きな特徴としては以下の点があります。
- パフォーマンス
メモリ効率が高くランタイムやガベージコレクタがないためC/C++と同等の処理速度を誇ります。
パフォーマンス比較の記事はたくさんありますが以下の記事が複数言語を比較していて分かりやすかったです。
- 安全性
コンパイラ言語であるRustは豊かな型システムと所有権モデルによりメモリ安全性とスレッド安全性が保証されているのでコンパイル時に様々なバグを排除することが可能です。
Rustには所有権とライフタイムという概念があり以下のようなコードはコンパイル時にエラーになります。
let mut data = vec![1, 2, 3];
// 内部データの参照を取る
let x = &data[0];

// しまった! `push` によって `data` の格納先が再割り当てされてしまった。
// ダングリングポインタだ! メモリ解放後の参照だ! うわーー!
// (このコードは Rust ではコンパイルエラーになります)
data.push(4);

println!("{}", x);
- コミュニティ
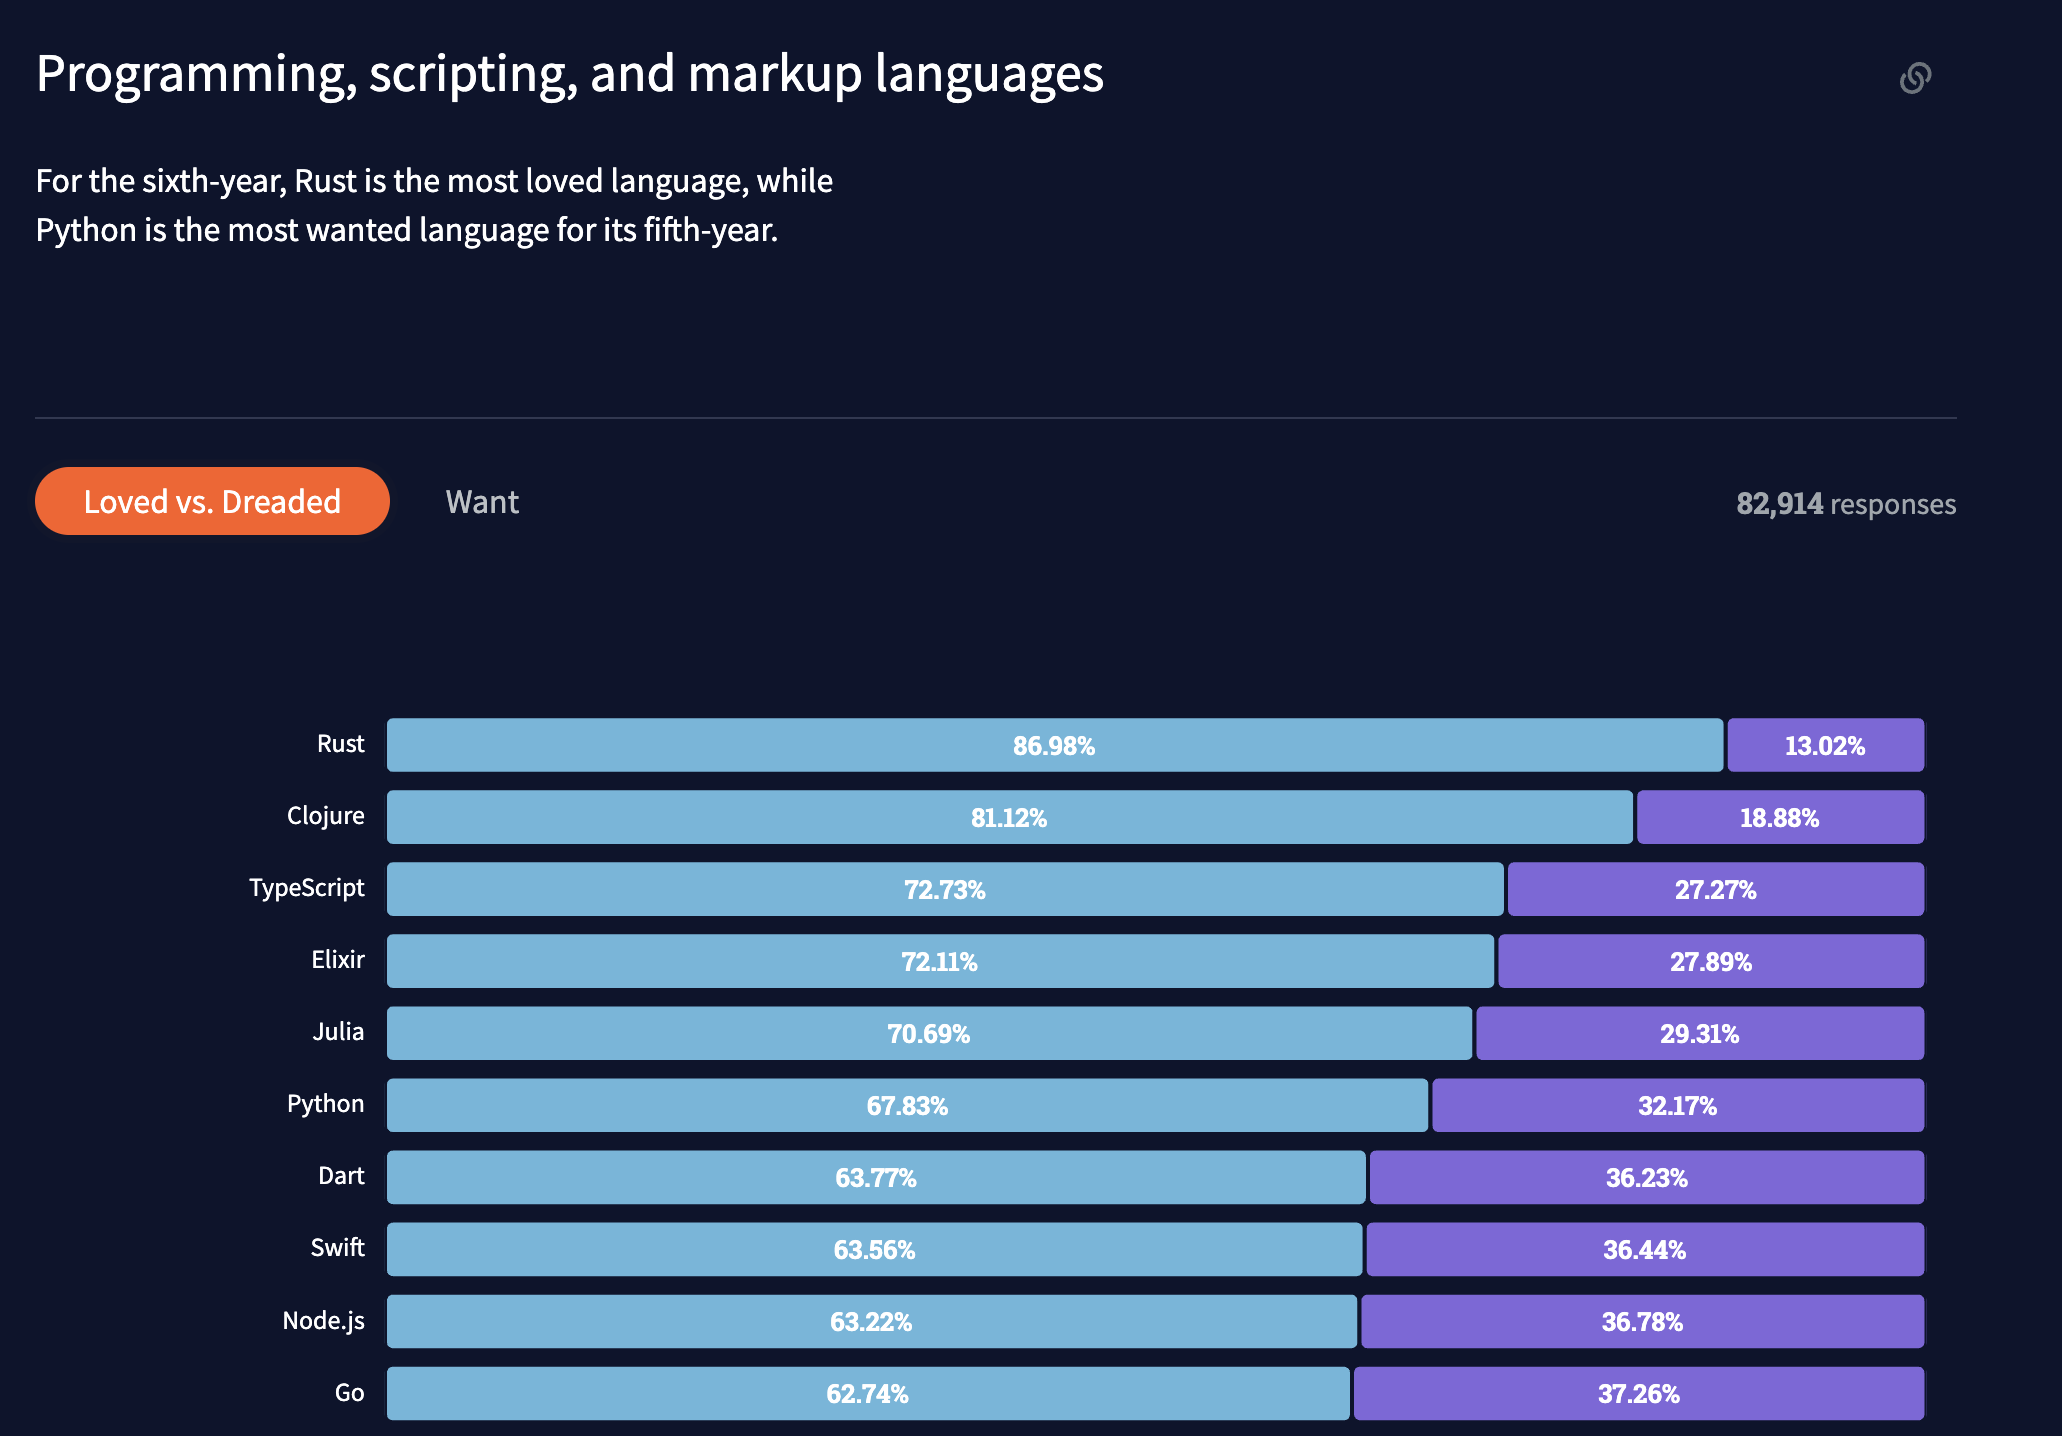
80,000人のdeveloperを対象にした2021年のstackoverflowのアンケート調査によると、Rustが6年連続でプログロマーに愛される言語ランキングで1位を獲得しているようです。

ref: Stack Overflow Developer Survey 2021
とりあえずRustがなんとなく凄そう?なのは分かったので、実際に環境構築して簡単なREST APIを作成することをゴールに進んでいきましょう。
Rust環境構築
動作環境は以下の通りです。
- macOS Monterey (v12.1)
- MacBook Pro (14インチ、2021)
- チップ: Apple M1 Max
rustupをinstall
Rustはrustupというツールによってインストール・管理されています。以下のコマンドでinstallしましょう。
$ brew install rustup-init
$ rustup-init

$ exec $SHELL -l # restart shell
もしshellをfishにしている方はこちらのコマンドよりパスを通してください。
set -U fish_user_paths $fish_user_paths $HOME/.cargo/bin
これでrustupコマンドとビルドシステム兼パッケージマネージャのcargoもinstallされたかと思います。
$ rustup --version
> rustup 1.24.3 (2021-05-31)

$ cargo --version
> cargo 1.59.0 (49d8809dc 2022-02-10)
プロジェクトの作成
rustupをinstallできたら早速プロジェクトを作成してみましょう。
cargo new rust_practice
作成されたプロジェクト、 rust_practiceを開くとCargoが2つのファイルと1つのディレクトリを生成してくれたことがわかるかと思います。
Rustでは基本的にsrc/以下にソースコードを記入していきます。 自動で作成されたsrc/main.rsを見ると
fn main() {
    println!("Hello, world!");
}
と書かれていることが分かるかと思います。
早速cargo runコマンドでコンパイルしてこのスクリプトを実行してみます。
$ cargo run
> Compiling rust_demo v0.1.0 (/Users/andrew/repos/rust_demo)
    Finished dev [unoptimized + debuginfo] target(s) in 0.28s
     Running `target/debug/rust_demo`
Hello, world!
簡単にHello, world!まで実行できてしまいましたね。
それでは今回はREST APIを作るということでweb frameworkを導入していこうかと思います。
actix-webを導入する
Rustのweb frameworkは複数あり、有名どころだとrocketやactix-webがあります。以下のリンク先で様々なRustのweb frameworkが比較されているので気になる方は見てみてください。
今回はRustの数あるweb frameworkの中でも軽量でかつパフォーマンスがいいactix-webを選択することにしました!
以下のリンク先に複数言語のweb frameworkのパフォーマンス比較が載っています、その中でもactixは上位にランクインしてますね。
cargo-editを導入する
作成されたプロジェクトを見ると以下のようなファイルが作成されているかと思います。
[package]
name = "rust_demo"
version = "0.1.0"
edition = "2021"

[dependencies]
このファイルは外部ライブラリを管理するためのもので、dependencies以下に依存関係を記述していきます。ちなみにRustではライブラリのことをクレート(crate)と呼びます。
このファイルに直接
[dependencies]
actix-web = "version"
のように記述してもいいのですがcargo-editというツールをinstallするとcliでCargo.tomlを編集することができるので入れてみましょう。
$ cargo install cargo-edit
actix-webをinstall
そして早速actix-webをinstallします。
cargo add actix-web
Cargo.tomlが以下のように更新されたかと思います。
[package]
name = "rust_demo"
version = "0.1.0"
edition = "2021"

# See more keys and their definitions at https://doc.rust-lang.org/cargo/reference/manifest.html


[dependencies]
actix-web = "4.0.1"
これでactix-webのinstallは完了です。
それではとりあえずgetのAPIを一つ作ってみます。
公式ページにある通り、main.rsを以下のコードに置き換えてみましょう
use actix_web::{get, web, App, HttpServer, Responder};

#[get("/hello/{name}")]
async fn greet(name: web::Path<String>) -> impl Responder {
    format!("Hello {name}!")
}

#[actix_web::main] // or #[tokio::main]
async fn main() -> std::io::Result<()> {
    HttpServer::new(|| {
        App::new()
            .route("/hello", web::get().to(|| async { "Hello World!" }))
            .service(greet)
    })
    .bind(("127.0.0.1", 8080))?
    .run()
    .await
}
そしてcargo runを実行し、http://localhost:8080/helloにアクセスするとweb serverが立ち上がっていることが分かります。
少し公式ページから持ってきたコードを見てみます。
まず、Rustではcrateのimportをuseを使って行います。そして::は階層を表し、つまりuse actix_web::web はactix_web/web.rsをimportしているということです。そして同一階層の複数のmoduleをimportしたい場合は{}で括って一括で宣言できます。actix_webのgithub repositoryを見るとよりしっくりくるかと思います。
Rustの関数はfnで定義し、関数の引数と返り値に型定義をしているのが特徴的です。この型定義を間違えるとコンパイル時にエラーとなります。
それではweb APIを立ち上げることに成功したので次はDBと繋いでいきます。
dieselを導入する
RustのORMはdieselが現時点では一強です。
install
actix_web同様cargo add dieselでcrateをimportしていきます。今回はDBにMySQLを使うので--feature flagを使ってinstallしていきます。featureフラグとはコンパイル時にクレートの特定の機能の有効にするためのフラグです。以下コマンドでinstallしていきましょう。(r2d2は後述)
cargo add diesel --features mysql --features r2d2
またDBの情報を.envファイルから読み込ませるようにしたいのでdotenvもinstallします。
cargo add dotenv
diesel-cliでmigrationの実行
そうしたらまずはDBにtableを作成していきたいと思います。
migrationを実行するためのcli、diesel-cliをinstallしておきましょう。
# diesel cliをinstall
cargo install diesel_cli --no-default-features --features mysql
installが完了したらdieselコマンドが使えるようになっているはずです。以下コマンドでmigration設定ファイルを作成していきます。
# migrations dirを作成
diesel setup

# migration file作成
diesel migration generate create_users
> Creating migrations/2022-04-12-132620_create_users/up.sql
> Creating migrations/2022-04-12-132620_create_users/down.sql
作成されたsqlファイルに以下のようにupとdownのクエリを書きます。
CREATE TABLE users
(
    id INT PRIMARY KEY AUTO_INCREMENT,
    email VARCHAR(64) NOT NULL
);
DROP TABLE users;
Migrationを実行していきます。DATABASE_URLを環境変数もしくは.envに設定すれば接続先のDBを指定できるので.envファイルを作ってしまいましょう。
#{user}, {password}, {port}にはlocalで立ち上がっているMySQLへのログイン情報を入れてください。
DATABASE_URL=mysql://{user}:{password}@127.0.0.1:{port}/rust_practice
そしたらMySQLに入り先に今回使用するDB、rust_practiceを作成しておきましょう。
create database rust_practice;
準備は整ったので以下コマンドでmigrationを実行します。
diesel migration run
migrationが完了すると__diesel_schema_migrationsとuserstableが作成されていることが分かります。
mysql> show tables;
+----------------------------+
| Tables_in_rust_practice    |
+----------------------------+
| __diesel_schema_migrations |
| users                      |
+----------------------------+
2 rows in set (0.01 sec)
__diesel_schema_migrationsにはmigrationのバージョンが入るようになっております。
さらに上記コマンドで自動でsrc/schema.rsが作成されているかと思います。
table! {
    users (id) {
        id -> Integer,
        email -> Varchar,
    }
}
定義したSQLを元にRustでの型を定義したschemaファイルを作成してくれます。
次はmodelを定義していきます。model.rsを作成し以下のようにUserモデルを定義します。
pub struct User {
    pub id: i32,
    pub email: String,
}
structは構造体と呼ばれ、データ型の要素を集めたものです。これでmodelの作成も完了です。
db connection poolの作成
次にsrc/db.rsファイルを作成し、そこにdieselを用いてDBと接続するためのコードを記述していきます。
connection poolを作成しactix_webにinjectできるようconnection pool管理用crateのr2d2もinstallしていきます。
cargo add r2d2
以下のようにdb.rsを編集していきます。
use diesel::mysql::MysqlConnection;
use diesel::r2d2::ConnectionManager;
use dotenv::dotenv;

pub type Pool = r2d2::Pool<ConnectionManager<MysqlConnection>>;

pub fn establish_connection() -> Pool {
    dotenv().ok();

    std::env::set_var("RUST_LOG", "actix_web=debug");
    let database_url = std::env::var("DATABASE_URL").expect("DATABASE_URL must be set");

    // create db connection pool
    let manager = ConnectionManager::<MysqlConnection>::new(database_url);
    let pool: Pool = r2d2::Pool::builder()
        .build(manager)
        .expect("Failed to create pool.");
    pool
}
useを使って外部crateを読み込むところは同じですが、pubをつけてmain.rsで参照したい関数やtypeを定義しております。
変数前につくletはRustは変数定義のために使われるものです。Rustではデフォルトで変数はイミュータブル(変更不可能)になっており、変更可能にするには明示的にlet mut foo = xxxとする必要があります。
mainでimport
そうしたらmain.rsで先ほど作成したdb.rs moduleをimportしていきます。
mod db;
と書くことでcrate内のファイル(module)を読み込むことができます。(useでは動かないのでご注意ください。)
実はRustではdefaultではsrc/main.rsまたはsrc/lib.rsでmodを用いてimportされているmoduleを除いてコンパイル対象になりません。ですのでschemaとmodelもmodでimportしておきます。
またRustは2018にメジャーアップデートを行いRust2018と呼ばれる記法とRust2015で記法が異なる場合があります。
dieselは一部Rust2018の記法に対応していないので以前のuseの書き方である以下記法でcrateをimportする必要があります。
#[macro_use]
extern crate diesel;

mod db;
mod model;
mod schema;
connection poolをactix_webにinject
connection poolをinjectするために以下のようにコードを書き換えます。
#[macro_use]
extern crate diesel;

use actix_web::web::Data;
use actix_web::{get, web, App, HttpServer, Responder};
mod db;
mod model;
mod schema;

#[get("/users/{id}")]
async fn get(db: web::Data<db::Pool>, id: web::Path<String>) -> impl Responder {
    // db connectionが利用可能に!
    let conn = db.get().unwrap();
    format!("Hello {id}!")
}

#[actix_web::main]
async fn main() -> std::io::Result<()> {
    // db moduleからestablish_connection関数をimport
    let pool = db::establish_connection();

    // app_dataを用いactix_webにdb poolをinject
    HttpServer::new(|| App::new().app_data(Data::new(pool.clone())).service(get))
        .bind(("127.0.0.1", 8080))?
        .run()
        .await
}
これでdb poolを各エンドポイントで使用可能になりました!
次はget関数に注目して変更を加えていきます。
Serde(serializer)の導入
まず対象のidのユーザーをjsonで返却するAPIを作成したいのでdieselで定義したmodelをjsonにserializeする必要があります。そのためserdeというserializerのcrateを追加します。
cargo add serde --features derive
model.rsを以下のように修正します。
use crate::schema::users;
use serde::{Deserialize, Serialize};

#[derive(Queryable, Insertable, Deserialize, Serialize)]
#[table_name = "users"]
pub struct User {
    // idはauto_incrementなので不要
    pub email: String,
}
そしてmain.rsのget関数を以下のようにします。
// 追加
use diesel::ExpressionMethods;
use diesel::QueryDsl;
use diesel::RunQueryDsl;

#[get("/users/{id}")]
async fn get(db: web::Data<db::Pool>, path: web::Path<i32>) -> Result<impl Responder> {
    let conn = db.get().unwrap();
    let id = path.into_inner();
    let user = schema::users::table
        .select(schema::users::email)
        .filter(schema::users::id.eq(id))
        .load::<String>(&conn)
        .expect("error");

    Ok(web::Json(user))
}
これでtableに試しに適当なusersデータを作成し、作成されたidをパスに含めhttp://localhost:8080/users/1へアクセスしてみます。すると作成したusersデータがjsonで返却されてるかと思います!
これで一つMySQLからデータを取得し返却するAPIをRustで作成することができましたね。
あとは同じ要領でPOST, PUT, DELETEのエンドポイントを作ってみます。
コードとしては以下のようになります。
// POST API
#[post("/users")]
async fn post(db: web::Data<db::Pool>, item: web::Json<model::User>) -> Result<impl Responder> {
    let conn = db.get().unwrap();
    let new_user = model::User {
        email: item.email.to_string(),
    };
    diesel::insert_into(schema::users::dsl::users)
        .values(&new_user)
        .execute(&conn)
        .expect("Error saving new post");

    Ok(HttpResponse::Created().body("get ok"))
}
// PUT API
#[put("/users/{id}")]
async fn put(
    db: web::Data<db::Pool>,
    path: web::Path<i32>,
    item: web::Json<model::User>,
) -> Result<impl Responder> {
    let id = path.into_inner();
    let conn = db.get().unwrap();
    let target = schema::users::dsl::users.filter(schema::users::dsl::id.eq(id));

    diesel::update(target)
        .set(schema::users::dsl::email.eq(item.email.to_string()))
        .execute(&conn)
        .expect("Error updating new post");

    Ok(HttpResponse::Created().body("update ok"))
}
// DELETE API
#[delete("/users/{id}")]
async fn destroy(db: web::Data<db::Pool>, path: web::Path<i32>) -> Result<impl Responder> {
    let id = path.into_inner();
    let conn = db.get().unwrap();
    let target = schema::users::dsl::users.filter(schema::users::dsl::id.eq(id));

    diesel::delete(target)
        .execute(&conn)
        .expect("Error deleting new post");

    Ok(HttpResponse::Created().body("Delete ok"))
}
エンドポイントを追加したのち、HTTPServerにserviceを渡せば動くようになるかと思います。
#[actix_web::main]
async fn main() -> std::io::Result<()> {
    let pool = db::establish_connection();

    HttpServer::new(move || {
        App::new()
            .app_data(Data::new(pool.clone()))
            .service(get)
            .service(post)
            .service(put)
            .service(destroy)
    })
    .bind("127.0.0.1:8080")?
    .run()
    .await
}
cargo runを叩いてcURLやPostmanでリクエストを送ってみてください。
Rustで開発してみての感想
- javascript→typescriptに移行した時のような型定義で手こずる感覚がある。(仕事では主にpythonを使用しております)
- エコシステムが既に強力、リンターやフォーマットが豊富にあり開発体験はかなりいい。
- 日本語のドキュメントは少なめ。特にweb APIの作成に関しては。stackoverflowなどから情報をかき集めて作成した。
- パフォーマンス、堅牢性を考えるとこれからweb APIとしてももっと使われることになりそう。
質問疑問等あればコメントください!
Rust日本語の記事が少なかったのでこれからもたくさん情報発信していこうかと思います。
今回使用したコードはgithubにあげておいたのでぜひ参考にしてみてください。