この記事ではLaravelでExcelのデータをDBにインポート&エクスポートする方法を紹介します。
この記事では以下の内容を紹介しています。
・formからexcelファイルを読み込み、Storageに保存&importでDBにデータを挿入
・DBからデータをエクスポート
・bladeのビューからデータをエクスポート
開発環境
・laravel 5.7
・MySQL
・XAMPP
・php 7.4
はじめに
通常、phpでExcelを操作するにはPhpSpreadsheetを使いますが、laravelにはLaravel Excelという便利なパッケージがあるので今回はそちらを使います。laravelの開発環境の構築は、以下の記事がわかりやすいので参考にしてみてください。
https://qiita.com/miriwo/items/37e4dfec4484d389db07
環境構築はVagrantでもDockerでもなんでも構いません。自身で合わせてください。
今回はまるっと環境が構築できるXAMPP環境で紹介しています。
== 概要==
① Laravel Excelをインストール
② DBの設定とmigration
③ エクスポートとインポートクラスを定義
④ Excelファイルをインポート
⑤ MySQLからデータをExport(Excelで出力)
① Laravel Excelをインストール
はじめにlaravelに「Laravel Excel」をインストールする必要があります。
下記コマンドを実行してください。
composer require maatwebsite/excel
もし、下記のようなエラーが出た場合、
PHP Fatal error: Allowed memory size of 123456789 bytes exhausted ~
メモリ割り当ての設定によってcomposerが走っていません。
以下のコマンドを実行してみてください。
$ COMPOSER_MEMORY_LIMIT=-1 composer require maatwebsite/excel
無事インストールされた後はサービスプロパイダーとファサードを登録します。
configフォルダのapp.phpを開いて以下2つを追加しましょう。
'providers' => [
    Maatwebsite\Excel\ExcelServiceProvider::class, //追加
],
'aliases' => [
    'Excel' => Maatwebsite\Excel\Facades\Excel::class,//追加
],
上記ざっくり説明すると、こんな感じです。
Laravelはサービスコンテナに登録されているサービスを利用してアプリケーションの開発を行ないます。サービスコンテナはサービスを入れる箱とイメージしてください。laravelでサービスを利用するためには、サービスコンテナに事前にサービスを登録しておく必要があります。その登録をする役目を持つのがサービスプロバイダーです。上では「porviders」にサービスを登録しています。
次にファサードですが、これはクラスをインスタンス化しなくてもメソッドを実行できるようにしてくれる機能のことです。ここでは詳細説明は省略します。
今回はあまり触りませんが、excelのimport&exportの設定ファイルを公開しておいて、いつでも設定できるようにしておきます。
php artisan vendor:publish --provider="Maatwebsite\Excel\ExcelServiceProvider"
これで、Copied File [/vendor/maatwebsite/excel/config/excel.php] To [/config/excel.php]が表示されているとうまく実行されました。/config/excel.phpにはexcel.phpのexportとimportの定義について記載されています。特段いじることはあまりありませんが、もし拡張子などを設定する時はここで調整する必要があります。
② DBの設定とmigration
ここまでLaravelExcelのインストールを実施しました。
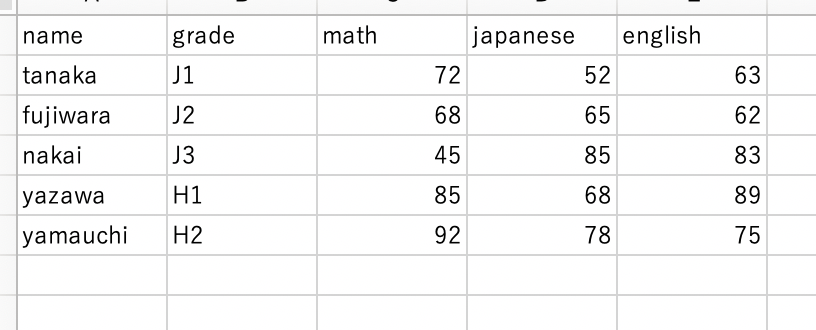
今回はダミーデータとして、「生徒名簿」をexcelで作成することにします。ファイル名は「students.xlsx」としています。
これで読み込むデータを作成しました。次にDBに格納するためのテーブルを作成します。
自身の環境にDBを作成していると思います。そのDBにテーブルを作成していきましょう。
migrationを実行してテーブルを作成します。
php artisan make:migration create_students_table
storage/migrations/配下にcreate_students_table.phpが作成されました。
以下のように中身を変更しましょう。
<?php

use Illuminate\Support\Facades\Schema;
use Illuminate\Database\Schema\Blueprint;
use Illuminate\Database\Migrations\Migration;

class CreateStudentsTable extends Migration
{
    /**
     * Run the migrations.
     *
     * @return void
     */
    public function up()
    {
        Schema::create('students', function (Blueprint $table) {
            $table->increments('id');
            $table->string('name')->nullable()->comment('生徒の名前');
            $table->string('grade')->nullable()->comment('学年');
            $table->integer('math')->nullable()->comment('数学');
            $table->integer('japanese')->nullable()->comment('国語');
            $table->integer('english')->nullable()->comment('英語');
            $table->timestamps();
        });
    }

    /**
     * Reverse the migrations.
     *
     * @return void
     */
    public function down()
    {
        Schema::dropIfExists('students');
    }
}
php artisan migrateを実行するとテーブルが作成されます。次にModelを作りましょう。
php artisan make:model Studentsを実行すると、Studentsモデルが作成されます。以下のように参照先をセットしましょう。
<?php

namespace App;

use Illuminate\Database\Eloquent\Model;

class Students extends Model
{
    protected $table = 'students';

    protected $fillable = [
        'name',
        'grade',
        'math',
        'japanese',
        'english',
    ];

}
③ エクスポートとインポートクラスを定義
Laravel Excelでは参照ファイルをエクスポート・インポートするときに先にExportクラスとImportクラスを作成して、そこに定義を記述していきます。先ほど紹介したexcel.phpでは読み込む際のファイル指定や読み込み時のデータセットについて、今回のクラスは具体的な処理ついて定義をします。
下記コマンドを実行して、ExportクラスとImportクラスを作成しましょう。
$ php artisan make:export StudentExport --model=App\\Students
$ php artisan make:import StudentImport --model=App\\Students
app/Imports 配下に StudentImport.phpが、app/Exports 配下に StudentExport.php が生成されました。このファイルの中に具体的な処理ついて記述していきます。app/Imports/StudentImport.phpを以下のように変更してください。
<?php

namespace App\Imports;

use App\Students;
use Maatwebsite\Excel\Concerns\ToModel;

class StudentImport implements ToModel
{
    /**
    * @param array $row
    *
    * @return \Illuminate\Database\Eloquent\Model|null
    */
    public function model(array $row)
    {
        return new Students([
            'name'                => $row[0],
            'grade'            => $row[1],
            'math'                   => $row[2],
            'japanese'              => $row[3],
            'english'               => $row[4],
        ]);
    }
}
ここまででImportとExportの下準備が完了しました。
④ Excelファイルをインポート
では実際にExcelファイルをインポートします。
先に、Controllerを作成しましょう。
php artisan make:controller StudentsControllerを実行してcontollerを作成。
StudentsController.phpを以下のように変更します。
<?php

namespace App\Http\Controllers;

use Illuminate\Http\Request;
use App\Imports\StudentImport;
use Maatwebsite\Excel\Facades\Excel;

class StudentsController extends Controller
{
    public function import(Request $request){
        $excel_file = $request->file('excel_file');
        $excel_file->store('excels');
        Excel::import(new StudentImport, $excel_file);
        return view('index');
    }
}
useを使って今まで作成したサービスと定義を呼び出します。
import関数については、Excelとしてimportすることを記述しています。
次にルーティングを設定します。
// Excelインポート
Route::post('/students_import','StudentsController@import')->name('import');
viewも設定しておきましょう。
    <form method="post" action="/students_import" enctype="multipart/form-data">
        @csrf
        <input type="file" name="excel_file" ><br>
        <input type="submit" value="インポート">
    </form>
適当にindex.blade.phpを作成して/を参照先としてweb.phpに定義しておいてください。
一連の流れを整理すると、
formでファイル送信->web.php->StudentController->excel読み込み->StudentImport.phpでexcelデータをMySQLへインポート、となっています。
ここまでですでにimportが実行されるはずですが、Excelファイルの見出し行をカラム名を記述しておくと、その値に沿ってインポートも実行されます。さらにlaravelのインポート処理はデフォルトでは全て一括で行われるので、chunkメソッドを作ってインポートの制限をすることができます。下記のようにStudentImport.phpを変更しておきましょう。
<?php

namespace App\Imports;

use App\Students;
use Maatwebsite\Excel\Concerns\ToModel;
use Maatwebsite\Excel\Concerns\Importable; //追加
use Maatwebsite\Excel\Concerns\WithHeadingRow; //追加

class StudentImport implements ToModel,WithHeadingRow
{
    /**
    * @param array $row
    *
    * @return \Illuminate\Database\Eloquent\Model|null
    */
    use Importable;

    public function model(array $row)
    {
        //  rowの数字をカラム名前に変更
        return new Students([
            'name'                => $row['name'],
            'grade'            => $row['grade'],
            'math'                   => $row['math'],
            'japanese'              => $row['japanese'],
            'english'               => $row['english'],
        ]);
    }

    public function chunkSize():int{
        return 50;
    }
}
chunkSize():int関数では50に設定されています。これは「インサートは50ずつ実行してね」という意味です。
それではファイル送信をしてみましょう。実行すると、storage/app/excelsに指定のexcelファイルが保存され、MySQLにデータが挿入されていればOKです。
⑤ MySQLからデータをExport(Excelで出力)
ここまでインポート方法を紹介しました。
次にMySQLのデータをExcelで出力する方法を紹介します。
まずは、view側でエクスポート用のボタンを作成します。
<form method="post" action="/students_export">
        @csrf
        <input type="submit" value="生徒データダウンロード">
</form>
ルーティングを設定します。
Route::post('/students_export','StudentsController@export')->name('export'); //追加
コントローラーに以下を追加します。
<?php

namespace App\Http\Controllers;

use Illuminate\Http\Request;
use App\Imports\StudentImport;
use App\Exports\StudentExport; //追加
use Maatwebsite\Excel\Facades\Excel;

class StudentsController extends Controller
{
    public function import(Request $request){
        $excel_file = $request->file('excel_file');
        $excel_file->store('excels');
        Excel::import(new StudentImport, $excel_file);
        return view('index');
    }

    public function export(){ //追加
        return Excel::download(new StudentExport, 'output_student_data.xlsx');
    }
}
formのボタンを押すと実行されます。
action = "/student_export"からpostを実行し、exportを実行しています。
簡単ですね。
とはいえ、実際にエクスポートをおこなう時は「ブラウザで内容を確認」→「データを一通り確認してからダウンロード」が普通だと思います。それにちなんで、bladeの画面からexportが実行されるようにしてみましょう。
まずはviewの作成です。
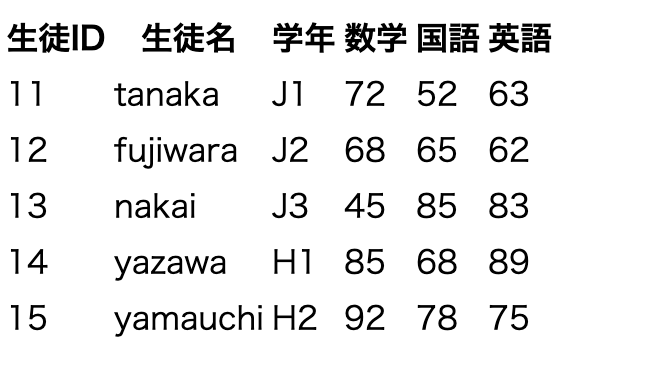
自身で定義したindex.blade.phpに以下のようなテーブルを作成してください。
<table>
        <thead>
        <tr>
          <th>生徒ID</th>
          <th>生徒名</th>
          <th>学年</th>
          <th>数学</th>
          <th>国語</th>
          <th>英語</th>
        </tr>
        </thead>
        <tbody>
        @foreach($students as $student)
          <tr>
            <td>{{ $student->id }}</td>
            <td>{{ $student->name }}</td>
            <td>{{ $student->grade }}</td>
            <td>{{ $student->math }}</td>
            <td>{{ $student->japanese }}</td>
            <td>{{ $student->english }}</td>
          </tr>
        @endforeach
        </tbody>
      </table>
コントローラーを調整します。
index.blade.phpを表示するために自身で設定したcontrollerに以下を記述します。
public function index(){
     $students = Students::all();
     return view('index',['students' => $students]);
}
これでindex.blade.phpにはテーブルが表示されているかと思います。

表示されたviewをそのままエクスポートします。
まず、エクスポートクラスに以下のように定義します。
<?php

namespace App\Exports;

use App\Students;
use Maatwebsite\Excel\Concerns\FromCollection;
use Illuminate\Contracts\View\View; //追加
use Maatwebsite\Excel\Concerns\FromView; //追加


class StudentExport implements FromView  //変更
{
    /**
    * @return \Illuminate\Support\Collection
    */
    // public function collection()
    // {
    //     return Students::all();
    // }

    public function view(): View //追加
    {
        return view('index', [
            'students' => Students::all()
        ]);
    }
}
これまではFromCollectionでしたが、FromViewを実装する形に変更しています。そして、viewメソッドの中でbladeテンプレートの指定とデータを渡しています。
実行するとtable表示のデータをエクスポートできます。
まとめ
今回はlaravelでExcelデータのインポート&エクスポートする方法を紹介しました。
従来excelで管理していたものをDBと連携することで、アプリケーションと連動してより使いやすくなるのではないかなと思います。逆にDBデータを出力する時にも役立つと思うのでぜひ実践してみてください。


